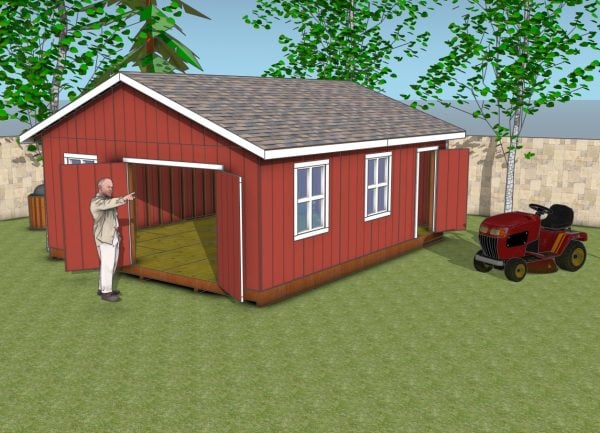
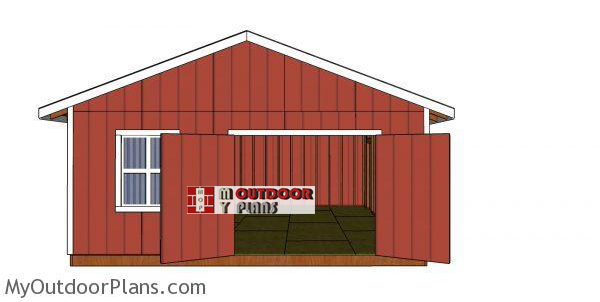
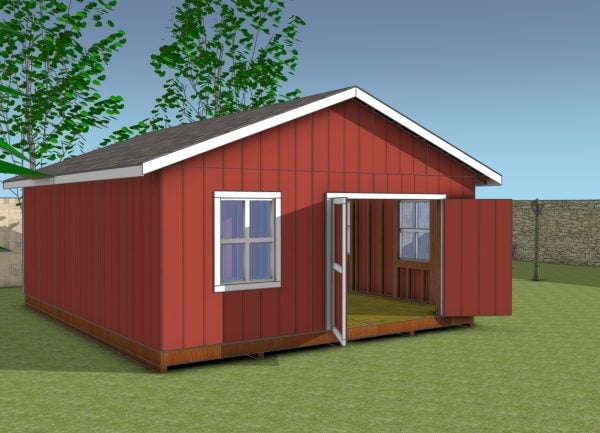
This step by step diy project is about 20×24 gable shed plans. I have designed this large shed with a gable roof, so you can have the best of the two worlds: storage space and accessible design. The shed features double doors to the front and a side door. In addition, I have added 3 large windows to the shed, so you have plenty of light inside and use it as a workshop. Take a look over the rest of my woodworking plans, if you want to get more building inspiration. Remember that you need to select the site for the shed with attention and that you have to comply with a few legal regulations.
Estimating the cost of constructing a 20×24 gable shed involves a few key considerations. Depending on your choice of materials and finishes, you can expect to spend between $5,000 and $12,000 for a high-quality build. Including additional features like custom shelving, insulation, and stylish decor can add another $1,000 to $3,000, ensuring your shed is both functional and fabulous.
When buying the lumber, you should select the planks with great care, making sure they are straight and without any visible flaws (cracks, knots, twists, decay). Investing in cedar or other weather resistant lumber is a good idea, as it will pay off on the long run. Use a spirit level to plumb and align the components, before inserting the galvanized screws, otherwise the project won’t have a symmetrical look. If you have all the materials and tools required for the project, you could get the job done in about a day. See all my Premium Plans HERE.
Projects made from these plans
20×24 Shed Plans – Free PDF Download

building-a-20×24-gable-shed
Cut + Shopping Lists
- A – 12 pieces of 4×4 lumber – 12 ft long SKIDS
- B – 2 pieces of 2×8 lumber – 288″ long, 19 pieces – 237″ long FLOOR FRAME
- B – 13 pieces of 3/4″ plywood – 48″x96″ long, 4 pieces – 48″x48″ long FLOOR
- D – 1 piece of 2×4 lumber – 288″ long, 1 piece – 281″ long, 1 piece – 226 1/4″ long, 1 piece – 25 3/4″ long, 20 pieces – 91 1/2″ long, 12 pieces – 7 1/2″ long, 4 pieces – 48″ long, 8 pieces – 25″ long, 2 pieces – 78 1/2″ long, 10 pieces of 2×6 lumber – 39″ long SIDE WALL WITH WINDOW
- C – 2 pieces of 2×4 lumber – 288″ long, 1 piece – 281″ long, 21 pieces – 91 1/2″ long SIDE WALL
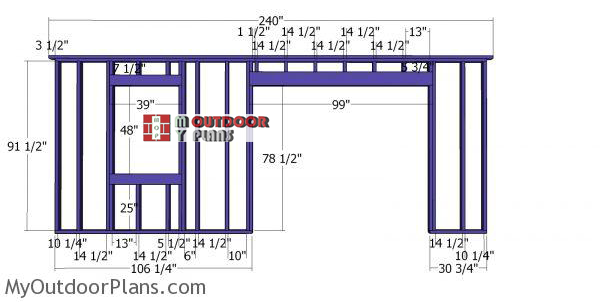
- E – 1 piece of 2×4 lumber – 240″ long, 1 piece – 233″ long, 1 piece – 106 1/4″ long, 1 piece – 30 3/4″ long, 10 pieces – 91 1/2″ long, 4 pieces – 7 1/2″ long, 2 pieces – 48″ long, 4 pieces – 25″ long, 2 pieces – 78 1/2″ long, 8 pieces – 5 3/4″ long, 2 pieces of 2×8 lumber – 99″ long, 4 pieces of 2×6 lumber – 39″ long FRONT WALL
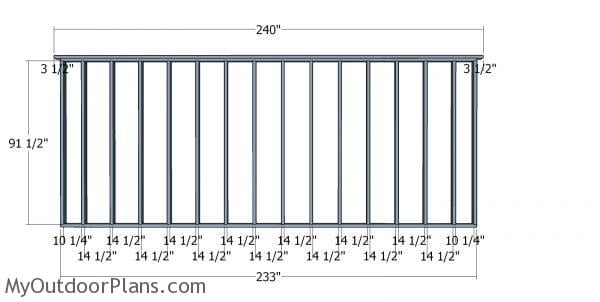
- F – 2 piece of 2×4 lumber – 233″ long, 1 piece – 240″ long, 16 pieces – 91 1/2″ long BACK WALL
- 12 pieces of 4×4 lumber – 12 ft
- 2 pieces of 2×8 lumber – 24 ft
- 19 pieces of 2×8 lumber – 20 ft
- 2 pieces of 2×8 lumber – 10 ft
- 15 pieces of 3/4″ plywood – 4’x8′
- 5 pieces of 2×4 lumber – 24 ft
- 6 pieces of 2×4 lumber – 20 ft
- 84 pieces of 2×4 lumber – 8 ft
- 7 pieces of 2×6 lumber – 8 ft
- 1 piece of 1/2″ plywood – 4’x8′
- 2 1/2″ screws
- 3 1/2″ screws,
- 1 5/8″ screws
- 4d nails, 16d nails
- rafter ties
- wood filler , wood glue, stain/paint
Tools
![]() Hammer, Tape measure, Framing square, Level
Hammer, Tape measure, Framing square, Level
![]() Miter saw, Drill machinery, Screwdriver, Sander
Miter saw, Drill machinery, Screwdriver, Sander
Time
![]() One week
One week
Related
- PART 1: 20×24 Gable Shed Plans
- PART 2: 20×24 Gable Shed roof Plans
Step 1: How to build a 20×24 shed floor

Building-the-floor-frame—20×24-shed
First of all, you need to build the frame for the floor. Cut the components at the right dimensions from 2×8 lumber. Align the edges flush and make sure the corners are square. Drill pilot holes through the rim joists and insert 3 1/2″ screws into the joists. Place the joists every 16″ on center for a professional result.
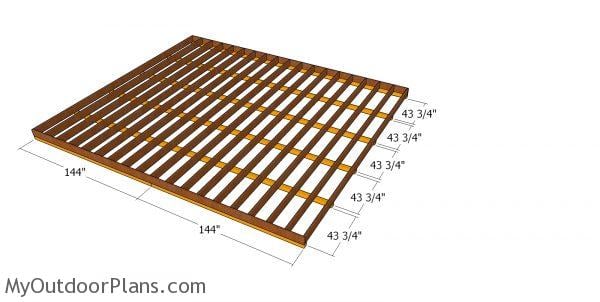
Fitting the skids
You can attach 4×4 skids to the floor frame. Place the skids equally spaced and use screws or hardware to lock them together tightly. The skids will lift the floor from the ground and this will protect the components from moisture. Read the local codes before building the shed and choosing its location. Remove the vegetation layer and level the ground. Spread a 2-4″ layer of gravel, to help with drainage. Invest in pressure treated lumber for the skids, because it is more durable.
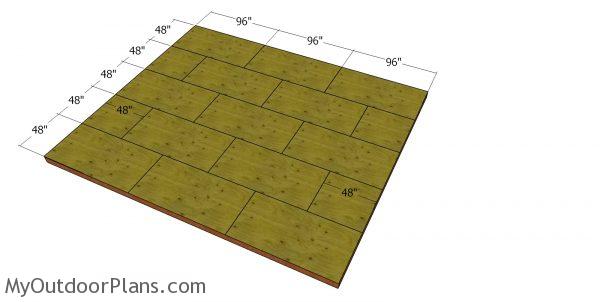
Floor sheets – 20×24 shed
Attach 3/4″ plywood sheets to the floor frame of the shed. Cut the sheets to the dimensions shown in the plans and in the cut list. Align the edges flush, making sure you leave no gaps between the components. Insert 1 5/8″ screws every 8″ through the sheets into the joists.
Step 2: How to build the wall frames for the shed
Side wall frame – 20×24 shed
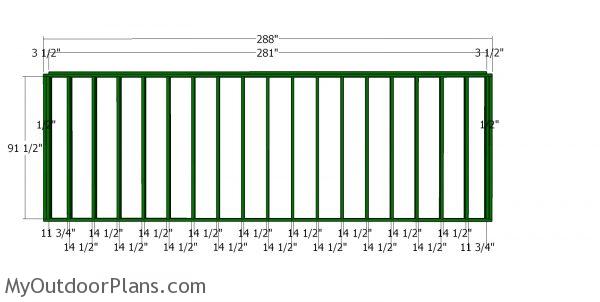
Assemble the plain side wall frame from 2×4 lumber. Make sure the corners are square and align the edges flush for a neat result. Place the studs every 16″ on center for a neat result. Drill pilot holes through the plates and insert 3 1/2″ screws into the studs. Measure the diagonals and make adjustments until they are perfectly equal.
Side-wall-frame—20×24-shed
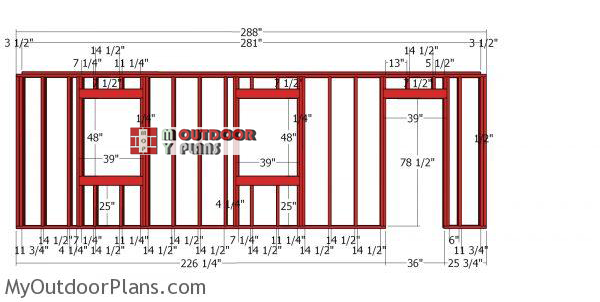
Build the opposite side wall for the 20×24 gable shed. Cut the components from 2×4 lumber and the double headers from 2×6 lumber. Fit 1/2″ plywood between the double headers. Drill pilot holes and insert 2 1/2″ screws to lock the headers. You can adjust the size of the windows, so it suit your needs.
Fit the double header to the door, as well. You can adjust the size of the door to suit your needs. You can also play with the location of the window and door. Placing the studs every 16″ on center will help you create a structure that is really durable and very rigid.
Front-wall-frame
Frame the front wall for the shed using 2×4 lumber for the studs and plates, while the double header for the door opening requires 2×8 lumber. Drill pilot holes through the plates and insert 3 1/2″ screws into the studs. Toe-nail the double header to the front wall. Make sure the corners are square and align the edges flush. You can easily adjust the size of the 8′ door opening to suit your needs.
I have also framed a 3’x4′ window to the front of the shed. This window is optional, but you should know it will add more natural light inside the storage shed.
Back wall frame – 20×24 shed
Frame the back wall for the large storage shed, using the same techniques described above. You should use 3 1/2″ screws or 16d nails to lock the joints together tightly. Place the studs every 16″ on center and make sure the corners are square.
Step 3: Fitting the wall frames
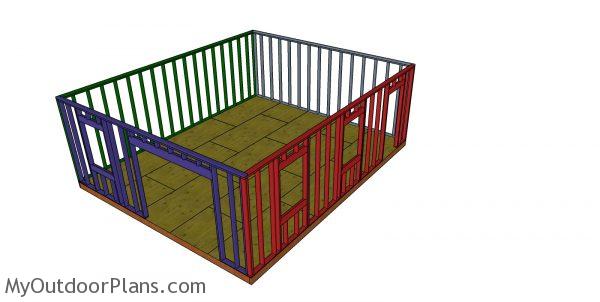
Assembling the frame of the 20×24 shed
Fit the side walls to the floor of the shed. Plumb the walls plumb and drill pilot holes through the bottom frames. Insert 3 1/2″ screws to secure the wall frames into place. Use temporarily braces to hold the walls into place until you fit the front and back wall frames.
20×24 Gable Shed Plans
Install the wall frames to the front and back of the shed. Make sure the corners are square and then align the edges flush. Drill pilot holes through the bottom plates and insert 3 1/2″ screws to lock the adjacent walls together tightly. Use a spirit level to plumb the walls. Lock the adjacent wall frames together, by drilling pilot holes and insert 3 1/2″ screws.
20×24-gable-shed-plans—front-view
You need to check out PART 2 of the shed, so you learn how to build the roof for the shelter. In addition, you need to make the double doors and attach the trims.
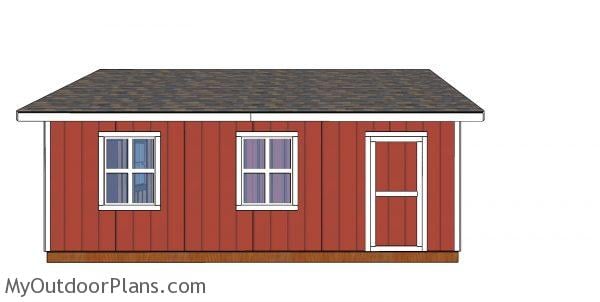
20×24 Shed Plans – side view
This is a simple project you should be able to build in a few weeks without much effort. Don’t forget to take a look over PART 2 to learn how to build the roof for the shed, as well as how to frame the doors.
Enhancing your 20×24 gable shed project can turn a simple structure into a dream space. Start by adding windows for natural light and ventilation, making the interior more inviting and functional. Incorporate custom storage solutions like built-in shelves and workbenches to maximize the use of space. For extra comfort, consider insulating the shed and adding electrical wiring for lighting and power tools, transforming it into a versatile, year-round retreat.
How to build a 20×24 gable shed
All in all, a 20×24 gable shed offers ample space, making it perfect for transforming into a workshop, art studio, or even a cozy guest house. Its roomy interior provides exceptional storage options for all your tools, equipment, and seasonal items, ensuring a clutter-free home. The modern design enhances your backyard’s aesthetic appeal while adding significant functionality and value to your property.
I suggest you to take a look over my other shed plans, such as this 16×18 gable shed.

This woodworking project was about 20×24 gable shed plans free. If you want to see more outdoor plans, check out the rest of our step by step projects and follow the instructions to obtain a professional result.

7 comments
Hello Staff,
I am not quite sure if you can help but I do need to ask and see what your answer will be.
My problem is that rodents like squirrels and chipmunks to name a couple seem to like to feast on my poor garden plants before the plants even have a chance to bear fruit as it were.
Because I live in Northern Arizona, I have come up with this potential solution. I would like to build myself a garden grow house to help protect the garden area from these pests and other creatures that would like to help themselves to the plants or crops.
The idea for this garden grow house is to make it 20 feet wide by 24 feet in depth minimum and I would also like to see plans for a 20 x 30 foot so I can compare the 2 and see which one will be more affordable.
20 wide across the front and back with 30 feet for the side wall and a 2 foot on center spacing between the studs. The bottom of this structure will be covered with corrugated metal roofing run these panels length wise around the structure to keep the squirrels and chipmunks and other rodents from climbing up the outside. This will give me close to 26 inches of protection from the ground and below ground.
There will also be a 4 x 4 pressure treated base that will be cemented in place on top of concrete blocks as a way to strengthen and keep the structure attached to the ground.
The walls themselves will be 86 inches in height and will be covered with 5 x 50 chicken wire fencing with 1 inch openings.
The roof will be flat with 2 x 2 x 8 built to the 20 foot distance and then covered with shade cloth so nothing else except for a nice wide door in the front would be nice to have.
I hope you can help me figure out this project.
William H
Hi, I’m trying to do 16×24 shed…which roof plans should I use?
Whichever roof shape suit your needs. All 16×24 plans here: https://myoutdoorplans.com/category/16×24/
Hi. I’d like to purchase a pdf of the 20×24 Shed Plan and the 20×24 Gable Shed Roof plan so I can email them to my builder. Is a clean PDF copy available to purchase? Thanks for your help!
No premium plans available for this project at the moment.
where is the free pdf download , i dont see it , it wants me to pay 7.99 for it
That is the premium version. If you want the free version you need to read the blog FAQs.