This step by step woodworking project is about outdoor swing plans. Building an a-frame swing is easy, if the right plans, materials and techniques are used. Nevertheless, there are so many things that you should take into account, that we really recommend you to pay attention to the instructions highlighted in this project. Invest in quality lumber (pressure treated lumber, redwood, cedar, pine), if you want to build a durable structure.
There are several things that you could take into account before starting the actual construction of the a-frame swing. As you will see in the plans, you nee to adjust the size of the structure, as to suit your needs and budget. This project features a basic structure for one person, but you can make it slightly larger, if you want to fit a two-person bench. Don’t forget that it is essential to set the legs into concrete, as to provide support to the construction. See all my Premium Plans HERE.
Projects made from these plans
[tabs tab1=”Materials” tab2=”Tools” tab3=”Time” tab4=”Related”]
[tab id=1]
- A – 4 pieces of 4×4 lumber – 94 1/2” long POSTS
- B – 2 pieces of 4×4 lumber – 33″ long, 2 pieces – 11 1/2″ long SUPPORTS
- C – 1 piece of 4×4 – 72” long TOP BEAM
- D – 8 piece of 1×6 – 30 1/2” long BRACES
- E – 1 piece of 1×10 lumber, rope SWING
- swing hanger
- swing seat
[/tab]
[tab id=2]
![]() Hammer, Tape measure, Framing square
Hammer, Tape measure, Framing square
![]() Miter saw, Drill machinery, Screwdriver, Sander, Post-hole digger
Miter saw, Drill machinery, Screwdriver, Sander, Post-hole digger
[/tab]
[tab id=3]
![]() One weekend
One weekend
[/tab] [tab id=4]
[/tab][/tabs]
Building an a-frame swing

Building a simple swing
Top Tip: A small garden swing is one of the best investments you could make, if you want to build a simple but fun project. As you will see in the article, this woodworking project doesn’t require more than 100 dollars in lumber and other materials.
Outdoor Swing Plans

Building the A-frames
The first step of the project is to build the A-frames for the outdoor swing. As you can see in the image, you need to to build the legs and the braces from 4×4 lumber. Cut both ends of the legs at 75º, by using a circular saw.
Drill pilot holes trough the legs and insert galvanized screws into the braces. In addition, add waterproof to the joints, in order to get a rigid structure.
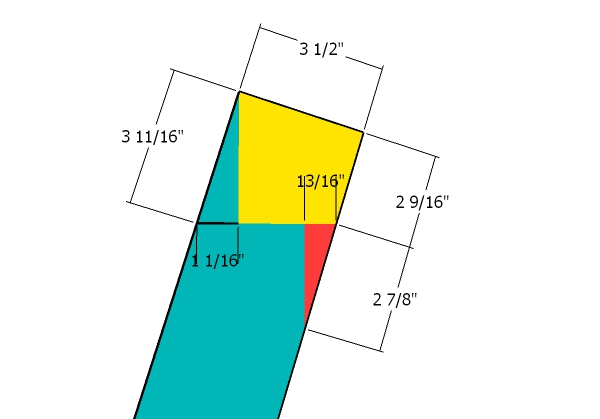
Top Support Cuts
Use the diagram for making the cuts for the top of the supports.
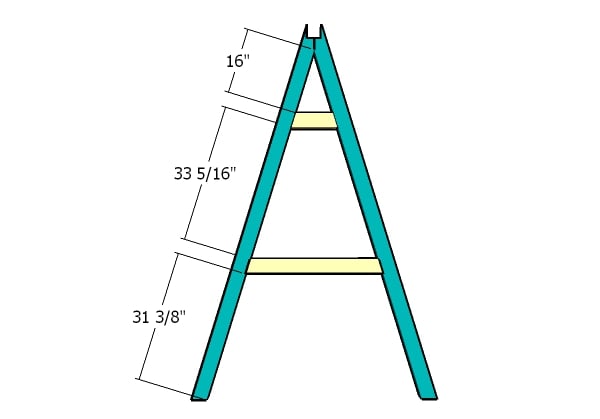
Laying out the supports
Lay out the components on a level surface and align the supports as shown in the diagram.

Installing the top beam
It is essential to align the components at both ends before locking them together. Next, you need to attach the 4×4 beam to the top of the A-frames and lock them into place with screws. Check if the beam is horizontal, drill pilot holes and drive in the screws.
We recommend you to lock the legs into concrete, if you want to create a rigid structure. Plumb the A-frames with a spirit level and let the concrete to dry out, before attaching the beam.

Fitting the braces
In order to add support to the A-frame swing, you need to install 4×4 braces, as in the plans. Cut both ends of the braces at 45º and lock them to the supports and to the top beam with galvanized screws.
Top Tip: Drill pilot holes before inserting the 3 1/2″ wood screws. Work with attention and with good judgement, to prevent costly mistakes and other issues.
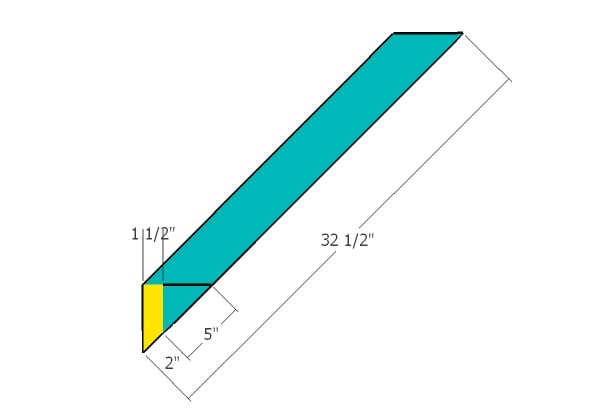
Building the braces
Build the braces for the swing.

Installing the swing
Building the actual swing is a straight forward. As you can notice in the image, you need to use a wooden plank and several pieces of rope. Adjust the size of the rope pieces according to your needs, making sure the wooden plank is perfectly horizontal.
Top Tip: Secure the swing to the top beam by using heavy-duty eye screws. Align everything before hanging the swing to the beam.

Outdoor Swing Plans
Last but not least, you have to take care of the finishing touches. Therefore, fill the holes and the cracks with wood filler and let it dry out for several hours, before sanding the surface with 120-grit sandpaper.
Top Tip: Protect the wooden components from rot by applying several coats of paint. Choose colors that match the design of the rest of your property, as to enhance the look of the garden swing.
This woodworking project was about outdoor swing plans. If you want to see more outdoor plans, we recommend you to check out the rest of our step by step projects.
10 comments
I love this swing! I’m trying to build one (with help – I only took shop in 7th grade, which was a VERY long time ago) for my 10 year old who has mild autism. He needs one that will swing a lot higher than this one would allow, but I have no idea how long the posts would need to be? Do you have any suggestions?? He loves the swings at the playgrounds, but we don’t have room in our yard for one that tall.
I’d love to help, but I don’t understand the question, since you have no room for a larger one. How high do you need it to swing? You should also consider that a taller swing frame will also be more dangerous.
Sorry Julian, I meant that we didn’t have room for a commercial playground size swing. We would cement a swing into the ground, so it could not trip over. A friend built one that had 12 foot long posts, but they go straight up, they are not an A frame. I don’t know how long they would need to be if we made an A frame type swing.
I have plans for a vertical swing here: http://myoutdoorplans.com/furniture/simple-swing-set-plans/ I would go for 14′ long supports, which you can set into the ground for about 2′. The 15 degree lean won’t take that much out of the total height, so it should be around 11′ high. If you want to make it taller, then use 16′ long supports.
I began building the A-frame’s and as I really read into the instructions I noticed a problem. There are no measurements for the top for the how the top beam is to sit in the a-frame. What are those measurements?
I’ve updated the project by adding a diagram with the cuts. If you have more questions, I am here to assist you. I’m looking forward to seeing how it comes out.
I cannot understand the red,yellow and blue colors on the A frame diagram
You need to cut the yellow and the red sections. The blue represents how the supports should look after making the cuts.
Hi. Do you have these plans you can share in a printable format such as a PDF or Word Doc? I would like to print these plans to have them handy while I build. When I go to print from this webpage, it becomes all jumbled up and hard to read.
Thank you!
You can do that. Please read the FAQs.