This step by step diy woodworking project is about a waist high raised garden bed plans. I designed this elevated planter box so you can grow vegetables on your patio, deck or balcony. Building a waist high garden bed makes watering easy, as well harvesting (yummy). If you want to save money and keep the costs down, I recommend you to use pine for the base and cedar or redwood for the actual planter box. You need hardwood for the planter as it resists a lot better against rot, making it more durable. Take a look over the rest of our woodworking plans, if you want to get more building inspiration. Premium Plans available for this project in the Shop.
When buying the lumber, you should select the planks with great care, making sure they are straight and without any visible flaws (cracks, knots, twists, decay). Investing in cedar or other weather resistant lumber is a good idea, as it will pay off on the long run. Use a spirit level to plumb and align the components, before inserting the galvanized screws, otherwise the project won’t have a symmetrical look. If you have all the materials and tools required for the project, you could get the job done in about a day. See all my Premium Plans HERE.
Projects made from these plans
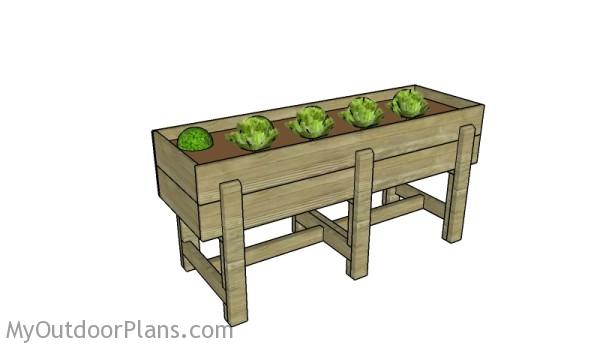
It’s that simple to build an elevated garden bed!
Waist High Planter Box Plans
Building-a-waist-high-planter
Cut & Shopping Lists
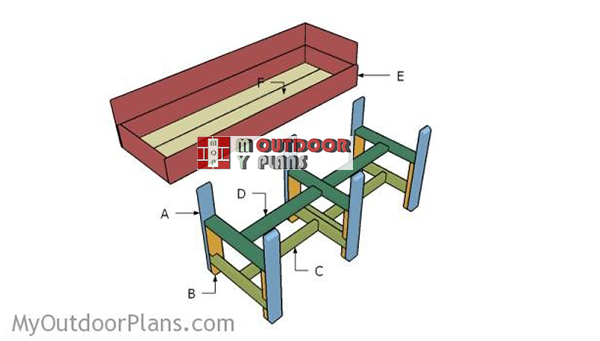
- A – 6 pieces of 2×4 lumber – 30″ long LEGS
- B – 6 pieces of 2×4 lumber – 18″ long LEGS
- C – 4 pieces of 2×4 lumber – 23 1/4″ long, 2 pieces – 28 3/4″ long BRACES
- D – 3 pieces of 2×4 lumber – 23 1/4″ long, 2 pieces – 26 3/4″ long SUPPORTS
- E – 4 pieces of 1×8 lumber – 72″ long, 4 pieces – 21 3/4″ long PLANTER
- F – 3 pieces of 1×8 lumber – 70 1/2″ long BOTTOM
- 6 pieces of 2×4 lumber – 8′
- 7 pieces of 1×8 lumber – 6′
- 1 piece of 1×8 lumber – 8′
- 100 pieces of 2 1/2″ screws
- 100 pieces of 1 1/4″ screws
- wood glue, stain/paint
Tools
![]() Hammer, Tape measure, Framing square, Level
Hammer, Tape measure, Framing square, Level
![]() Miter saw, Drill machinery, Screwdriver, Sander
Miter saw, Drill machinery, Screwdriver, Sander
Time
![]() One day
One day
Related
How to build an elevated garden bed
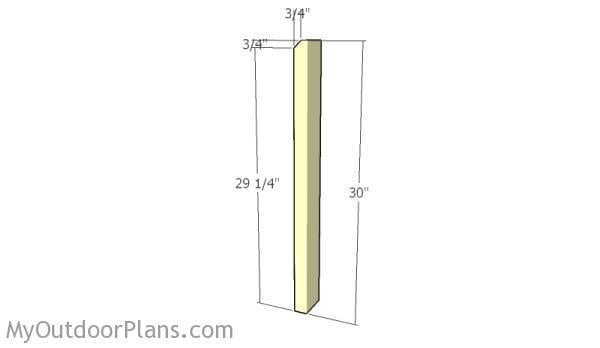
Building the long legs
The first step of the project is to build the legs for the legs for the elevated garden bed. Cut the top of the legs in a professional manner. Smooth the edges with sandpaper for a professional result.
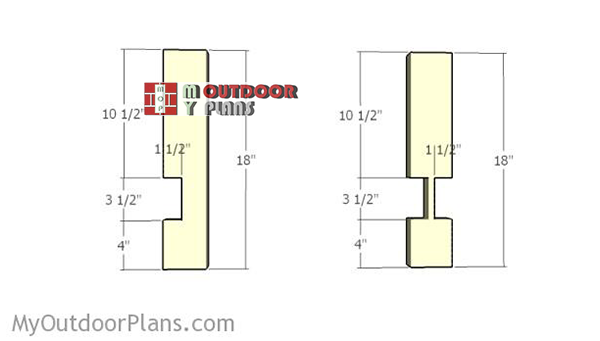
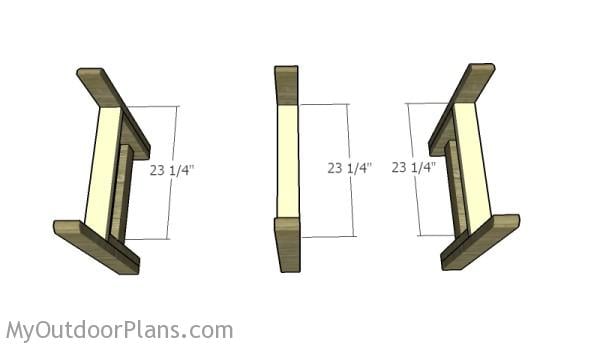
Building-the-small-legs
Build the interior legs for the base from 2×4 lumber. As you can easily notice in the diagram, you should make notches. Mark the cut lines and make parallel cuts inside the area. Remove the excess material with a chisel and clean the recess with sandpaper. Make 4 pieces of the left component and 2 pieces of the right components.

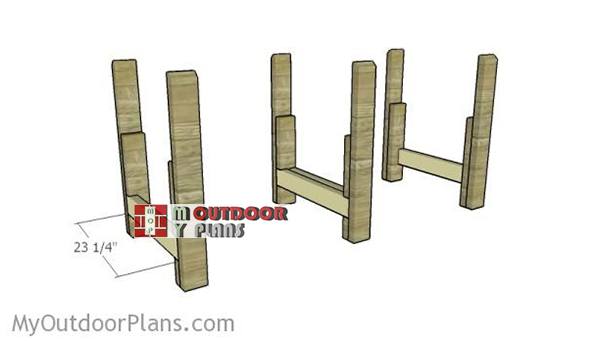
Building the legs
Attach the legs together, as shown in the image. Add glue to the joints and align the edges with attention. Drill pilot holes and insert 2 1/2″ screws to lock the components together tightly.
Fitting-the-horizontal-braces
Next, you need to fit the horizontal braces to join the legs together tightly. Drill pilot holes at both ends of the braces and insert 2 1/2″ screws into the vertical legs. Add waterproof glue to the joints for a professional result.
Fitting the top supports
Fit the 2×4 supports to the legs. Drill pilot holes and insert 2 1/2″ galvanized screws to lock them into place tightly. Make sure the corners are right-angled.
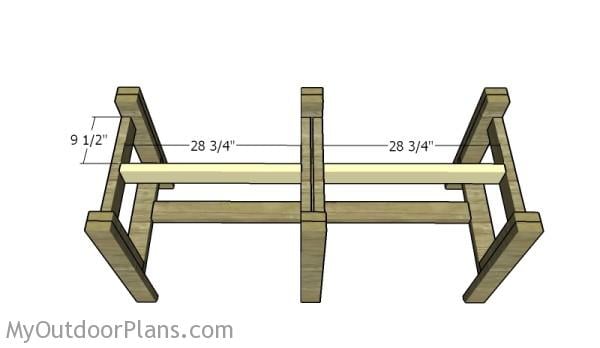
Fitting the top stretchers
Next, you need to join the legs together by fitting the 2×4 supports into place. Drill pocket holes at both ends of the supports and secure them to the top of the frames using 2 1/2″ screws. Make sure the corners are square and leave no gaps between the components.
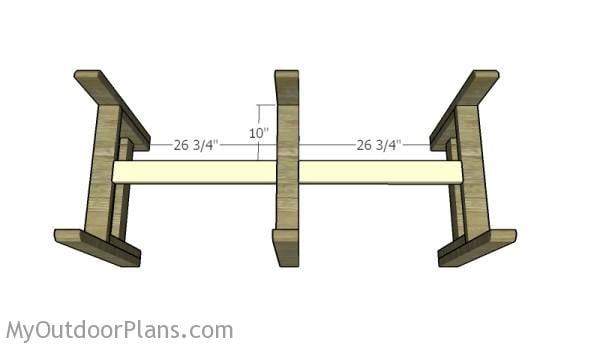
Fitting the bottom stretchers
Fit the stretchers to the bottom of the frames. Drill pocket holes at both ends 2×4 stretchers and secure them to the braces using 2 1/2″ screws. Make sure the corners are square.
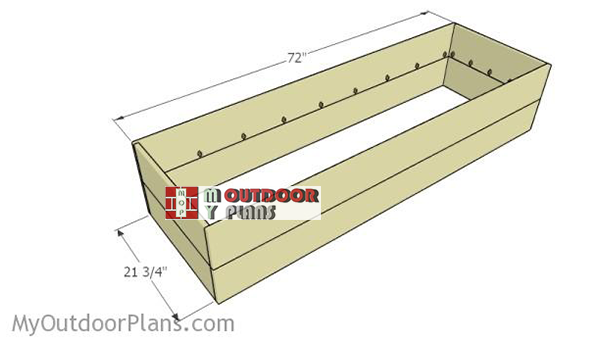
Assembling-the-frame-of-the-planter
Next, you need to build the frame of the garden bed from 1×8 cedar slats. Cut the components at the right dimensions and smooth the edges with sandpaper. Drill pocket holes along the bottom edges of the top slats to secure them to the bottom ones.
In addition, butt joint the long slats to the short slats. Drill pilot holes and insert 1 1/4″ screws to lock them tightly. Make sure the corners are square for a professional result.
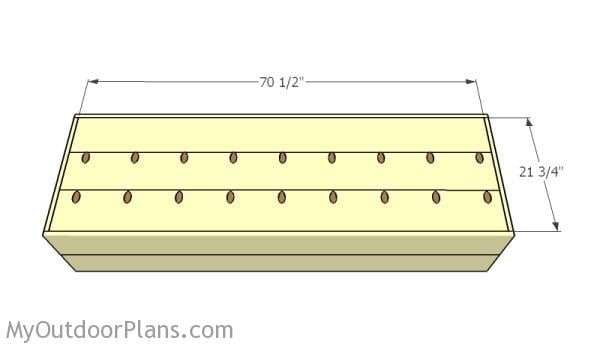
Attaching the bottom slats
Build the bottom of the planter from 1×8 slats. As you can easily notice in the diagram, you need to drill pocket holes so that you can join the three slats together tightly. Drill pilot holes through the frame of the garden bed and insert 1 1/4″ screws into the bottom slats. Insert the galvanized screws every 6″.
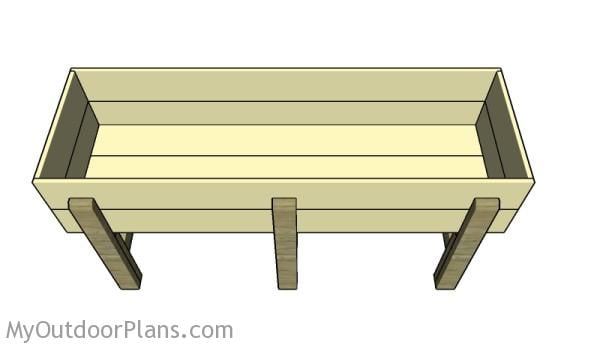
Fitting the planter box
Fit the planter box to the base, making sure you center it into place. Drill pilot holes through the bottom of the garden bed and insert 2 1/2″ screws into the base. In addition, I recommend you to drill 5/8″ drainage holes into the bottom of the planter box.
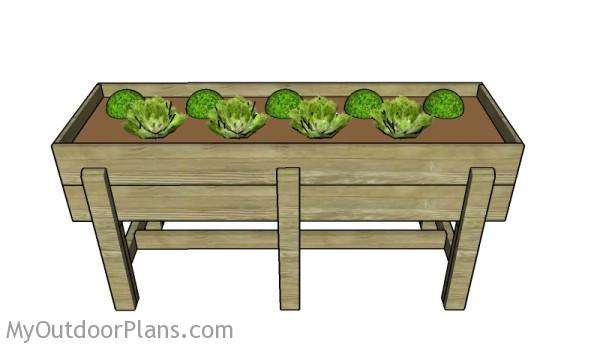
Waist high planter box plans
You can fit pond liner to the interior of the garden bed, making sure it is safe for your vegetables. Make sure you do not apply any product that isn’t safe for your plants to the wood. There are also a few finishing touches you can do to the planter box, such as adding 1×3 trims to the top of the frame. In addition, another cool idea would be to create storage shelves to the bottom supports, by attaching 1×4 slats for example.
This raised planter box will help you have fresh vegetables on the table every day, even if you think it’s too small. You will be amazed on how many varieties of vegetables you can actually grow in a small surface. And it’s also a learning curve, as the more you learn the more you’ll have on the table.
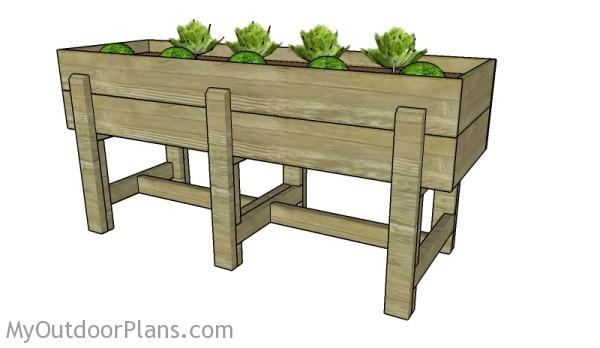
Elevated garden bed plans
Building a waist high garden bed is a great idea, as it comes with many benefits compared to growing vegetables directly into the ground. For example, it is a lot easier to control the quality of the soil. In addition, it is easier to water them and to keep the weeds away from your vegetables. You can even attach PVC hoops so you can create a poly-tunnel and protect the vegetables from cold weather.
It is essential to use cedar or redwood for the planter box, as it will be exposed to water and moisture daily. Pine will probably rot in less than one year, while you can have the hardwood one working for years and years. On the other hand, this waist high raised garden bed looks really nice, so that you actually add value to your backyard with this project.
Waist high raised garden bed plans
Fill the holes with wood putty and let them dry out for a few hours. Smooth the surface with 100-220 grit sandpaper and remove the residues with a damp cloth.
Top Tip: Apply a few coats of paint or stain to the base components, to enhance the look of the project. Design is a very subjective area, so you can make modifications to the project so it suit your needs. Premium Plans available for this project in the Shop.
If you want to get PREMIUM PLANS for this project, in a PDF format, please press GET PDF PLANS button bellow. Thank you for the support.

This woodworking project was about waist high raised garden bed plans free. If you want to see more outdoor plans, check out the rest of our step by step projects and follow the instructions to obtain a professional result.
EXPLORE MORE IDEAS FOR:
 |
 |
 |
 |
23 comments
the link said I could get the plans for this here but there’s no download here it was a sham right to get me to buy something. Just another lie to try and steal money gee I’m so surprised.
You don’t need to buy anything and I really don’t want anyone’s money. Your claims are beyond absurd, even insulting. If you actually read the FAQs instead of making accusations, you would see that you can easily print or download any plan on my site for free. Have a nice day and I would appreciate if you would be more polite and less angry next time. It doesn’t cost you anything.
Good lord, grow up…
🙂 Thank you for your professional plans and great website 🙂
Thank you!
I just finished building this (thank you so much for the plans). My only question is, how many drainage holes should I drill? Thank you!
Finally! I’ve been searching for a an elevated planter box plan for a long time and I came across your website. I like how your instructions are simple with pictures for reference. This is definitely something I can follow. Thank you!
You’re welcome! Let me know how it comes out!
Have been looking at these raised beds for some time now but was always put off by the extortionate prices the garden centres charge.
Came across your plans ‘by chance’. Whilst I don’t have many DIY skills, your instructions and plans have convinced me to undertake the building of my own raised beds.
Really grateful and my wife is happy too although she’s convinced, though, that the end product will be ‘wonky’ based on my previous DIY efforts but won’t go into detail!!
We’ll have to wait and see!!
Thank you so much.
Can recycled plastic lumber be used to make these?
Yes, you can use that.
The question of how many drainage holes was asked but I didn’t see an answer. Could you share that?
It depends, but I would personally go with 8 holes.
how do I buy this plan?
See the plans in the shop
I’m struggling to find out how each piece of lumber should be cut to make the pieces listed in the plan. Can you help?
You need to buy the premium plans for that
I’m a boy scout working on a service project. I Planned for everything based on this plan because I was unaware that there was a premium plan because it was unclear. Now the first part of my project starts today, I just found the premium plan, and all the measurements are different. thanks!
All dimensions are not different. It’s an optimized plans with color codes and cut diagrams, as you requested. You did not mention you already bought the materials, but there are no big differences. You can still build it with what you have
On the premium plan the screws are different and there is an extra 2×4
Use the screws you’ve got. Doesn’t matter that much. And the 2×4 extra is because of the different lengths
How much weight do you believe this raised garden bed will bear? Just wondering with soil added and weight from watering. Thinking of building a few of these for our greenhouse and out of all the plans I’ve searched, yours looks the most robust!
It should hold the soil if you fill in the planter. I don’t have an exact number.