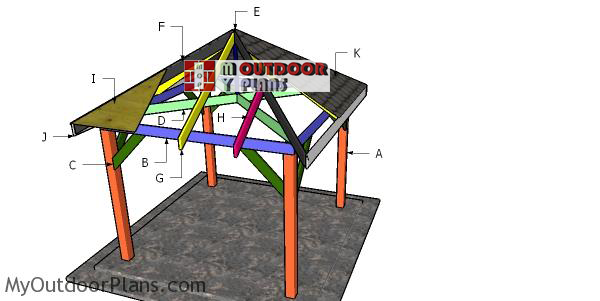
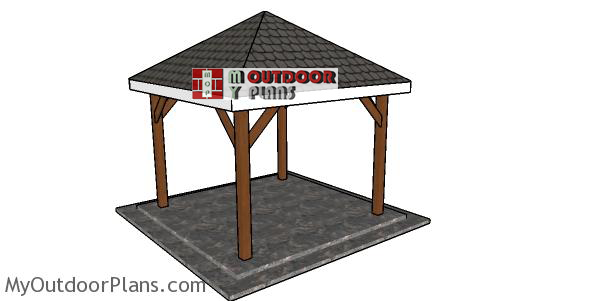
This step by step diy project is about simple 10×10 square gazebo plans. This is a simple gazebo with a hip roof that you can build in one weekend, if you follow my instructions. This square gazebo features a concrete floor, 6×6 posts and a hip roof with a generous slope. Make sure you read the local codes so you can comply with the legal requirements. Take a look over the rest of my woodworking plans, if you want to get more building inspiration.
When buying the lumber, you should select the planks with great care, making sure they are straight and without any visible flaws (cracks, knots, twists, decay). Investing in cedar or other weather resistant lumber is a good idea, as it will pay off on the long run. Use a spirit level to plumb and align the components, before inserting the galvanized screws, otherwise the project won’t have a symmetrical look. If you have all the materials and tools required for the project, you could get the job done in about a day. See all my Premium Plans HERE.
Projects made from these plans
Square Gazebo Plans
Building-a-10×10-square-gazebo
[tabs tab1=”Materials” tab2=”Tools” tab3=”Time” tab4=”Related Plans”] [tab id=1]
- A – 4 pieces of 6×6 lumber – 96″ long POSTS
- B – 2 pieces of 2×6 lumber – 117″ long, 2 pieces – 120″ long TOP PLATES
- C – 8 pieces of 2×6 lumber – 36″ long BRACES
- D – 1 piece of 2×6 lumber – 169 3/4″ long, 2 pieces – 84″ long BOTTOM RAFTERS
- 4 pieces of 6×6 lumber – 8′
- 4 pieces of 2×6 lumber – 10′
- 2 pieces of 2×6 lumber – 12′
- 2 pieces of 2×6 lumber – 8′
- 1 piece of 2×6 lumber – 16′
- 2 1/2″ screws, 3 1/2″ screws, 1 5/8″ screws
- 3″ lag screws
- 4d nails, 6d nails,
- 4 pieces of post anchors
- wood filler , wood glue, stain/paint
[/tab] [tab id=2]
![]() Hammer, Tape measure, Framing square, Level
Hammer, Tape measure, Framing square, Level
![]() Miter saw, Drill machinery, Screwdriver, Sander
Miter saw, Drill machinery, Screwdriver, Sander
[/tab] [tab id=3]
![]() One day
One day
[/tab][tab id=4]
- PART 1: 10×10 Square Gazebo Plans
- PART 2: 10×10 Gazebo Hip Roof Plans
[/tab][/tabs]
It’s that simple to build a gazebo – Video!
8×8 Grill Gazebo Plans

Posts for gazbeo
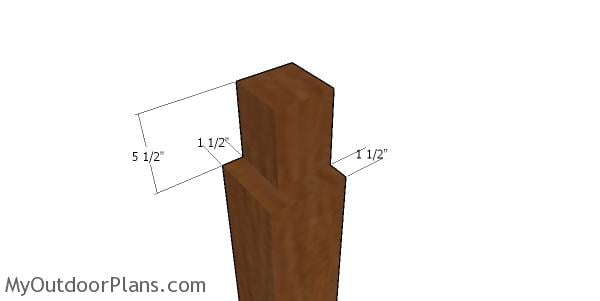
Making the notches to the top of the posts
The first step of the simple gazebo project is to build the posts. As you can see in the diagram, you need to use 6×6 lumber for the posts. Use a circular saw to make notches to the top of the posts. Make parallel cuts inside the marked areas and then remove the excess with a hammer and a chisel.
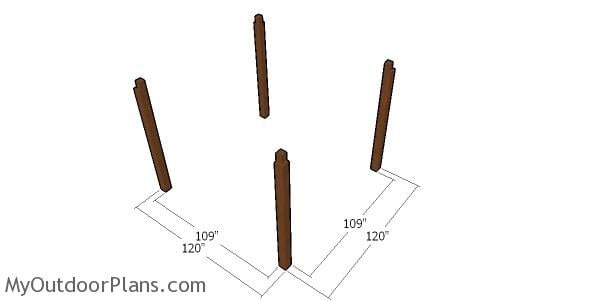
Laying out the posts for the gazebo
Next, choose the location for the square garden gazebo and to lay out the location of the posts. Make sure the surface is perfectly level and it complies with the local building codes. You can attach the posts to an already existing concrete slab, or you can secure the posts to the ground. Use batter boards and string to lay out the location of the posts. Apply the 3-4-5 rule to the corners and make adjustments until the diagonals are perfectly equal.

Anchoring the posts of the anchor
You can set the posts in concrete or you can pour 3′ deep footings and use posts anchors. Considering this is a light outdoor project, you can set the posts to anchors. That is why, these plans are designed having that assumption in mind (concrete anchors).
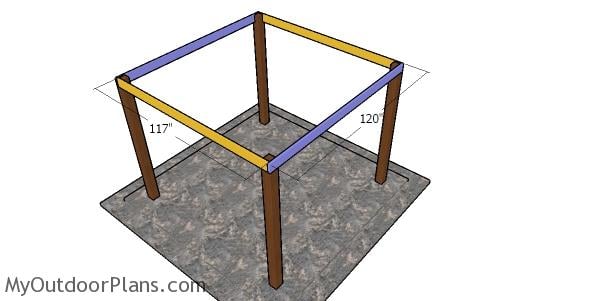
Fitting the top rails to the gazebo
Next, use 2×6 lumber for the top rails. Cut the beams as shown in the diagram. Fit the beams to the top of the posts and make sure the corners are right angled. Drill pilot holes through the beams and insert 3 1/2″ screws to lock them into place tightly.
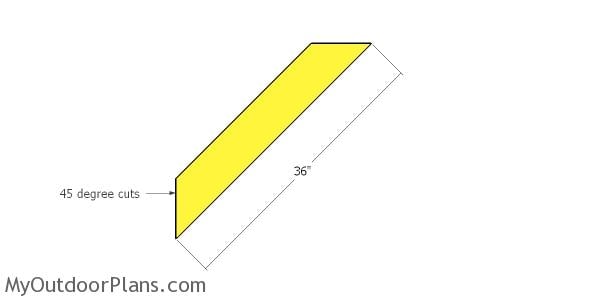
Building the braces for the gazebo
Use 2×6 lumber for the braces. Use a miter saw to make 45 degree cuts at both ends of the braces and then smooth the edges with sandpaper.
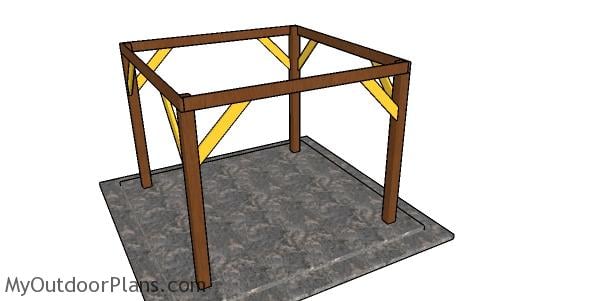
Fitting the braces to the 10×10 square gazebo
Fit the braces to the square gazebo frame, as shown in the diagram. Before fitting the braces and inserting the 3 1/2″ screws, make sure the posts are plumb.
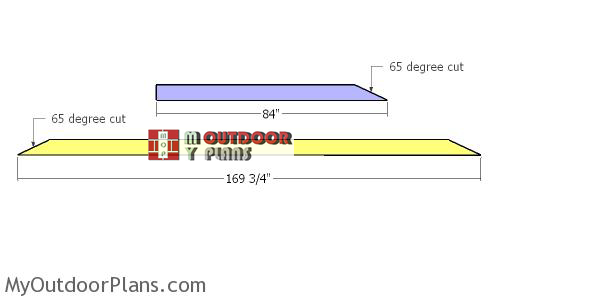
Building-the-bottom-rafters
Use 2×6 lumber for the bottom rafters. Use a miter saw to make 65 degree cuts to the components, as shown in the diagram.
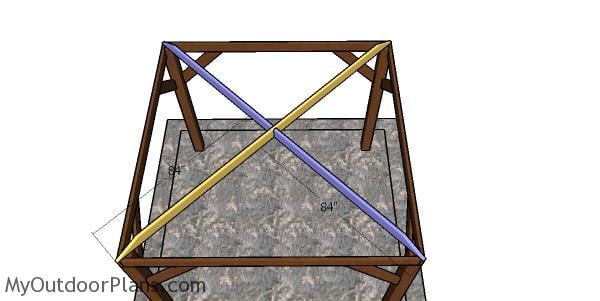
Assembling the bottom rafters – 10×10 hip gazebo
Fit the bottom rafters to the top of the posts, as shown in the diagram. Center the rafters, drill pilot holes and insert 3 1/2″ screws to lock everything together tightly. The angle between the rafters should be 90 degrees.
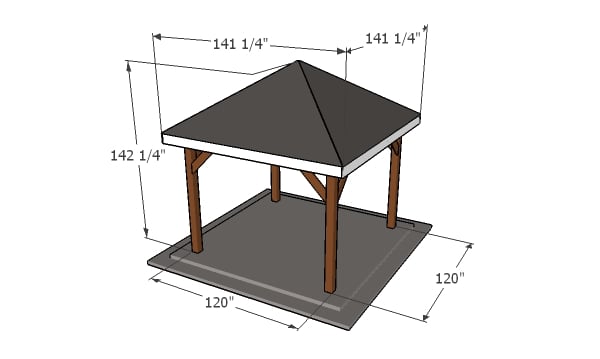
10×10 Gazebo Plans – dimensions
Take a look over PART 2 of the gazebo project, so you learn how to build the hip roof.
Simple-10×10-square-gazebo-plans
This 10×10 gazebo is build on a frame that is made from 6x6s. You can easily add railings to the gazebo, if you want to build a cute serving area. You can tackle this project in one weekend and save hundreds of the dollars. Please take a look over the rest of my woodworking plans, because I have over 1500 free designs.
If you want to get PREMIUM PLANS for this project, in a PDF format, please press GET PDF PLANS button bellow. Thank you for the support.

This woodworking project was about 10×10 gazebo plans free. If you want to see more outdoor plans, check out the rest of our step by step projects and follow the instructions to obtain a professional result.

EXPLORE MORE IDEAS FOR:
 |
 |
 |
 |
7 comments
Do you have the plans for this 10×10 gazebo in 10×14? Have you ever designed one with round columns instead of the 6×6 posts?
How do I get the PDF for the 10×10 hip roof gazebo?
I previously asked for plans for a 10′ x 10′ gazebo roof. You were prompt and sent plans right away. How ever I need to have plans for a concrete barrel tile roof. The plans you sent specifically install asphalt shingles. I need to verify the roof structure will support a heavier tile roof.
Will you please email me your 10 x 10 hip roof gazebo plan. Thank you!
You have a big START HERE button in the menu, read that and you will get the plans yourself.
10 x 10 gazebo
Hey Ovidiu. I recently purchased the 10×10 gazebo plans. I saw that the plans included bottom rafters. I would like to leave them out as to increase the head room to install a ceiling fan. Will omitting these bottom rafters compromise the integrity of the structure? I was planning on doubling up on 2×4’s on the hip rafters to compensate for removing the bottom rafters and blocking between the hip and common rafters about every 2 and a half feet. What are your thoughts on this?