If you’re looking to add charm, shade, and some serious curb appeal to your home, this 12×16 gable porch roof might be just the project for you. Whether it’s a spot to sip your morning coffee or a covered entry that makes your home feel more inviting, this build brings both function and style. And the best part? You can absolutely tackle it yourself with some basic tools and a little weekend hustle.
In this post, I’ll walk you through the full build—from setting the posts and beams to cutting the rafters, sheathing the roof, and adding all the finishing touches that make it pop. With clear steps, 3D diagrams, and a full material list, you’ll have everything you need to get the job done right. Let’s dive in and start building something you’ll enjoy for years to come.
Projects made from these plans
Pin it for later!

Building a 4×6 Catio
Building-a-12×16-porch-roof
Cut & Shopping Lists
Tools
![]() Hammer, Tape measure, Framing square, Level
Hammer, Tape measure, Framing square, Level
![]() Miter saw, Drill machinery, Screwdriver, Sander
Miter saw, Drill machinery, Screwdriver, Sander
![]() Post hole digger, Concrete mixer
Post hole digger, Concrete mixer
![]() Safety Gloves, Safety Glasses
Safety Gloves, Safety Glasses
Time
![]() One week
One week
Related
It’s that easy to build a porch roof!
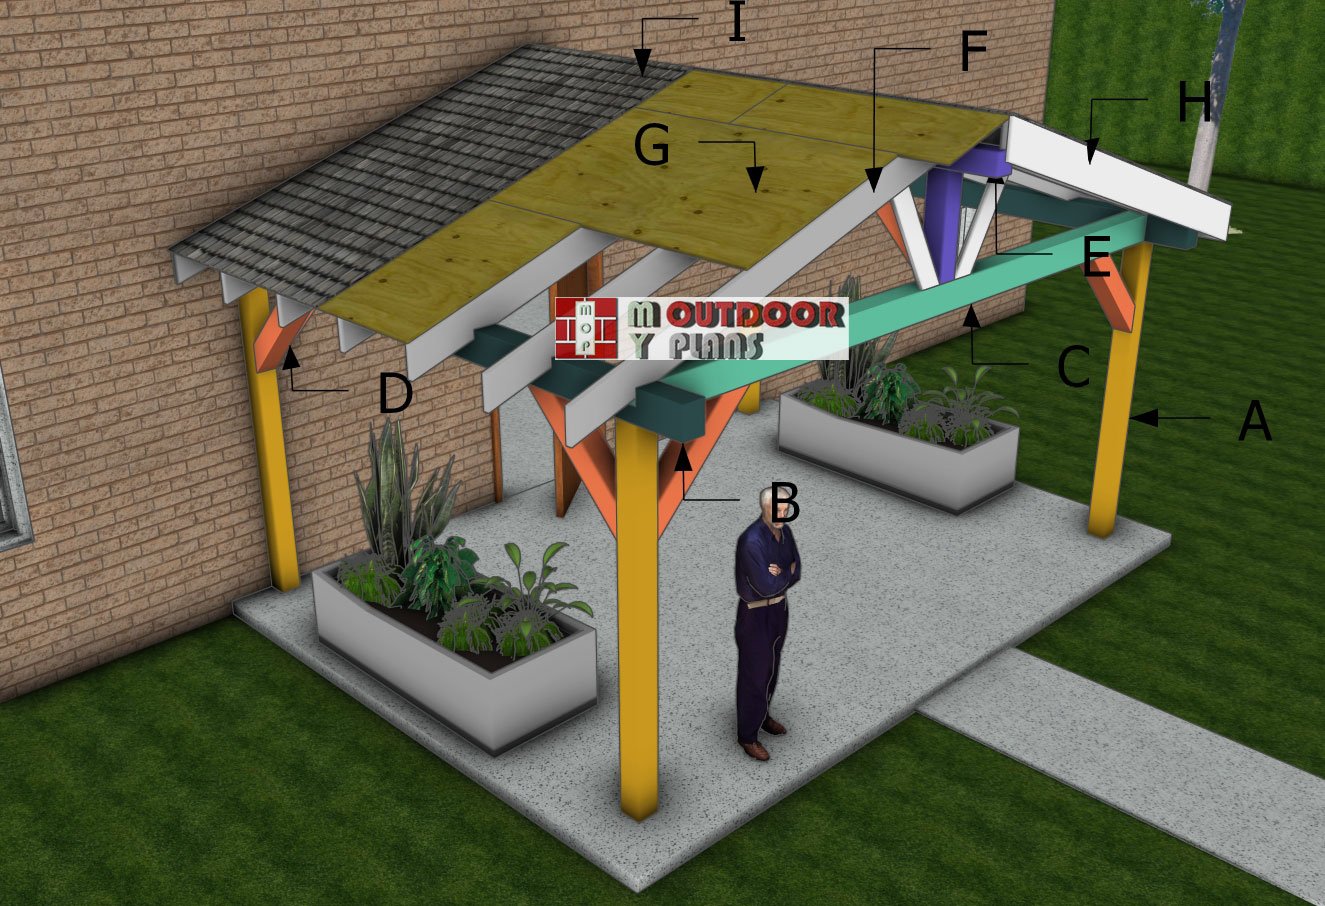
STEP 1: Building the frame of pavilion
Laying-out-posts
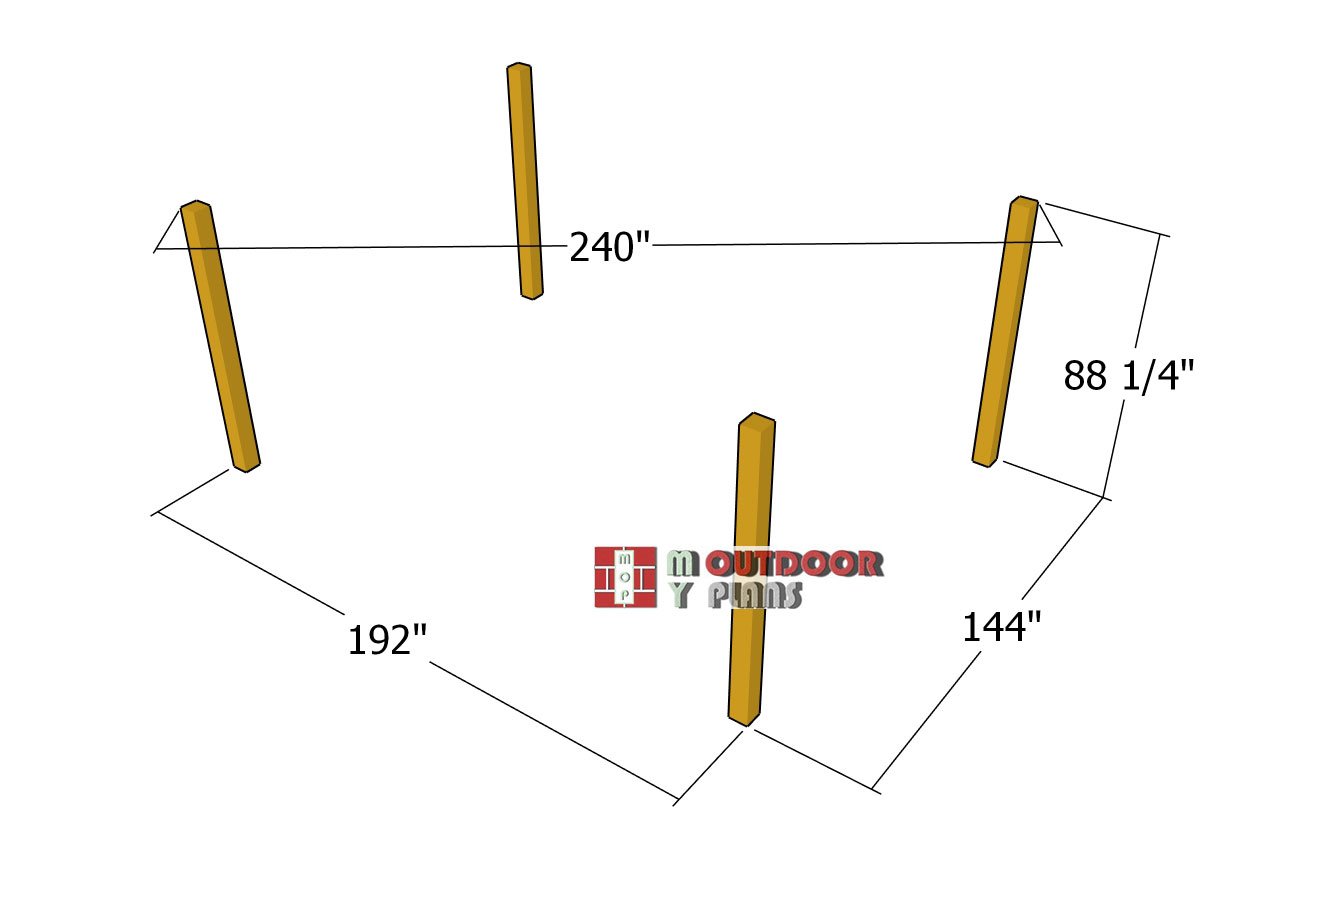
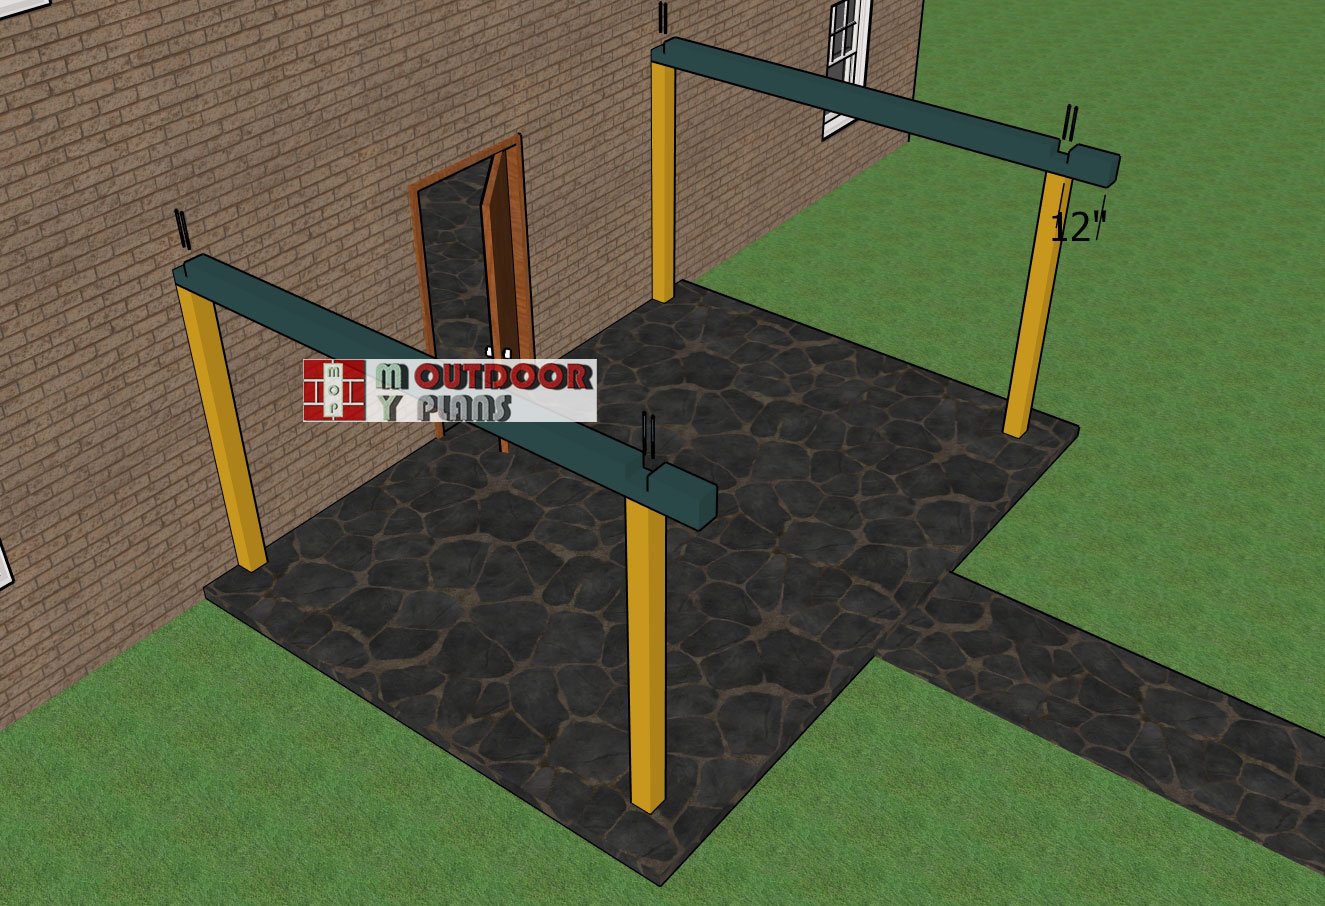
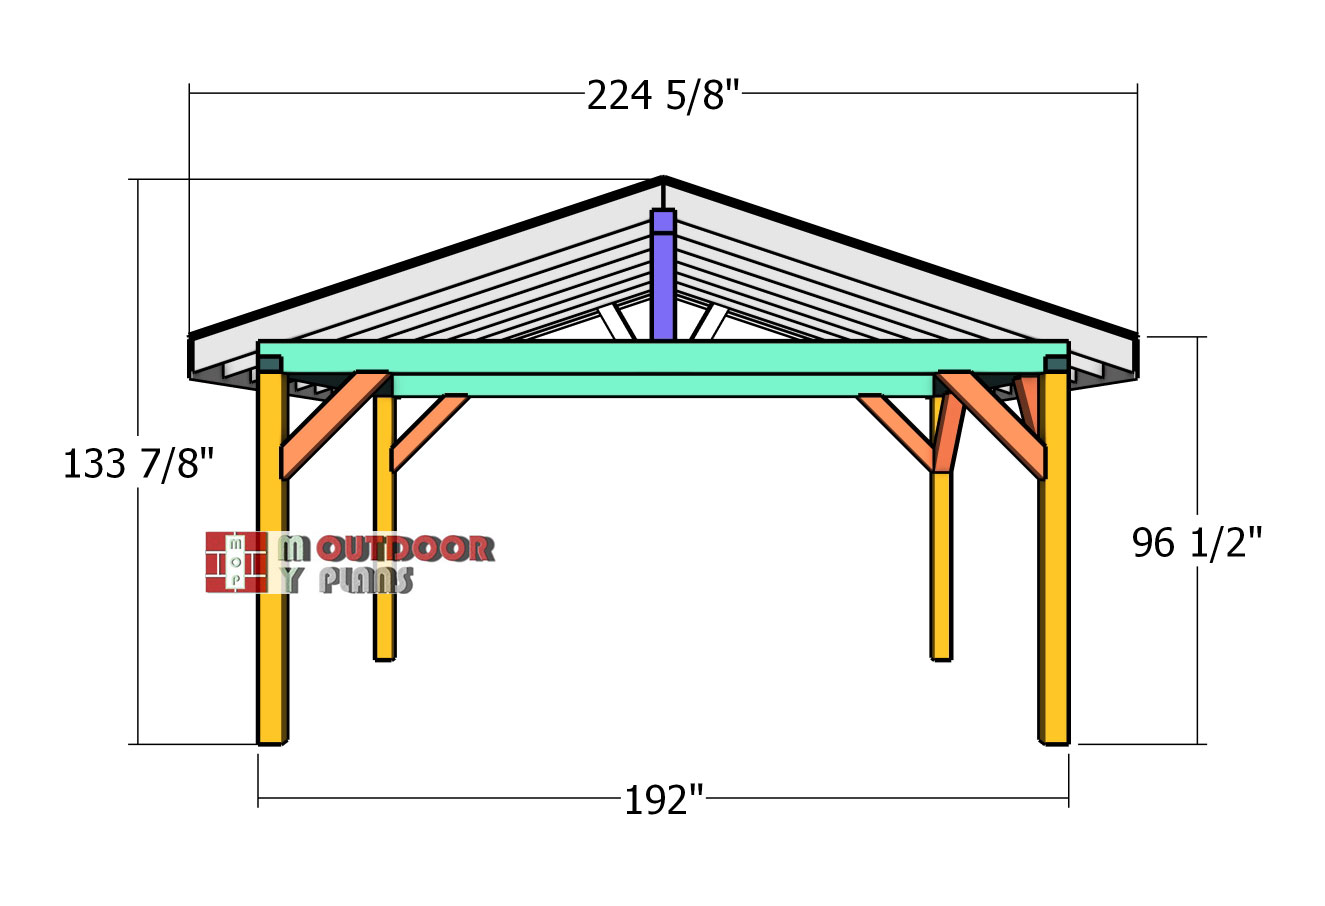
First, layout the posts for the 12×16 pavilion. Use batter boards and string to determine the location of the posts. Apply the 3-4-5 rule to every corner of the pavilion, so you make sure they are right angled. Make sure the diagonals are equal. Determining the location for the pavilion is essential, as you have to comply with the local building codes. Make sure the surface is level and remove the vegetation layer. This diagram shows the distance between the posts, outside to outside post.
Setting-the-posts
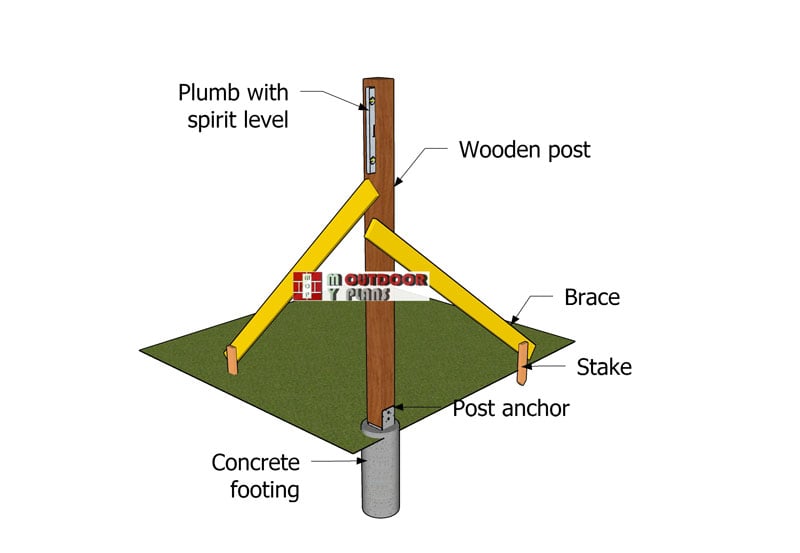
Once your post locations are marked, dig holes that are 3 feet deep and about 14 inches wide. Drop a concrete tube form into each hole and fill them up with concrete. While the mix is still wet, set your post anchors in place—take your time here to make sure they’re perfectly aligned. Getting this part right will save you headaches down the road.
After the concrete has fully cured, it’s time to install the posts. Set each post into its anchor, checking with a level to make sure it’s perfectly plumb. Use 2×4 braces to hold them steady while you work. Then, drive in lag screws through the anchors to lock the posts in for good. This gives you a solid, square foundation—ready to support the rest of the build.
Top-plates
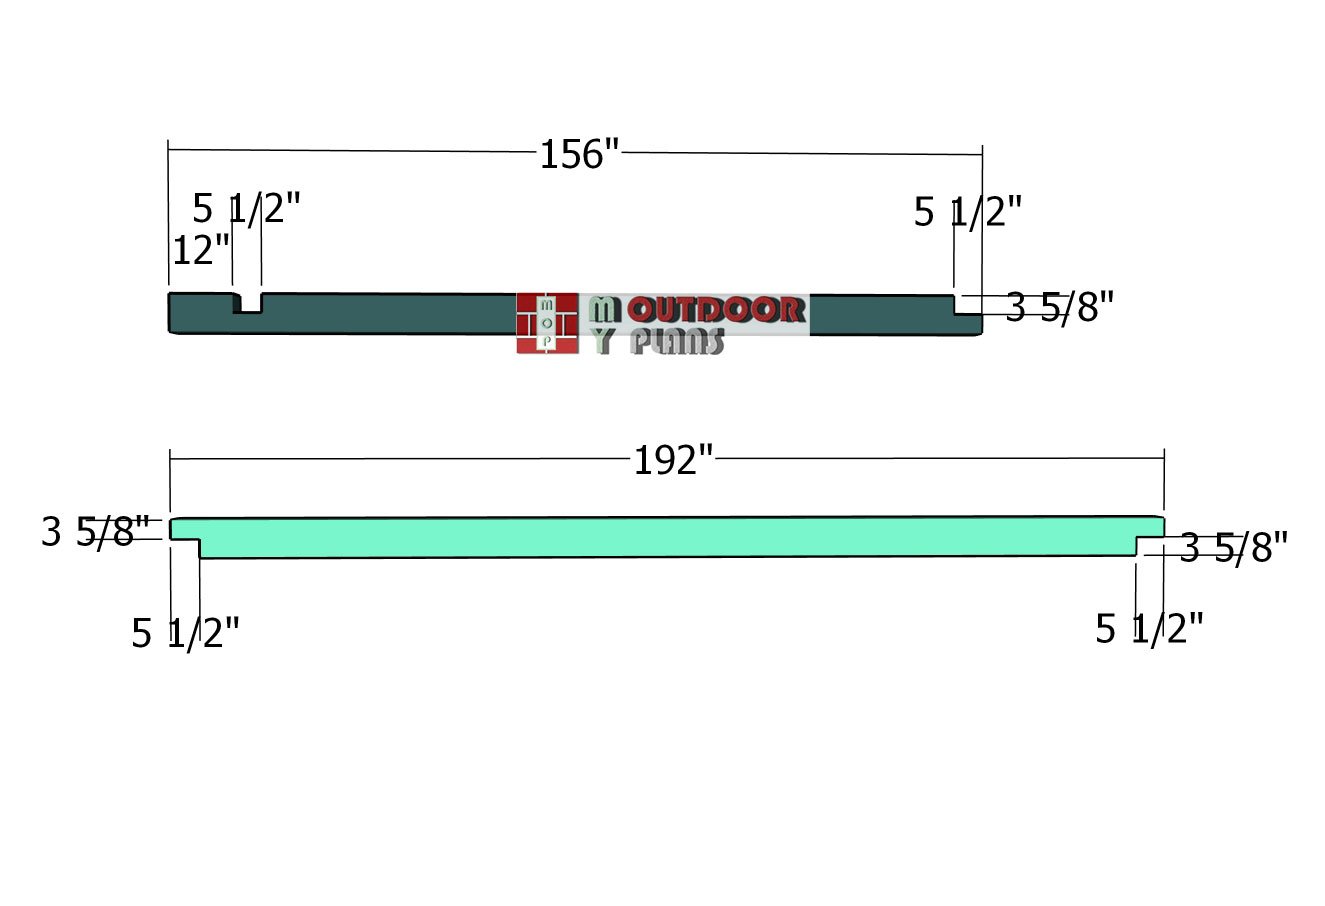
We will be using 6×8 lumber for the top support beams. Make 3 5/8″ deep notches to both ends of the beams. Use a circular saw and set the blade depth at 3 5/8″. Make parallel cuts inside the marked areas and remove the excess with a hammer and a chisel.
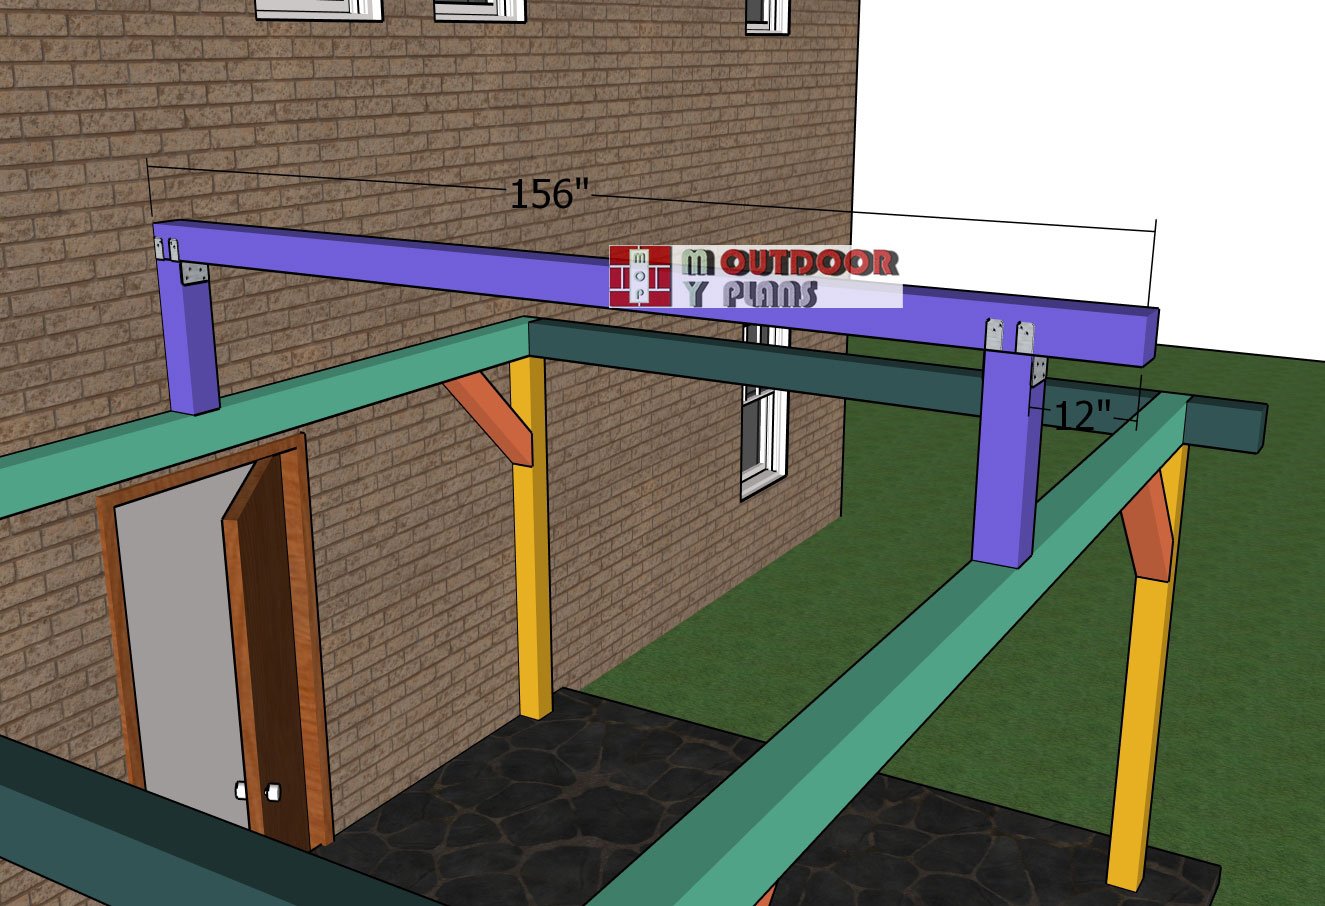
Top-side-beams
Now it’s time to fit those top beams into place and really bring this pavilion together! Start with the side beams—line them up so they sit flush with the outside edges of the posts. Be sure to keep that 12″ overhang on the front side to give the pavilion that nice finished look. Once everything’s aligned, drill pilot holes through the beams into the posts and drive in 8″ structural screws to lock them down tight.
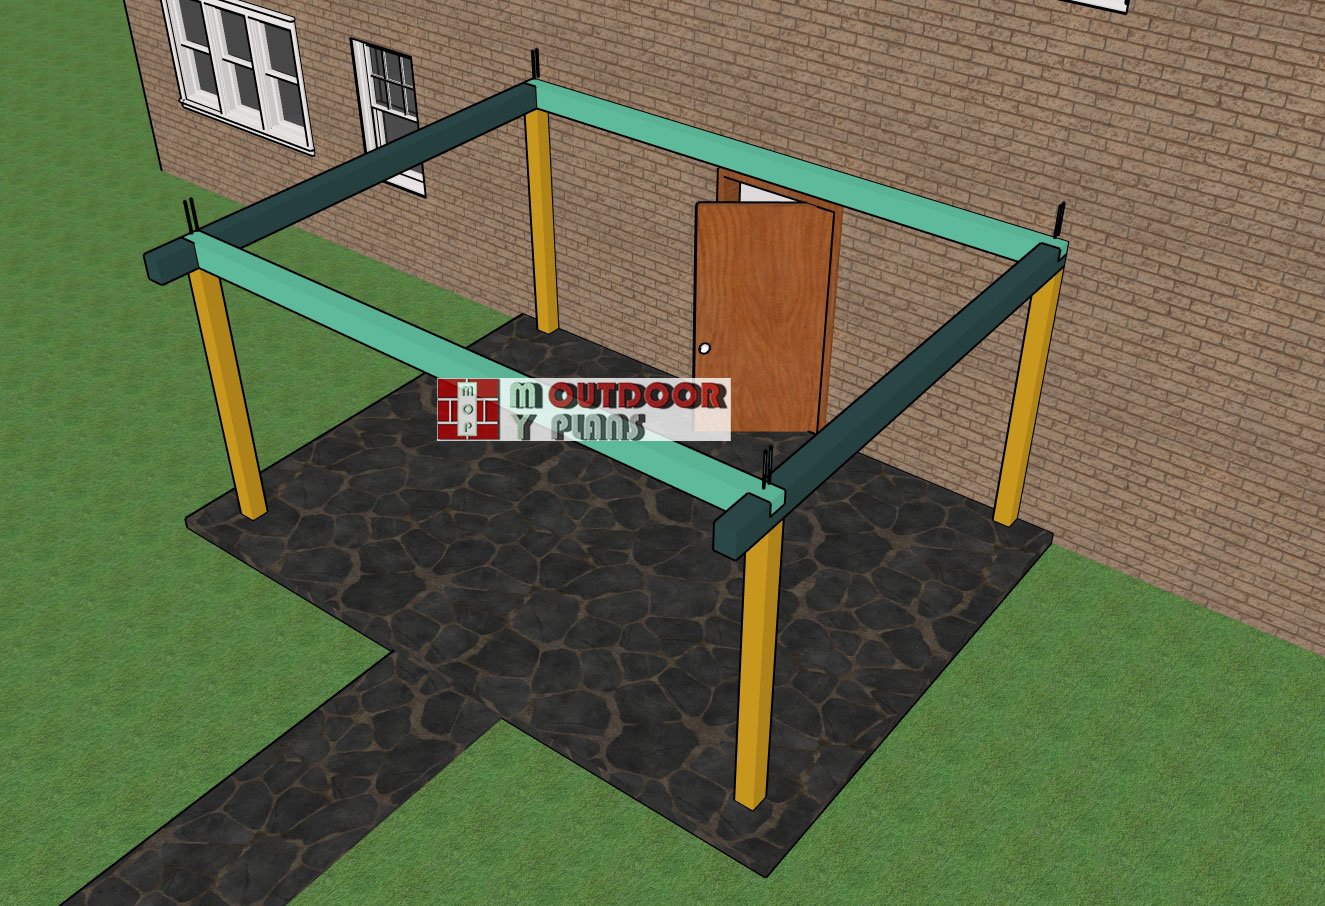
Fitting-the-crossbeams
Next up: the cross-beams. These tie everything together at the top. Just like before, drill pilot holes and secure them with 8″ screws. A quick tip here—double-check that your posts are plumb before locking in the top beams. It makes everything easier down the line and keeps the whole structure nice and square.
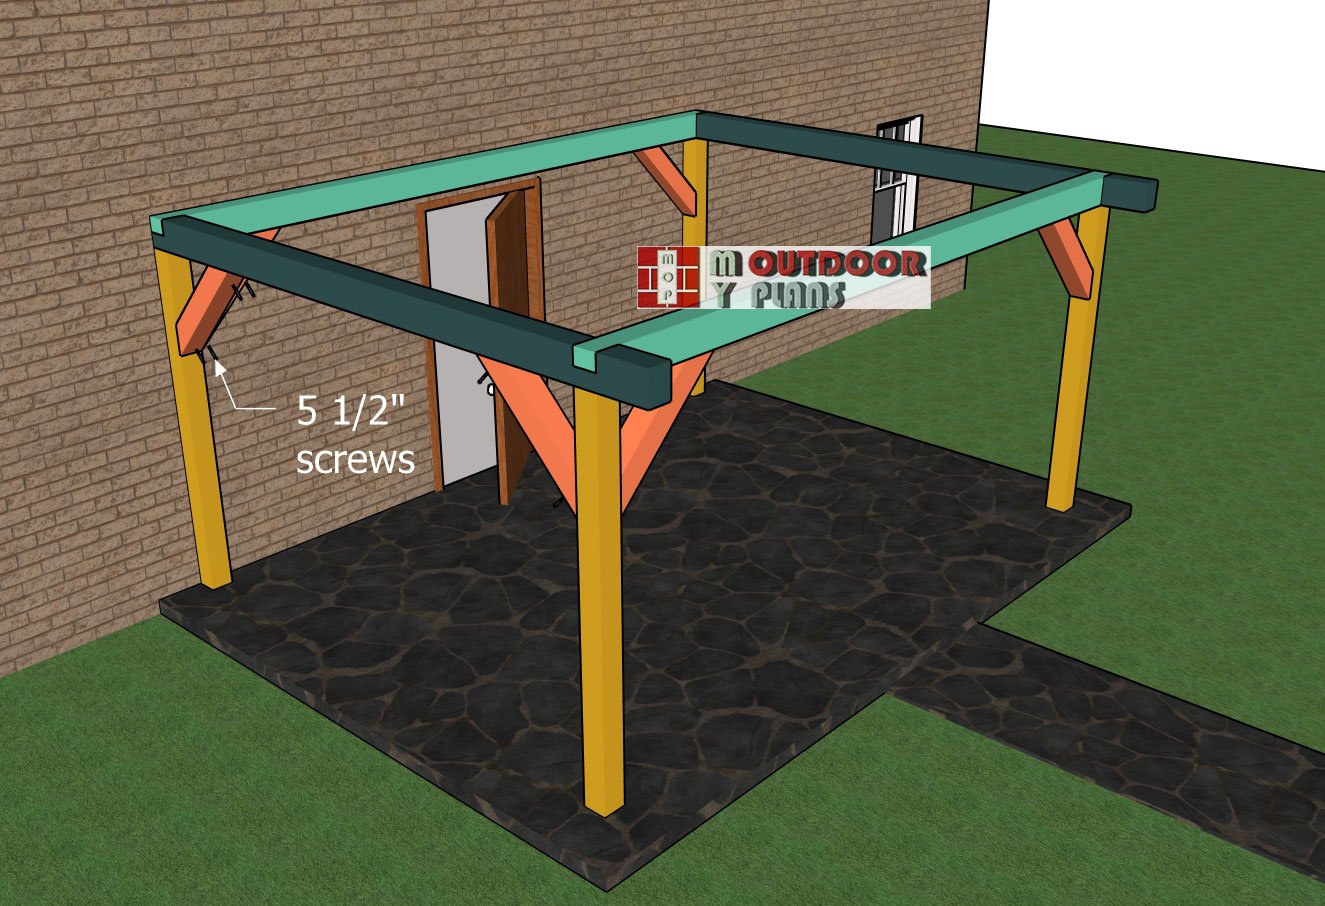
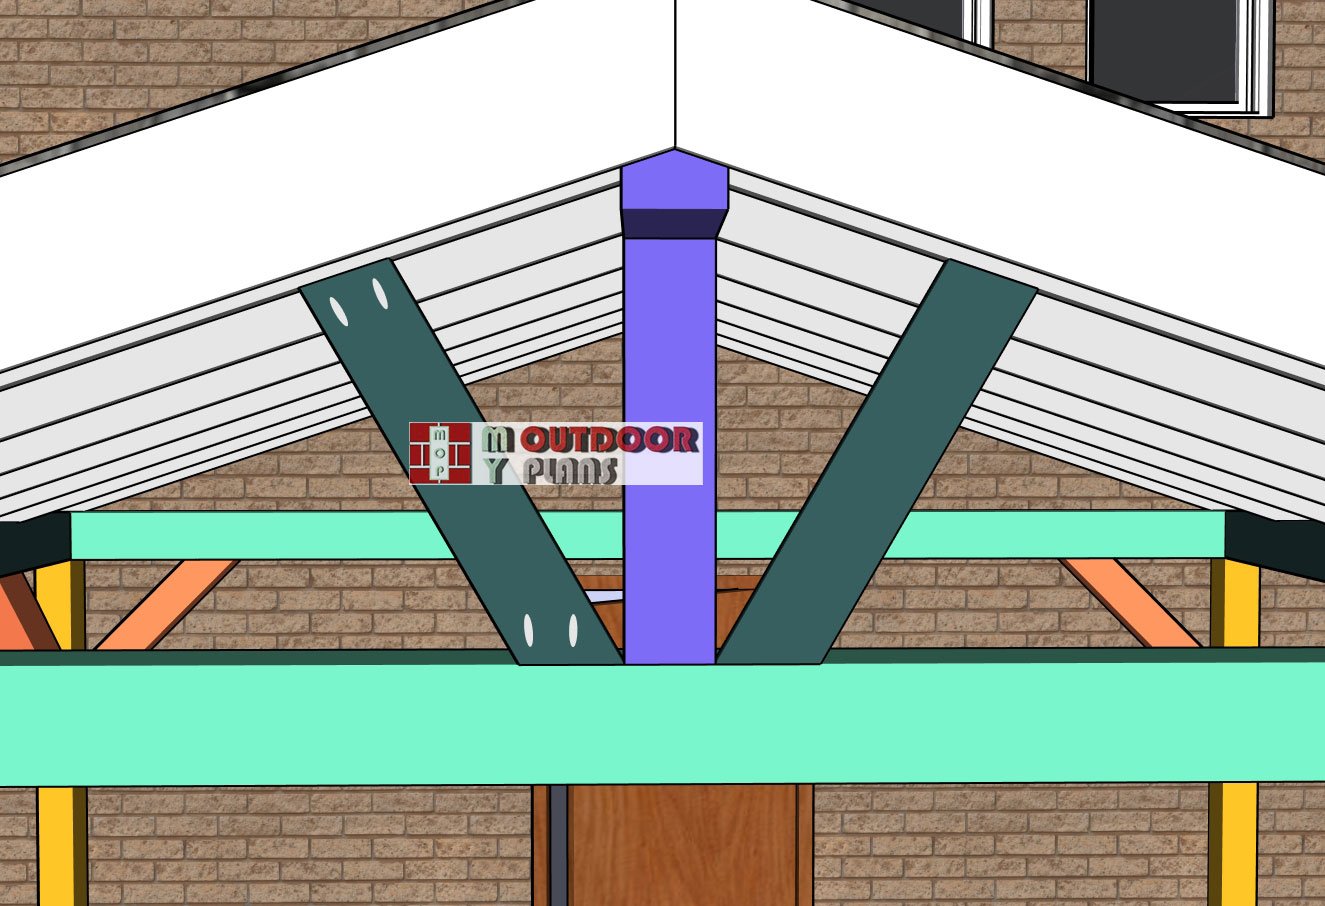
Fitting-the-braces
Let’s add some serious strength to the frame by installing the braces. Cut your braces from 6×6 lumber—these chunky pieces are going to do a great job stiffening up the whole pavilion. Make 45-degree angle cuts on both ends so they fit cleanly between the posts and beams. Once you’ve got them positioned just right, drill pilot holes and drive in 5 1/2″ screws—two at each joint—to lock them in nice and tight. This step might seem small, but it goes a long way in boosting the overall stability of the structure.
STEP 2: Building the gable roof
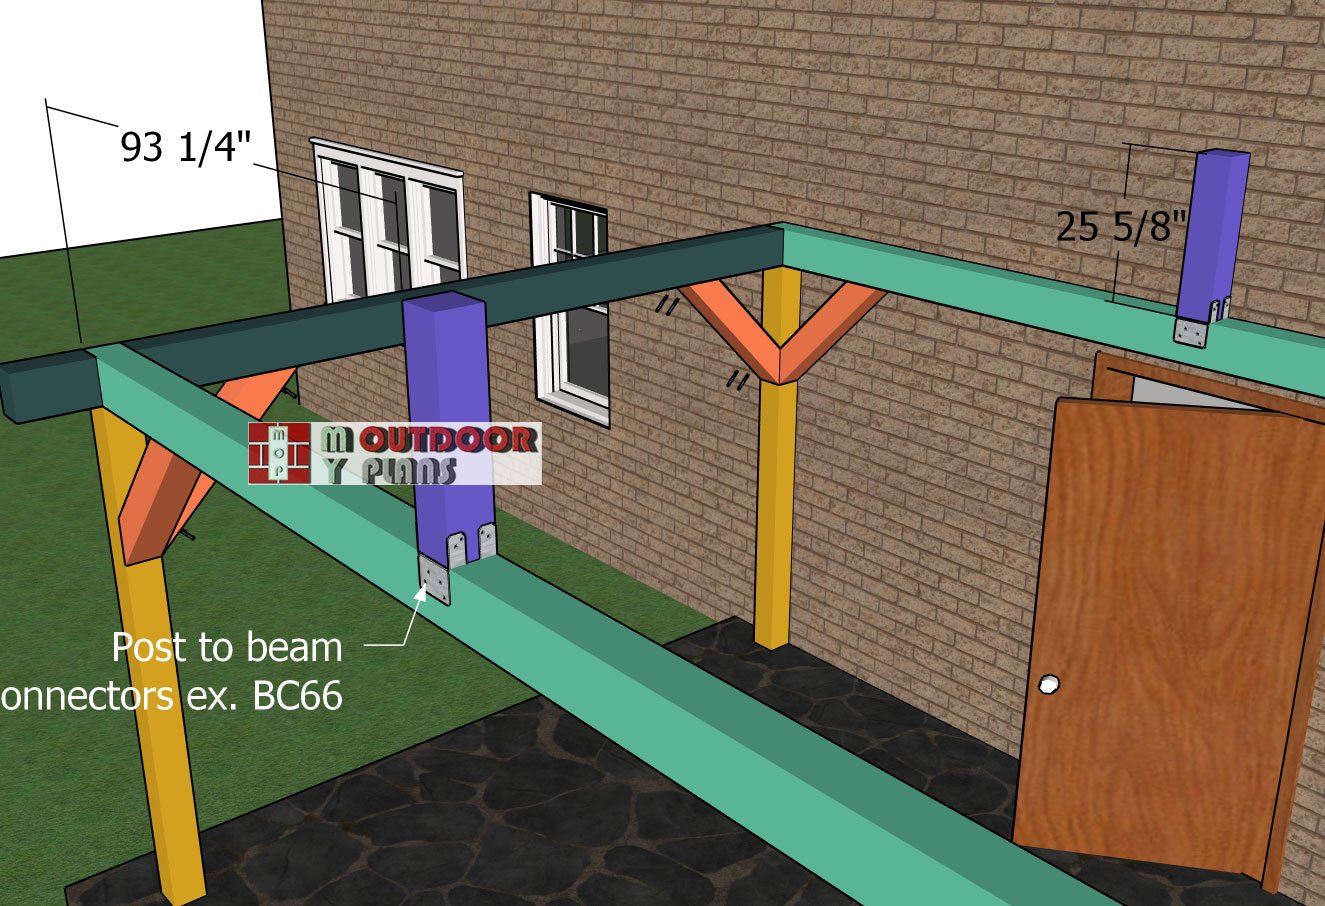
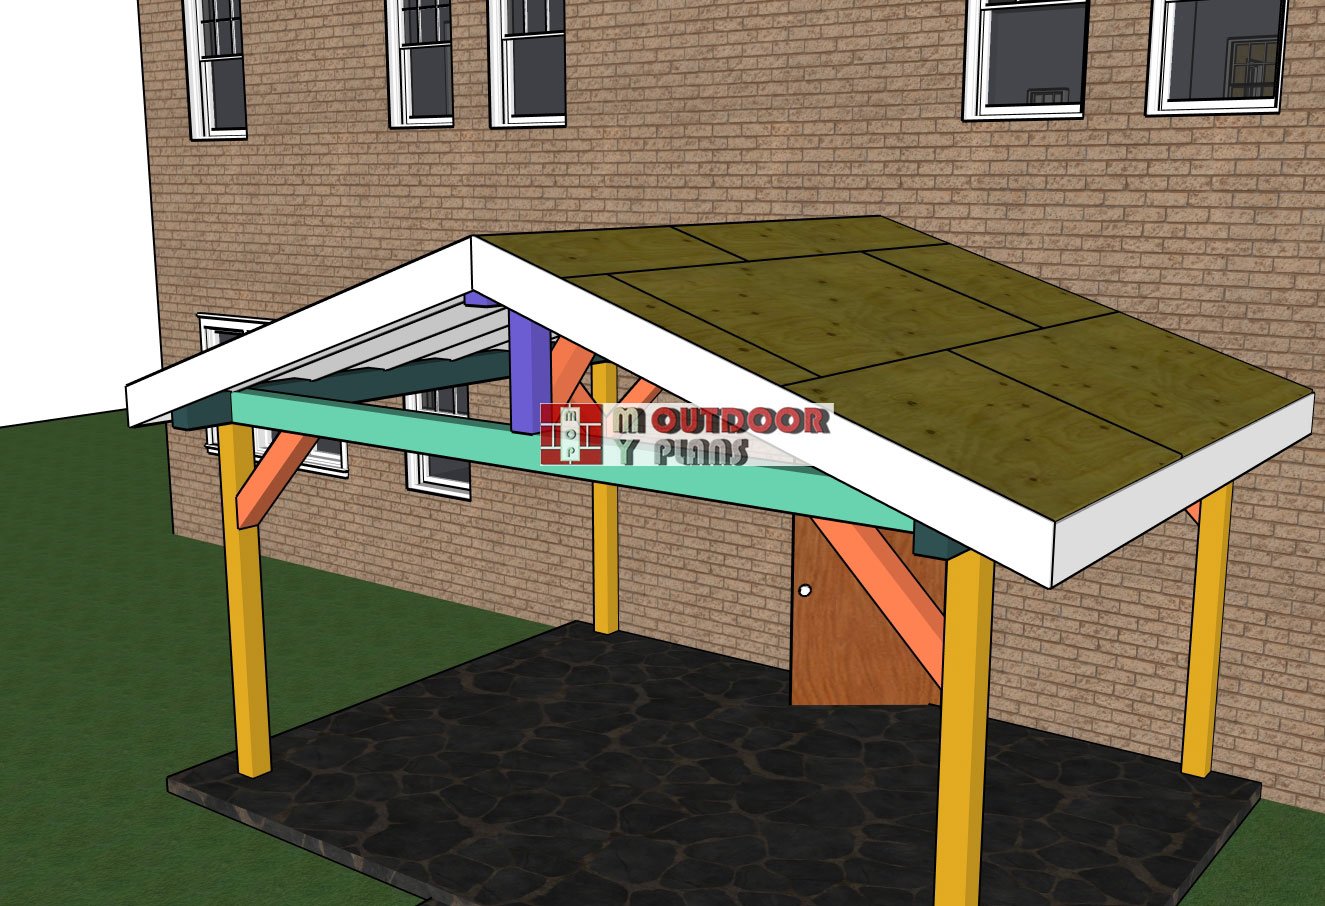
Ridge-beam-supports
Next, let’s get those ridge beam supports in place. Center them right on top of the cross-beams—these are going to carry the main ridge beam, so accuracy matters. Use post-to-beam connectors to make the job easier and more secure. Once you’ve got the supports positioned, check that they’re perfectly plumb using a spirit level. When everything’s lined up straight, drive in 2 1/2″ structural screws through the connectors to lock the supports down tight. This step sets the stage for a strong, level roof.
Attaching-the-ridge-beam
Now it’s time to install the 6×6 ridge beam—the backbone of your roof. Set it on top of the ridge beam supports, making sure you’ve got a 12″ overhang at the front for that nice finished look. Use heavy-duty connectors and 2 1/2″ structural screws to lock everything into place securely. Don’t forget to break out the spirit level and check that the ridge beam is perfectly horizontal before tightening it down. This step is all about setting a solid, straight line for the rafters to follow.
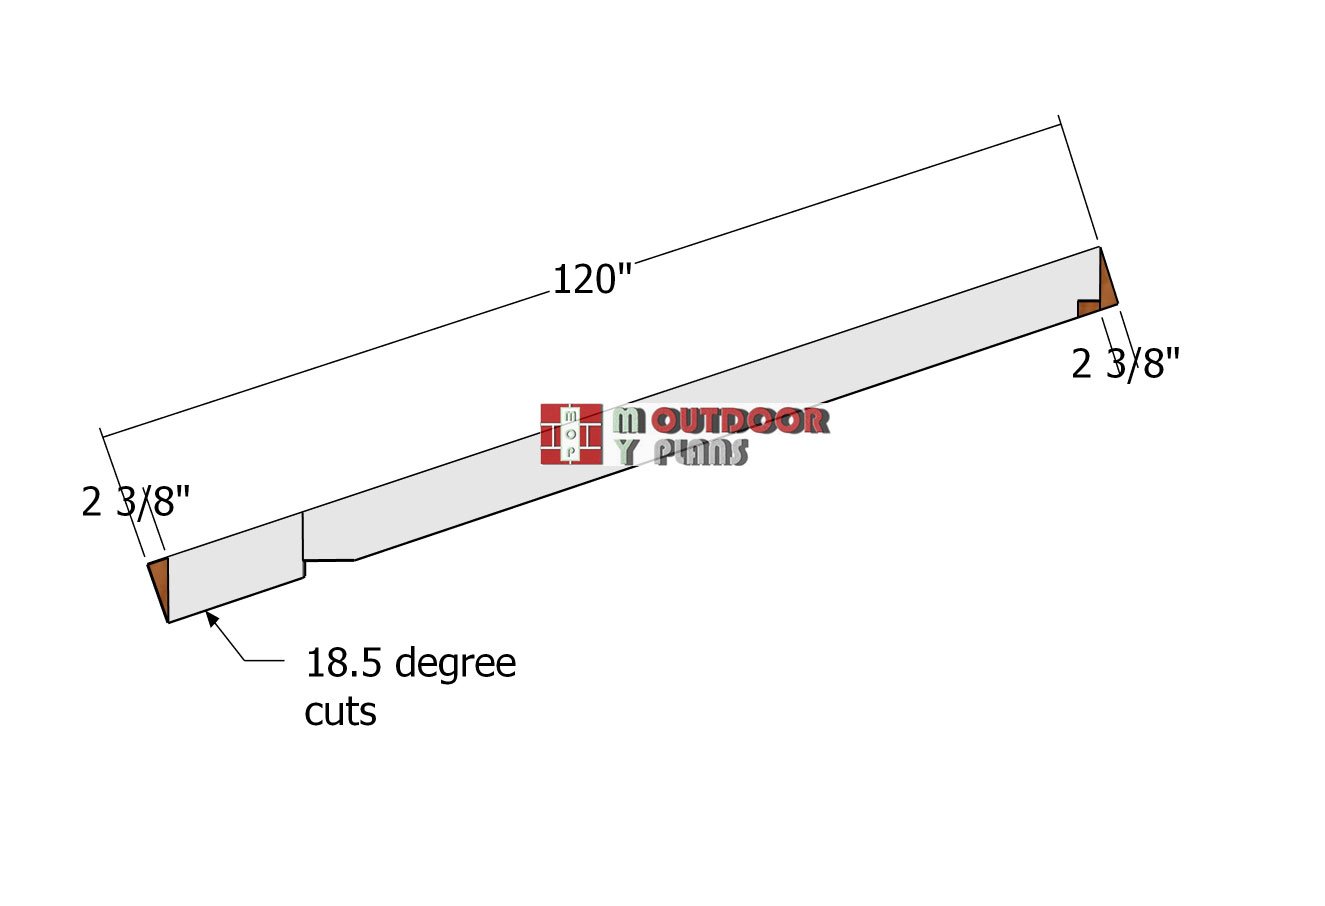
Cutting-the-rafters
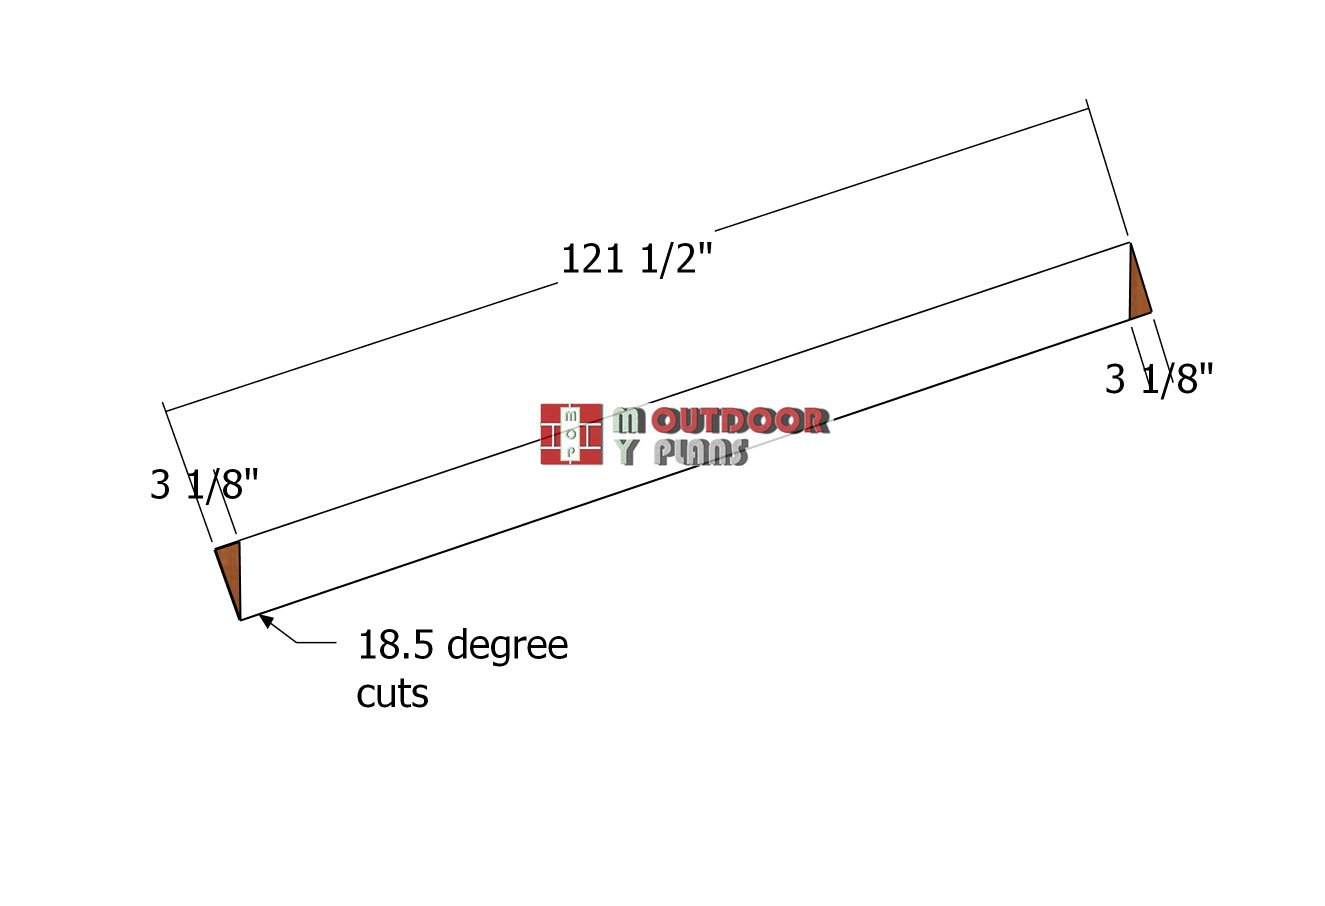
Let’s move on to the rafters. Cut these from 2×8 lumber—they’re strong, sturdy, and perfect for supporting the roof. Start by making a 18.5-degree angle cut on both ends of each rafter so they sit snug against the ridge beam and side beams. Then, mark out your birdsmouth cuts where the rafters will rest on the top beams. A framing square comes in handy here for clean, accurate marks. Once marked, use a circular saw to make the cuts, and finish up any tight corners with a handsaw if needed. Take your time on this step—clean cuts mean a tighter, more stable roof.
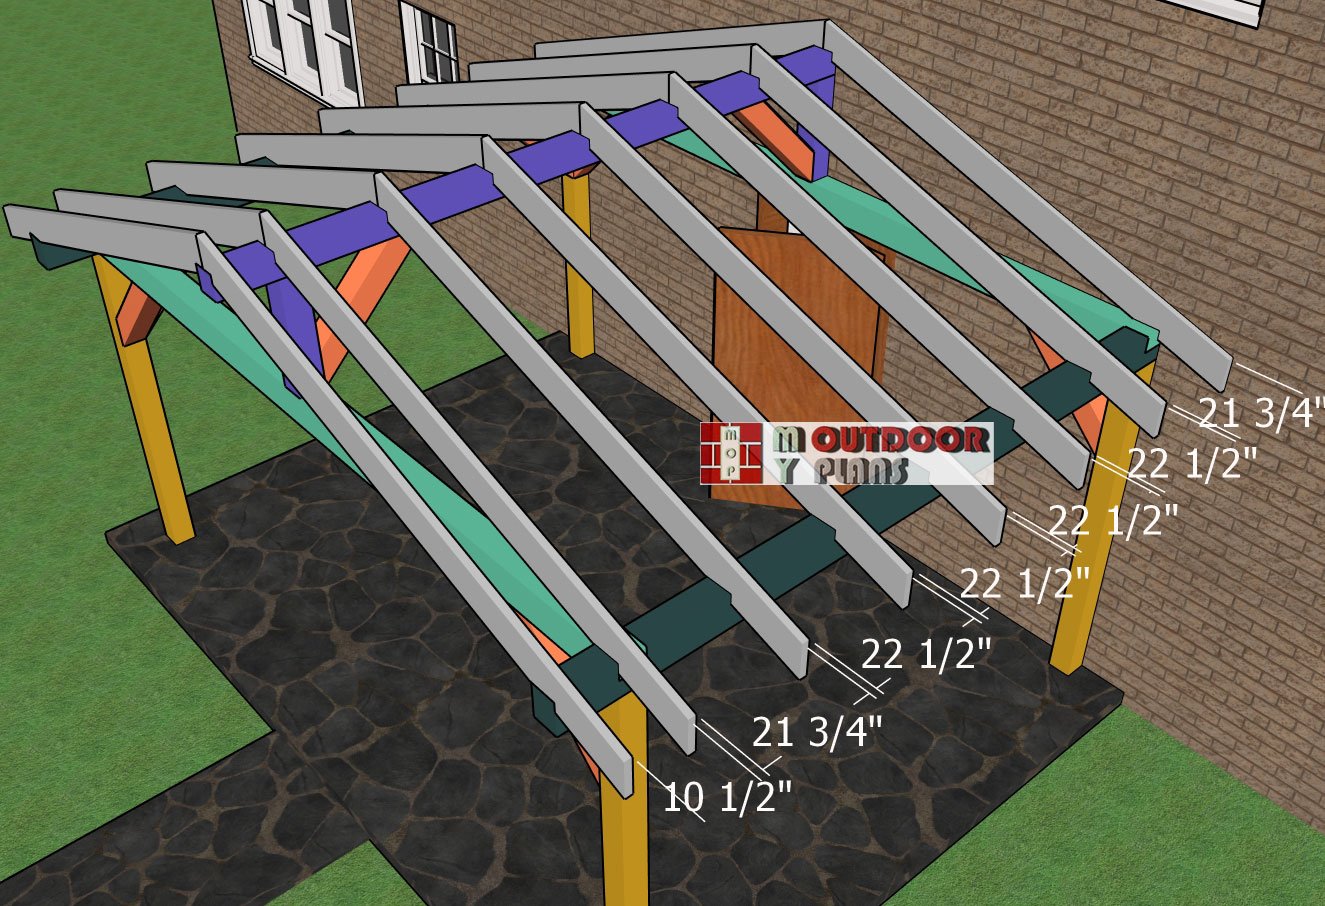
Fitting-the-rafters
Now that the rafters are cut, it’s time to install them and really shape that gable roof. Start at one end and work your way across, spacing the rafters 24″ on center. This spacing gives solid support for the roof without wasting materials.
Use rafter ties to secure each rafter to the top beams—these metal connectors make the whole roof much stronger and help prevent any shifting over time. Lock everything in place with 1 1/2″ structural screws or nails. Make sure each rafter sits snug and square before moving on to the next.
Fitting-the-roof-sheets
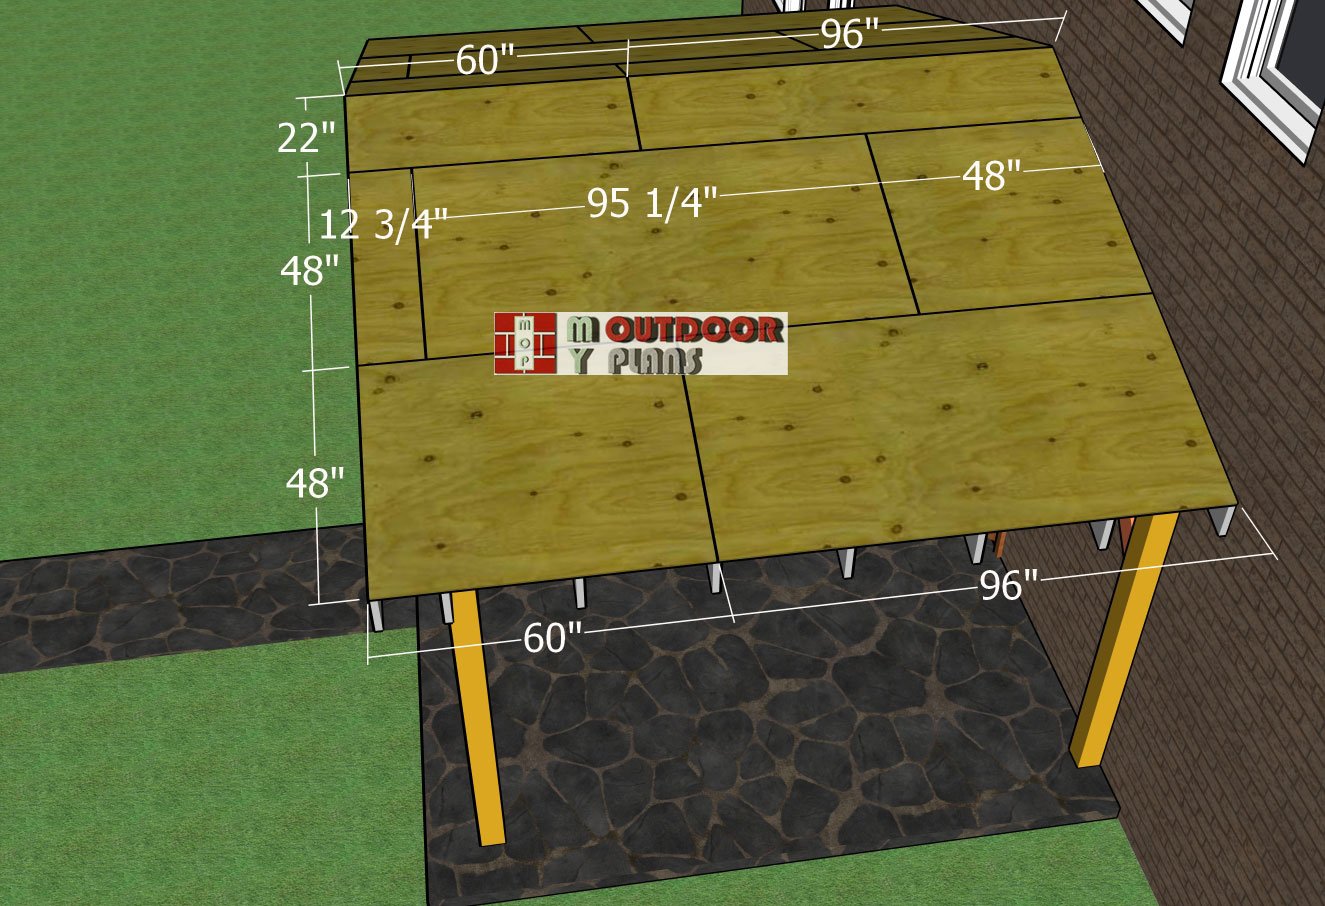
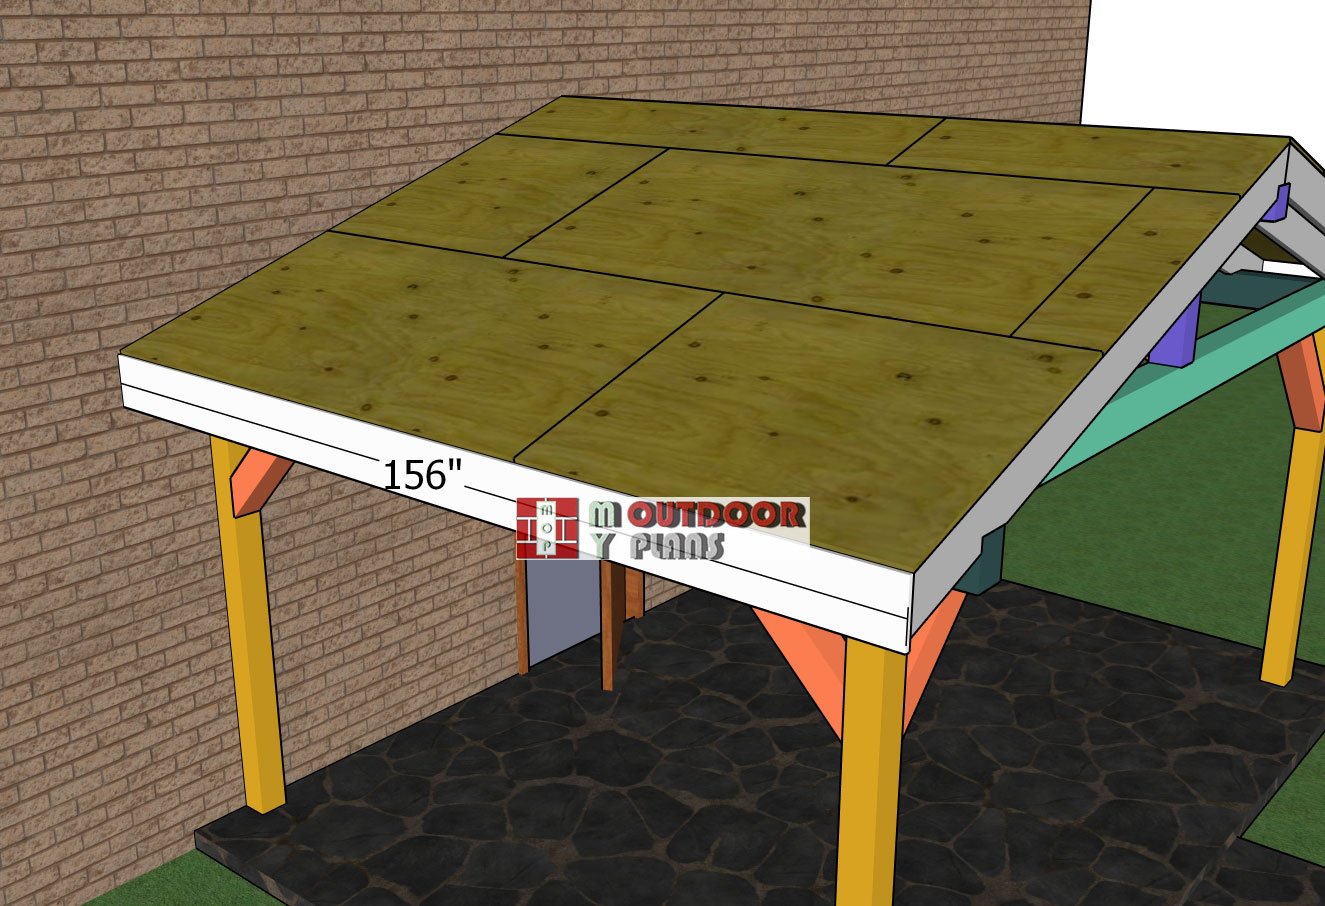
With the rafters up, it’s time to sheet the roof and really bring this pavilion to life. Grab your 3/4″ plywood panels and start laying them perpendicular to the rafters—this gives the roof more strength and helps everything stay square. Begin at the bottom edge and work your way up, staggering the joints like bricks for extra stability.
Secure the plywood with 2 1/2″ wood screws, spacing them about 6 to 8 inches along the edges and every 12 inches in the field. Take your time getting each panel lined up clean and tight—it’s the foundation for everything that goes on top.
Side-roof-trims
Now let’s clean up those roof edges with some trim. Grab your 1×10 boards and attach them to the sides of the pavilion for a nice finished look. Line up the edges so they sit flush with the roof sheathing. Once everything’s aligned, secure the trim with 2″ nails—just enough to hold them tight without splitting the wood. This step gives the pavilion a polished look and also helps protect those exposed plywood edges from the weather.
Gable-end-trims
To finish off the front of the porch roof, it’s time to install the 1×10 trim boards. These give the gable a clean, finished look and help tie the whole structure together visually.
Fitting-the-gable-trims
Start by making 18.5-degree angle cuts on both ends of each trim board so they follow the roof slope nicely. Once they’re cut to fit, line them up at the peak and along the front edge, keeping everything flush and even. Secure the trim with 2″ finish nails, making sure they’re set snug and clean for that polished finish.
Fitting-the-roofing—12×16-pavilion
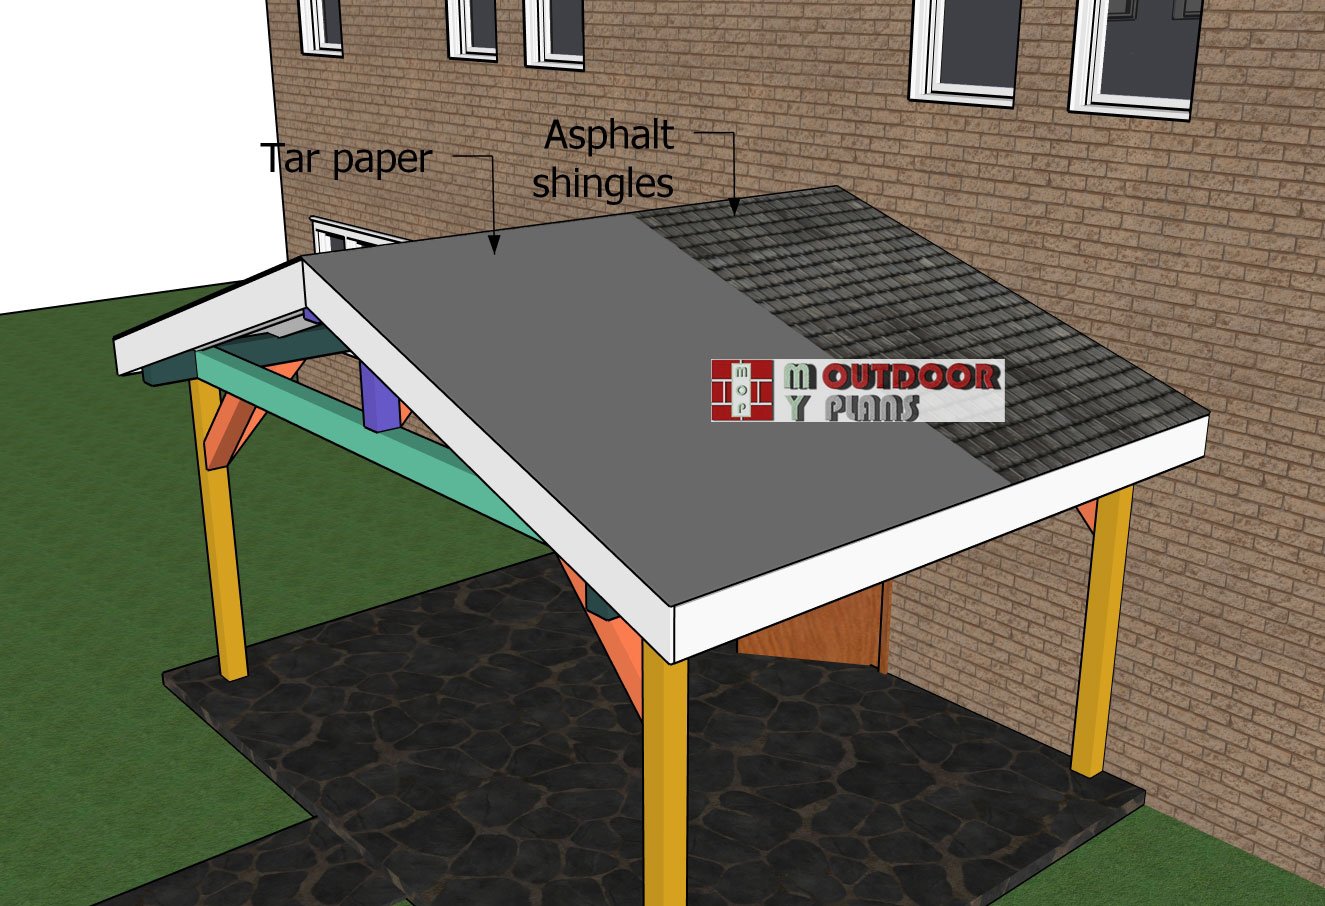
To install asphalt shingles to the new gable pavilion roof, begin by laying an asphalt underlayment over the plywood sheathing, ensuring complete coverage and proper overlapping. Start at the lower edge with a starter strip, securing it with roofing nails. . Lay the first row of shingles along the eaves, aligning the tabs with the starter strip and nailing them down. Continue installing subsequent rows, staggering shingle joints and following the manufacturer’s guidelines for overlap and fastening. Install ridge caps along the peak of the gable roof to provide a finished look and additional protection against water infiltration. Secure the ridge caps with roofing nails or adhesive, following the manufacturer’s instructions.

Gable-trims
If you really want to elevate the look of your pavilion, consider adding 2×6 decorative trim to the front of the roof. This adds a bold, custom touch and frames the gable beautifully. Cut both ends of the trim at angles to match the roof pitch so everything lines up cleanly at the peak. Before installing, drill pocket holes on the back side of the trim to keep your fasteners hidden and the face looking clean. Once everything’s dry fit and looking good, attach the trim with pocket hole screws and a bit of wood glue for a rock-solid hold.
Front-roof-trims
Go ahead and fit the 2×6 trims to the front of the porch roof. These will give the gable a bold, finished appearance. Line up the edges carefully so everything sits flush along the roofline. Make sure to orient the pocket holes toward the interior side of the structure—that way, they’ll stay hidden and won’t distract from the clean front face. Once everything is aligned, secure the trim in place using pocket hole screws for a strong, seamless connection.
STEP 3: Finishing touches
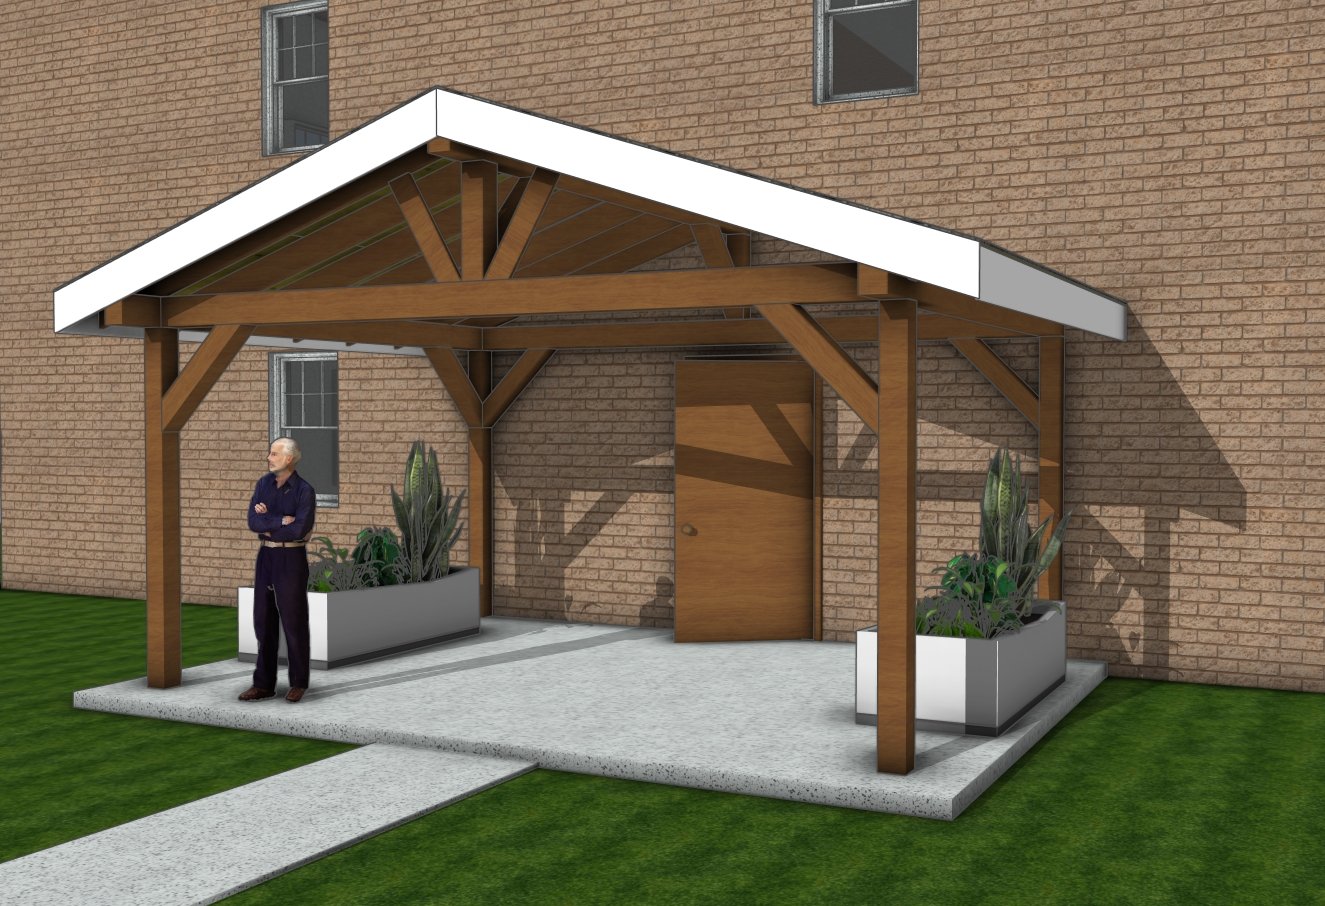
How to build a 16×12 attached pavilion
With all the structure in place, let’s bring this build home with the finishing details. Start by filling any visible nail or screw holes with exterior-grade wood putty. Let it dry completely, then come back with a sander and smooth everything out so your trim and posts have a clean, seamless look. Take your time here—good prep work makes the final finish really pop. Next up is paint or stain.
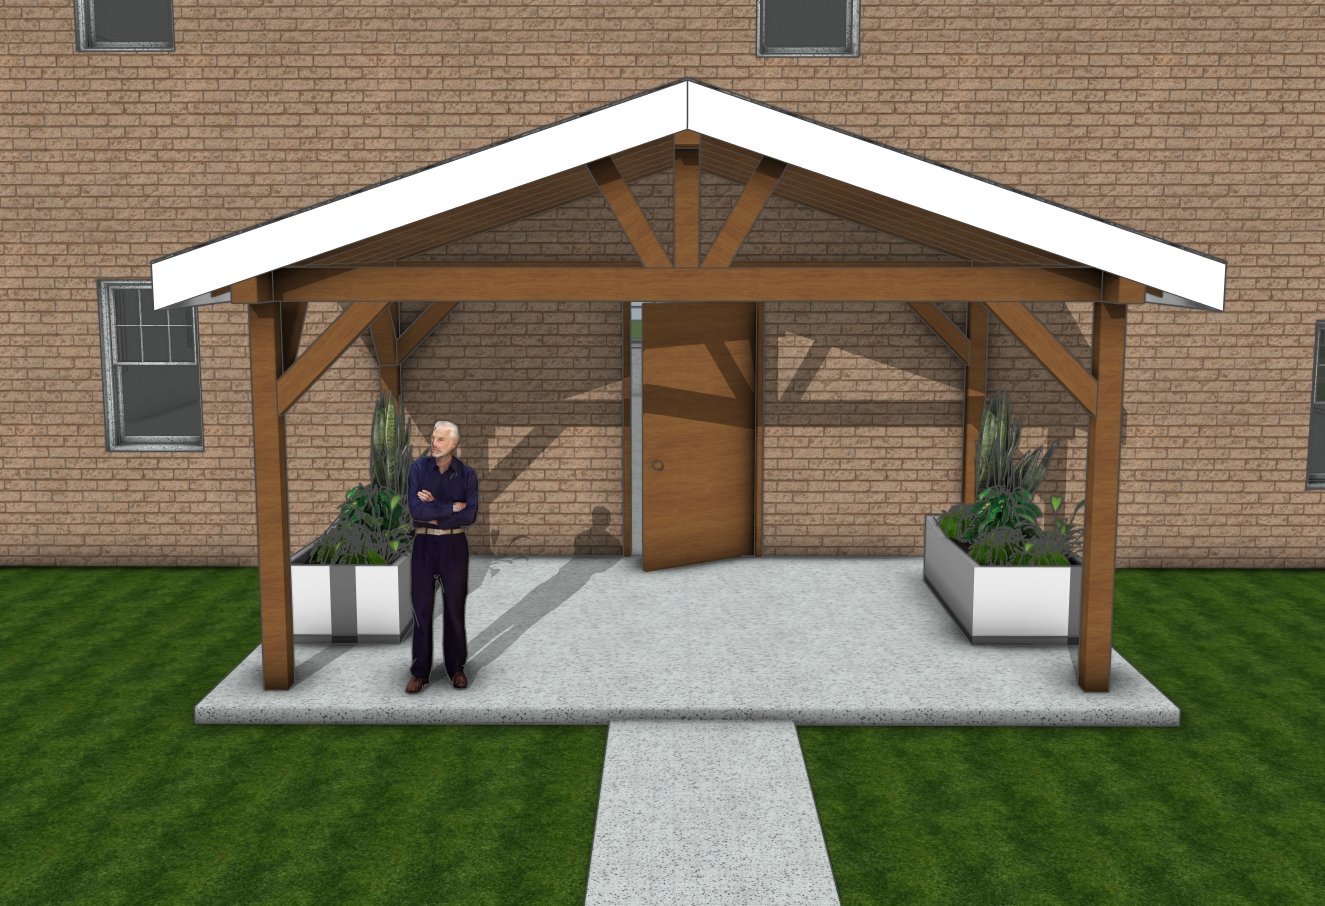
Gable porch roof 16×12
If you’re going for a crisp, classic look, use a high-quality exterior paint in your preferred color. For a more natural vibe, a weatherproof wood stain will highlight the grain and add warmth. Don’t forget to prime first if you’re painting! Apply two coats and seal any exposed ends or joints to protect the wood from the elements. This step is what makes your hard work shine and helps it stand up to years of weather.
Front-view
Now for the fun part—adding character! Hang a few string lights along the ridge or under the eaves for soft evening glow. You can mount outdoor sconces to the posts or add solar lights for a low-maintenance option. Hanging planters or railing-mounted flower boxes add a splash of color and life. Want even more function? Add hooks for hanging tools or garden gear, or even mount a porch swing if you’ve got the space and support. These little touches turn a solid build into a welcoming outdoor space you’ll love to show off.
Top Tip: If you want to get PREMIUM PLANS for this project, in a PDF format, please press GET PDF PLANS button bellow. If you want the free version of the plans, please read the blog FAQs. Thank you for your support.

This woodworking project was about 12×16 gable attached pavilion plans. If you want to see more outdoor plans, we recommend you to check out the rest of our step by step projects.