This step by step diy project is about 12×16 pavilion with hip roof plans. I have designed this pavilion so you can create a nice shaded area for the backyard where you can hang out with friends and even serve dinner. This would make for the perfect addition, next to a bbq or pizza oven. Make sure you read the local building codes before starting the project, so you get aware of the legal requirements and make the necessarily adjustments. Take a look over the rest of my woodworking plans, if you want to get more building inspiration.
When buying the lumber, you should select the planks with great care, making sure they are straight and without any visible flaws (cracks, knots, twists, decay). Investing in cedar or other weather resistant lumber is a good idea, as it will pay off on the long run. Use a spirit level to plumb and align the components, before inserting the galvanized screws, otherwise the project won’t have a symmetrical look. If you have all the materials and tools required for the project, you could get the job done in about a day. Premium Plans for this project available in the Shop.
Projects made from these plans
12×16 Pavilion with Hip Roof Plans
Building a pavilion with a hip roof
Cut & Shopping Lists
- A – 6 pieces of 6×6 lumber – 8′ long POSTS
- B – 2 pieces of 6×6 lumber – 16′ long, 4 pieces – 12′ long SUPPORT BEAMS
- C – 12 piece of 6×6 lumber – 36″ long BRACES
- D – 1 piece of 2×6 lumber – 48 1/2″ long, 2 pieces – 32″ long, 2 pieces – 24″ long RIDGE BEAM
- 6 pieces of 6×6 lumber – 8′
- 2 pieces of 6×6 lumber – 16′
- 7 pieces of 6×6 lumber – 12′
- 2 pieces of 2×6 lumber – 8′
- 8″ screws
- 6″ screws
- 3 1/2″ screws
- 6 pieces of 6×6 post anchor
- wood glue, stain/paint
- wood filler
- post anchors
- beam to post connectors
- structural screws for connectors
- strong tie T
Tools
![]() Hammer, Tape measure, Framing square, Level
Hammer, Tape measure, Framing square, Level
![]() Miter saw, Drill machinery, Screwdriver, Sander
Miter saw, Drill machinery, Screwdriver, Sander
![]() Concrete mixer, Post hole digger
Concrete mixer, Post hole digger
Time
![]() One weekend
One weekend
Related
- PART 1: 12×16 Hip Roof Pavilion Plans
- PART 2: 12×16 Pavilion Hip Roof Plans
It’s that easy to build a hip roof pavilion!
12×16 Hip Roof Pavilion Plans
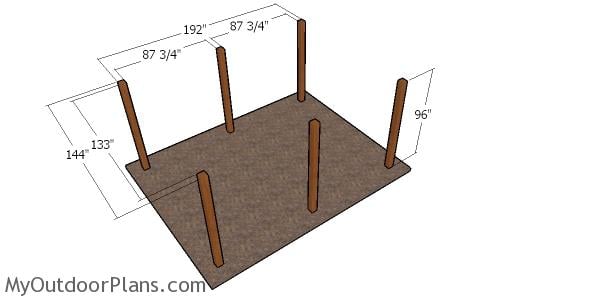
Laying out the posts for the pavilion
The first step of the project is to lay out the pavilion posts. Build batter boards and use string to layout everything in a professional manner. Apply the 3-4-5 rule to every corner and make sure the diagonal are equal, otherwise the corners won’t be square. Select the location for the carport with attention, making sure it complies with the local codes. Get a building permit if needed. Level the surface with attention, removing the vegetation layer.
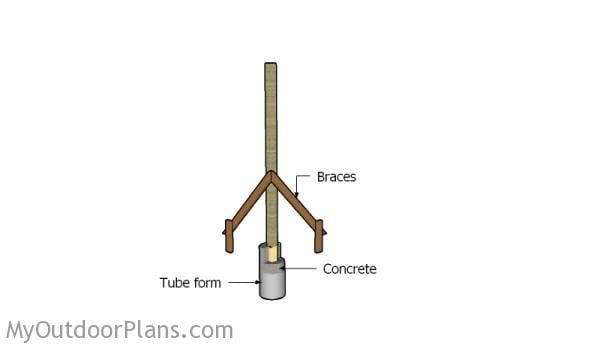
Setting the posts in concrete
You need to set the posts in concrete (about 3-6′ deep – make sure you read the local building codes for accurate information) or use anchors. Use a post hole digger to make the holes. Pour a 2″ layer of concrete on the bottom of the holes so you level them. Fit the tube forms and then the 6×6 posts / fit the anchors. Use a spirit level to make sure the posts are plumb and then secure them temporarily into place with braces. Fill the tubes with concrete and let it dry out as shown on the bags. Make sure the top of the posts are level.
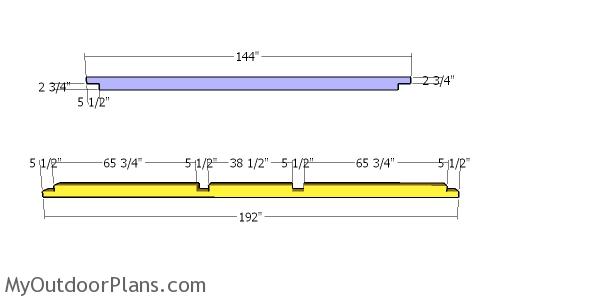
Pavilion top rails
Use 6×6 lumber for the plates that go on top of the posts. Use a circular saw to make the notches, so you can join them together. Make parallel cuts inside the marked areas and then remove the excess with a hammer and a chisel.
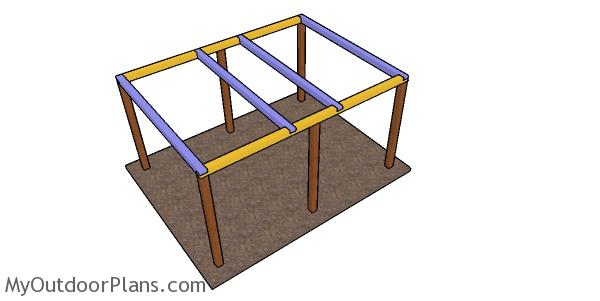
Fitting the top plates – hip roof pavilion
Fit the 6×6 plates to the sides of the garden pavilion. Align the edges with attention and make sure the corners are square. Drill pilot holes through the plates and insert 8″ screws into the top of the posts.
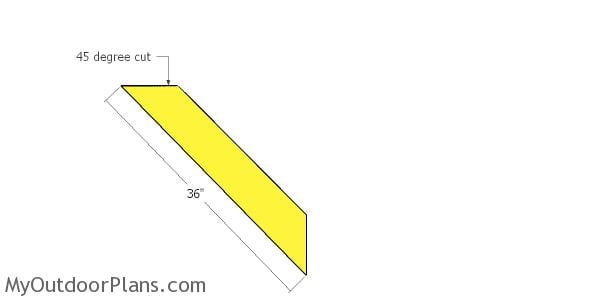
Braces for carport with hip roof
Use 6×6 lumber for the braces. Make 45 degree cuts to both ends of the braces, using a miter saw.
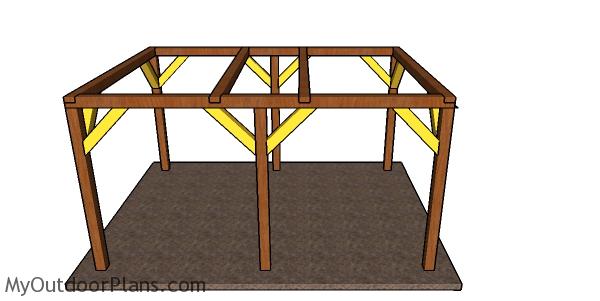
Fitting the braces – 12×16 pavilion plans
Fit the braces to the frame of the pavilion, as shown in the diagram. Plumb the posts with a spirit level and make sure the corners are square. Fit the braces into place, drill pilot holes and insert 4 1/2″ screws to lock them into place tightly.
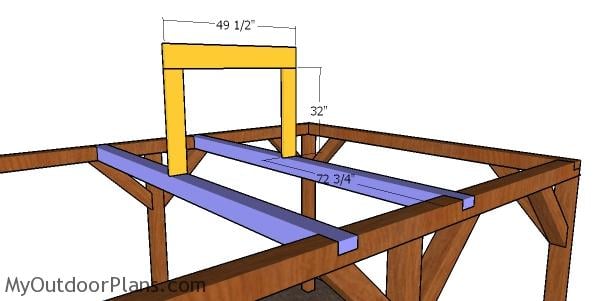
Fitting the ridge beam – hip roof pavilion
Use 2×6 lumber for the ridge beam and for the supports. Drill pocket holes at both ends of the supports and center them to the plates. Use 2 1/2″ screws to lock them into place tightly. Make sure the supports are plumb before attaching the ridge beam. Insert 2 1/2″ screws to secure the beam into place tightly.
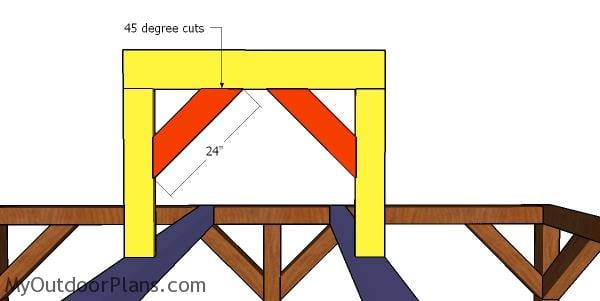
Fitting the braces to the ridge beam – pavilion with hip roof
Use 2×6 lumber for the braces. Make 45 degree cuts to both ends of the braces, drill pocket holes and lock them into place with 2 1/2″ screws.
How to build a 12×16 pavilion
I recommend you to take a look over PART 2 of the project, where I show you how to build the hip roof for the outdoor pavilion.
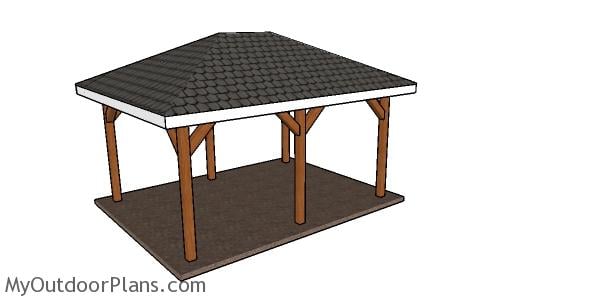
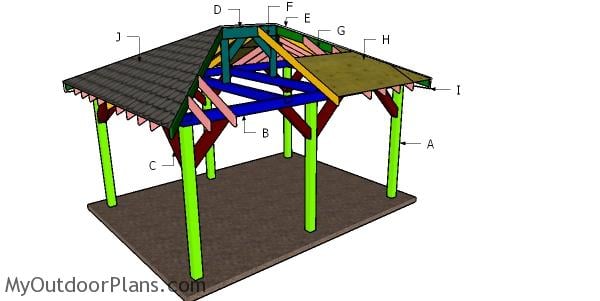
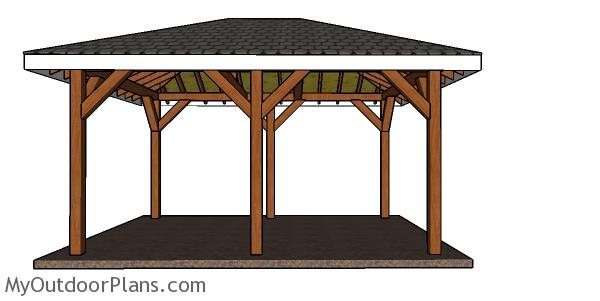
12×16 pavilion with hip roof plans
This garden pavilion with a hip roof has a footprint of 12×16. The roof structure is strong enough for winds and snow, but I recommend you to read the local codes and make modifications, if necessary. Premium Plans for this project available in the Shop.
If you want to get PREMIUM PLANS for this project, in a PDF format, please press GET PDF PLANS button bellow. Thank you for the support.

This woodworking project was about 12×16 hip roof pavilion plans. If you want to see more outdoor plans, check out the rest of our step by step projects and follow the instructions to obtain a professional result.

EXPLORE MORE IDEAS FOR:
 |
 |
 |
 |
19 comments
I can’t find Part 2 of this project. It looks perfect for the area near my pool. Can you point me toward the roof plan please.
I’ve updated the link.
What did you use on the corners for beam-to-post? Where did you use the Strong-Tie T?
For the corner posts you use post to beam connector. For the middle posts you use the T strong tie.
I apologize for the questions. The link you have for the post to beam connector doesn’t seem to work for corners. Am I looking at it wrong? Just to make sure I stay true to your plans.
You set the base plate to the posts and then lay the perpendicular plates. That will allow you to install the connectors. However, you can just use screws, if you find that too complicated.
Can you tell me how to scale down your plans to suit my needs. I would love it if you can help.
I want to purchase the plans for a 12×16 hip roof Pavilion. Are they available? All I found was 12×16 gable roof
No Premium Plans for this yet.
Can this plan only use 4 posts as the 10×16 does?
Hello,
I really enjoy looking at your plans and executing some of them…I’m trying to get a permit in my town in NJ to erect the 12×16, 6 post hip roof pavilion and am getting some resistance from the construction office.
They are stating that the 6×6 beams “girders” as they call it on the 12 ft side aren’t up to NJ code and should be triple 2x12s.
That seems unnecessary to me as I view the design as the weight of the roof being a uniformly dispersed one vs. concentrated (am I interpreting this correctly?)
I referred to a book I have, “Dot-it-yourself Housebuilding :the complete handbook” and it went into depth about beam strength and stiffness for beams and joists over spans and realize this is not always an easy thing to figure out, however every project is different and shouldn’t have a one formula applied to it just because it’s in the code book as a support beam.
If you have the time and have any advice for dealing with such matters (aka code inspectors) or a engineering formula that would prove this design is in fact strong and should be considered up to code I would greatly appreciate it. I’m having a hard time finding another design/size that I like as much as this one and I feel like making those changes would alter the rest of the roof (or is it a simple swap?)
I have a feeling the inspector will just say “refer to the code chart”, but worth a try before I give in to spending more money/wasting materials.
Thank you for your designs, and hope to hear your opinion.
-Emilia
You need to follow your building local codes. You are not going to change them. There exist for a reason, even they might seem too much, at times.
Agreed, we worked it out. thanks.
What would be the requirements of the frame in order to only do 4 posts instead of 6? I’m assuming 6×6 would not cut it for the 16 ft length with that amount of weight.
I have in the Shop plans for a 12×16 pavilion with hip roof and only 4 posts
Hey keonep,
I’m getting ready to build the 12 x 16 hip roof pavilion utilizing only 4 posts. My engineer told for the 16ft span I would need a 5-1/4 x 13-3/4 pressure treated glulam engineered beam to meet my local code and load calculations. I will also have to add hurricane ties to my rafters as well as collar ties. Also my posts will be anchored to piers that are 30 inches deep with a 24″ footer as I live in Florida and have to meet 130mph wind zone compliance. So just check with your local code office and an engineer.
Other than my hurricane compliance additions for Florida the engineer said the plans are good to go structurally as posted by Ovidiu.
Would I be able to use 2 6x6x8 instead of one 6x6x16ft for the support beams?
Yes
How far out are the eaves and how much of a drop is it from the top plate? Trying to match the hight up with the house. I also bought the premium plans but they don’t say either.