This step by step diy woodworking project is about a 16×16 pavilion roof plans. This article features detailed instructions for building the gable roof for a 16×16 outdoor shelter. The roof has a 30 degree slope which is ideal for any area you live in. Check out PART 1 of the project to learn how to frame the pavilion. Take a look over the rest of our woodworking plans, if you want to get more building inspiration.
When buying the lumber, you should select the planks with great care, making sure they are straight and without any visible flaws (cracks, knots, twists, decay). Investing in cedar or other weather resistant lumber is a good idea, as it will pay off on the long run. Use a spirit level to plumb and align the components, before inserting the galvanized screws, otherwise the project won’t have a symmetrical look. If you have all the materials and tools required for the project, you could get the job done in about a day. See all my Premium Plans HERE.
Projects made from these plans
16×16 Pavilion Roof Plans
Building-a-16×16-pavilion
Cut & Shopping Lists
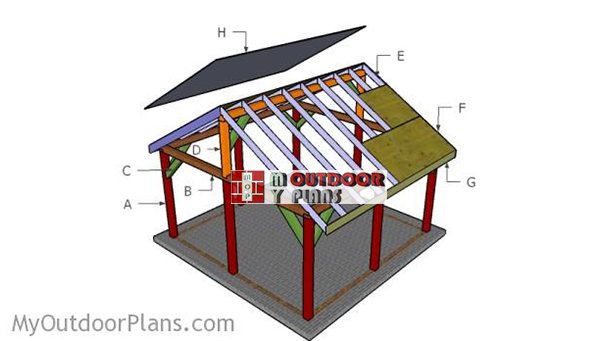
- E – 18 pieces of 2×6 lumber – 133 1/4″ long RAFTERS
- F – 6 pieces of 3/4″ plywood – 48″x96″ long, 8 pieces – 48″x48″ long, 4 pieces – 34 1/2″x96″ long ROOF
- G – 2 pieces of 1×8 lumber – 192″ long, 4 pieces – 135″ long TRIMS
- H – 400 sq ft of tar paper, 400 sq ft asphalt shingles ROOFING
- 18 pieces of 2×6 lumber – 12′
- 4 pieces of 1×8 lumber – 12′
- 2 pieces of 1×8 lumber – 16′
- 12 pieces of 3/4″ plywood – 4’x8′
- 36 pieces of rafter ties
- 500 pieces of 1 5/8″ screws
- 100 pieces of 2″ brad nails
- 400 sq ft of tar paper, 400 sq ft asphalt shingles
- wood glue, stain/paint
Tools
![]() Hammer, Tape measure, Framing square, Level
Hammer, Tape measure, Framing square, Level
![]() Miter saw, Drill machinery, Screwdriver, Sander
Miter saw, Drill machinery, Screwdriver, Sander
Time
Related
- PART 1: 16×16 Pavilion Plans
- PART 2: 16×16 Pavilion Roof Plans
How to build a pavilion roof
Building-the-rafters
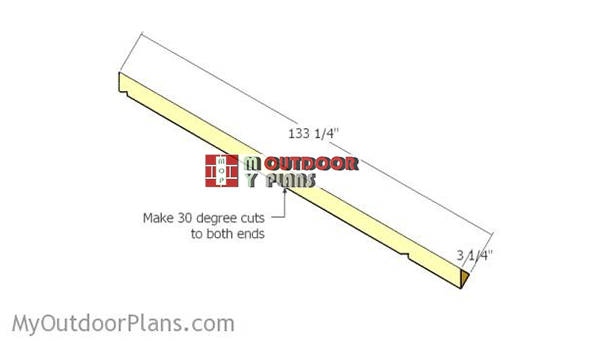
The first step of the project is to build the rafters for the roof using 2×6 beams. As you can see in the plans, you need to cut both ends of the beams at 60 degrees.

Bottom notch
Next, you need to make a notch to the bottom of the rafters, so that they can fit into place easily. Mark the cut lines with attention and get the job done with a saw. Smooth the edges with sandpaper.
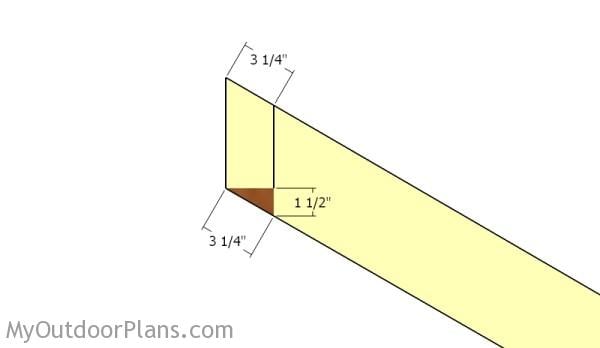
Top notch
Next, you need to make a notch to the top of the rafters, as shown in the diagram. The notch will help you fit the rafters to the top ridge easily.
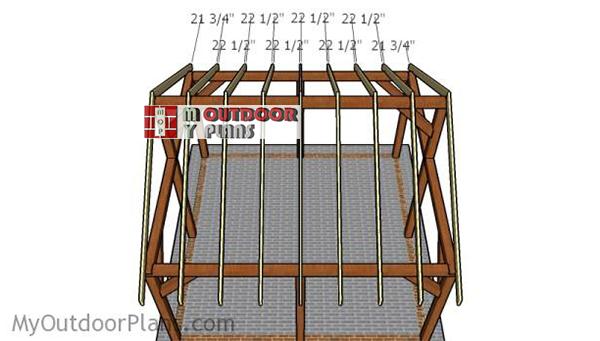
Fitting-the-rafters
Attach the rafters to the top plates of the pavilion, at one end, and to the top ridge, at the other end. Make sure you space the rafters as shown in the diagram, otherwise the roofing sheets won’t fit properly. Use can use framing nails to lock the rafters into place, but the ideal method would be to use ties.
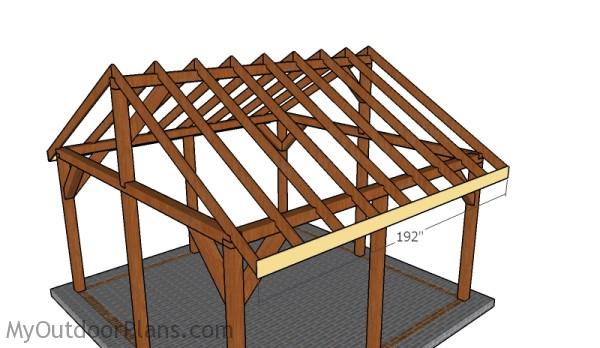
Fitting the trims to the rafters
Attach the 1×8 trims to the ends of the rafters, as shown in the plans. Align the trims with attention and secure them into place with 2″ brad nails.
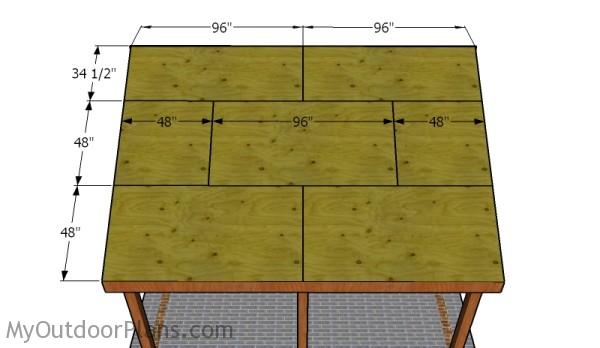
Fitting the roofing sheets
Use 3/4″ plywood sheets for the roofing. Lay the sheets to the rafters following the pattern shown in the plans. Use 1 5/8″ screws to lock the sheets to the rafters. Leave no gaps between the sheets for a professional result.
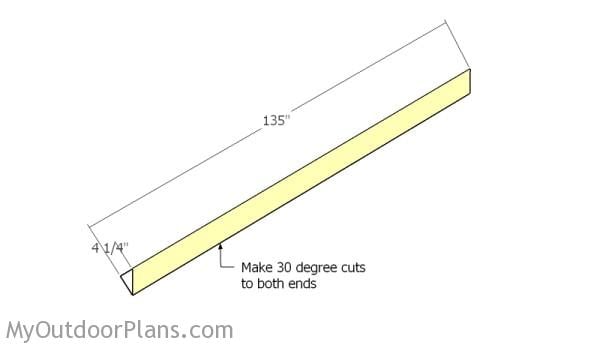
Building the roofing trims
Build the trims for the front and back gable ends of the pavilion from 1×8 lumber. Cut both ends of the trims at 60 degrees.
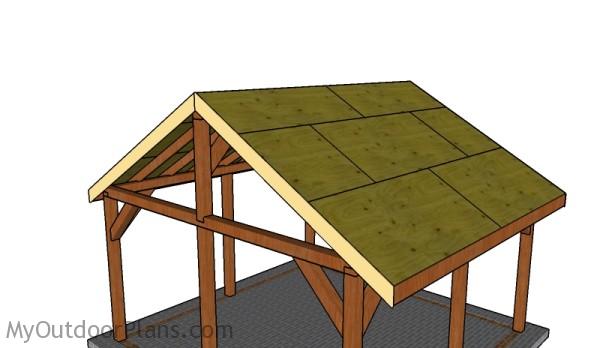
Fitting the roofing trims
Fit the trims to the pavilion and lock them into place with 2″ brad nails.
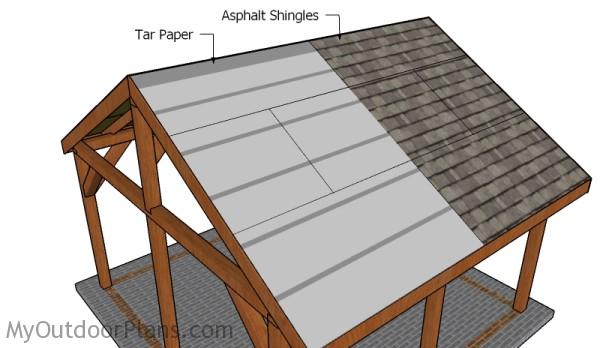
Fitting the roofing
Cover the roof of the shed with roofing felt, making sure the strips overlap at least 2″. Secure the tar paper to the plywood sheets with roofing staples. In addition, cut a 12″ piece for the top ridge. Fit the side drip edges over the roofing felt, while the bottom drip edges should be fit under.
Start the first course of shingles with a full tab, the second with 2 1/2 tabs, the third with 2 tabs, the forth with 1 1/2 tabs, the fifth with 1 tab, the sixth with half tab and the seventh with a 3 tabs.
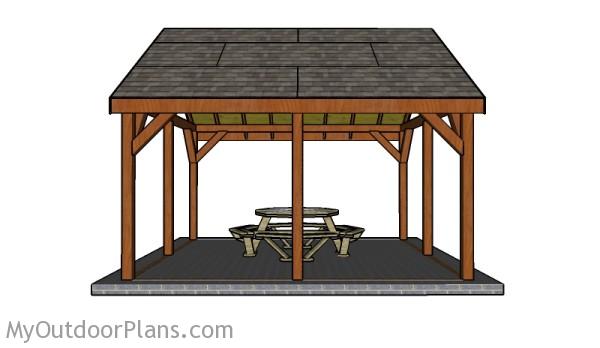
Pincnic Shelter – Side View
Once the pavilion is assembled you can customize it to suit your needs. Therefore, you can attach rails to the sides of the pavilion or even enclose it.
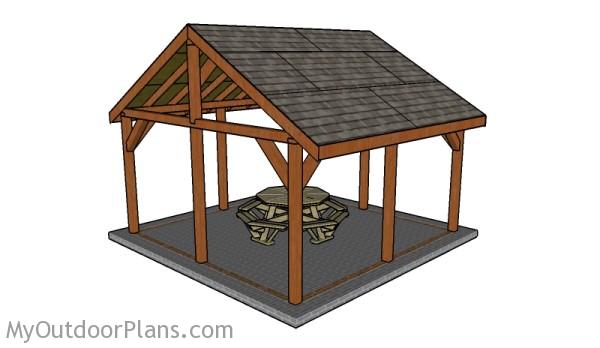
Building a picnic table
Fill the holes with wood putty and let them dry out for a few hours. Smooth the surface with 100-220 grit sandpaper and remove the residues with a damp cloth.
Top Tip: Apply a few coats of paint or stain to the components, to enhance the look of the project. Check out PART 1 of the project so you learn how to build the frame for the pavilion.
This woodworking project was about 16×16 outdoor pavilion roof plans free. If you want to see more outdoor plans, check out the rest of our step by step projects and follow the instructions to obtain a professional result.


21 comments
would love these plans but 15’x30′
I don’t have enough time to make plans for every size out there. Considering your needs, it should be easy to build a 16×32 picnic shelter by making small modifications to the plans.
Could you send plans for the 16X32′ pavilion?
I don’t have plans for that size.
Although I’ll be building something a little different in size, your plans have helped me tremendously.
Thank you for taking the time to make the plans and post them
You’re welcome and thank you for the nice words. Let me know how it goes.
we want to built 12×14 which can take wind gust upto 115 mph its required by township is this doable? Please let me know
You need some serious engineering for that. I advice you to seek for a local architect.
do you have plans for a 16′ x 16′ with only 4 post (LEGS) instead of 6? also with a lesser pitched roof?
No, I don’t have that.
Could one use 4x4s if they are using just a metal roof?
I wouldn’t suggest that due to the wide opening span.
Looks great. I want to build this 16 x 16 but with a wood deck ( I can figure out that part ). How do I go about getting the plans?
Thank you
Please read the faqs: http://myoutdoorplans.com/faq/
this is great! would it require any modification for a metal roof
It depends on what kind of metal roof. Generally speaking, you can take the plywood off and use purlins.
What is the finished height of the sides? How much below does the finished trim sit below the 6×6 side boards?
Why does it say to cut at a 30 degree angle in the diagram, but instructions say 60 degrees for the rafters
It doesn’t say that. Cut the rafters at 60 degrees, in the description, means you need to make cuts so that the ends of the rafters will be 60 degrees. Therefore, set the miter saw at 30 degrees.
I was a bit confused about the diagram as well on the 30/60° angle. I thought that was what you meant but thank you for clarifying.
If I’m going to adjust to 17×17 do I add 6” to the 16×16 gable rafters to have the same pitch?