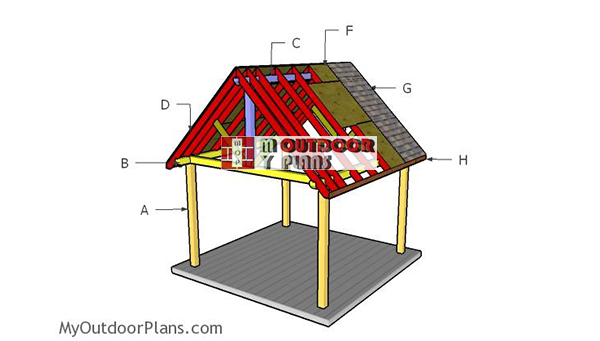
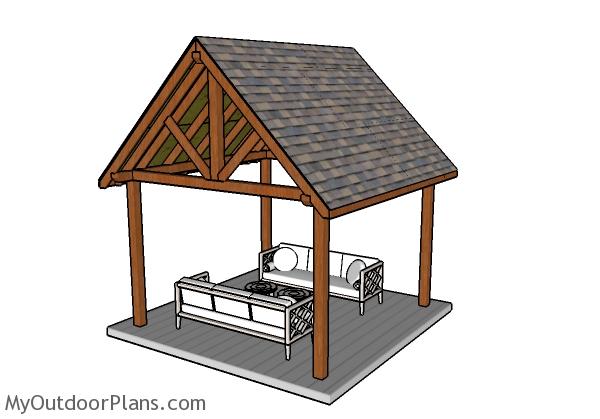
This step by step diy woodworking project is about a 12×12 outdoor pavilion plans. I have designed this beautiful pavilion so you can create some shade in your backyard while being protected from rain and ultraviolet rays. The frame of the pavilion is built using 6x6s for a beefy look and for extra-sturdiness. Take a look over the rest of our woodworking plans, if you want to get more building inspiration.
When buying the lumber, you should select the planks with great care, making sure they are straight and without any visible flaws (cracks, knots, twists, decay). Investing in cedar or other weather resistant lumber is a good idea, as it will pay off on the long run. Use a spirit level to plumb and align the components, before inserting the galvanized screws, otherwise the project won’t have a symmetrical look. If you have all the materials and tools required for the project, you could get the job done in about a day. See all my Premium Plans HERE.
Projects made from these plans
12×12 Pavilion Plans
Building-a-12×12-pavilion
Cut & Shopping Lists
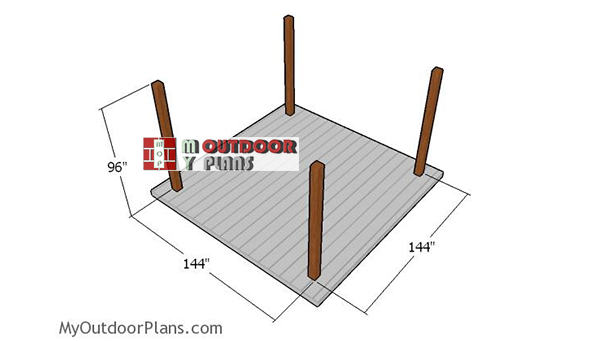
- A – 4 pieces of 6×6 lumber – 96″ long POSTS
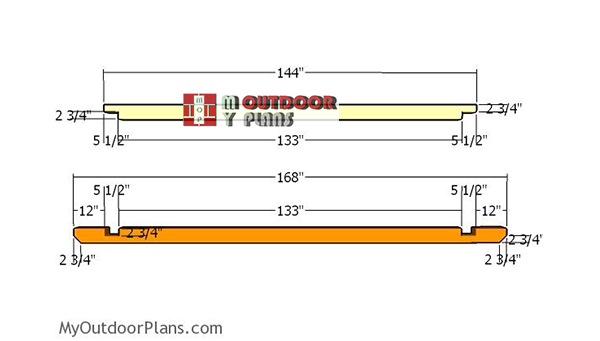
- B – 2 pieces of 6×6 lumber – 144″ long, 2 pieces – 168″ long TOP PLATES
- C – 2 pieces of 6×6 lumber – 64 1/2″ long, 1 piece – 168″ long TOP RIDGE
- C – 2 pieces of 6×6 lumber – 48″ long, 8 pieces – 36″ long BRACES
- 5 pieces of 6×6 lumber – 8′
- 3 pieces of 6×6 lumber – 14′
- 2 pieces of 6×6 lumber – 12′
- 6 pieces of 6×6 lumber – 6′
- concrete form tube
- post anchors
- beam to post connectors
- structural screws for connectors
- strong tie T
- 5 1/2″ screws, 3 1/2″ screws
- wood glue, stain/paint
Tools
![]() Hammer, Tape measure, Framing square, Level
Hammer, Tape measure, Framing square, Level
![]() Miter saw, Drill machinery, Screwdriver, Sander
Miter saw, Drill machinery, Screwdriver, Sander
Time
![]() One day
One day
Related
- PART 1: 12×12 Pavilion Plans
- PART 2: 12x12 Pavilion Roof Plans
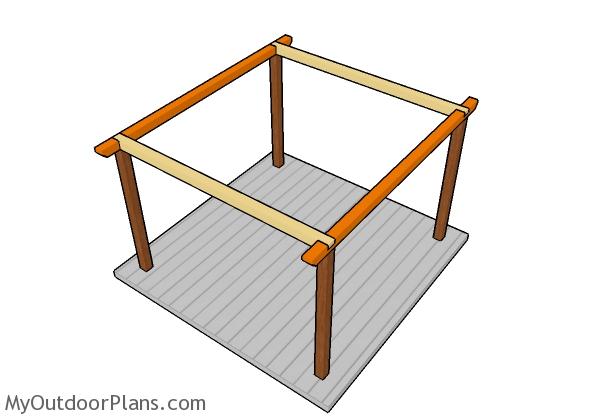
How to build a 12×12 pavilion
Laying-out-the-posts
The first step of the project is to layout the posts for the 12×12 pavilion. Use batter boards and string to determine the location of the posts. Apply the 3-4-5 rule to every corner of the pavilion, so you make sure they are right angled. Moreover measure the diagonals and make sure they are equal.
Determining the location for the pavilion is essential, as you have to comply with the local building codes. Make sure the surface is level and remove the vegetation layer.
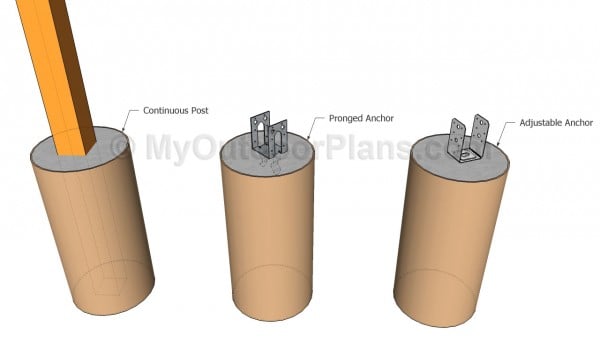
Anchoring the posts of the anchor
There are several ways to lock the posts into place. Therefore, you could dig 2′ holes in the ground and set the posts into concrete, or you could use post anchors. Use tube forms so that the footing will be really strong.
Fitting the posts
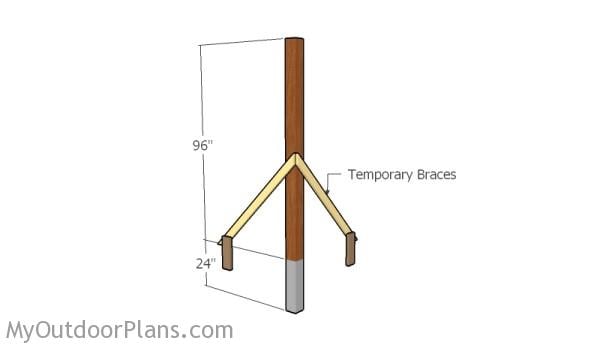
If you want to set the posts in concrete, then you need to use temporarily braces. Plumb the posts with a spirit level. Read the local building codes for finding the right depth of the footings. It is essential to set the footing at the right depth to avoid them being heaved by the Winter freeze/thaw cycle.
If you go for footings, you have to dig holes with a 14″ diameter. After digging the holes set the concrete forms and then fill them with concrete. Fit the anchors and align them with attention. After the concrete dries, fit the 6×6 posts and plumb them.
Building-the-top-plates
Use 6×6 lumber for the top plates of the pavilion. As you can notice in the plans, you have to make notches to the beams, so you can join then them together. Mark the areas and then make parallel cuts with a circular saw set at a depth of 2 3/4″. Remove the excess material with chisel and smooth the recess with sandpaper.

Fitting the side plates
Fit the rails to the sides of the pavilion, so there are 12″ overhangs. Align the edges flush, making sure the corners are square, drill pilot holes and insert 5 1/2″ screws.
Fitting the top plates
Continue the project by attaching the other beams. Align the edges with attention, making sure the corners are square. Drill pilot holes and insert 5 1/2″ screws to lock them together tightly.
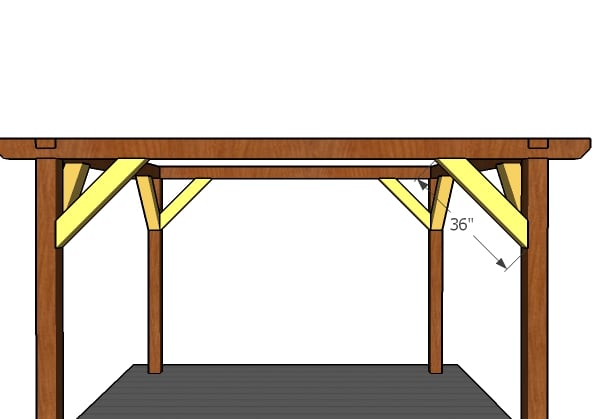
Fitting the braces
If you live in a windy area, you should add braces to the frame. Make 45 degree cuts to both ends of the braces and then secure them into place with screws.

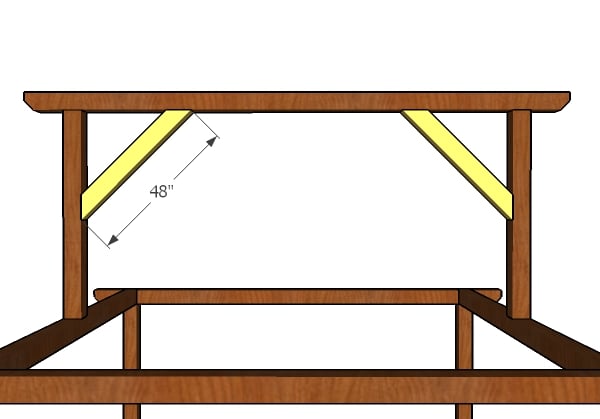
Fitting the top ridge
Use 6×6 lumber for the top ridge and for its supports. Cut the beams at the right dimensions and then smooth the edges with sandpaper. Center the supports to the front and back top plates and then plumb them with a spirit level. Use hardware to secure the supports into place tightly.
Center the top ridge to the top of the supports and then lock it into place with screws or metal lumber connectors. As you can see in the plans, you should make 45 decorative cuts to both ends of the top ridge beam.
Fitting the top braces
Fit the 4×4 braces to the top ridge. Make sure the corners are square before fitting the braces into place.
12×12 Pavilion Plans
You should check out PART 2 of the 12×12 pavilion plans, so you learn how to build the roof.
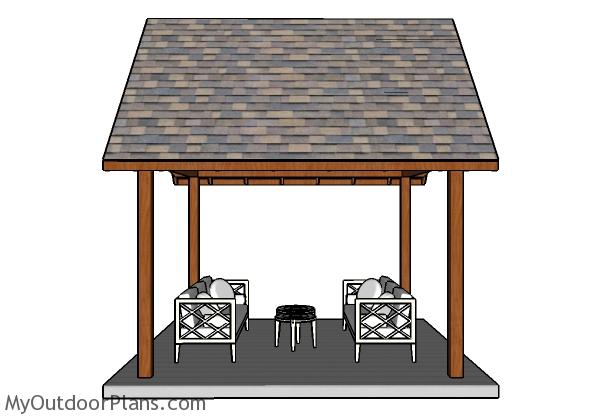
12×12 Pavilion Plans – Side view
Fill the holes with wood putty and let them dry out for a few hours. Smooth the surface with 100-220 grit sandpaper and remove the residues with a damp cloth.
Top Tip: Apply a few coats of paint or stain to the components, to enhance the look of the project.
If you want to get PREMIUM PLANS for this project (different design with re-engineered structure), in a PDF format, please press GET PDF PLANS button bellow. Thank you for the support.

This woodworking project was about 12×12 outdoor pavilion plans free. If you want to see more outdoor plans, check out the rest of our step by step projects and follow the instructions to obtain a professional result.

11 comments
Under the cut list, it states next to letter C you need two pieces of 6 x 6 lumber -64 1/2 long. I understand that part but where is piece under the material list? I don’t see it being accounted for
That’s a good point. I have added and extra 2 pieces of 6×6 lumber 6ft.
On the plans where the 64 1/2 is called out there are two braces (2 in the front and 2 in the back) that is not shown under the material list. What is the size of those materials?
There are listed in PART 2 of the project. Click the NEXT button at the bottom of this article.
Do you know where I can find technical publications for helping me with building a pergola ? I would like to build the 10×10 pergola with 6 inch dimensional lumber and lower the ridge to a 8 inch rise per foot. The rafter cut looks a little tricky if I change . Otherwise these are great straightforward plans.
This 12″x12″ Pavillion Plan is just what I am looking for. I plan to reduce the roof pitch from 1V:1H to 1v:2H. (This would reduce wind loads as well).
Do I need braces at the top of the columns?.
Does it matter if the bottom of the posts are fixed in concrete or just secured on top with shoes??
Thanks
I would still add the braces. I would also set the posts in concrete, they are sturdier.
Great plans! Ballpark, how much should I expect to pay if I were to go completely DIY?
You have the materials list for that. It is easy to add the local costs for the materials to get an accurate estimate.
Any idea what the over hang length is ? Also is this using rough sawn or dimensional?
Thank you
All my plans are designed using dimensional lumber. 12″ overhangs