This step by step woodworking project is about barn greenhouse plans free. This article features detailed instructions for building a barn shaped 10×12 greenhouse. We have designed the plans to keep the expenditures under control and to involve the least amount of work possible. These are the easiest plans for building a barn greenhouse you will find on internet.
When buying the lumber, you should select the planks with great care, making sure they are straight and without any visible flaws (cracks, knots, twists, decay). Use a spirit level to plumb and align the components, before inserting the galvanized screws, otherwise the greenhouse won’t have a symmetrical look. If you have all the materials and tools required for the project, you could get the job done in about a day. See all my Premium Plans HERE.
Projects made from these plans
Barn greenhouse plans
Building a barn greenhouse
Cut & Shopping Lists
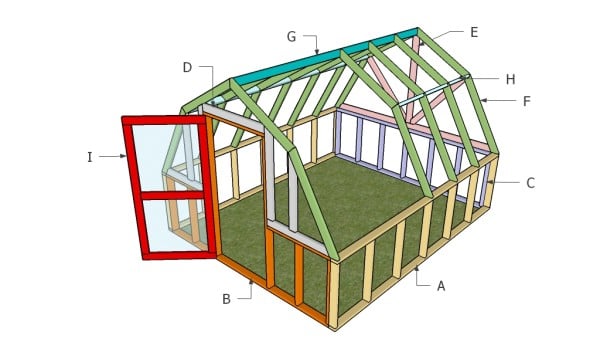
- A – 2 pieces of 2×4 lumber – 144″ long, 7 pieces – 33″ long 2xSIDES
- B – 1 pieces of 2×4 lumber – 113″ long, 4 pieces – 33″ long, 2 pieces – 36 1/2″ long, 2 pieces – 76 1/4″ long, 1 piece – 40″ long FRONT
- C – 2 pieces of 2×4 lumber – 113″ long, 7 pieces – 33″ long BACK
- D – 1 piece of 2×4 lumber – 36″ long, 2 pieces – 35 1/2″ long, 2 pieces – 43 1/4″ long, 1 piece – 40″ long FRONT
- E – 1 pieces of 2×4 lumber – 112″ long, 2 pieces – 47 1/2″ long, 1 piece – 54 3/4″ long BACK
- F – 14 pieces of 2×4 lumber – 41 1/2″ long, 14 pieces – 48″ long RAFTERS
- G – 1 pieces of 2×4 lumber – 141″ long TOP RIDGE
- H – 12 pieces of 2×4 lumber – 22 1/4″ long BLOCKINGS
- I – 2 pieces of 2×4 lumber – 37″ long, 2 pieces – 69 1/4″ long, 1 piece – 30″ long DOOR
- 4 pieces of 2×4 lumber – 10 ft
- 5 pieces of 2×4 lumber – 12 ft
- 41 pieces of 2×4 lumber – 8 ft
- 500 pieces of 2 1/2″ screws
- film
- vent opener
- thermostat outlet
- hinges + latch
Tools
![]() Hammer, Tape measure, Framing square, Level
Hammer, Tape measure, Framing square, Level
![]() Miter saw, Drill machinery, Screwdriver, Sander
Miter saw, Drill machinery, Screwdriver, Sander
Time
![]() One weekend
One weekend
How to build a barn greenhouse
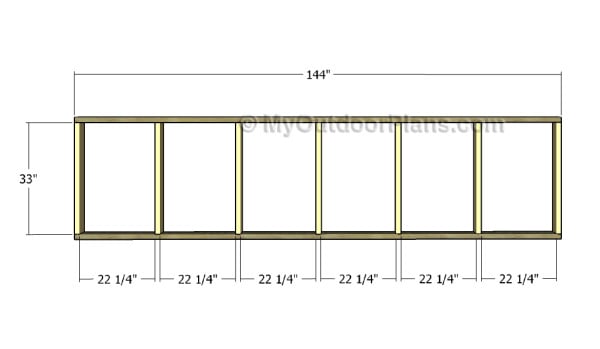
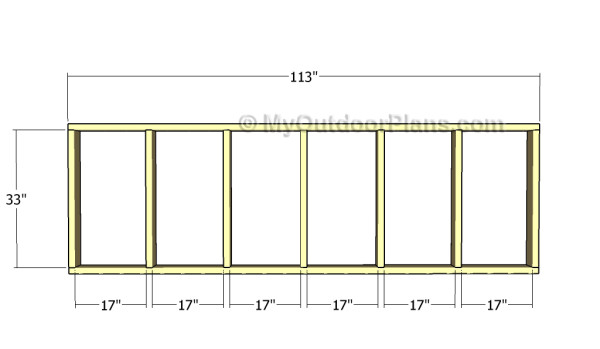
Building the side walls
The first step of the project is to build the side walls. Cut the components out of 2×4 lumber and drill pilot holes though the plates. Fit the studs equally-spaced and insert 2 1/2″ screws through the plates to lock them into place properly. Make sure the corners are square before inserting the screws.
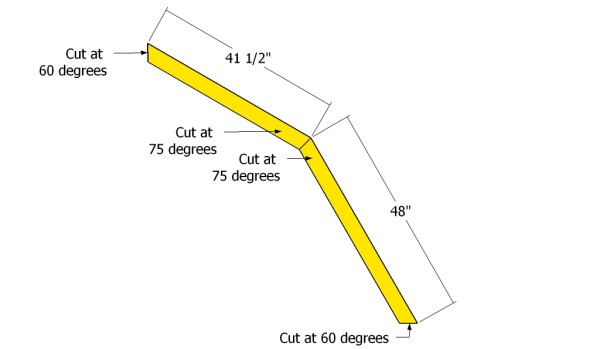
Building the end rafters
Next, you need to build the end rafters. Use 2×4 lumber and a miter saw for the angle cuts. Drill pocket holes through the rafters and lock them together with 2 1/2″ screws. Alternatively, you could use 3/4″ plywood gussets to reinforce the joints.
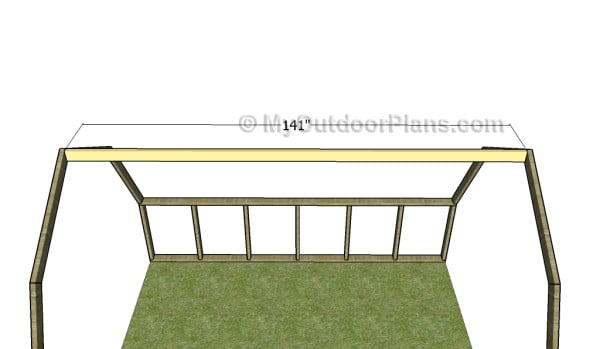
Fitting the top ridge
Fit the end rafters to the plates, as described in the diagram. Next, you need to fit the top plate to the top of the barn greenhouse. Drill pilot holes through the end rafters and insert 2 1/2″ screws into the top ridge.

Building the rafters
Continue the outdoor project by assembling the intermediary rafters. Cut the components at the right angles and sizes before assembling them together with 2 1/2″ screws.
Fitting the rafters
Fit the rafters to the structure, making sure you place them equally-spaced. Drill pilot holes through the rafters and insert 2 1/2″ screws into the plates to create rigid joints.

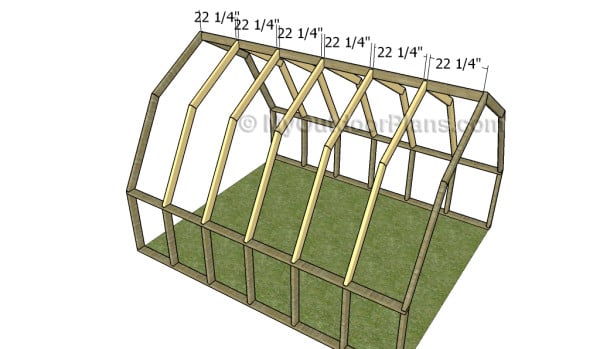
Fitting the blockings
Next, attach the 2×4 blocking to the roof of the barn greenhouse. Drill pocket holes at both ends and secure them to the rafters using 2 1/2″ screws. Meke sure the edges are flush before inserting the galvanized screws.

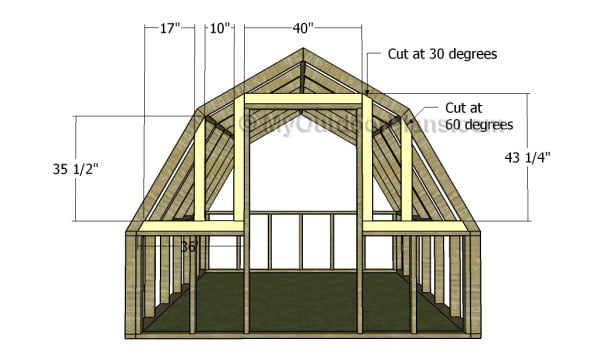
Front Wall
Build the front wall for the greenhouse, using the information described in the diagram. Drill pilot holes before inserting the 2 1/2″ screws to lock the components together. Make sure the edges are flush and check if the corners are right-angled.

Fitting the back and front walls
Fit the front wall to the barn greenhouse, as describe din the diagram. Insert 2 1/2″ screws through the studs placed at both ends into the adjacent side walls, to create a rigid structure. Plumb the walls with a spirit level, before inserting the screws.
Building the front wall
Continue the project by attaching the rest of the components to the front wall of the barn greenhouse. Make the angle cuts and lock everything together with screws. Leave no gaps between the components for a professional result.
Back wall
Build the back wall for the greenhouse. Cut the studs and the plates at the right dimensions. Drill pilot holes through the plates and insert 2 1/2″ screws into the studs. Place the studs equally-spaced and make sure the corners are square.

Build the back wall supports
Build the rest of the components for the back wall of the greenhouse. Pay attention to the angle cuts, if you want to get a professional result.
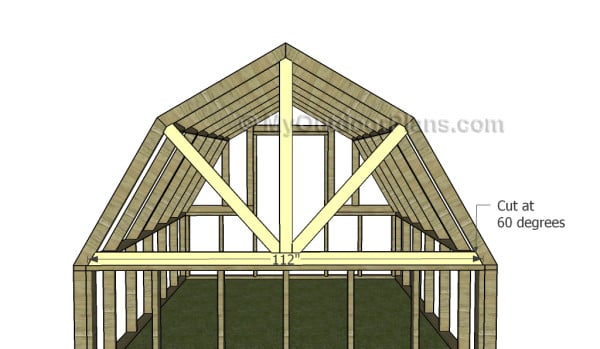
Fitting the back wall supports
Fit the back wall to the structure and secure it to the adjacent walls using galvanized screws. In addition, fit the rest of the components to the rafters, as described in the diagram. Drill pocket or pilot holes before inserting the screws.
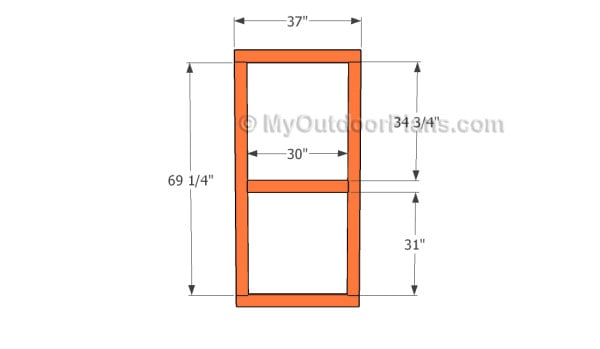
Building the front door
Build the door out of 2×4 lumber. Cut the components at the right dimensions and lock them together with screws. Make sure the corners are right-angled before inserting the screws and leave no gaps between the components.
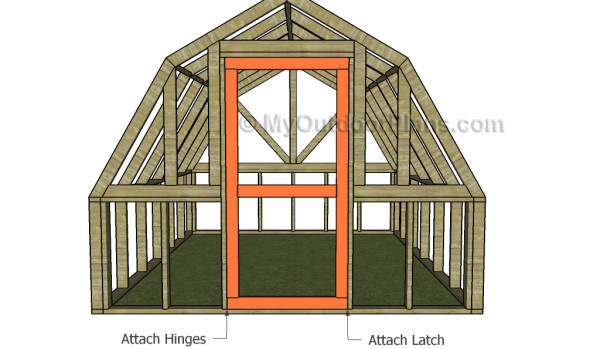
Attaching the door
Fit the door to the opening and secure it to the structure with two hinges. Install a door latch to lock the door properly.
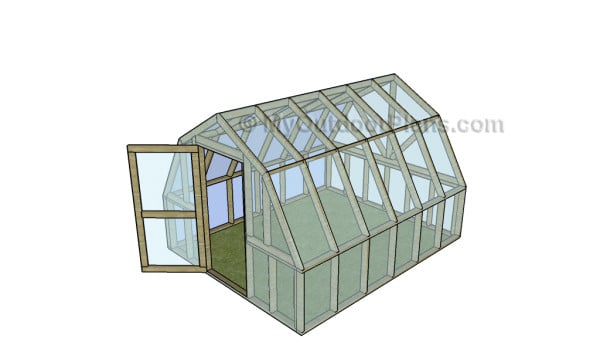
Barn greenhouse plans
One of the last steps of the woodworking project is to take care of the finishing touches. Therefore, fill the pilot holes with wood putty and smooth the surface with 120-grit sandpaper.
Top Tip: If you want to enhance the look of the project and to protect the wooden barn greenhouse from decay, we recommend you to cover the components with paint or stain.
This woodworking project was about barn greenhouse plans. If you want to see more outdoor plans, we recommend you to check out the rest of our step by step projects. LIKE us on Facebook and Google + to be the first that gets out latest projects and to hep us keep adding free woodworking plans for you.
11 comments
I have a question on section D. It says you need 2 pieces – 43 1/4 1/2″ long? Is there a typo here?
D – 1 piece of 2×4 lumber – 36″ long, 2 pieces – 35 1/2″ long, 2 pieces – 43 1/4 1/2″ long, 1 piece – 40″ long FRONT
Yes. It is 43 1/4″. Thanks for letting me know.
Also do you have a recommendation of what size lumber and how many to buy at the lumber yard to get all of these sizes?
Unfortunately, I don’t have a materials list for this project.
I don’t see any tips on how the plastic needs to be applied to the greenhouse and how to prevent the wind from tearing it up.
It depends on the plastic you will use. In addition. I am mainly a woodworking designer so I stick to what I know best.
Also what about the footing of the building?
I have designed this greenhouse a light structure, that can be fitted directly to the ground. However, you can pour footings if you want a permanent construction.
Hi i stumbled upon your plans and i wanted to let you know how grateful i am to have found them. My wife and i have recently decided to build a garden at our newly acquired farm. This barn greenhouse will be perfect to get started and also get a bit of knowledge on how to build a structure. It’s very windy were we live. Would you advise installing anchor posts on each side of the structure? Although its a big enough structure and may not be affected at all.
Yes, I would recommend you to set some anchors to secure the greenhouse to the ground.
Hi, great plans you have here. I wanted to know how you control the climate inside the greenhouse to keep it at an optimum level. Thanks.