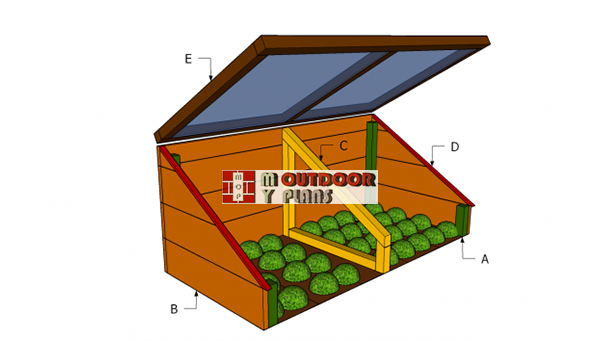
This step by step diy project is about free cold frame plans. Building a simple structure out of weather-resistant wood will allow you to grow vegetables during the cold season. The best part about this simple woodworking project is that it doesn’t imply a significant investment. All you need to do is to cut the wooden components at the right size and to lock them together with galvanized screws.
Build the wooden lid out of 2×2 lumber and poly-carbonate sheets. Attach the lid on top of of the cold frame, align it properly and lock it into place with a couple of hinges. In addition, install 1×2 braces, in order to lift the lid when ventilating the interior of the cold frame. Alternatively, you could install an automatic vent opener which will lift the lid whenever necessary. See all my Premium Plans HERE.
Projects made from these plans
Cut & Shopping Lists
- A – 2 pieces of 2×2 lumber – 5 1/2”, 2 piece of 2×2 lumber – 18” LEGS
- B – 5 pieces of cedar siding -48” long, 8 pieces of cedar siding – 22 1/2” FRAME
- C – 1 piece of 2×2 lumber – 19 1/2”, 1 piece – 27”, 1 piece – 5, 1 pice 17 1/2” SUPPORT
- D – 2 piece of 1×1 lumber – 27” TRIMS
- E – 2 pieces of 2×2 lumber – 48″, 3 pieces of 2×2 lumber – 24 3/4” LID
Tools
![]() Hammer, Tape measure, Framing square
Hammer, Tape measure, Framing square
![]() Miter saw, Drill machinery, Screwdriver, Sander
Miter saw, Drill machinery, Screwdriver, Sander
Time
![]() One day
One day
Related
Building a cold frame
Building-a-cold-frame
Building a cold frame out of wood is easy, if the right plans are used. A basic cold frame doesn’t require a large investment and it will also supply your family with fresh vegetables during the cold season.
Top Tip: As strange as it might seem, even during winter the sun could overheat the cold frame, so you need to open the lid and ventilate the interior. Nevertheless, you could ease the process by installing an automatic lid opener.
Free Cold Frame Plans
Fitting-the-framing
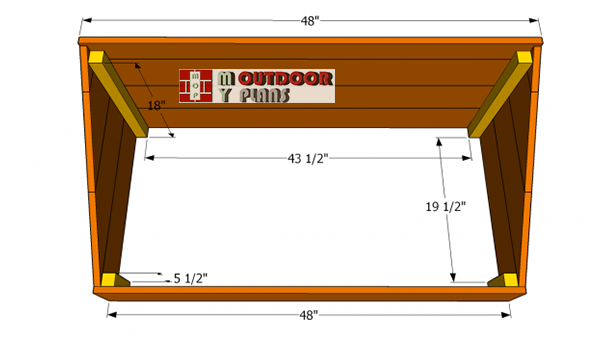
The first step of the project is to build the wooden frame. As you can see in the image, you need to secure the cedar siding to several 2×2 wooden posts. Cut the boards at the right size, using a circular saw.
Drive 1 1/4” nails or screws trough the siding into the corner posts. Make sure you check if the corners are right-angled, if you want to get the job done as a professional.

Fitting the side walls
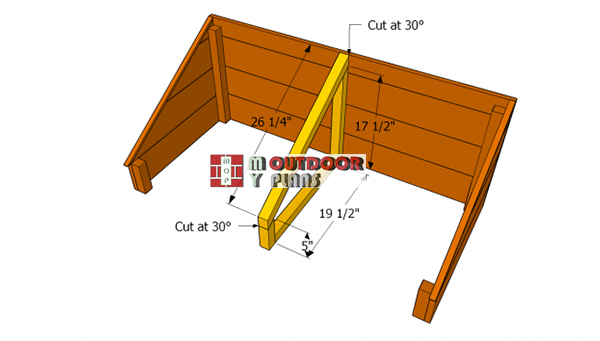
In order to have enough space inside the cold frame and to heat it properly, you should build the side walls as in the plans. Cut one end of the slats at about 30º, using a circular saw with a sharp blade.
Top Tip: Attach the cedar siding (it is weather-resistant) to the wooden legs and secure them into place with finishing nails. Check if the components are aligned at both ends, if you want to get a neat appearance.
Installing-the-middle-frames
Although this step is not compulsory, we recommend you to take into account if you want to enhance the rigidity of the cold frame. Use a simple structure out of 2×2 lumber, in order to support the weight of the lid and to hold the frame locked together tightly.
Use a spirit level to plumb the components. In addition, drill pilot holes trough the components before driving in the 2 1/2” wood screws, to prevent the wood from splitting.

Fitting the trims
Attach two strips of wood to the top edges of the side walls, as in the image. In this manner, the wooden lid will sit properly into place. Make sure the wooden strips are aligned properly at both ends.
Building-the-lid-cold-frame
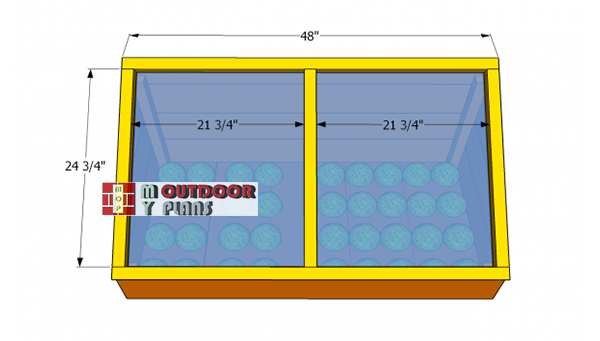
There are a several shapes and designs you could choose from when building the lid. Nevertheless, in this project we show you a simple technique to build the lid, using 2×2 lumber and poly-carbonate sheets.
Use 1×1 cleats to support the poly-carbonate or glass panels or cut a small channel inside the frame, using a table saw. Use hinges to secure the lid into place, after aligning it properly.

Free cold frame plans
Last but not least, you should take care finishing touches. If you want to get a professional look, we recommend you to sand the edges or make them round with a router and a 1/4” bit. Check if the lid opens properly and if the cold frame is rigid.
Top Tip: Apply several coats of protective paint, otherwise the wooden components will rot on the long run. Fit ab automatic vent opener, if you don’t have time to ventilate the cold frame.
This article was about garden work bench plans. If you want to see more outdoor plans, we recommend you to check out the rest of our projects.
EXPLORE MORE IDEAS FOR:
 |
 |
 |
 |