This diy woodworking project is about compost bin plans free. In this article we show you how to design the wood compost bin and how to build it by yourself, step by step. There are many similar products on the market, made of plastic or wood, but why not try to build it by yourself in just a few hours and save a significant amount of money. Any person with basic carpentry skills could get the job done, as the project has a medium difficulty. Select the lumber with great care and align all the components, before driving in the screws into place.
We recommend you to buy quality materials, such as cedar treated against rot, as the wood bin will last longer and will produce the best compost you could find on the market, at no cost. Make sure the slats are in perfect condition, having no cracks, twist, chips or other visible flaws. Work with good judgement and with patience, making sure you follow the right instruction for your needs and tastes. See all my Premium Plans HERE.
Projects made from these plans
Cut & Shopping Lists
- A – 20 pieces of 1×6 lumber 30” long SLATS
- B – 10 pieces of 1×4 lumber 31 1/2” long TRIMS
- C – 100 pieces of 1 1/4” wood screws SCREWS
- D – 40 pieces of 2 1/2” wood screws SCREWS
- E – 2 pieces of 2×2 lumber 31 1/2” long, 1 piece 28 1/2″ long RAILS
- F – 8 pieces of 1×4 lumber 31 1/2” long LID
- G – 4 pieces of 1×4 lumber 14 3/4″ long BATTENS
- 7 pieces pieces of 1×4 lumber – 8′
- 1 piece of 2×2 lumber – 8′
- 7 pieces of 1×6 lumber – 8′
- 1 1/4″ screws
- 2 1/2″ screws
- compost thermometer
- hinges
Tools
![]() Hammer, Tape measure, Framing square
Hammer, Tape measure, Framing square
![]() Miter saw, Drill machinery, Screwdriver, Sander
Miter saw, Drill machinery, Screwdriver, Sander
Time
Diy Compost Bin
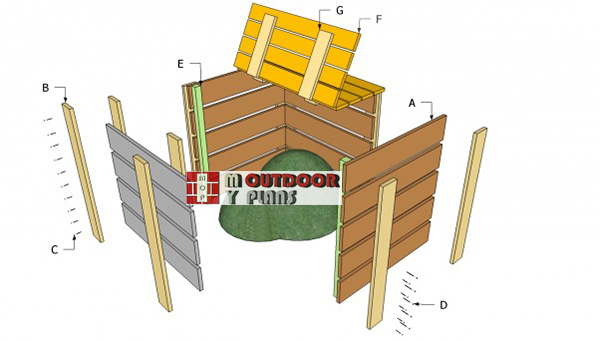
Compost-bin-components—diy-project
If you want to grow your own vegetables, it would also be a great idea to make your own compost for the organic plants. Therefore, the first step is to build a small compost bin, as to create a place where to make the organic fertilizer. Choose the dimensions that fit your needs and buy proper materials for the job.
Top Tip: The front face of the bin should slide up, as to have a proper access to the compost. In addition, it would be a great idea to make the front panel from two components.
Wood Compost Bin Plans
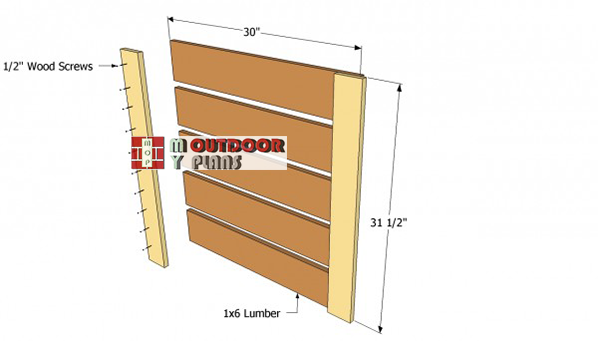
DIY-Compost-bin-plans
First of all, you need to build the sides of the compost bin, using 1×6 slats and 1×4 trims. In this example we use 30” long slats, but you could adjust the size of the bin, according to your needs and tastes. Drill pilot holes and insert two screws in each slats, at both ends.
The diagonals of the panels should be equal and the corners square. Leave 1” between the boards, to let air circulate around the pile.
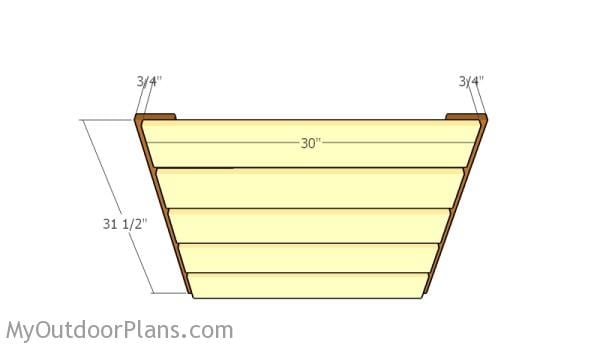
Making the panels
As you can see, the vertical slats need to overhang the panels for about 3/4″, on both sides. Build three of these panels for the bin.
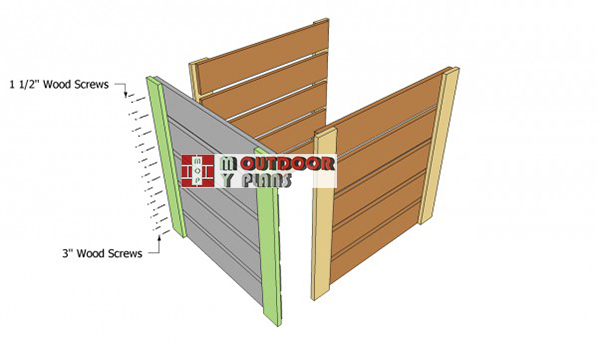
attaching-the-back-panel-to-compost-bin
After you have built the three panels, you should join them together in a professional manner, as in the free plans. Use several clamps or ask a handy friend to assist you, while locking the components together.
Plumb the side walls with a spirit level, before inserting 2 1/2” screws trough the trims. Pre-drill holes, to avoid the wood from splitting. Use a framing square, to ensure the interior corners are square.
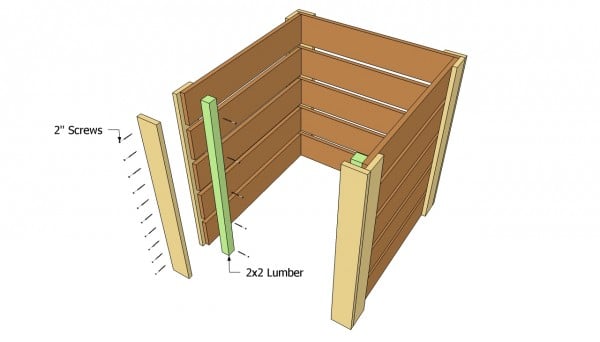
Building the front face of the bin
As we have already said, the front face of the bin should slide up, in order to have an easy access to the compost pile. Therefore, you should install 2×2 rails on the interior faces of the bin, as in the image.
The removable front panel should fit easily between the rails and the trims, therefore you should leave 1” gap. Measure the components attentively, as to get the job done properly from the very beginning.
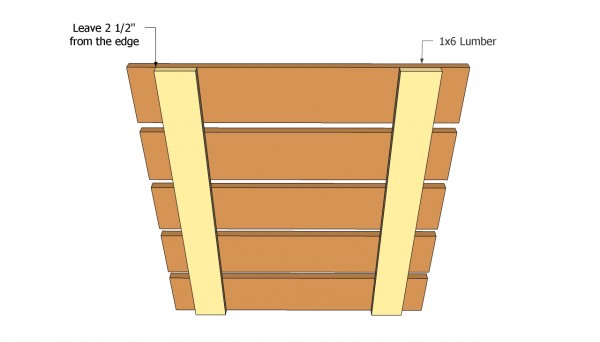
Compost bin front face plans
Building the removable front panel is a straight forward job, if you have reached this stage of the diy project. Therefore, you should use five 1×6 slats and two 1×4 supports. Place the slats on a sturdy surface and leave 1” between them. Place a piece of wood between the slats, to get consistent gaps.
Align the components at both ends, making sure the corners are square, before driving in the 1 1/4″ screws. Insert 2 screws in each slat, at both ends.
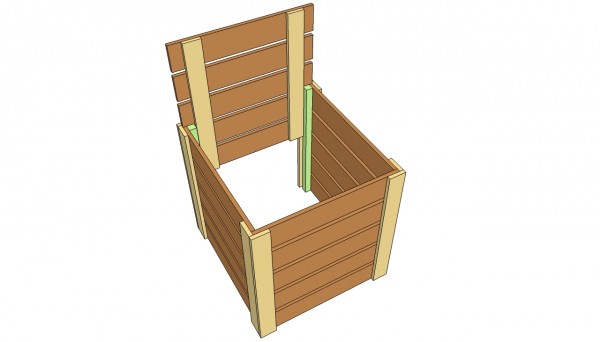
Installing the front face of the compost bin
After you have built the removable panel, you should fit it between the rails and the trims. If you have followed the instruction, the front door should fit easily into place. Make sure you position the panel supports properly, at least 2 1/2” from the edges.
Top Tip: If the front panel is too large and heavy to handle it, you could cut it in half. In this manner, you could remove only the top component, when you need to turn the pile.
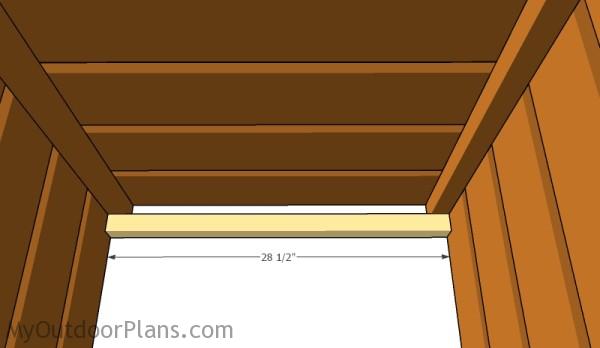
Front support
Fitting a 2×2 support to the front of the bin is a good idea, as it will hold it together when removing the lid. Use 2 1/2″ screws to lock it to the vertical supports.
Building-the-lid
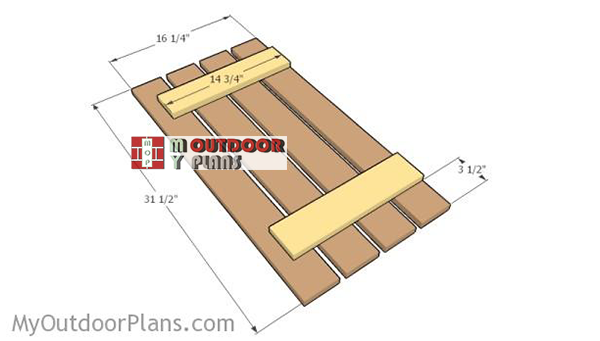
Use 1x4s for the lid. As you can see in the diagram, you need to build two of these. Building the lid for the compost bin is as simple as the previous steps, provided you take accurate measurements and use the right carpentry techniques. In order to get the job done, you should use 1x4s slats, according to your needs and tastes.
Split the lid in half, in order to remove only one segment when letting air to circulate around the pile. The battens should be 2-3” shorter than the lid, on the side towards the exterior of the bin.
Assembling the lid
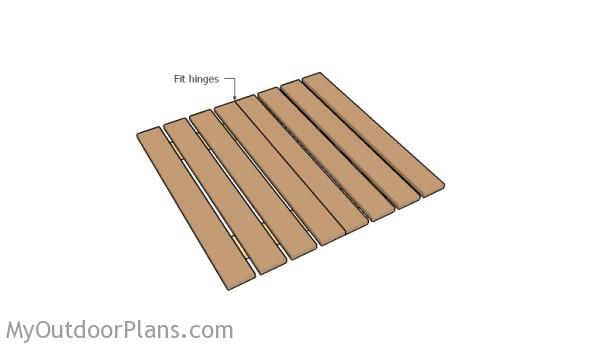
Use hinges to lock the two panels together.
compost bin plans free
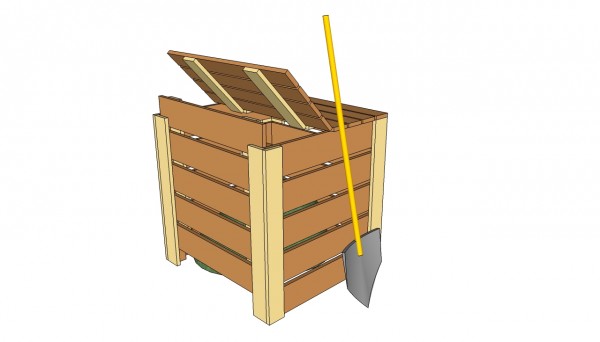
Attach the top of the bin into place, as well as the rest of the components. Check attentively the bin, to make sure all the components are locked together tightly with screws. Make sure there are no protruding screws or sharp edges that might injure you.
Top Tip: Protect the lumber from decay with appropriate non-toxic substances. Otherwise, buy cedar treated against rot, from the very beginning.
This woodworking project is about wood compost bin plans free. If you want to see more outdoor plans, check out the rest of our step by step projects and follow the instructions to obtain a professional result.

6 comments
First thanks for taking the time to post these plans. I was really looking forward to building this bin but once I got started I realized that there is a tremendous amount of detail missing here. To start when you provide plans in addition to a cut list you should try and provide a shopping list. This enables less experienced people to be able to purchase the proper amounts of wood. Second when you instruct to build the walls you leave out a very important part. You leave out the hang over space needed for the vertical 31 1/2″ slats. This is even left out in the illustration. There are a few other issues but they could be overlooked if the instructions were just put together more concisely. Again thanks for putting this up and I was able to manage but did cost some time and extra wood.
Thanks for your feedback. This was one of the first plans on the site, so some details might be indeed blurry. If you check the latest plans, I have included all your recommendations to the projects. I’ve added more diagrams and the shopping list to make it accessible for beginners, as well. I’m looking forward to seeing your DIY projects.
I guess you can use regular 3″ galvanized hinges for the cover?
Yes.
thank you for the plans.i don t speak english
You’re welcome. Looking forward to seeing your projects.