This step by step diy article is about wooden bridge plans. Building a small wooden bridge for your backyard is easy, but you need to know the basic woodworking techniques before starting the actual construction. Work with attention and with great care, making sure you plan everything from the very beginning., if you want to prevent costly mistakes and to create something that fits your needs.
Building a small wooden bridge is not easy, but there are still a few things that you should pay attention to. First of all, we recommend you to use quality lumber, such as cedar, pressure-treated lumber, pine or redwood. Always take accurate measurements and align the components at both ends, if you want to get a professional result. Apply a good waterproof glue to the joints, if you want to get a rigid structure. See all my Premium Plans HERE.
Projects made from these plans
Cut & Shopping Lists
- A – 4 pieces of 2×6 lumber – 144” long STRINGERS
- B – 5 pieces of 2×6 – 27″ long SUPPORTS
- C – 10 pieces of 4×4 lumber – 40″ long POSTS
- D – 38 pieces of 2×4 lumber – 37″ long SLATS
- E – 6 pieces of 1×4 lumber – 144″ long RAILINGS
Tools
![]() Hammer, Tape measure, Framing square
Hammer, Tape measure, Framing square
![]() Power mixer, Miter saw, Drill machinery, Screwdriver, Sander
Power mixer, Miter saw, Drill machinery, Screwdriver, Sander
Time
Related
Building a wooden bridge
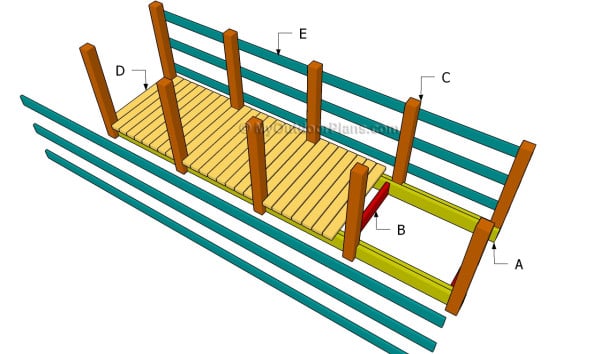
Building a wooden bridge
Top Tip: Building a simple wooden bridge is easy and it doesn’t cost a fortune, but it will most certainly add value to your backyard. If you want to build an arched bridge, don’t forget to check out these plans.
Wooden Bridge Plans
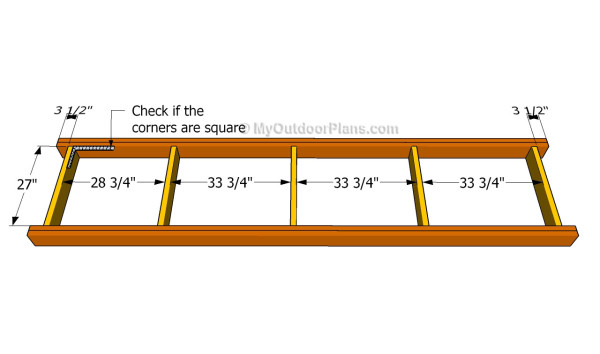
Building the frame
The first step of the woodworking project is to build the frame of the garden bridge. In order to get a professional result, we recommend you to assemble the stringer by using two 2×6 – 2×10 lumber. Add waterproof glue between the beams and lock them temporarily with c-clamps.
Drill pilot holes trough the beams and insert 5″ galvanized screws into the supports. Make sure the corners are right-angled, if you want to get a professional result.
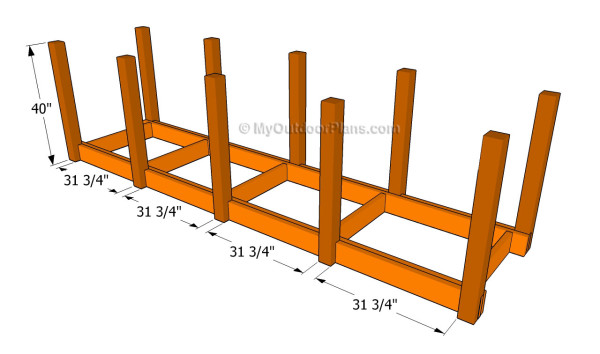
Attaching the posts
After building the frame of the wooden bridge, we recommend you to attach the posts, as in the image. Cut the posts at the right size, according to your needs, by using a circular saw.
Top Tip: Cut out a small notch in the posts, otherwise they won’t fit into place properly. Make several parallel cuts (1 1/2″ deep) at the bottom of the posts and clean the recess with a chisel and sandpaper.
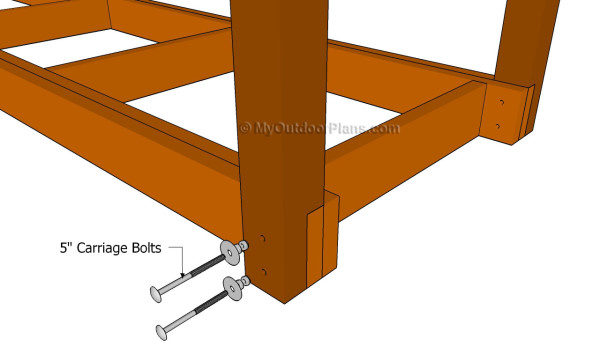
Inserting the carriage bolts
In order to create rigid joints, we recommend you to attach the posts to the stringers, as in the image. Drill pilot holes using a good drill machinery and insert the carriage bolts.
Don’t forget that you should add silicone in the holes, as to prevent the wood from getting damaged over the long run. Plumb the posts with a spirit level before inserting the bolts, if you want to get a professional result.
Attaching the 2×4 slats
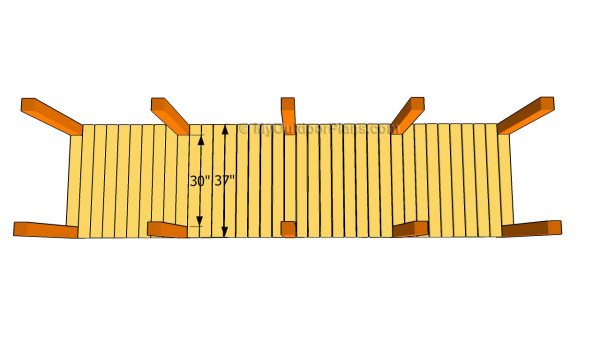
One of the last steps of the woodworking project is to attach the 2×4 slats to the frame of the bridge. Align the wooden boards at both ends, making sure you place them equally spaced. Place a small piece of plywood between the slats, in order to get consistent gaps.
Top Tip: Drill pilot holes and insert 2 1/2″ screws into the frame. Smooth the edges with a sander, or use a router and a 1/4″ bit.
Attaching the railings
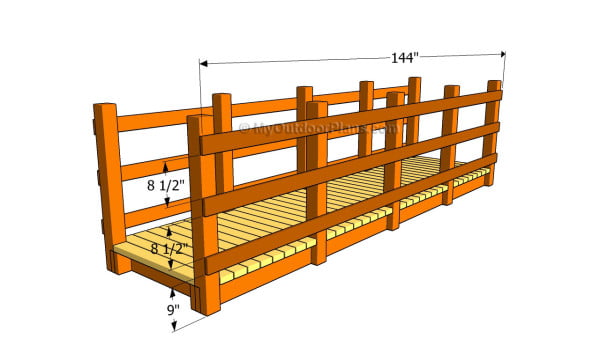
There are many ways in which you could build the railings for the wooden bridge. One of the easiest ways to get the job done, we recommend you to attach 1×4 slats to the posts, as in the image.
Top Tip: Alternatively you could attach 2×2 balusters or even x-shaped railings. Countersink the head of the screws before inserting them, to get a nice appearance. Check if the railings are horizontal, by using a spirit level.
Wooden bridge plans
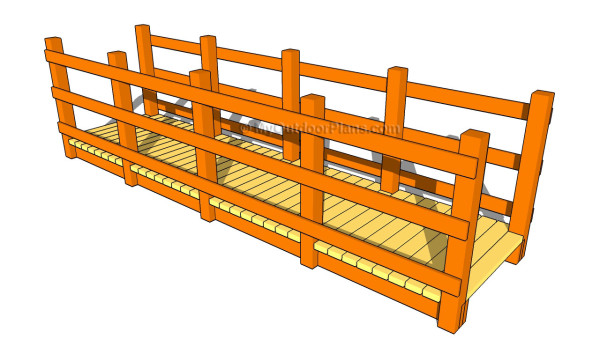
Afterwards, you have to fill the gaps and the holes with a good wood putty. Let the compound to dry out properly, before sanding the whole wooden components, along the wood grain, with 120-grit sandpaper.
Top Tip: Apply several coats of wood stain or paint, in order to enhance the look of the wooden bridge. Place the bridge on several concrete slabs and lock it into place with metal brackets and screws.
This woodworking project is about wooden bridge plans. If you want to see more outdoor plans, we recommend you to check out the rest of our step by step projects.

2 comments
Could you explain the timber required for the slats it doesn’t make any sense.
Thank you for the feedback. I have updated the list.