This step by step diy woodworking project is about simple swing set plans. The project features instructions for building a wooden swing set with a minimalist design. However, if you want to help your kids spend more time outdoor, building this swing set could be exactly what you are looking for. Make sure you take a look over the rest of plans to see alternatives and more projects for your garden. Premium Plans available for this project in the Shop.
You should notice my plans come with 3D diagrams, detailed instructions and a complete Cut / Shopping list. The plans are PDF download and Print friendly, so you can take them with you in the garden. However, remember that all my plans are for personal use only!
When buying the lumber, you should select the planks with great care, making sure they are straight and without any visible flaws (cracks, knots, twists, decay). Investing in cedar or other weather resistant lumber is a good idea, as it will pay off on the long run. Use a spirit level to plumb and align the components, before inserting the galvanized screws, otherwise the project won’t have a symmetrical look. If you have all the materials and tools required for the project, you could get the job done in about a day. See all my Premium Plans HERE.
Projects made from these plans
Simple Swing Set Plans
Building-a-wooden-swing-stand
Cut + Shopping List
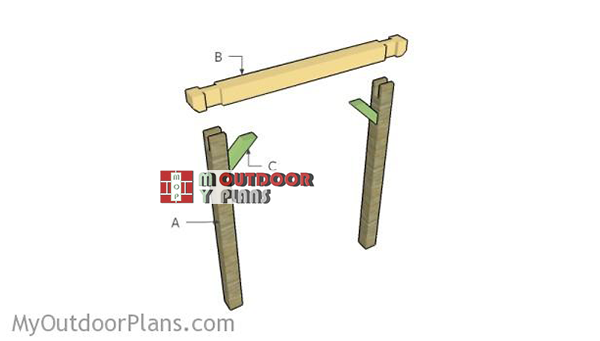
- A – 2 pieces of 6×6 lumber – 108″ long POSTS
- B – 1 piece of 6×6 lumber – 82″ long BEAM
- C – 2 pieces of 4×4 lumber – 16 1/4″ long BRACES
- 2 pieces of 6×6 lumber – 10′
- 1 piece of 6×6 lumber – 8′
- 1 piece of 4×4 lumber – 4′
- 6 pieces of 6″ carriage bolts
- concrete mix
- swing
Tools
![]() Hammer, Post hole digger, Tape measure, Framing square, Level
Hammer, Post hole digger, Tape measure, Framing square, Level
![]() Miter saw, Drill machinery, Screwdriver, Sander
Miter saw, Drill machinery, Screwdriver, Sander
Time
![]() One day
One day
Step 1: Setting the Wooden Posts for Swing Set
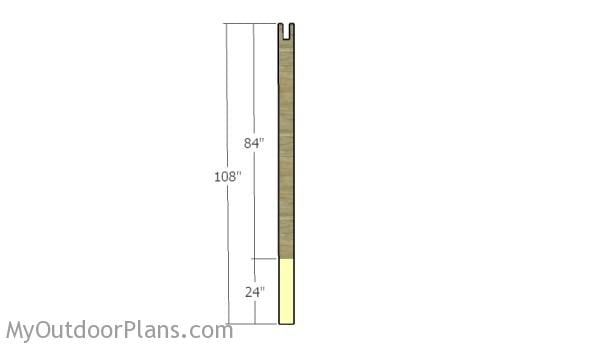
Building the posts
For this project, we recommend you to use 6×6 lumber. First of all, cut the posts at 9′ if you want to set the posts 2′ into the ground or at 10′ if you want to set them 3′ into the ground.
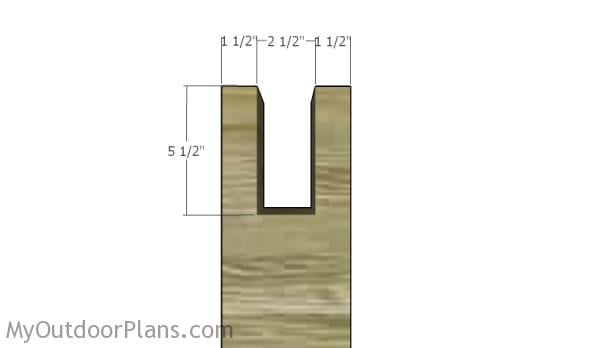
Making notches to the top of the posts
As you can easily notice in the diagram, you need to make notches to the top of the posts. Use a saw to make parallel cuts inside the marked area and remove the excess with a chisel. Smooth the recess with sandpaper.
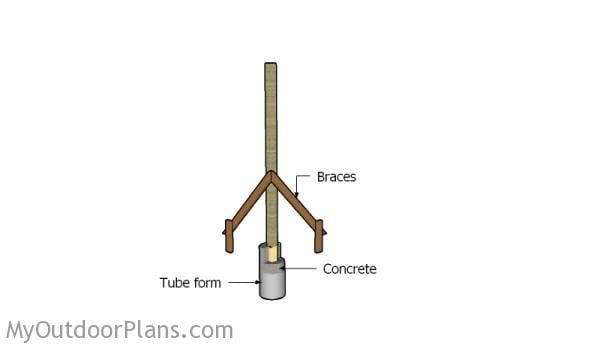
Setting the posts in concrete
Next, set the posts into concrete for about 2-3′. Use a post hole digger to make the holes. Set tube forms into the holes and fit the posts into place. Use a spirit level to plumb the posts and lock them temporarily into place with braces. Fill the tube forms with concrete and let it dry out for several days.
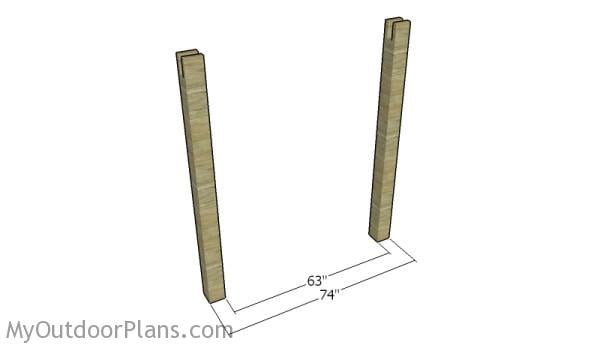
Laying out the posts
In addition, you need to layout the other post, as shown in the plans. Also, make sure the top of the posts are horizontal.
Step 2: Attaching the top beam
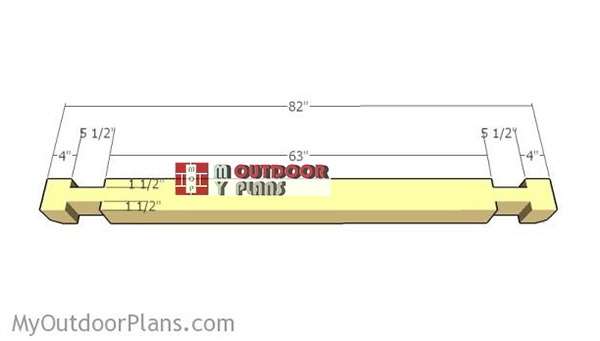
Building-the-top-beam
Next, build the top beam for the garden swing from 6×6 lumber. As you can easily notice in the diagram, you need to make notches to the beam. Smooth the recess with a chisel and with sandpaper. In addition, make 45 degree cuts to both ends of the beams, in order to get a decorative effect.

Assembling the swing set frame
Additionally, fit the top beam to the posts, as shown in the plans. Make sure there are no gaps between the components and use a spirit level to check if the posts are vertical and if the top beam is horizontal. Drill pilot holes through the posts and through the beam. Insert 6″ carriage bolts to lock the components together tightly.
Step 2: Setting the braces
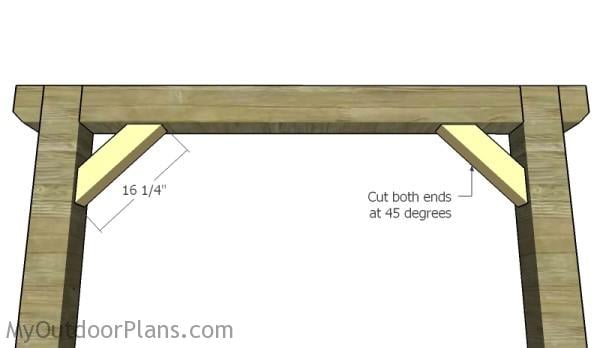
Fitting the braces
In order to enhance the rigidity of the swing stand, you need to attach 4×4 braces, as shown in the plans. Cut both ends of the braces at 45 degrees and fit them to the frame. However, drill pilot holes and lock them into place using 3 1/2″ screws. Make sure the corners are square before inserting the screws, for a professional result.
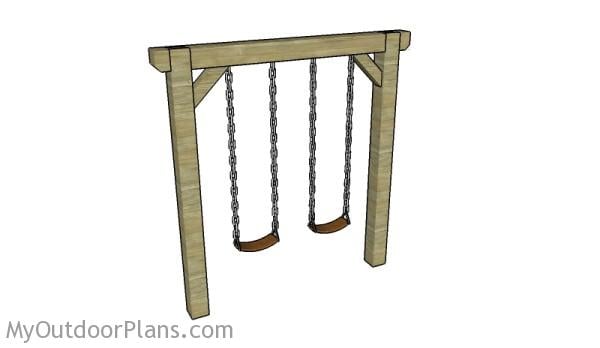
Simple swing set plans
Lastly, fill the holes with wood putty and let them dry out for a few hours. Smooth the surface with 100-200 grit sandpaper and remove the residues with a damp cloth. Apply a few coats of stain or paint to enhance the look of the swing set. Install the swings using appropriate hardware. You can place a larger swing or two smaller ones.
Top Tip: Check out the rest of the projects, if you want to learn more about building outdoor projects. Premium Plans available for this project in the Shop.
This woodworking project was about simple swing set plans. If you want to see more outdoor plans, check out the rest of our step by step projects and follow the instructions to obtain a professional result.
33 comments
Hi Julian, If I wanted to use 12′ timber to make it a little taller for older children, how far would you suggest I sink the uprights into the ground to compensate? Thank you.
3′ into concrete. In addition, make sure you also make the holes larger in diameter. In this manner, the larger concrete footings will compensate for the higher forces. Something like 24″ in diameter. You could also consider an A-frame design: http://myoutdoorplans.com/furniture/a-frame-swing-plans/
How much weight and force will this support. I love that it takes up less space than a traditional A-Frame. I’ve got a 6 year old and 4 year old that swing high and hard. Will this do?
I don’t recommend this if they “swing high and hard”. An a-frame with the posts locked in concrete is the better option.
Your list of “Materials” includes “6 pieces of 6″ carriage bolts”. Are these used for the braces (2 each), plus two for the beam (1 on each side)?? I’m confused because the “Fitting the braces” section says to use “3 1/2 screws”. What do I use?
I noticed that “2 tube forms” was omitted from the materials list. Should they be included? Thank-you very much for sharing your information. Looking forward to helping build this for our grandchildren!
No. The bolts are for the beams, the screws are for the braces.
Sorry, I also meant to ask about the materials sections whereby one area says “2 pieces of 4×4 lumber – 16 1/4″ long. BRACES”. Another section says “1 piece of 4×4 lumber – 4′”. Does this mean it is suggested that we buy and cut the 1 piece into two pieces of 16 1/4 long”. Thank-you very much.
Yes. The top part is the CUT LIST, the bottom part is the MATERIALS LIST.
When attaching the beam to the posts, to what are the carriage bolts attached at the other end? There isn’t a way to attach a nut. Or, is a carriage SCREW recommended?
The 6×6 beams are actually 5 1/2″ x 5 1/2″, so the 6″ carriage bolts overhang 1/2″ on one side. You use a washer and a nut to secure the beams with the bolts.
Love these plans, How much weight do you think that this could support? I have older children who I know would enjoy using this too, just wondering if something like this is the best route to go.
This can hold adults, as well. Just set the posts in concrete and join the beams with attention.
Have you actually built this swing?
What do you mean?
Have you built it or is this just plans? My husband built it Saturday. I’m waiting on the concrete to set up to add the swing and then I will post a picture of it.
I only design plans. Looking forward!
If built with 12′ posts 30″ in the ground, underside of the beam 9′ from the ground, for a single seat swing would this design be sufficient for adult who like to swing high?
Yes, I would say that would be ok. However, if you want this swing for an adult that likes to swing high I would go for an A-frame swing, because it offers more support. This is more for light swinging.
with my kids locked in due to corona, I want to build a swing set for my 2 yr old but it has to be on a concrete driveway so I can’t dig and use concrete mix. think i could use an E-Z Base Post Base to secure the beams?
Unless you add some bracing, these kind of anchors are not good for a 2 post swing.
if by bracing, do you mean A-frame style? yes, I was planning on that. would a 4×4 be strong enough for the top support that would hold the swing? if no, what would you suggest?
My plans call for a 4×4. Yes, Diagonal braces or A frame directly.
In that case you can go for 4x4s.
Hello,
I would love to build this, I have 3 kids and this looks way more sturdy than the swing set we have now but I am reading this isn’t good for swinging high. Can you explain? These are huge beams cemented into the ground. I want something that will last even when they are big. My a frame swing set tips and doesn’t support them swinging very good at all. Thank you so much
If you want something that will resist swinging high, I recommend you metal. Also, the A-frame shape is structurally more stable for swing high.
Hi,
I do not have an auger to dig a post hole and will be using a shovel. What do you recommend measurements do you recommend the hole to be? LxW?
Thank you
3 ft deep and 16″ in diameter.
Please show the A frame build step by step
I want to the extend the cross member to 10 ft instead of the 8 ft in the plans. Any necessary changes required
Yes, use a 6×8 beam
What is the best way to make sure the two vertical posts are level and aligned? Would hate to attempt to attach the cross beam and things don’t line up or off level
Spirit level and string.
I would like to build this for use with a 2-person swing. What is the maximum width between braces to place chain bolts? Thanks.