This step by step diy project is about outdoor shower plans. Building a wooden shower for your garden is a great project, as it challenges your woodworking skills. However, the end result will be amazing, especially if you like to spend the summer afternoons in your garden. Work with attention and plan every aspect of the construction to the littlest detail, in order to prevent costly mistakes.
We recommend you to adjust the size and the design of the outdoor shower to your needs and to the style of your garden. Work with attention and invest in the best materials you can afford. Taking into account you are going place the shower outside, we recommend you to buy weather-resistant lumber, such as pine, cedar or redwood. Select the lumber with attention, making sure the components are in a good visual condition. See all my Premium Plans HERE.
Projects made from these plans
Cut & Shopping Lists
- A – 2 pieces of 2×6 lumber – 77″ long, 7 pieces – 57″ FLOOR
- B – 10 pieces of 2×6 lumber – 77″ long FLOORING
- C – 2 pieces of 4×4 lumber – 84”, 2 pieces – 93″, 1 piece – 88 3/4″ POSTS
- D – 42 pieces of 1×6 lumber – 48″ long SLATS
- E – 4 pieces of 1×4 lumber – 77″, 2 pieces – 53″, 4 pieces – 24 1/2″ CLEATS
- F – 8 pieces of 2×4 lumber – 92″ long RAFTERS
Tools
![]() Hammer, Tape measure, Framing square, Level
Hammer, Tape measure, Framing square, Level
![]() Miter saw, Drill machinery, Screwdriver, Sander
Miter saw, Drill machinery, Screwdriver, Sander
![]() Post hole digger, Concrete mixer
Post hole digger, Concrete mixer
Time
Related
Building an outdoor shower
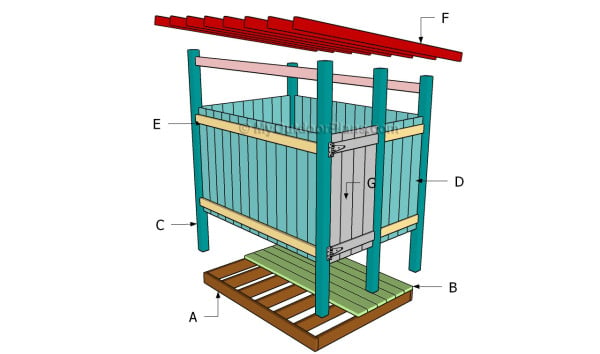
Building an outdoor shower
Top Tip: Building a simple outdoor shower for your backyard is a complex project, but with proper plans any person with basic woodworking skills can obtain a professional result.
Outdoor shower plans

Building the frame
The first step of the outdoor project is to build the frame of the floor. As you can see in the plans, we recommend you to assemble the frame by using 2×6 lumber. Cut the components at the right size and lock them together with galvanized screws.
Drill pilot holes through the perimeter joists before inserting the screws, to prevent the wood from splitting. Check if the corners are right-angled and make sure the joists are horizontal.
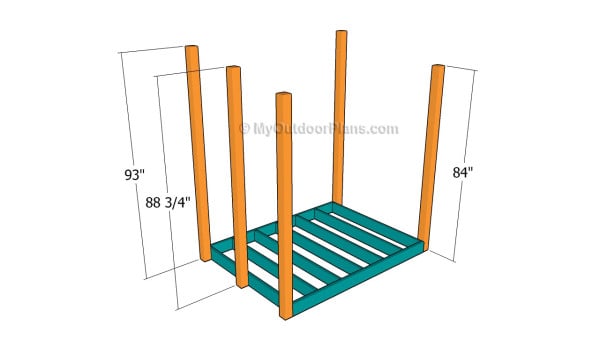
Attaching the posts
Attach the 4×4 posts to the exterior of the frame, by using the information from the free plans. Drill pilot holes at the bottom of the posts and insert lag bolts into the frame, after plumbing them with a spirit level.
It is essential to cut the posts at the right size and to attach them tightly to the frame. Work with attention and plumb the posts before attaching them into place, if you want to get a professional result.
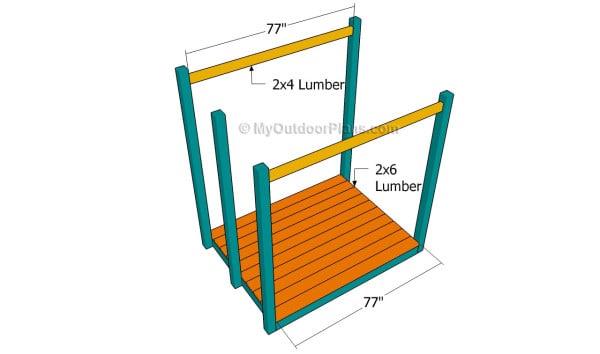
Attaching the flooring
Attach the 2×6 slats to the floor frame and lock them to the joists with 2 1/2″ galvanized screws. Drill pilot holes through the slats before inserting the screws, making sure you also countersink them.
Top Tip: Place a piece of wood between the slats, in order to get consistent gaps. Fit the 2×4 supports between the top of the posts, in order to reinforce the structure of the outdoor shower.
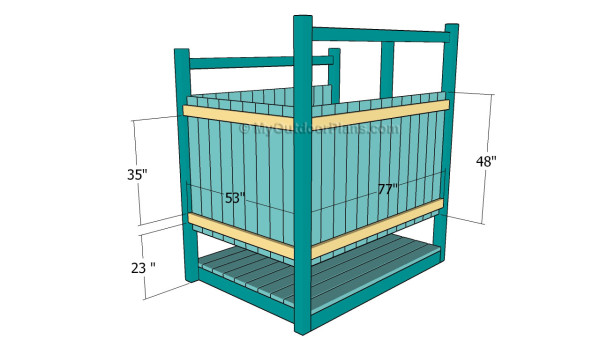
Attaching the side walls
Continue the woodworking project by attaching the side panels between the posts. Don’t forget that you should adjust the size of the slats before locking them to the cleats. Drill pocket holes at both ends of the cleats before locking them to the posts.
Top Tip: Add waterproof glue to the joints before inserting the galvanized screws, if you want to get the job done in a professional manner.
Fitting the rafters
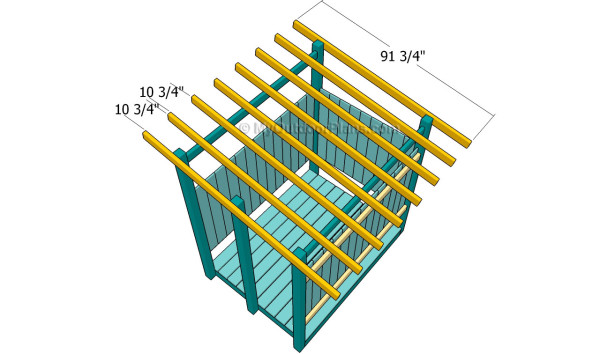
Attach the 2×4 rafters to the supports, making sure you place them equally spaced. Drill pilot holes and insert the screws into the supports. Make sure the rafters overhang both on the front and the back of the shower.
Installing the door
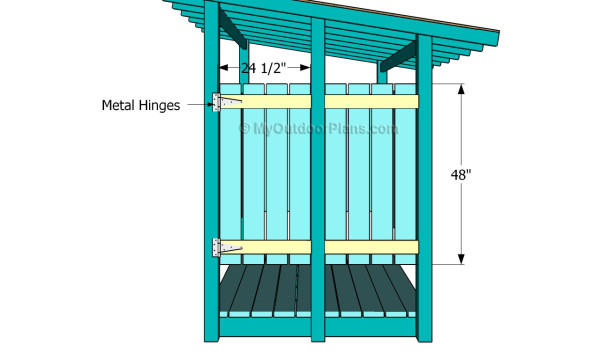
Build the doors for the outdoor shower by using the information described in the plans. Attach the slats over the cleats and make sure the corners are right-angled. Fit the door inside the opening and lock it to the posts with metal hinges.
Top Tip: Check if the door opens properly and install a proper latch. Afterwards, you need to move the shower to the definitive location and take care of the finishing touches.
Outdoor Shower Plans
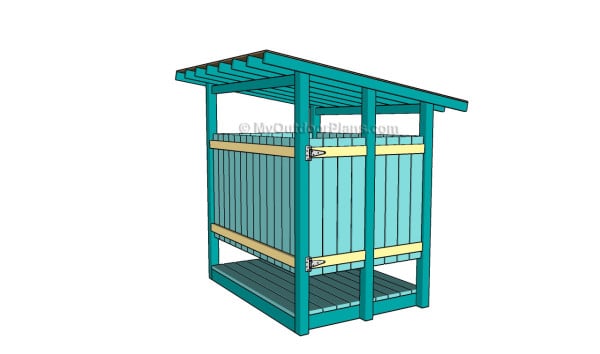
Fill the holes with putty and let it dry out for several days. Smooth the wooden surfaces with 120-grit sandpaper and clean the residues with a dry cloth. Cover the roof structure with a piece of waterproof fabric and lock it to the rafters with staples.
Top Tip: Apply several coats of paint over the wooden components, in order to protect them from water damage. Make the plumbing connections and enjoy your new backyard construction.
This woodworking project was about outdoor shower plans. If you want to see more outdoor plans, we recommend you to check out the rest of our step by step projects. LIKE us on Facebook to be the first that gets our latest updates and submit pictures with your DIY projects.
EXPLORE MORE IDEAS FOR:
 |
 |
 |
 |

5 comments
why when i click on woodworking plans am i seeing a pdf converter screen forcing me to down load a program i dont use. How do i get to the wood working plans without downloading this program
thanks
doug
Please read the FAQs: http://myoutdoorplans.com/faq/
Just a heads up: your list of supplies left out 2 77″ 2x4s(the two that hold up the rafters)
These shower instructions reference “the free plans” in a couple of spots. Where do I get the free plans. I can’t locate them anywhere on this website??
They are in front of you, on the blog. They are free, none asked you money for access. To print them, read the blog FAQs.