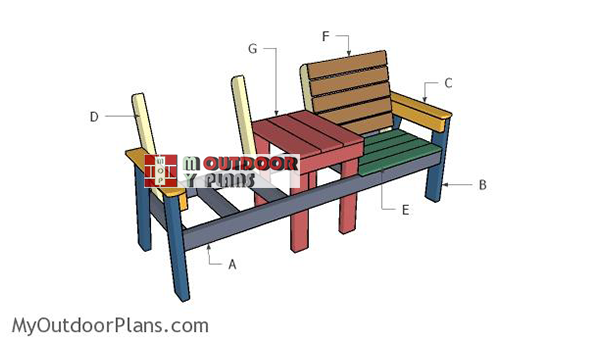
This step by step woodworking project is about large double chair bench with table plans. If you are a big guy and you like the double chair bench design, the initial plans I have designed might me a little too narrow for your needs. That is why I have adjusted the plans and made the chair wider, as well as I added 2×4 legs to the middle table and extra supports to the seats. Now, the outdoor bench is a lot more sturdy while keeping the same unique and rustic design. It is an ideal project for a deck or a backyard patio. If you are looking for free woodworking plans for an unique garden bench you are at the right place.
When buying the lumber, you should select the planks with great care, making sure they are straight and without any visible flaws (cracks, knots, twists, decay). Investing in cedar or other weather resistant lumber is a good idea, as it will pay off on the long run. Use a spirit level to plumb and align the components, before inserting the galvanized screws, otherwise the bench won’t have a symmetrical look. If you have all the materials and tools required for the project, you could get the job done in about a day. See all my Premium Plans HERE.
Projects made from these plans
Large Double Chair Bench Plans
Building-a-large-double-chair-bench
Cut & Shopping Lists
- A – 2 pieces of 2×4 lumber – 68″ long, 6 pieces – 18″ long FRAME
- B – 2 pieces of 2×4 lumber – 23″ long, 2 pieces – 24 3/4″ long LEGS
- C – 2 pieces of 2×4 lumber – 21 3/4″ long, 2 poieces of 1×4 lumber – 22 1/4″ long SUPPORTS
- D – 4 pieces of 2×4 lumber – 24″ long BACKREST SUPPORTS
- E – 8 pieces of 1×4 lumber – 25 1/2″ long SEAT
- F – 10 pieces of 1×4 lumber – 24″ long BACKREST
- G – 4 pieces of 2×4 lumber – 23″ long, 2 pieces – 17″ long, 3 pieces of 1×6 lumber – 21 3/4″ long TABLE
- 8 pieces of 2×4 lumber – 8′
- 6 pieces of 1×4 lumber – 8′
- 1 piece of 1×6 lumber – 8′
- 100 pieces of 1 1/4″ screws
- 100 pieces of 2 1/2″ screws
- filler, glue, stain
Tools
![]() Hammer, Tape measure, Framing square, Level
Hammer, Tape measure, Framing square, Level
![]() Miter saw, Drill machinery, Screwdriver, Sander
Miter saw, Drill machinery, Screwdriver, Sander
Time
![]() One day
One day
It’s that easy to build a Jack & Jill bench!
How to build a heavy duty double chair bench
Seat frame support
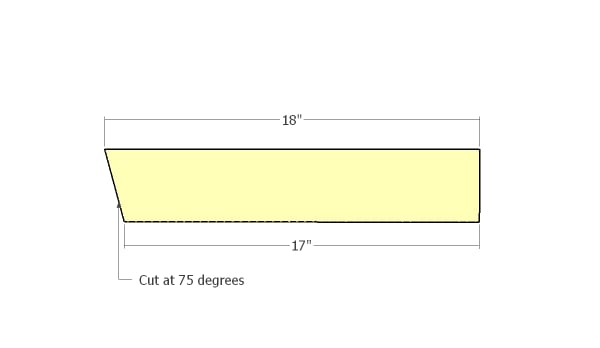
The first step of the project is to build the seat frame for the double chair bench. Use 2×4 lumber for the components, making sure you cut them at the right dimensions. Cut one end of the supports at 75 degrees using a good miter saw.
Building-the-frame-of-the-bench
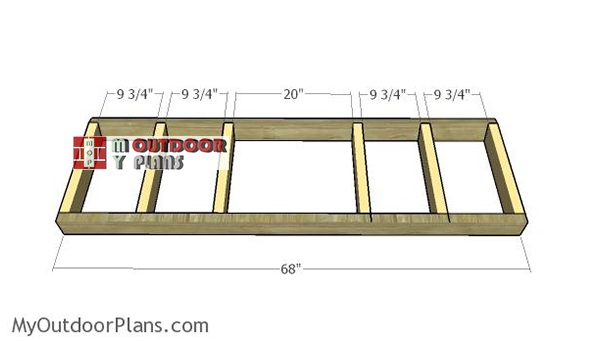
Next, you need to assemble the seat frame by attaching the 2×4 supports, as shown in the diagram. Drill pilot holes trough the front and back supports and insert 2 1/2″ screws into the perpendicular components. Make sure the corners are square and add waterproof glue to the joints.

Building-the-bench-legs
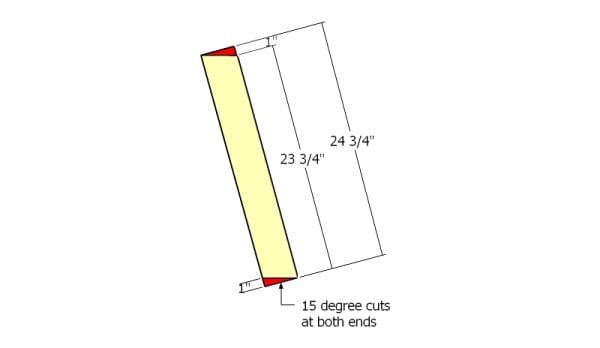
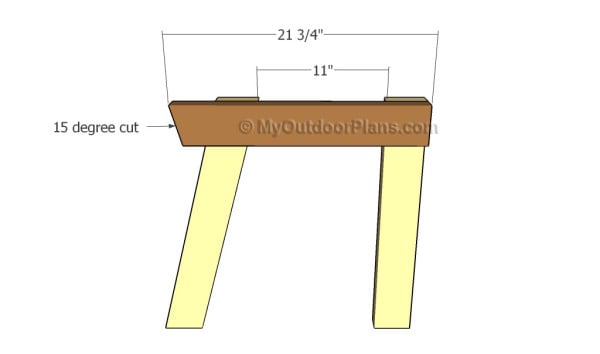
Continue the woodworking project by building the legs for the double chair bench with table. Cut both ends of the back legs at 75 degrees. Smooth the edges with sandpaper.
Back Legs
You can see in the diagram more information about cutting the back legs. As I have already said, cut both ends at 75 degree, which means you need to make 15 degree cuts. Use the information from the diagram to build the back legs properly. The easiest way to get accurate angle cuts is to use a miter saw. Smooth the cut edges with sandpaper.
Attaching the armrest support
Continue the project by attaching the top support to the side legs. Cut one end of the 2×4 support at 75 degrees. Attach the support to the top of the legs, making sure the edges are perfectly aligned. Drill pilot holes and secure the support to the legs using 2 1/2″ screws. Pre-drilling prevents the wood from splitting.
Use a carpentry square to make sure the corners are 90 degrees. In addition, you an set the legs against a straight line, so you make sure they are aligned properly, before attaching the horizontal supports.
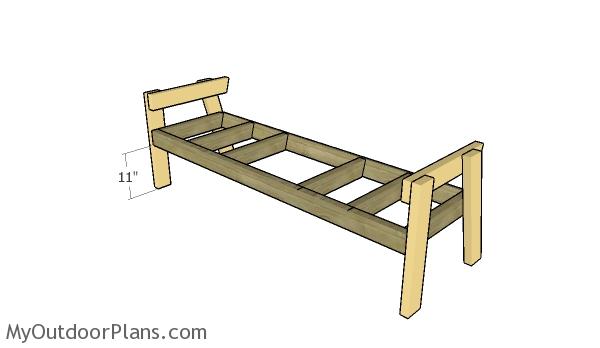
Assembling the frame of the bench
Attach the sides to the seat frame for the double chair bench. Drill pilot holes through the sides of the frame and insert 2 1/2″ screws into the legs. Make sure the corners are square and align the seat frame to the side legs flush.
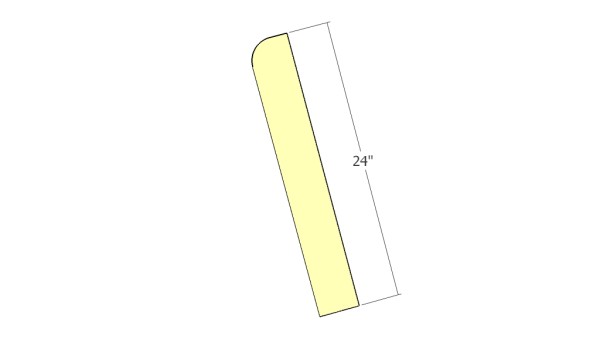
Building the backrest supports
Build the backrest supports from 2×4 lumber. Round the exposed corner of the supports using a jigsaw and smooth the edges with sandpaper.
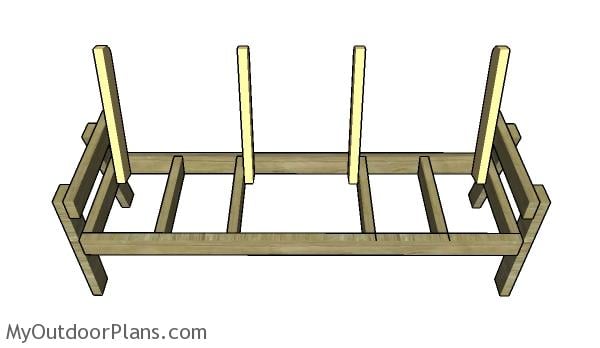
Fitting the backrest supports
Fit the backrest supports to the seat frame, as shown in the diagram. Align everything with attention and drill pilot holes through the supports. Insert 2 1/2″ screws into the seat frame. Make sure everything is aligned properly before inserting the galvanized screws.
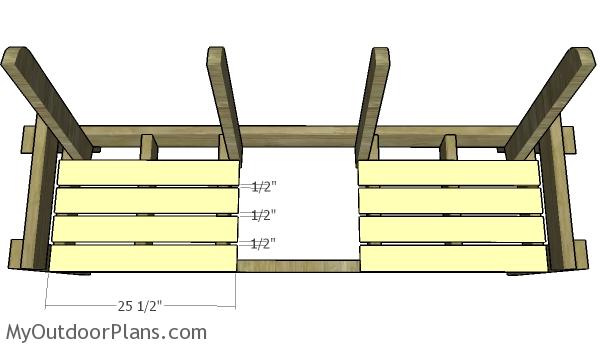
Fitting the seat slats
Next, attach the 1×4 slats to the seat frame to form the chairs. Place a piece of 1/2″ plywood between the slats to create even gaps between the components. Drill pilot holes and use 1 1/4″ screws to secure the slats into place.
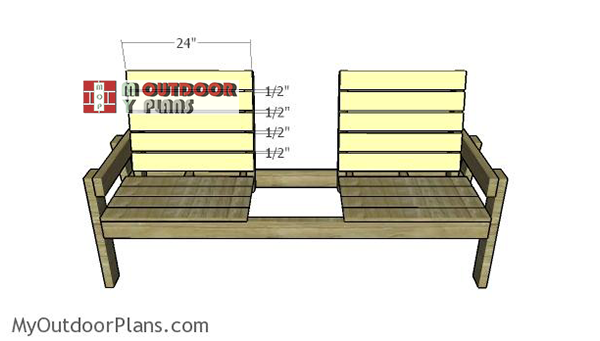
Attaching-the-backrest
Attach the backrest slats to the supports in the same manner described above.
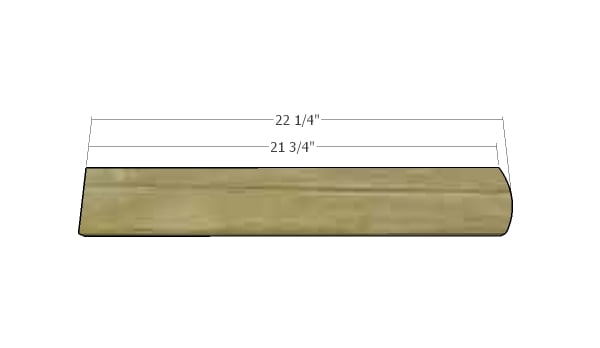
Building the armrests
Build the armrests for the double chair bench from 1×4 lumber. Round one end of the slats for a beautiful look. Smooth the edges with sandpaper.
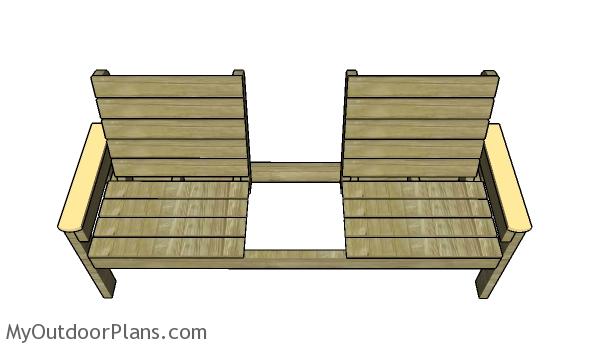
Fitting the armrests
Fit the armrests to the double chair bench. Align the components with attention and secure them into place with 1 1/4″ brad nails.
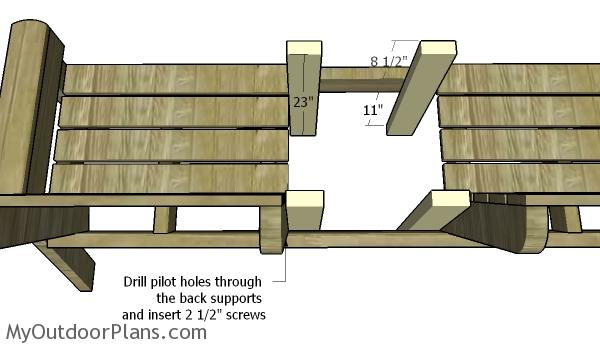
Fitting the table legs
Next, you have to attach the 2×4 legs to the middle of the double chair bench. These legs have a dual purpose, on one hand they add rigidity to the bench and on the other hand they will support the tabletop. Place the bench on a level surface before attaching the legs to structure.
Drill pilot holes through the legs and insert 2 1/2″ screws into place. Use a spirit level to make sure the legs are plumb before inserting the screws, for a professional result.
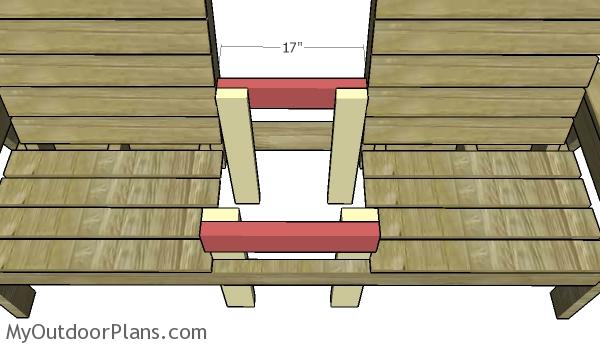
Fitting the table supports
Fit the 2×4 supports to the top of the legs, as shown in the diagram. Drill pilot holes through the legs and insert 2 1/2″ screws into the supports. Make sure the supports are perfectly horizontal and check if the corner are square.
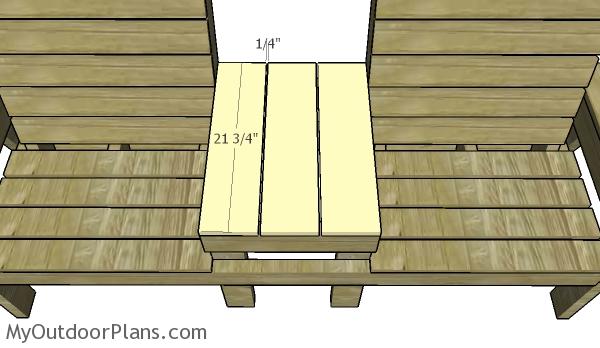
Fitting the tabletop slats
Use 1×6 lumber for the tabletop. Place a piece of 1/4″ plywood between the slats to get consistent gaps. Drill pilot holes through the slats and insert 1 1/4″ screws into the supports. Smooth the edges with attention for a professional result.

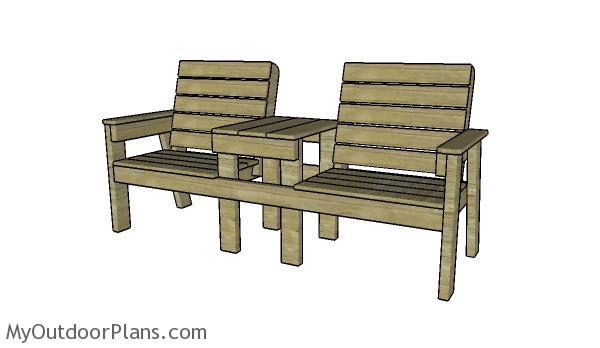
Large Double chair bench with table plans
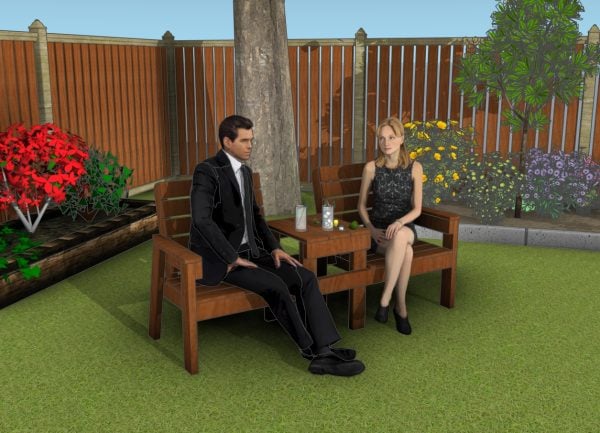
If you find this double chair bench too big and over-engineered for your needs, you should take a look over the initial plans. If you liked this patio furniture plan, then you would also love the corresponding chair. In this manner, you can create a relaxation area where you can hang out with your friends and family.
This bench will shortly become a centerpiece and a focus point on you property. If you are looking for a great conversation piece, I recommend you to consider building one. You can enjoy yourself under the shade of the porch, reading a good book and sipping a lemonade. In addition, you can have a friend or a loved one keeping you company on the other chair.
Large Double chair bench plans
One of the last steps of the woodworking project is to take care of the finishing touches. Therefore, fill the pilot holes with wood putty and smooth the surface with 120-grit sandpaper. Attach handles to the lid, to ease the opening process.
Large double chair bench
Top Tip: If you want to enhance the look of the project and to protect the wooden bench from decay, we recommend you to cover the components with paint or stain. If you want to get PREMIUM PLANS for this project, in a PDF format, please press GET PDF PLANS button bellow. Thank you for the support.

This woodworking project was about large double chair bench with table plans. If you want to see more outdoor plans, we recommend you to check out the rest of our step by step projects. LIKE us on Facebook and Google + to be the first that gets out latest projects and to hep us keep adding free woodworking plans for you.
18 comments
My kids and I made this for my wife as a Mother’s Day gift. We went to the lumber yard at 8:30 am and by 6 pm, we were to the point of it being complete less filling the holes, sanding, and painting. We were able to get it done with 7 2×4’s, but 8 is good in case you miscut. Thank you for the plans, it was a fun project for us.
You’re very welcome. I am happy to hear it was a success and you like how it came out. I have featured your project and I’m looking forward to seeing your next builds.
How tough would it be to modify these plans into something taller. My initial rookie thoughts would be to make all the legs longer and then doing 2×4’s all the way around about a foot up and using that on the front to help build a step/foot rest. Our deck railing hits in the wrong spot for a view from a lower chair. Thanks for any advice
I don’t think it will be stable enough if you make the legs too tall. Another idea would be to build a base/stand at least double the size of the bench and the fit on top.
Could you tell me what the finished dimensions are for the DEPTH of the seat and the HEIGHT of the seat back? I have some outdoor cushions I would like to add to this but not sure if they would fit. Thanks!!!!
Great plans, put one together this weekend. Took me about 6 hours, but I am not a woodworker and my garage is my shop. Had to plug and unplug tools, due to lack of outlets. A person with a nice setup could make one quicker.
That’s awesome. You can share a few pics at: http://myoutdoorplans.com/contact/
Could you use wooden 3/8 wooden dowels instead of screws? Also do you paint and polyurethane each piece before assembly?
Yes, you can use dowels for the joints. And again yes, you have to paint the components before assembly.
hopefully one last question. New to wood working, I know the bill of materials calls for 8 each 2×4’s 8 ft long. Could you purchase 11 each 2×4 that are 6 feet long instead?
No, it doesn’t work that way. You would need more than 11 pieces if you go for the 6 ft boards.
Do you have premium plans for this? I know there are plans for the smaller one but I am a beginner so full plans with the added adjustments would be great! Thanks!
No plans yet, but since you asked nicely, let me a few days. Saturday the premium plans should be on the blog. Cheers!
UPDATE: Premium Plans here: https://gum.co/nAWIxb
Thank You!!
hope you send free plans
Read this: https://myoutdoorplans.com/faq/
Very disappointed in the premium plans. About the only difference is that they are painted. Not much more helpful.
Really? How about the Cut layout diagrams (shows you how to cut the parts to get minimal waste material), the color code? Is there anything that I promised you will get in the premium plans, and you didn’t receive?