This step by step diy woodworking project is about glider swing stand plans. Create a beautiful wooden glider swing for your patio, to enjoy your afternoon in open space. You can build this stand in just one day with common household tools and under 50 $ worth of raw materials (if you go with cedar, pine is a lot cheaper). Make sure you take a look over the rest of plans to see alternatives and more projects for your garden. Premium Plans available for this project in the Shop.
Work with attention and don’t forget that a good planning will save you from many issues and it will keep the costs withing the total budget. Invest in high quality materials, such as pine, redwood or cedar. Drill pocket holes before inserting the galvanized screws, to prevent the wood from splitting. Add waterproof glue to the joints, in order to enhance the rigidity of the structure. See all my Premium Plans HERE.
Projects made from these plans
It’s that simple to build a glider swing!
Glider Swing Plans

Building-a-glide-swing-stand
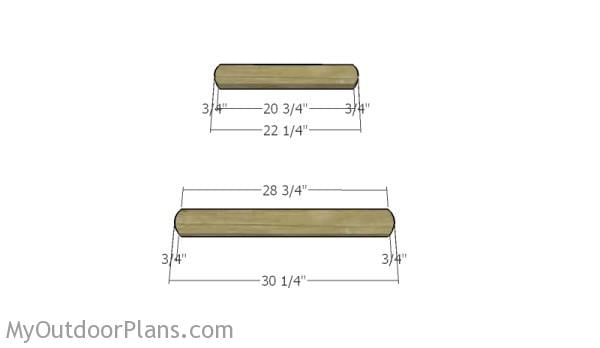
Cut List
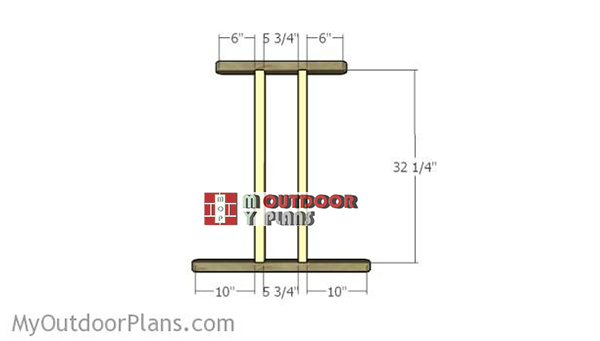
- A – 4 pieces of 2×4 lumber – 32 1/4″ long LEGS
- B – 2 pieces of 2×4 lumber – 22 1/4″ long, 2 pieces – 30 1/4″ long FRAME
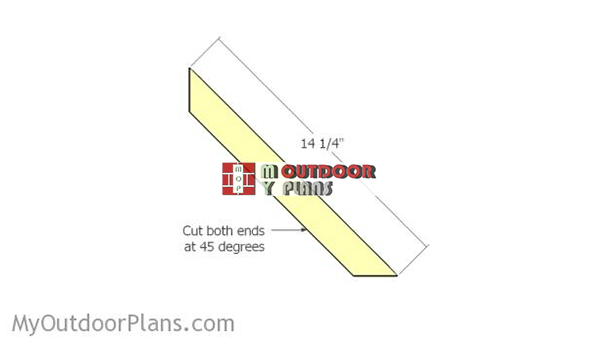
- C – 4 pieces of 2×4 – 14 1/4″ long, 2 pieces – 5 3/4″ long BRACES
- D – 2 pieces of 2×4 lumber – 70″ long SUPPORTS
Shopping List
- 6 pieces of 2×4 lumber – 8′
- 100 pieces of 2 1/2″ screws
Tools
![]() Hammer, Tape measure, Framing square, Level
Hammer, Tape measure, Framing square, Level
![]() Miter saw, Drill machinery, Screwdriver, Sander
Miter saw, Drill machinery, Screwdriver, Sander
![]() Post hole digger, Concrete mixer
Post hole digger, Concrete mixer
Time
![]() One day
One day
Related:
- PART 1: Glider stand plans
- PART 2: Swing bench plans
How to build a glider swing stand
Top and bottom supports
The first step of the project is to build the bottom and top components for the side frames. If you want to enhance the look of the components, you can round both ends with a jigsaw. Smooth the edges with sandpaper and remove the residues with a damp cloth.
Building-the-side-frames
Build the vertical supports from 2×4 lumber. Drill pilot holes through the top and bottom supports and insert 2 1/2″ screws into the vertical components. Align the edges with attention. Alternatively, you can drill pocket holes at both ends of the vertical components and insert 2 1/2″ screws into the supports.
Building-the-braces
Build the braces from 2×4 lumber. Cut both ends of the braces at 45 degrees.
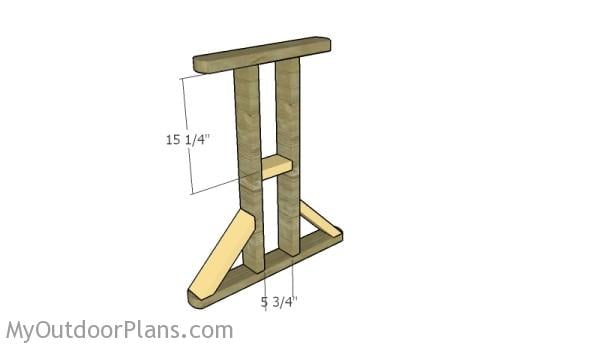
Fitting the braces
Fit the braces to the side frames, as shown in the plans. Align the edges, drill pilot holes and insert 2 1/2″ screws to lock the braces into place.
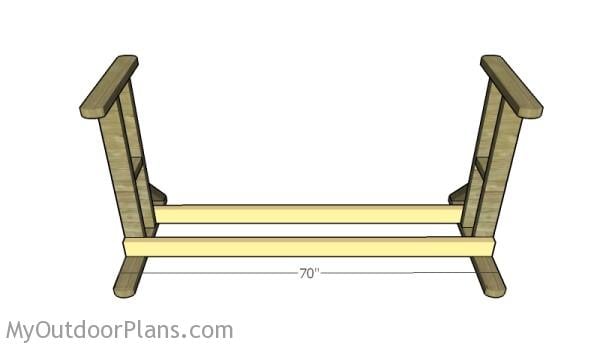
Fitting the base supports
Next, you need to assemble the stand by fitting the bottom braces. Cut the components at the right dimension (according to the size of your swing bench) and lock them to the vertical components with 2 1/2″ screws. Drill pilot holes to prevent the wood from splitting.
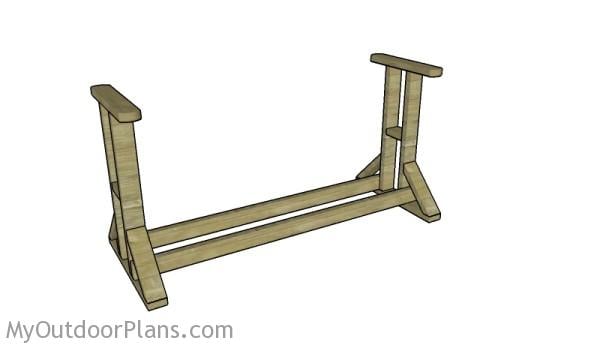
Glider swing stand
Make sure the side frames are plumb and check if the corners are square.
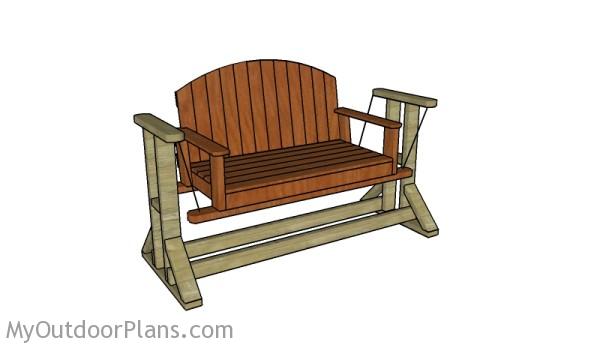
Wooden glider swing plans
One of the last steps of the woodworking project is to take care of the finishing touches. Therefore, fill the pilot holes with wood putty and smooth the surface with 120-150 grit sandpaper.
Glider swing plans
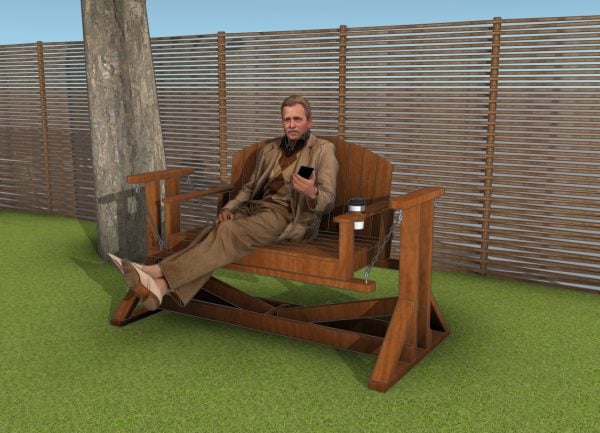
Top Tip: If you want to enhance the look of the woodworking project and to protect the stand from decay, we recommend you to cover the components with paint or stain. Check out PART 2 of the project, to learn how to build the swing bench. Premium Plans available for this project in the Shop.
If you want to get PREMIUM PLANS for this project, in a PDF format, please press GET PDF PLANS button bellow. Thank you for the support.

This woodworking project was about glider swing plans. If you want to see more outdoor plans, we recommend you to check out the rest of our step by step projects. LIKE us on Facebook and Google + to be the first that gets out latest projects.

17 comments
How do make coins of plans
I don’t understand what you are asking. Can you please rephrase it so I can help you?
The way the chains are set.when a person sits down and leans back won’t the seat flip backwords.just want to know.thank you.have you tested for that kind of predicament.
Unfortunately the measurement given for the braces between the uprights, 5 1/4″ is incorrect. It should be 7 1/4″. I cut all of my pieces according to your measurements. I had to make part D 12″ longer as I have a bigger swing. Even so after laying out everything just so I ended up with only a #10 can full of scrap pieces. I could have cut the said braces longer, but. So now I am faced with finding some scraps to make the longer braces or cutting another full size 2 X 4. I also allowed for the longer supports under my swing.
Can you explain why do say the support measurement is incorrect? Why do you claim it should be 7 1/4″ long?
Sorry My mistake! I didn’t allow for the setback on the diagonal braces.
are this plans for a 5ft long bench?
No, the plans are for a 4 ft bench. See the bench plans here: http://myoutdoorplans.com/furniture/swing-bench-plans/
If you where wanting a wider bench seat, what adjustments would be needed?
Other than the obvious of widening the bench & frame.
Worried about how it may effect the load or the swinging action of the bench.
I would add more braces to the stand from all directions.
I’m said tchoma faustin very interesting project if we can open a center here in Kenya kakuma
Love the idea but ..when anyone even my 90lbs son sits in it the sides of the stand pull in towards the swing,great idea but don’t think there’s anyway around the stand pullingredients in when ya put weight on the swing.
You can easily solve that with additional cross braces.
Thanks for your plans glider swing I love it the only thing I want to know is the list of the hard ware. Thanks and God bless you
Enjoyed your page.
What is the weight of the completed glider swing with stand? Can one person do this themselves or is it so heavy that you need two people?
I don’t have an exact number, but I’m pretty certain that you need two people to move it around.