This step by step woodworking project is about garden seat plans free. In this article we show you how to make a simple bench for your garden out of 2×4 lumber and using common carpentry techniques and tools. There are many designs and plans you could choose from, so make sure you check out the rest of the related plans, before taking a decision regarding your outdoor project.
There are several aspects you should take into account, if you want to get the job done as a professional. Therefore, buy weather-resistant lumber, even if this increases the total costs of the project (cedar, redwood, pine). Align all the components at both ends before driving in the screws and locking them together tightly. Using carriage bolts will make the assembly process straight forward and create rigid joints. See all my Premium Plans HERE.
Projects made from these plans
Cut & Shopping Lists
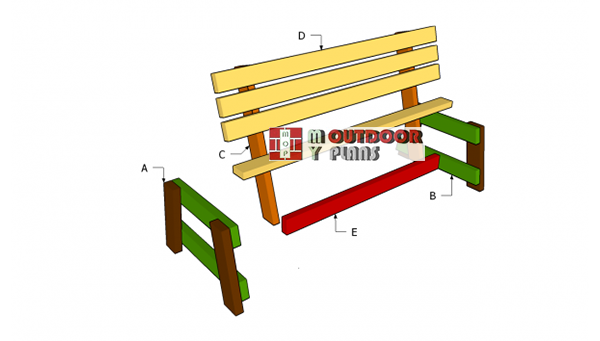
- A – 2 pieces of 2×4 lumber 16” long LEGS
- B – 2 pieces of 2×4 lumber 24 3/4” long, 2 pieces of 2×4 lumber – 21 1/4 ” long BRACES
- C – 2 pieces of 2×4 lumber 32” long SUPPORTS
- D – 7 pieces of 2×4 lumber – 60” long SLATS
- E – 1 pieces of 2×4 lumber – 46” long STRETCHER
Tools
![]() Hammer, Tape measure, Framing square
Hammer, Tape measure, Framing square
![]() Miter saw, Drill machinery, Screwdriver, Sander
Miter saw, Drill machinery, Screwdriver, Sander
![]() Safety Gloves, Safety Glasses
Safety Gloves, Safety Glasses
Time
![]() One day
One day
Building a wooden seat
Building-a-garden-seat
You could change dramatically the look of your garden by installing a nice bench seat. In addition, if you follow our tips and instructions, you could get the job done in less than a week.
Top Tip: Adjust the size of the bench to your needs, before starting the project. In addition, plan everything from the very beginning, if you want to get a professional result.
Garden seat plans
Building-the-sides-of-the-bench
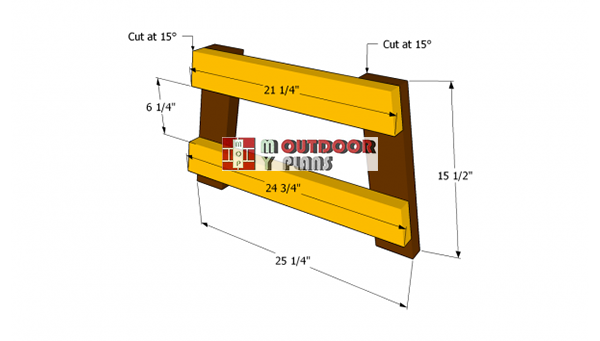
The first step of the project is to build the sides of the garden seat. Therefore, you should follow our plans and build the main components out of 2×4 lumber. Cut the both ends of the legs and of the braces at 75º, using a good miter saw (make 15 degree cuts).
Drill pilot holes trough the braces and secure them to the legs, by using 3 1/2” carriage bolts. Make sure the ends of the components are flush, before driving in the screws.
Installing-the-backrest-supports
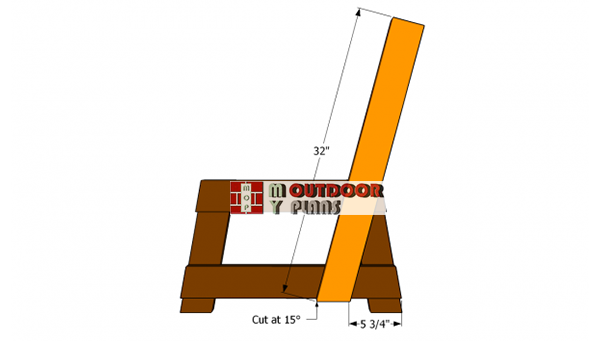
Continue the project by installing the frame of the back support. As you can see in the image, you should cut two pieces of 2×4 lumber at about 32”. In addition, cut one end of the supports at 75º, or at an angle that fits your needs and tastes (make 15 degree cuts).
Top Tip: Attach the support to the side frames, drill pilot holes and insert the carriage bolts. Work with great care, if you want to avoid costly mistakes. Assemble the components on a level surface.

Fitting the stretcher
In order to provided extra-support to the frame of the garden seat, you should install a stretcher between the side frames. Align everything with great care, drill pilot holes and drive in the 3” wood screws trough the braces into the stretcher.
Top Tip: Usually this step should be done after fitting the seat slats, but if you ask a friend to assist you, you could install the stretcher at this stage. Check if the stretcher is perfectly level.

Installing the slats
One of the last steps of thew project is to attach 2×4 slats to the seat and to the back support. As you can notice in the image, you could place the slats symmetrically and leave about 1/2” between them. Alternatively, you could use 2×6 boards.
Top Tip: Drill pilot holes at both ends and secure them to the frame of the seat with 2 1/2” wood screws. Don’t forget to countersink the head of the screws.

Garden seat plans
Last but not least, you should take care of the finishing touches. In order to get a professional result, you have to fill the holes with wood filler, let it dry out and smooth the surface with 120-grit sandpaper.
Top Tip: Round the exposed edges with a router and a 1/4” bit. Lastly, apply several coats of stain or paint to protect the wood from decay or water damage.
This article was about garden seat plans. If you want to see more outdoor plans, we recommend you to check out the rest of the projects.
5 comments
What do you use to put it together? Screws? Carriage bolts? Does it matter which ones I use?
If you read the article carefully, you will get the answers for each step of the project. Use 3 1/2″ carriage bolts for the frame and 2 1/2″ galvanized screws for the seat and backrest slats.
Hi ,
The picture shows the end frames cut at 15 degrees but in the description it says 10 degrees. Which is best ?
Make 15 degree cuts. I updated the typing error in the article. Therefore, cut the ends at 75 degrees by making 15 degree cuts using your miter saw.
Thank you so much for offering up these plans. I purchased (9) 2 x 4 x 8 pressure treated pieces, (8) carriage bolts, etc… The plans call for 16″ cuts for the legs but the diagram shows 15 1/2″. Is that because of the 15 degree cut I’ll be making for the 4 pieces? Any other tips you can give me would be most appreciated. Thanks again and I look forward to posting my results when I’m done!