This step by step diy project is about folding picnic table plans plans. If you are tight on space in your backyard or you want to impress your friend with an unique project, you should consider building a nice folding picnic table bench. This 6′ wide project is built entirely from 2x4s and it has a nice design. Take a look over the rest of my woodworking plans, if you want to get more building inspiration.
When buying the lumber, you should select the planks with great care, making sure they are straight and without any visible flaws (cracks, knots, twists, decay). Investing in cedar or other weather resistant lumber is a good idea, as it will pay off on the long run. Use a spirit level to plumb and align the components, before inserting the galvanized screws, otherwise the project won’t have a symmetrical look. If you have all the materials and tools required for the project, you could get the job done in about a day. See all my Premium Plans HERE.
Projects made from these plans
Folding Picnic Table Plans
Building-a-folding-picnic-table
Cut & Shopping Lists
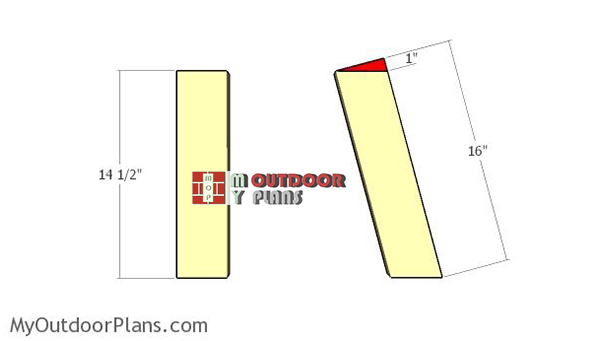
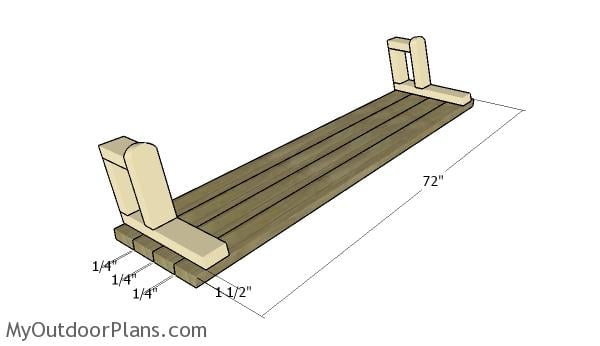
- A – 2 pieces of 2×4 lumber – 14 1/2″ long, 2 pieces – 16″ long LEGS
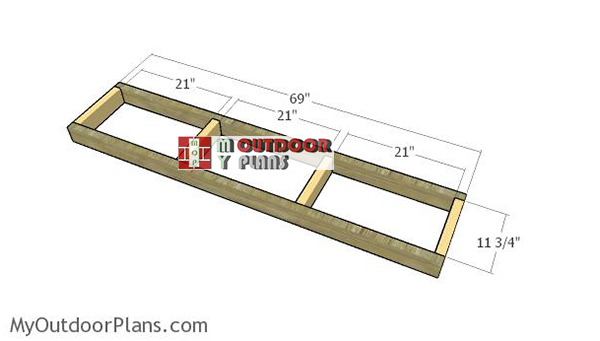
- B – 2 piece of 2×4 lumber – 69″ long, 4 pieces – 11 3/4″ long FRAME
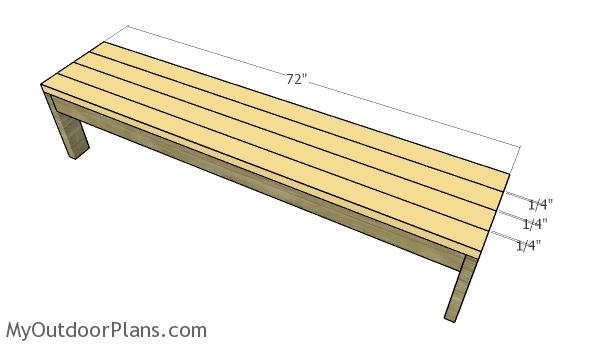
- C – 4 pieces of 2×4 lumber – 72″ long SEAT
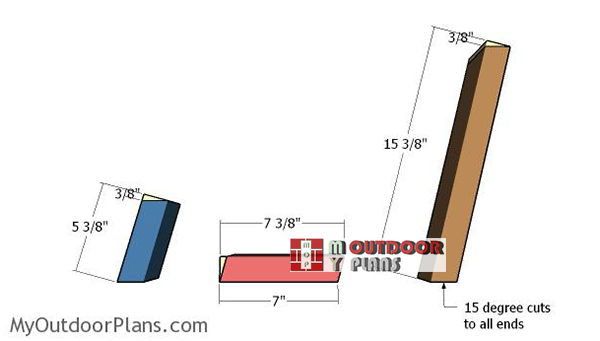
- D – 1 piece of 2×4 lumber – 5 3/8″ long, 1 piece – 7 3/8″ long, 1 piece – 15 3/8″ long, 1 piece – 10″ long 2xSUPPORT
- E – 4 pieces of 2×4 lumber – 72″ long TABLETOP
- 14 pieces of 2×4 lumber – 8′
- 2 1/2″ pocket screws
- 1 1/2″ brad nails, 2 1/2″ screws
- wood filler , wood glue, stain/paint
Tools
![]() Hammer, Tape measure, Framing square, Level
Hammer, Tape measure, Framing square, Level
![]() Miter saw, Drill machinery, Screwdriver, Sander
Miter saw, Drill machinery, Screwdriver, Sander
Time
![]() One day
One day
Related
It’s that simple to build a folding picnic table!
How to build a folding picnic table
Building-the-side-legs
The first step of the project is to build the legs for the bench seats. Cut the legs from 2×4 lumber, using the instructions from the diagrams. Mark the cut lines on the slats and get the job done with a saw. Smooth the edges with sandpaper for a professional result.
Building-the-seat-frame
Build the frame for the bench using 2×4 lumber. Drill pocket holes at both ends of the 11 3/4″ long components and insert 2 1/2″ screws into the perpendicular components. Align the edges flush and make sure the corners are right-angled. Add waterproof glue to the joints for a professional result.
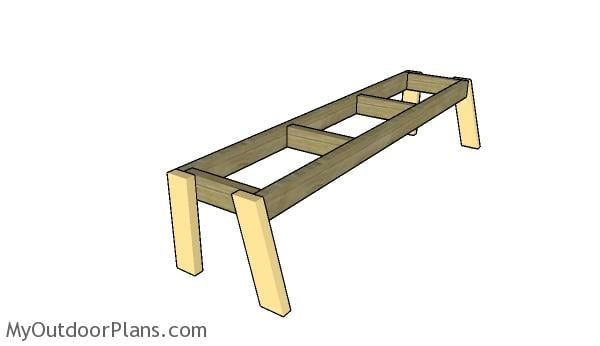
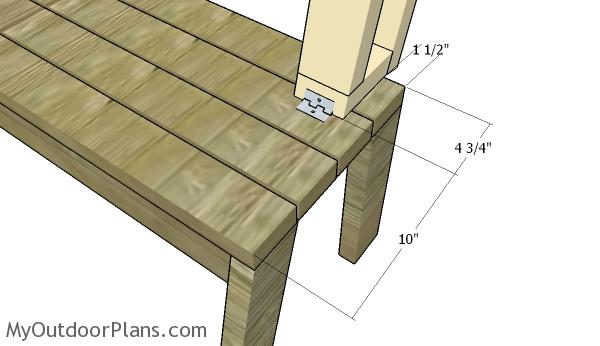
Attaching the legs
Attach the 2×4 legs to the seat frame, as shown in the diagram. Drill pilot holes through the top of the legs and insert 2 1/2″ screws into the frame. Make sure the corners are square for a neat result.
Fitting the seat slats
Attach 2×4 slats to the seat frame, making sure you space them evenly. In order to create consistent gaps, you need to fit a piece of 1/4″ plywood between the slats. Align the edges with attention. Drill pilot holes through the slats and insert 2 1/2″ screws into the frame.
Building-the-backrest-slats
After assembling the bench seat, you need to make the supports for the folding backrest. Start by cutting the components from 2×4 lumber, as shown in the diagram. Cut both ends of the components at 75 degrees, after taking accurate measurements.
Building the armrest
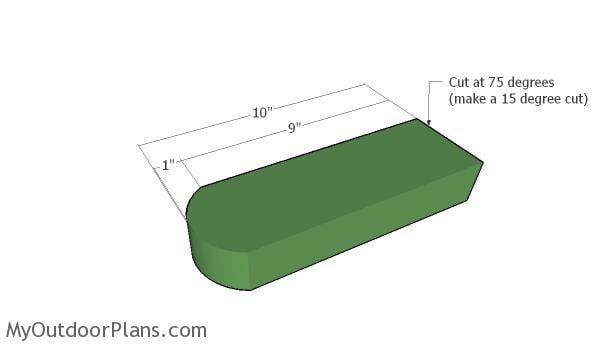
Next, cut the armrests for the bench using 2×4 lumber. Round one end of the armrests using a jigsaw and smooth the edges with sandpaper. In addition, cut the opposite end of the armrests at 75 degrees, for a professional result.
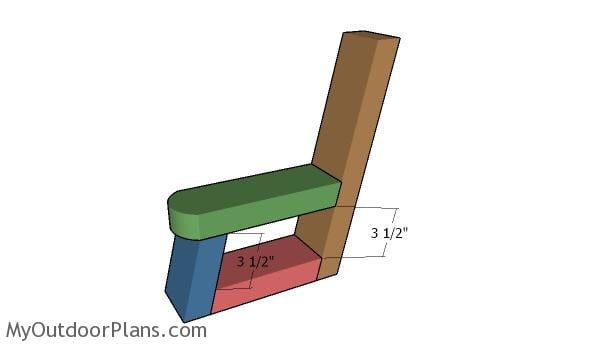
Assembling the backrest supports
After cutting the components for the armrest supports, I recommend you to assemble them, using the information from the diagram. Drill pilot holes and use 2 1/2″ screws to lock everything together tightly. Leave no gaps between the components and add waterproof glue for a professional result.
Assembling the backrest
Next, attach the 2×4 slats to the backrest supports, as shown in the diagram. Align the slats with attention and drill pilot holes through the support, before inserting the 2 1/2″ screws, for a professional result. Smooth everything with attention for a professional result.
Fitting the backrest to the bench
Fit the backrest to the bench and align the supports, as shown in the diagrams. Afterwards, you need to lock them supports into place with hinges, so you can fold down the table and turn it into a bench.
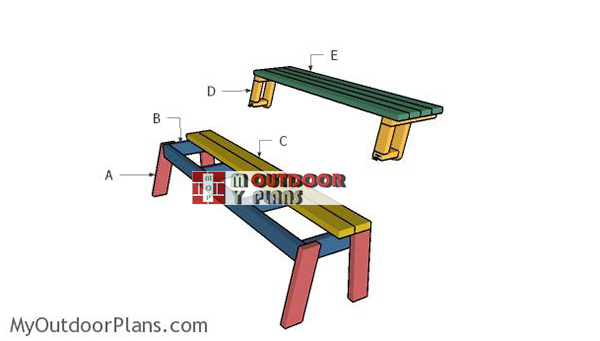
Assembling the picnic table benches
You can see in the plans the picnic table when it is fold up into a table.

Picnic table bench plans
For a maximum result, you should build a few of these and groups them, as shown in the image.

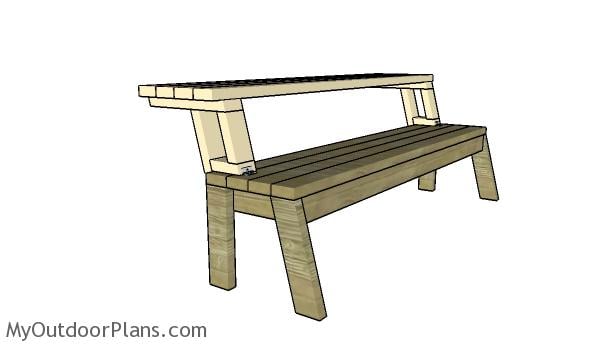
Picnic table bench
When you fold down the tabletop into a backrest, the bench will look as in the plans. This 6′ wide bench has a nice design and it is extremely comfy because of the angled backrest.
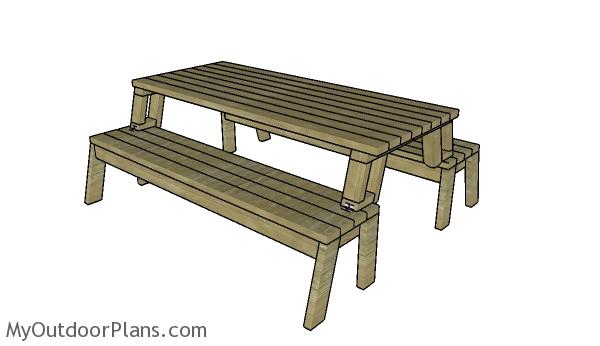
Folding picnic table plans
This is a simple project you should be able to build in a few days without much effort. This fold down picnic table and bench is a fun woodworking project as you can combine both projects in one. If you are looking for a project you can impress your friend with, this is a serious candidate on the list.
If you want to get this plan as a PDF file with 1 full cut list and 1 full shopping list, please take a look over the GET PDF PLANS button bellow. Thank you for your support.

This woodworking project was about folding picnic table plans free. If you want to see more outdoor plans, check out the rest of our step by step projects and follow the instructions to obtain a professional result.
6 comments
I saw a picnic table the other day for handicap and now can’t find it. Could you help me with this please? Thanks
It was this project, I think: http://myoutdoorplans.com/furniture/12-foot-picnic-table-with-roof-plans/
How many 2x4x8s does it take to make this? I am not sure where the number 14 comes from?
The list is for one bench / table.
Could this be modified to an 8 foot table without additional support(s)?
As someone who just recently build these tables, they work well but plan on adding a 1/4 inch to 1/2 inch wooden shim to go between the armrest/hinge when the tables are closed. It makes the table tops level and makes it more structurally sound.