This step by step diy project is about 8 foot picnic picnic table plans plans. If you have a backyard bbq, a nice 8′ picnic table will be an extraordinary addition. Lucky, I have you covered with step by step instructions and diagrams, so you can get the job done in a professional manner. Take a look over the rest of my woodworking plans, if you want to get more building inspiration. Premium Plans available for this project in the Shop.
When buying the lumber, you should select the planks with great care, making sure they are straight and without any visible flaws (cracks, knots, twists, decay). Investing in cedar or other weather resistant lumber is a good idea, as it will pay off on the long run. Use a spirit level to plumb and align the components, before inserting the galvanized screws, otherwise the project won’t have a symmetrical look. If you have all the materials and tools required for the project, you could get the job done in about a day. See all my Premium Plans HERE.
Projects made from these plans
It’s that simple to build a picnic table!
8 foot Picnic Table Plans

Building-a-8–ft-picnic-table
Cut & Shopping Lists
- A – 4 pieces of 2×6 lumber – 36″ long LEGS
- B – 2 pieces of 2×6 lumber – 60″ long SUPPORTS
- C – 3 piece of 2×4 lumber – 28 1/2″ long SUPPORTS
- D – 5 pieces of 2×6 lumber – 96″ long TABLETOP
- E – 2 pieces of 2×6 lumber – 85″ long SEAT STERTCHERS
- F – 4 pieces of 2×6 lumber – 96″ long SEAT
- G – 2 pieces of 2×4 lumber – 44 1/2″ long BRACES
- 2 pieces of 2×4 lumber – 8′
- 14 pieces of 2×6 lumber – 8′
- 3 1/2″ carriage bolts
- 2 1/2″ pocket screws
- 2 1/2″ screws
- wood filler , wood glue, stain/paint
Tools
![]() Hammer, Tape measure, Framing square, Level
Hammer, Tape measure, Framing square, Level
![]() Miter saw, Drill machinery, Screwdriver, Sander
Miter saw, Drill machinery, Screwdriver, Sander
Time
![]() One day
One day
Related
How to build a 8 foot picnic table
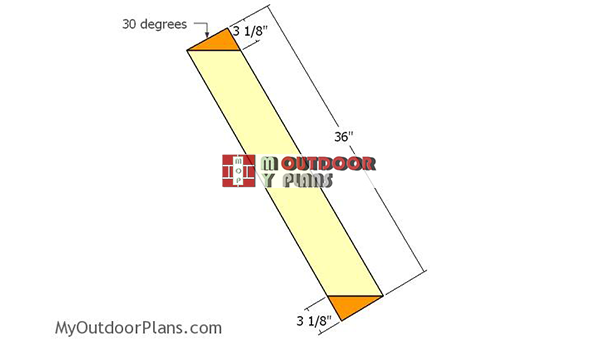
Building-the-legs
The first step of the outdoor project is to build the legs for the 8′ picnic table. As you can easily see in the diagram, you need to make 30 degree cuts to both ends of the 2×6 legs. Smooth the edges with sandpaper.

Tabletop-supports
Next, you need to build the tabletop supports from 2×4 lumber. Make 45 degree cuts to both ends of the supports, following the diagram. Moreover, drill pocket holes into the 2×4 supports, so you can lock it to the tabletop slats.
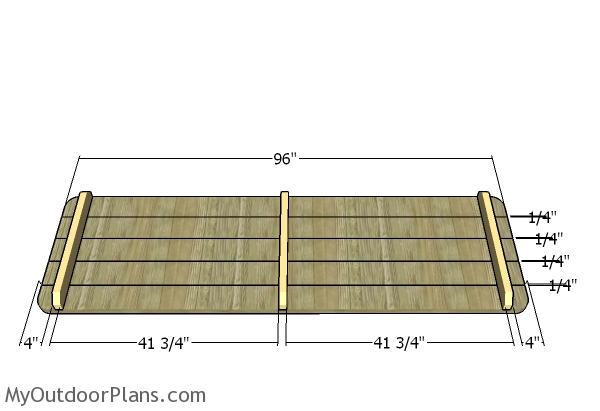
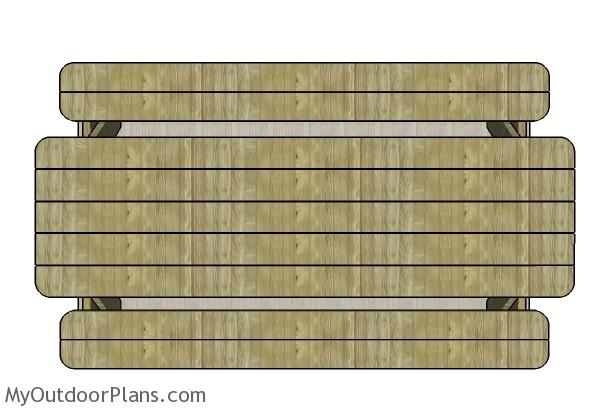
Assembling the tabletop
Lay the 2×6 tabletop slats on a level surface. Place 1/4″ plywood pieces between the slats so you can create even gaps. Fit the supports to the slats and then place them equally spaced. Insert 2 1/2″ screws to secure the supports into place tightly.
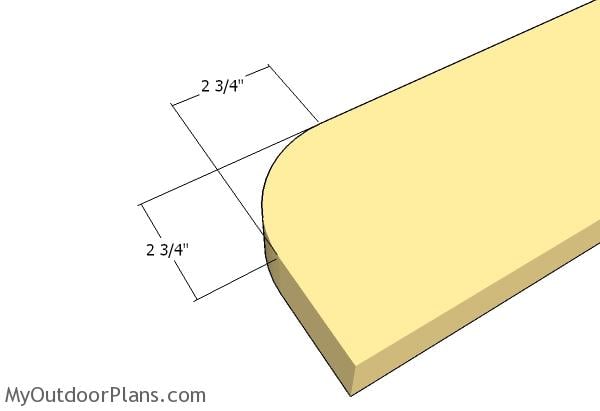
Decorative cuts
Use a jigsaw to make round decorative cuts to the corners of the tabletop.

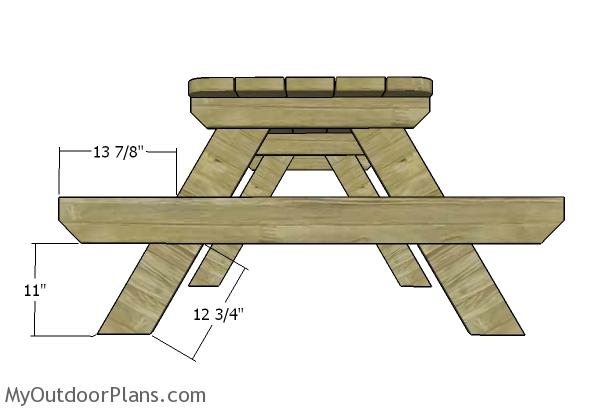
Fitting the legs
Fit the 2×6 legs to the picnic table, as shown in the diagram. Clamp the legs to the supports and then drill pilot holes through both components. Insert 3 1/2″ carriage bolts and tighten the components into place. Use two bolts for each joint for a professional result. Using the carriage bolts will also make disassembling the picnic table easy, if you want to move it to another location.
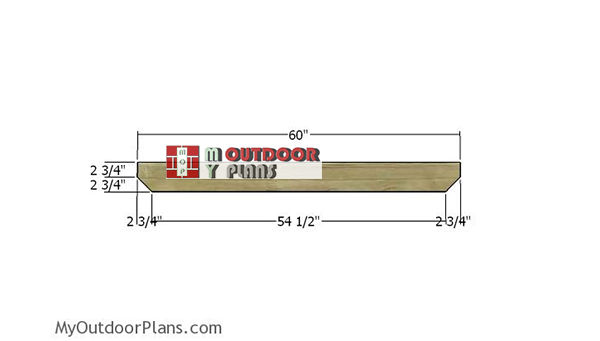
Seat-supports
Build the seat supports from 2×6 lumber. Make 45 degree cuts to both ends of the supports, as shown in the plans.
Fitting the seat supports
Align the seat supports to the legs and then clamp them into place tightly. Drill two pilot holes through the braces and through the legs, for each joint. Insert 3 1/2″ carriage bolts to lock the components together tightly. Use a spirit level to plumb the seat supports horizontally.
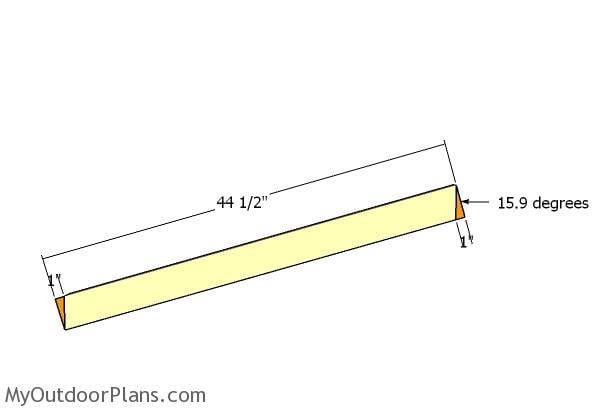
Digonal braces
Build the braces for the table from 2×4 lumber. Make 15.9 degrees cut to both ends of the braces. Smooth the edges with sandpaper.

Fitting the diagonal braces
Fit the diagonal braces to the picnic table, making sure the corners are square. Use a spirit level to plumb the legs and to check if the top is horizontal. Drill pilot holes and insert 2 1/2″ screws to lock the braces to the frame of the picnic table.
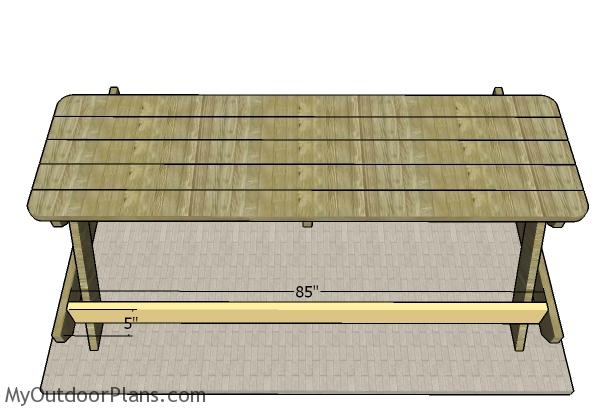
Seat under support
Fit a 2×6 beam to the picnic table, as shown in the diagram. Drill pocket holes at both ends of the supports and then secure them to the seat support with 2 1/2″ screws. Make sure the corners are square and then insert the screws.
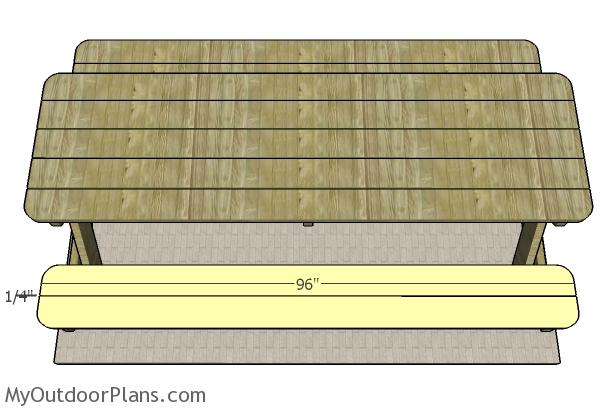
Fitting the seat slats
Last but not least, you need fit the 2×6 seat slats. Center the slats to the frame of the picnic table, drill pilot holes and insert 2 1/2″ screws. Countersink the head of the screws for a neat result. Round the corners of the seat slats with a spirit level for a neat result.

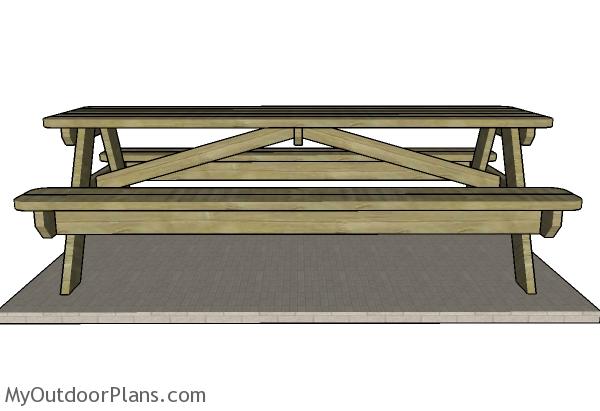
8 foot Picnic Table
Last but not least, you need to take care of the finishing touches. Fill the holes with wood putty and let them harden for a few hours. Smooth the surface with 120-220 grit sandpaper and round the exposed edges with a router. Apply a few coats of paint or stain to protect the lumber from the elements and to enhance the look of the 6 foot picnic table.
8′ Picnic Table
This picnic table is the ideal project for any garden, as it is easy to build and it the materials don’t cost a fortune. Moreover, if you have a drill, a saw and a sander, you will get the job done in one weekend.
How to build a 8 foot picnic table
Don’t forget to take a look over the rest of my picnic table plans HERE. If you are new to MyOutdoorPlans.com, I recommend you to check out the rest of my designs, as well, as I have created thousands of free plans for your backyard. Instant building inspiration right here! Premium Plans available for this project in the Shop.
This woodworking project was about 8 foot picnic table plans free. If you want to see more outdoor plans, check out the rest of our step by step projects and follow the instructions to obtain a professional result.
32 comments
Hi, did you just insert the carriage bolts by themselves or did you put a nut on the end of the bolt?
You need to use a washer and a nut, as well.
Hi a few questions:
-on the plan it says its an 8 foot picnic table, but on multiple spots it mentions it as a 6 foot picnic table. which is it?
-also, when making the cuts to the braces, it says to make them from the 2×6 lumber. however, on the materials, it says that the braces are 2×4, 44.5″ pieces of wood. are the braces 2×6 or 2×4?
thanks
It is a 8′ picnic table. The diagonal braces are made from 2x4s. Thank you for the feedback, I have updated the plans.
Overall, I am pretty satisfied with how the table has turned out so far. I would, however, like to offer a few suggestions that i feel would improve these plans.
1. A cut list that shows the most efficient way to cut the timber. I assumed the cut list was laid out this way only to discover half way in that the 60” inch bench supports should have been cut first leaving 2 of the 36” pieces needed for the legs. I ended up having to go out and buy one extra piece of 2”x6”x8’ because of this. This was obviously an error on my end in not doing more math and planning up front, but this edit may help other first timers (like myself) not make the same mistake.
2. You a have a diagram of where the pocket holes should go for the table top supports but not on the seat supports. I ended using my intution to figure out where they should go, but a demonstration would have been helpful. Just another edit that might help other first timers (like myself).
3. The fact that there doesn’t seem to be much room to screw the bench slats along the 85” support concerns me. It seems that over time, the slats may warp in the center with nothing to hold them down. I’m considering adding a 12 &1/4” piece of 2×6 half lapped over the 85” piece of 2×6 (laid perpendicular) and pocket whole screwing the seat slats down in the center to improve support and ensure longevity. This may be a bit of overthinking and over-engineering, but I’d love to know your thoughts.
4. I was pretty concerned about flipping the table top with just the legs carriage bolted into the table top support over by myself in order put the bench supports of the A frame in place 11” off the ground. Instead I opted to create some spacer pieces out of scrap lumber. The spacer pieces should be 8 & 3/8”. If you cut these spacer pieces, you can place them on the table top supports and place the bench support on top of the spacer pieces to position it. It makes it much easier to get that bench support in place and level and you get the same result of the bench support 11” off the ground.
This is just the 2 cents of an armature woodworker.
Thank you for your valuable comment. Regarding point 3, that is a good idea and it will definitely work. Looking forward to seeing your project, Donald!
I had 2 extra why u have to buy a extra one
Could you please send a list of how many bolts and screws needed to build this 8 foot picnic table?
16 pieces of 3 1/2′ carriage bolts
25 pieces of 2 1/2″ pocket screws
100 pieces of 2 1/2″ screws
Everything worked as planned , however the two 44-1/2” braces are not correct. They need be longer and a different angle
How do they need to be longer and at a different angle, when I design my projects in a 3d modeling software? I mean the dimensions and angles are accurate.
How many boards is needed to build this 2×6 pinic table all from 2×6’s
16 boards 8 ft
Nice plans, they were very helpful. I used them for a basis of what I had in mind for the table I wanted to build.
I planed 8 – 2x6x8 to take out the beaded edge for the table top, glued them together into a solid top. Took nice rosy colored pine 2×4 and wrapped it around the sides of the table 45’d corners. Did the math and widened the the supports. Then, assembled it, don’t recall the bit name but router-ed the top edge of the table and the seats with a nice detail and a rich rounded corner edge. That made it nice and comfortable on the backs of the legs with shorts on and looks sharp too. coated it in TWP cedar and couldn’t be happier with the result. Nice web site, thx.
Thank you for stopping by. I would love to see your project, it sounds like a great one. You can send a few pics: http://myoutdoorplans.com/contact/
Thanks for the plans. The table looks great! One thing I added was a second ~85 inch support under each bench so that each of the seat pieces can be supported and you don’t need to put anything under the crack between these pieces (my table is under a pine that drops a lot of needles).
Great design. Thank you! Built it just as you have it and it turned out great. Can’t wait to get it up to our mountain property!
That’s awesome. Congrats! I’d love to see some pics of the project, that’s my greatest joy for me 🙂
I’ll take a better picture when the table is in place up on our property.
Looking forward to that. Are you going to apply any finish on it?
Used your plan yesterday to make an 8′ table. Great plan, easy to follow and accurate. I saw where someone commented that they were off and the center supports need to be longer. I made all of my cuts exactly as you said and it fit great. Anyway, I did make a few changes. I didn’t want bother with pocket screws and just used 3″ exterior screws. I also used 8 1/8″ spacer cut from scrap to hold up the seat supports while mounting them. That worked great. I also used a piece of scrap clamped to the bottom of the seat supports to hold up the 85″ bench support while fastening it. Once I had the 85″ piece in place I used tie down straps to pull the seat supports up tight against the 85″ bench support while putting the screws into it.
But I just wanted to say that your plans are dead on and I appreciate it. And if others read this maybe it will give them some options. I can send you a pic of the spacers if you want. Just don’t know where to send it.
Thanks
Hi, I’m a complete novice at this so forgive any obvious questions…. I’m just about to order the materials for this project but I’m concerned about the 3 1/2 inch carriage bolts, they are used to join two pieces of 2 inch timber together, correct ? I may be misunderstanding the way the carriage bolts are described but shouldnt they be longer that 3 1/2 inches ?
2xsomething lumber is actually 1 1/2″. Please take a look over this table for reference: https://myoutdoorplans.com/imperial-to-metric-conversion/
Excellent, thanks for the resource. And after doing some research on nominal vs actual dimensions it makes sense now. I assume the same rules apply to pressure treated timber ?
Yes.
Good, thanks for the replies, much appreciated
15.9 degeees on the cross brace cut…? I used 16 degrees. The plan call for (14) 8’ 2×6. Not enough Unless you utilize the boards using the cut offs on the legs from another piece. Not spelled out in the instructions at all. You find this out too late as the legs are cut before the scrape 36” + piece appears. The end result is a beautiful table. I built it with my grandson (6 years old) in 2 hours (less the return trip to Lowes to buy another 2×6) I chose to forgo the pocket holes and used 4” screws and countersunk by 1/2” using a paddle bit and predrilled the 2×4 stringers for the top. I felt it was stronger and quicker. Adding number of fasteners to the material list would be helpful.
congrats for the project. The Premium Plans for this project come with a Cut Layout Diagram, that shows how to cut the boards to get minimum waste. That layout is not available in this free version.
Good plans. 2 ideas.
Change the legs to pressure treated from one 12 ft 2×6 and the bench Soopers could come from one 10 ft 2×6.
Possibly be change the support under the bench to a 2×4 to save wood. Need to investigate if it is stiff enough.
We built this entire table with 8ft 2x6s. We ended up using about 15 boards. We didnt round the edges or pre-drill any holes. We sunk GRK screws into it for a nice, strong, finished look. It took my husband and i about 2 hours. We could easily whip another out in less than an hour. The 15.9 degree angle didn’t work, so we improved the angle.
Great plans! Going to try this one out. What are the overall dimensions? I see the length is 8foot, what about height and depth?
My kids are all grown now so my husband and I deconstructed their old playhouse and ended up with a pile of decent lumber that was just enough to build this 8 foot picnic table.
I built this all by myself and the directions and measurements were perfect. Thanks so much for giving me a way to keep the playhouse memories alive for my family as we sit around this table.