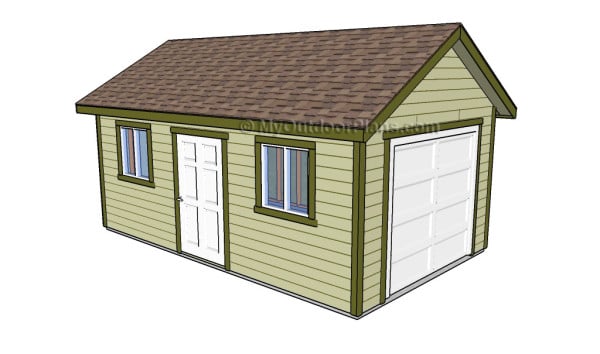
This step by step diy project is about free garage plans. If you want to protect your car from bad weather and have a place where you can store your tools, we recommend you to build a detached garage. Adjust the design and the dimensions of the garage to suit your needs and budget. Plan everything from the very beginning and build a strong foundation for the garage, in order to build a durable garage.
It is essential to choose the right materials before starting the construction and the assembly of the garage. As you will see in the project, you need to choose durable lumber with a nice appearance, such as pine, cedar or redwood. Make sure the components are in a good visual condition and choose professional tools when adjusting their size. Take accurate measurements and join the components with glue and screws. See all my Premium Plans HERE.
Projects made from these plans
Free Garage Plans
Building a garage
Cut & Shopping Lists
- A – 13 pieces of 2×4 lumber – 90″, 2 pieces – 240″, 1 pieces – 233″ WALL A
- B – 14 pieces of 2×4 – 90″, 2 pieces – 240″, 1 piece – 233″, 4 pieces – 36″, 8 pieces – 39″ WALL B
- B – 1 piece of 2×4 – 48″, 14 pieces – 9 1/2″, 10 pieces – 37 1/2″, 2 pieces – 76 1/2″ WALL B
- C – 7 pieces of 2×4 – 90″, 2 piece – 137 “, 1 piece – 144″ WALL C
- D – 4 pieces of 2×4 – 90”, 1 piece – 137, 1 pieces – 144″, 2 pieces – 18 1/2″ WALL D
- D – 2 pieces of 2×4 – 82 1/2”, 7 pieces -2″, 2 pieces of 2×6 – 103″ WALL D
- E – 15 piece of 1/2″ plywood – 4×8′ EXTERIOR WALLS
Tools
![]() Hammer, Tape measure, Framing square, Level
Hammer, Tape measure, Framing square, Level
![]() Miter saw, Drill machinery, Screwdriver, Sander
Miter saw, Drill machinery, Screwdriver, Sander
Tme
![]() One day
One day
Related
- Part 1: Free Garage Plans
- Part 2: Garage Roof Plans
Building a detached garage
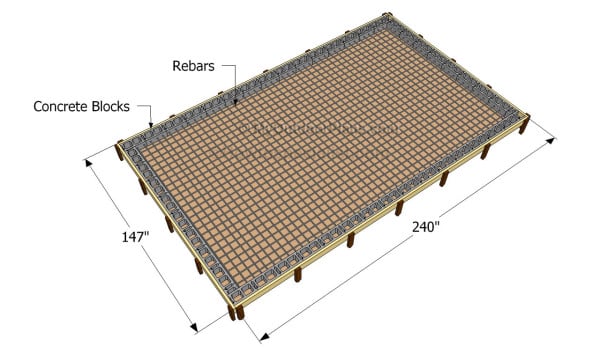
Building the concrete slab
A detached garage doesn’t require deep footings as in the case of attached constructions. Use shallow footings that have 1/2″ rebars at the edges. Tie the slab to the footings with wire mesh. After pouring the footings you should let the concrete to set for about about 24 hours.
Center the concrete blocks on top of the footings and compact inside a 4″ layer of gravel. Install anchor bolts every 6″ inside the blocks, as to secure the wooden sills to the slab.
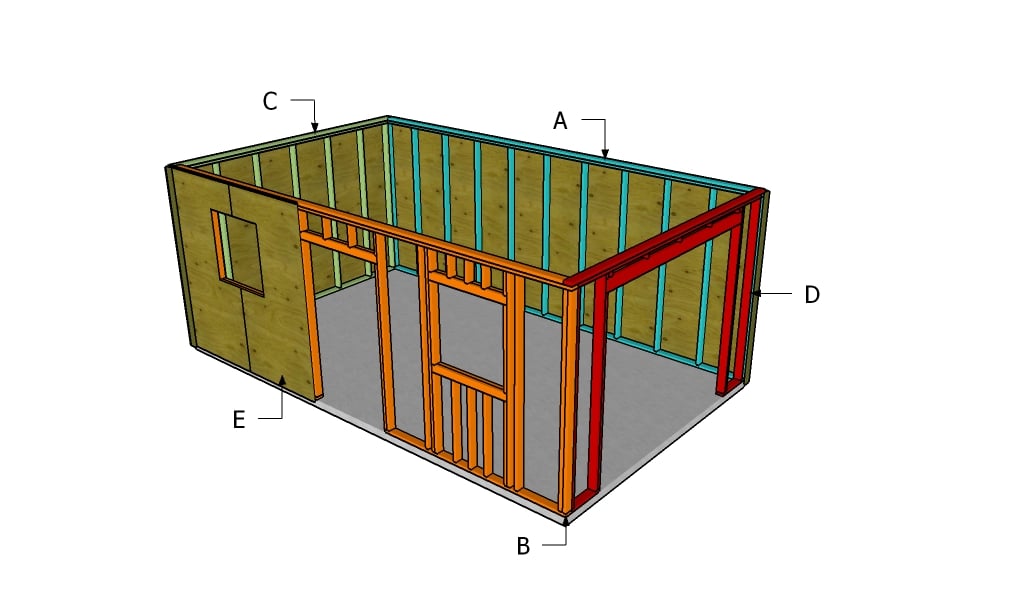
Building-the-side-wall-with-door
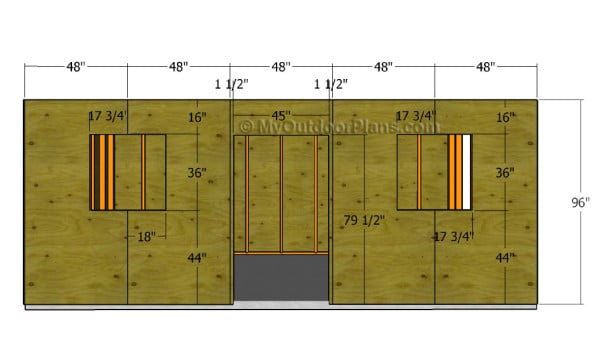
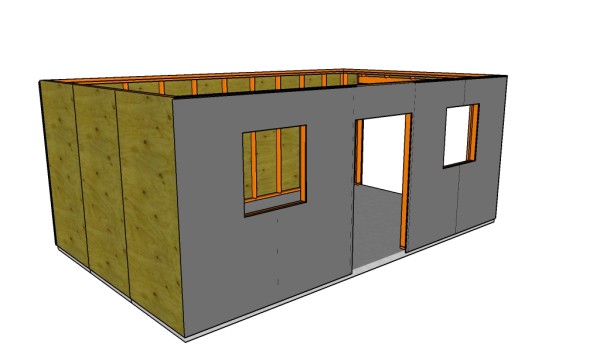
Building the side wall is complex, as you need to leave opening for the door and for the windows. Double the plates, in order to get a rigid frame. Place the studs as in the diagram, otherwise you won’t be able to attach the 4×8 plywood sheets properly.
Fit trimmer studs and double headers, in order to reinforce the side wall of the garage. Build the walls on a level surface, making sure you drill pilot holes in the plates before inserting the 3″ screws. Make sure the corners are square.
Building-the-side-wall-frame
Build the opposite side wall, using the instructions described in the diagram. Cut the components at the right size and lock them together tightly to the top and bottom plates. Make sure the corners are square and leave no gaps between the components.
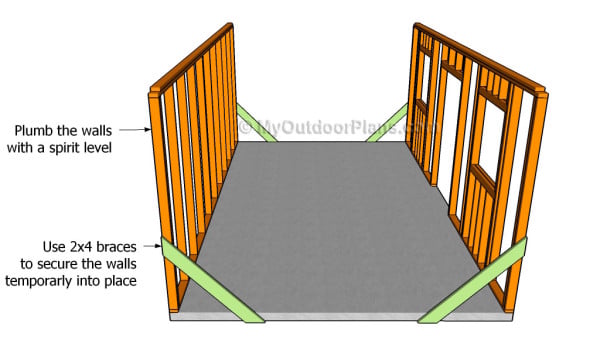
Fitting the side walls
After building the side walls, we recommend you to secure them to the concrete slab. Lift the walls and lay them to the concrete slab. Use a spirit level to plumb the walls and secure them temporarily into place by using 2×4 braces.
Secure the walls into place by using the anchor bolts in the concrete slabs. Tighten the bolts and leave the braces into place until you fit the front and the back walls to the structure of the shed.
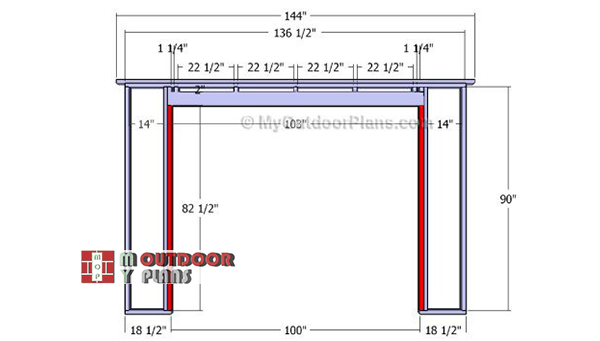
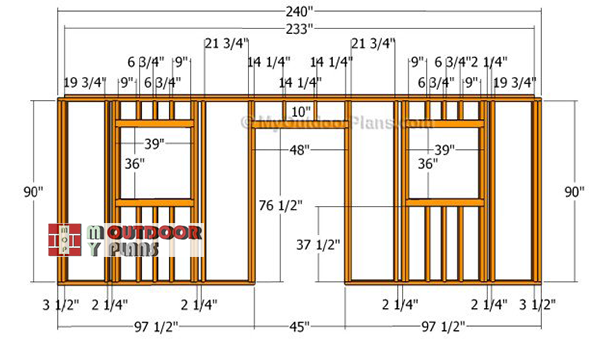
Building-the-front-wall-frame
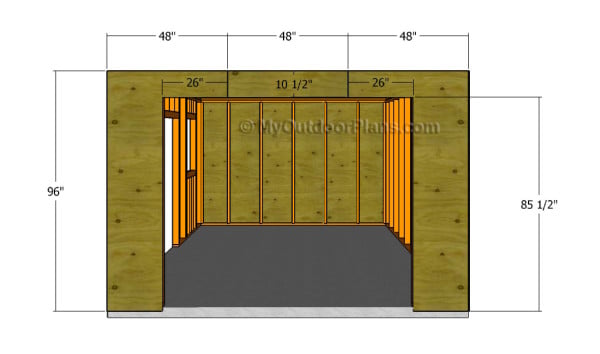
Next, you have to frame the front wall of the detached garage. Make sure the opening is large enough for a garage door. It is essential to make a build a sturdy wall frame and to adjust the size of the opening according to the door you are going to fit.
As you can see in the diagram, build the double header from 2×6 lumber, as to add extra-support to the construction. Make sure the corners are right-angled before inserting the screws.
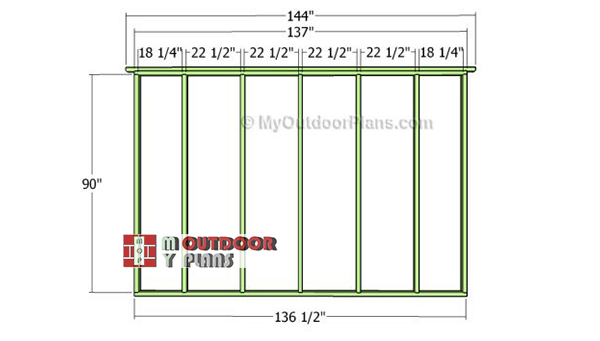
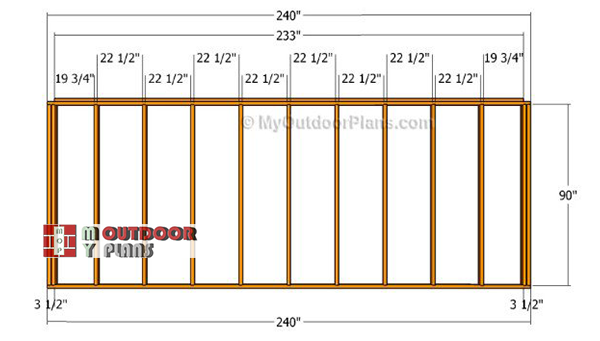
Building-the-back-wall-frame
Building the back wall for the garage is a straight forward process, as there are no openings or other complex cuts to be made. Make sure you place the studs equally spaced, every 24″ on center. Follow the instructions described in the diagram to get a professional result.
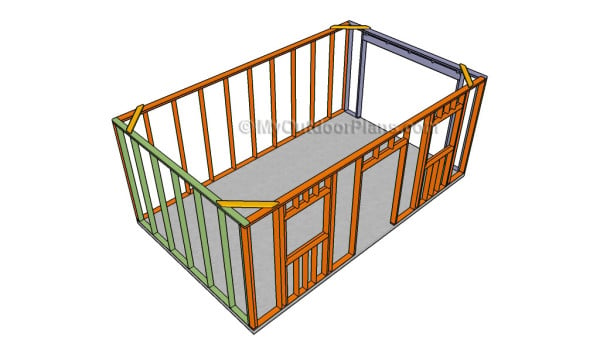
Assembling the frame of the garage
After building the front and the back wall of the garage, we recommend you to assemble the structure. Lift the walls and lay them to the concrete floor, as described in the diagram. Make sure the corners are square and use temporarily braces to lock them together.
Drill pilot holes through the plates and lock them together tightly. In addition, lock the adjacent walls together by inserting 2 1/2″ screws. Leave no gaps between them to get a professional result.
Fitting the plywood sheets to the door wall
Next, attach the 1/2″ plywood sheets to the framing, as seen in the diagram. Align the sheets to the top plates and secure them to the wall studs by using nails. if you have built the structure properly and have spaced the studs accurately. Cut out the sheets around the door opening, using a good circular saw. Make sure you take accurate measurements, if you want to get a professional result. Smooth the edges with fine-grit sandpaper.
Secure the sheets into place with 1 1/4″ screws or nails, every 6″ along the studs.
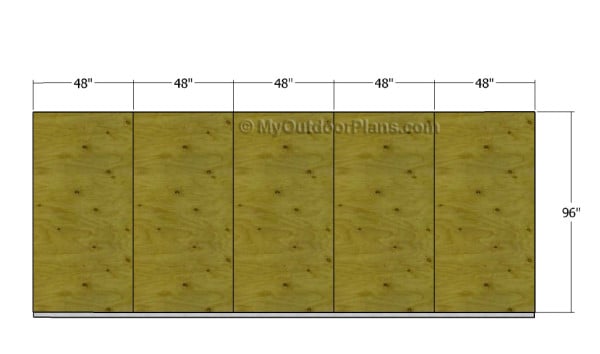
Fitting the plywood sheets to the side wall
Attaching the plywood sheets to the other side of the detached garage is easy, as you don’t need to make cuts. Align the sheets to the structure and secure them into place using galvanized nails. Insert the nails through the sheets into the studs, every 6″.
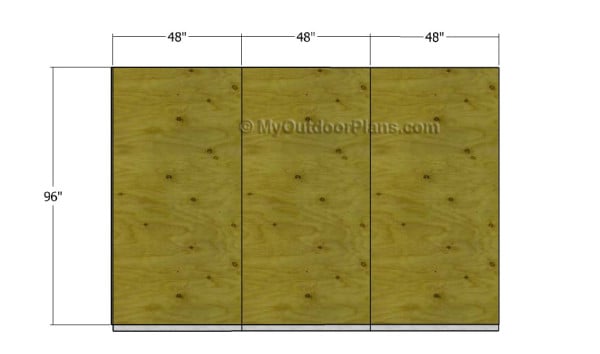
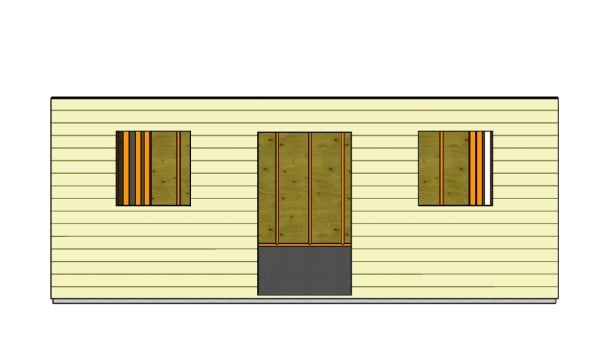
Fitting the plywood sheets to the front wall
Continue the project by fitting the plywood sheets to the front face of the garage. Adjust the plywood sheets at the right size, if you want to get a professional result. Mark the cut lines on the sheets with attention, otherwise they won’t fit into place properly. Don’t leave any gaps between the sheets, and make sure the joints are rigid.
Attaching the plywood sheets to the back wall
Attach the plywood sheets to the back face of the garage structure, as described in the diagram and using the instructions and techniques described in the previous steps. Leave no gaps between the structure and the plywood sheets.
Fitting the tar paper
Before installing the siding, install the housewrap to the exterior of the garage. In this manner, you will protect the garage from air and moisture and save money on the long run. Make sure you overlap and tape the seams. Cut the wrap around the door and window openings and staple it to the frame.
Attaching the siding
In order to protect the garage from water damage, you should attach siding to the exterior walls. Make sure the boards overlap several inches and when installing the nails into place, you leave about 1” from the edges. In addition, you need to fit drip caps over the windows and doors. If the top board is too wide, you need to adjust it to the right size with a circular saw.
Apply several coats of paint over the siding, to protect them from decay and water damage.
Free garage plans
One of the last steps of the woodworking project is to take care of the finishing touches. Therefore, fill the pilot holes with wood putty and smooth the surface with 120-grit sandpaper.
Top Tip: In order to protect the lumber from water damage, we recommend you to cover the components with several coats of paint. Read the other parts of the detached garage project. You should also check out my newer 16×24 garage plans, where I show you much more detailed plans and instruction!
This woodworking project was about free garage plans. If you want to see more outdoor plans, we recommend you to check out the rest of our step by step projects. LIKE us on Facebook to be the first that gets our latest plans. Send us pictures with your plans.

5 comments
Are these plans available in pdf format?
Yes, there are. Just click the floating green widget in the left side of the site, with the printer icon, if you are browsing on your desktop.
I am looking for the print icon but it’s not there.
Thanks for sharing your free plans. Just wondering if you are located in Canada. I want to build a garage/car port 20X10X8. It may not be free but I am interesting in getting more info
Hi there. I am not located in Ca. I recommend you to take a look over my 12’x20′ carport plans here: http://myoutdoorplans.com/carport/how-to-build-a-carport/