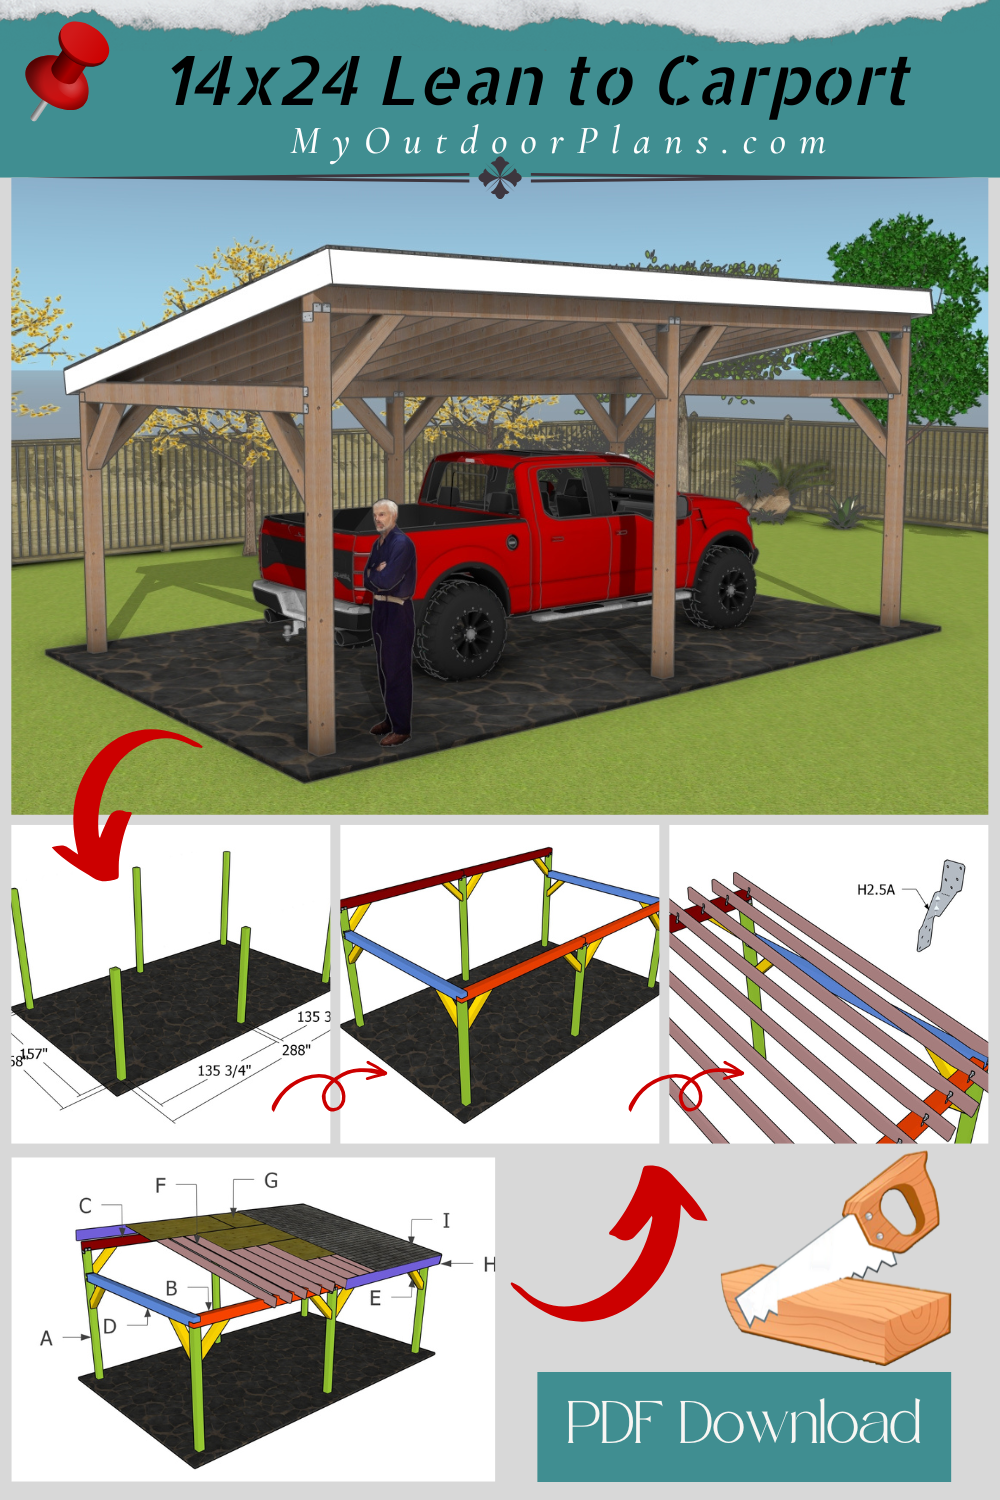
A DIY 14×24 lean-to carport is one of the best ways to protect your vehicle or outdoor equipment without the complexity of a full garage. With a sturdy design and a straightforward construction process, this project is perfect for DIYers looking to build a durable, functional structure. Whether you need shelter from the sun, rain, or snow, this carport provides reliable coverage while maintaining a clean, open look. Plus, with its simple framing and strong post-to-beam connections, it’s built to stand up to the elements for years to come.
In this guide, I’ll walk you through every step of the build, from setting the foundation and installing the beams to adding the rafters and securing the roofing. You’ll also learn how to reinforce the structure with diagonal bracing, apply finishing touches like sanding and staining, and even add optional upgrades like gutters and lighting. By the end of this project, you’ll have a sturdy, custom-built carport that not only protects your belongings but also adds value and style to your space.
When buying the lumber, you should select the planks with great care, making sure they are straight and without any visible flaws (cracks, knots, twists, decay). Investing in cedar or other weather resistant lumber is a good idea, as it will pay off on the long run. Use a spirit level to plumb and align the components, before inserting the galvanized screws, otherwise the project won’t have a symmetrical look. If you have all the materials and tools required for the project, you could get the job done in about a day.
Projects made from these plans
Pin it for later!
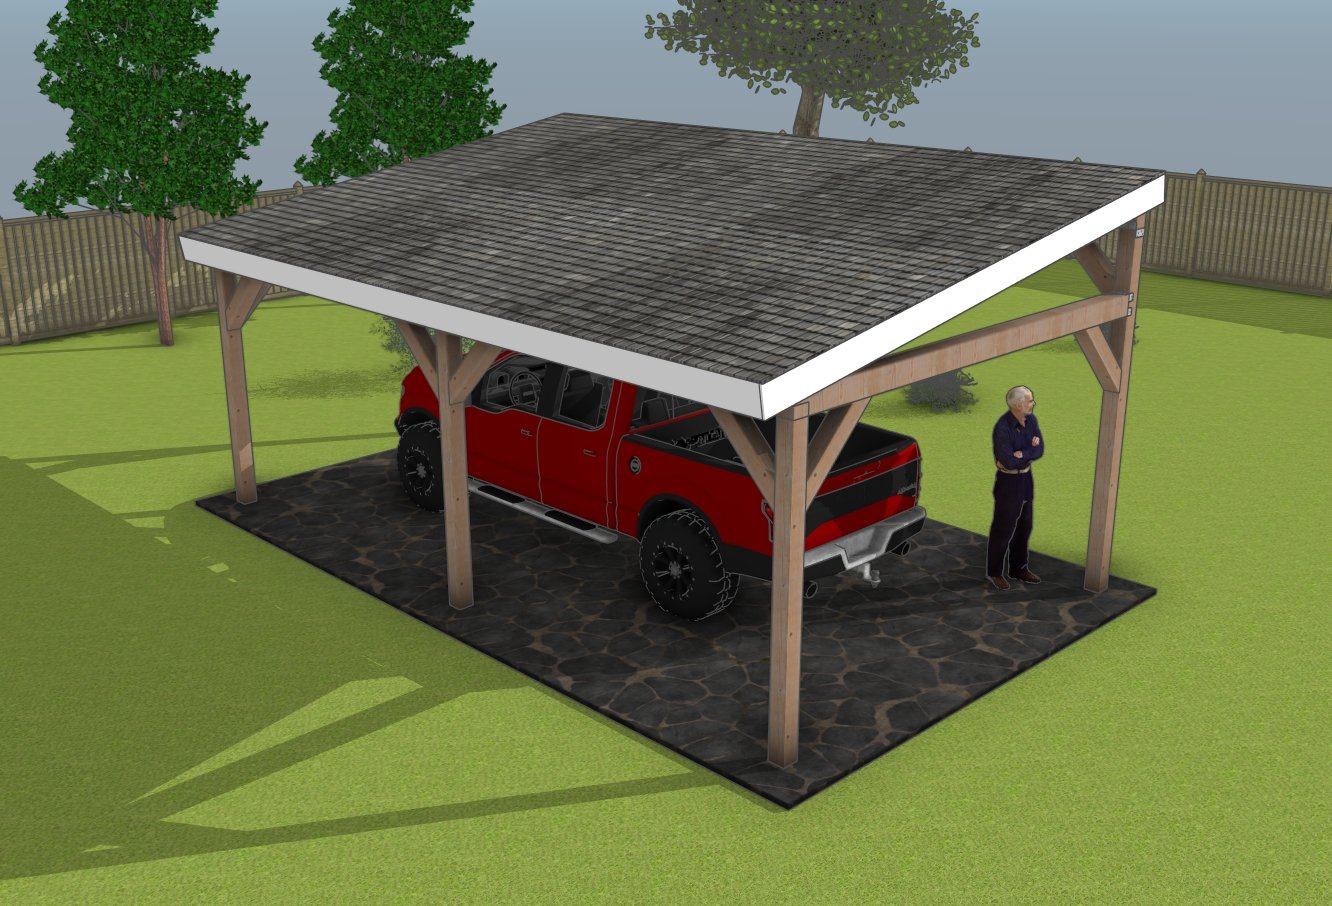
Building a Modern 14×24 Lean to Carport
Building-a-14×24-lean-to-carport
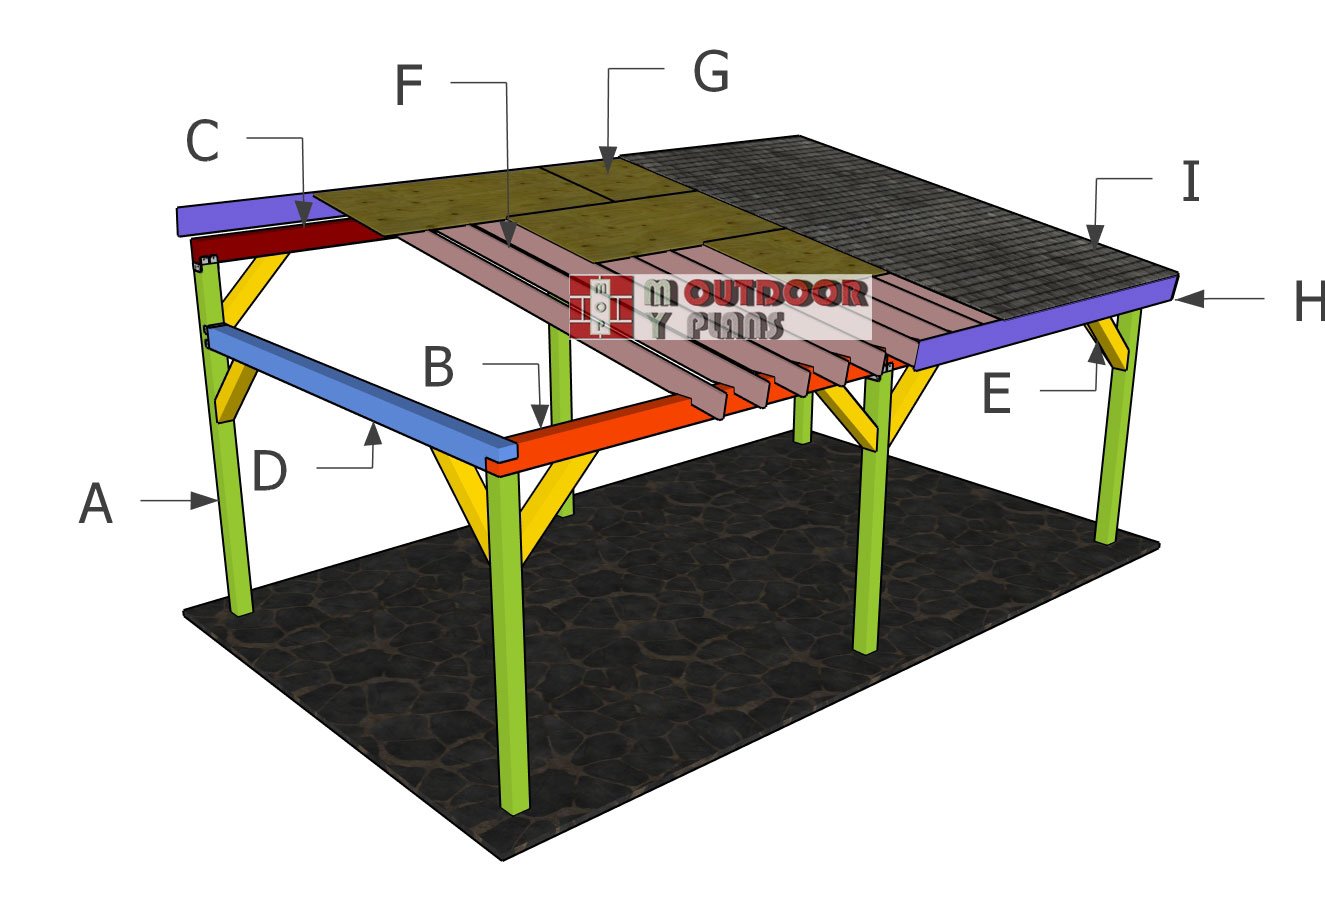
Cut & Shopping Lists
- A – POSTS – 6×6 lumber 12′ long – 3 pieces
- A – POSTS – 6×6 lumber 8′ long – 3 pieces
- B – TOP PLATES – 6×8 lumber 12′ long – 2 pieces
- C – RIDGE BEAMS – 6×8 lumber 12′ long – 2 pieces
- D – CROSSBEAMS – 6×8 lumber 162 1/2″ long – 2 pieces
- E – BRACES – 6×6 lumber 36″ long – 12 pieces
Tools
![]() Hammer, Tape measure, Framing square, Level
Hammer, Tape measure, Framing square, Level
![]() Miter saw, Drill machinery, Screwdriver, Sander
Miter saw, Drill machinery, Screwdriver, Sander
![]() Post hole digger, Concrete mixer
Post hole digger, Concrete mixer
![]() Safety Gloves, Safety Glasses
Safety Gloves, Safety Glasses
Time
![]() One week
One week
Related
- 12×20 Modern Carport Plans
- PART 1: 14×24 lean to carport plans
- PART 2: 14×24 lean to carport roof plans
It’s that easy to build a lean to pavilion!
STEP 1: Fitting the posts
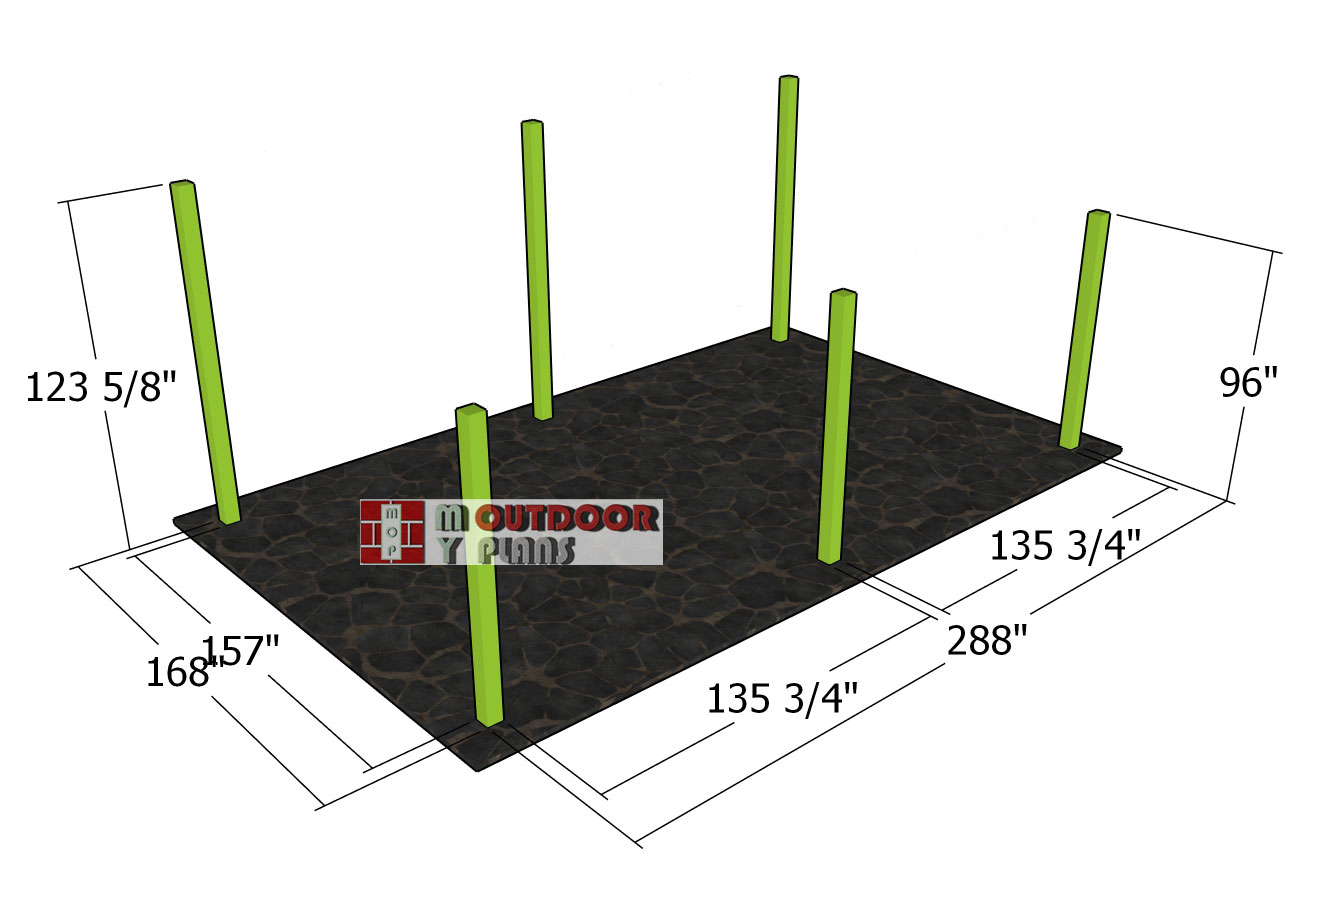
Layout-the-posts
First things first, let’s lay out those posts. This diagram isn’t just about spacing—it also locks in the height of your posts. It clearly shows both the distance between the posts and their exact placement. Getting these measurements right is key to a smooth build, so take your time and double-check everything before moving forward.
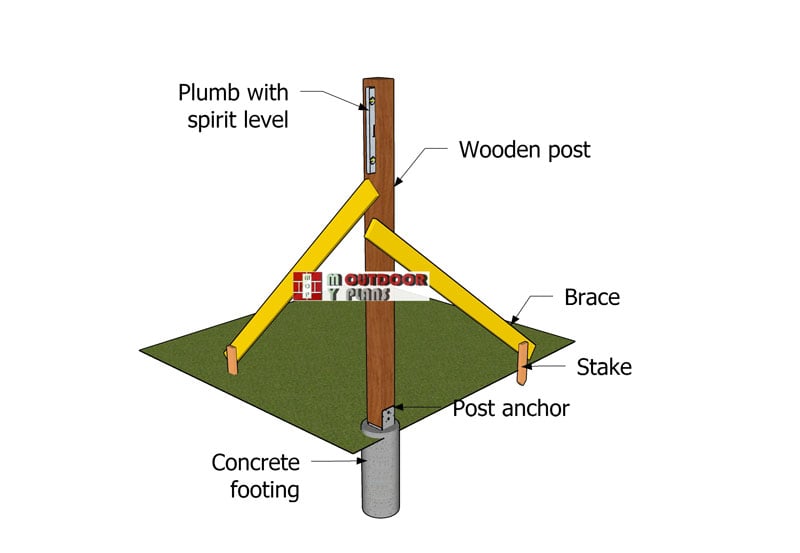
Setting-the-posts
After marking the spots, dig 3-foot-deep holes that are 14-16″ inches wide. Insert concrete tubes into each hole and fill them with concrete. While the concrete is still wet, set the post anchors carefully, making sure they’re perfectly aligned for accuracy. Once the concrete cures, you’re ready to attach the posts to the anchors.
Use a spirit level to ensure each post is perfectly plumb, and temporarily brace them with 2x4s for added stability. Finally, secure each post to the anchors using lag screws to lock everything in place, giving you a rock-solid foundation for your carport.
STEP 2: Attaching the beams
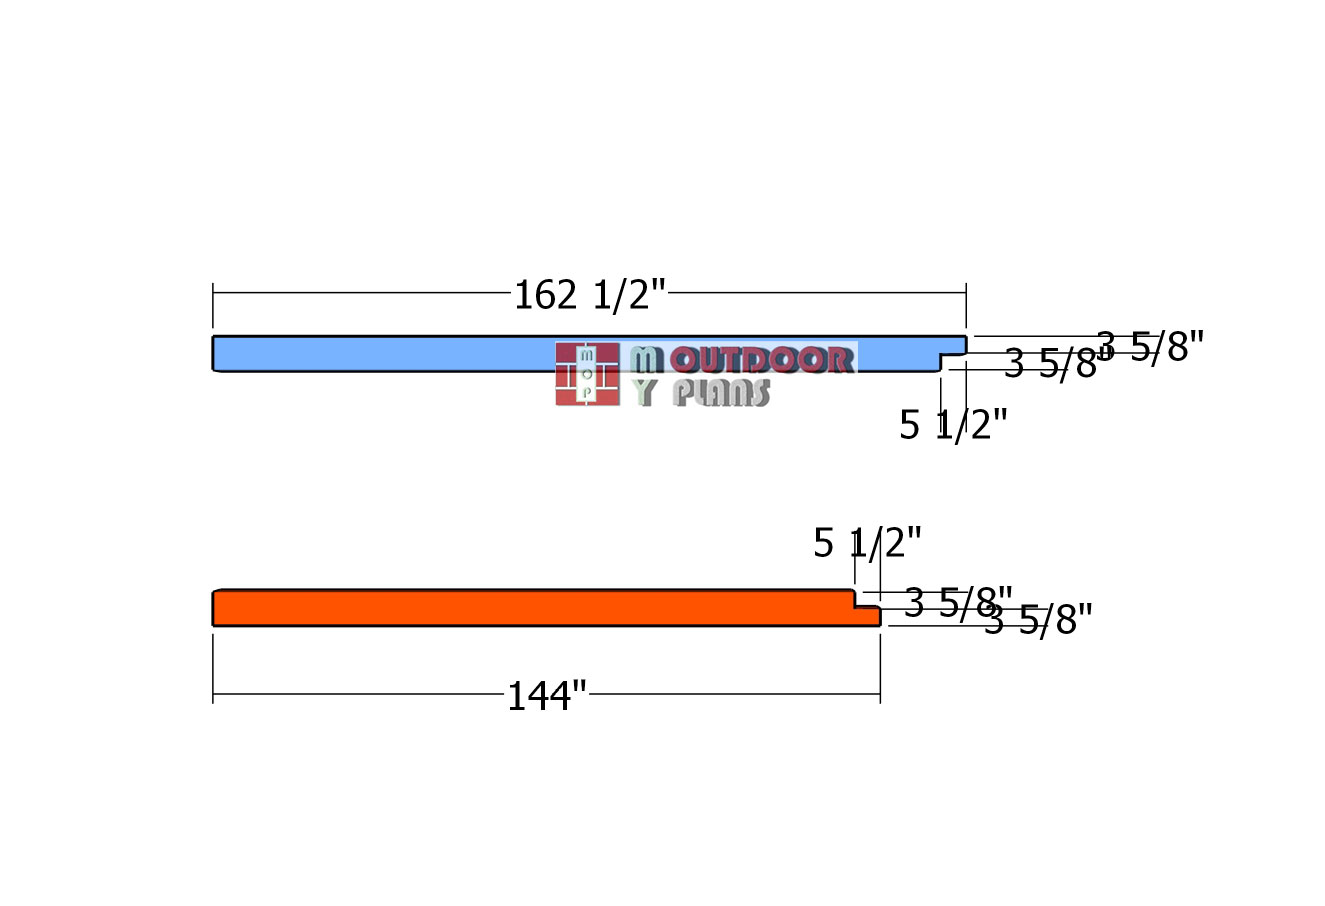
Top-plates—cut-details
Now, let’s get those beams cut for the lean-to carport. Start by marking your cut lines on the 6×8 beams—accuracy here is key. Once marked, grab your circular saw and make a series of parallel cuts within the notched area. Don’t rush this step; let the saw do the work. After that, take a chisel and hammer to clean out the remaining wood, leaving a nice, smooth notch. This will ensure a snug fit when assembling the structure, making everything stronger and more secure.
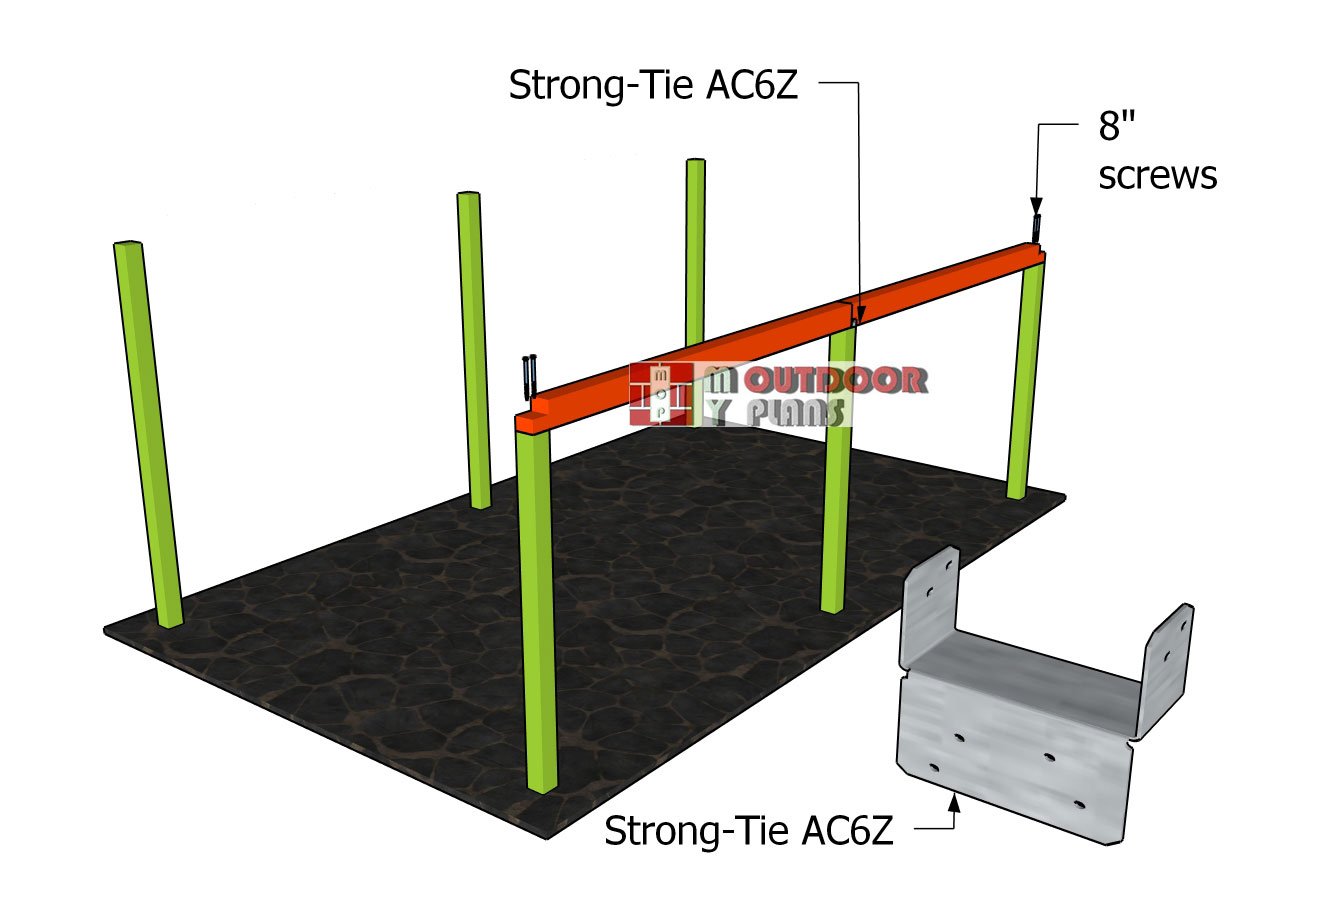
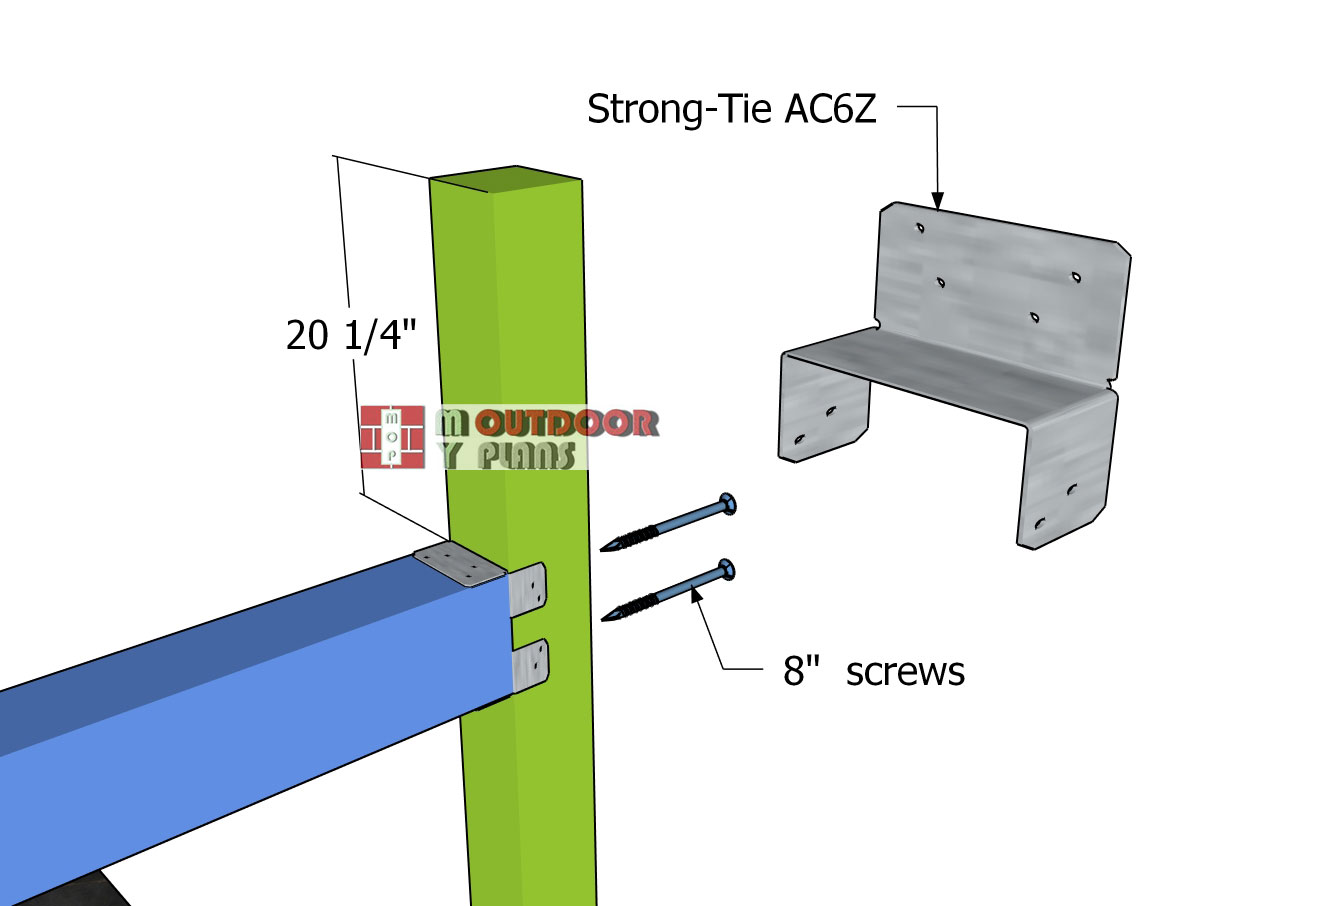
Fitting-the-top-side-plates
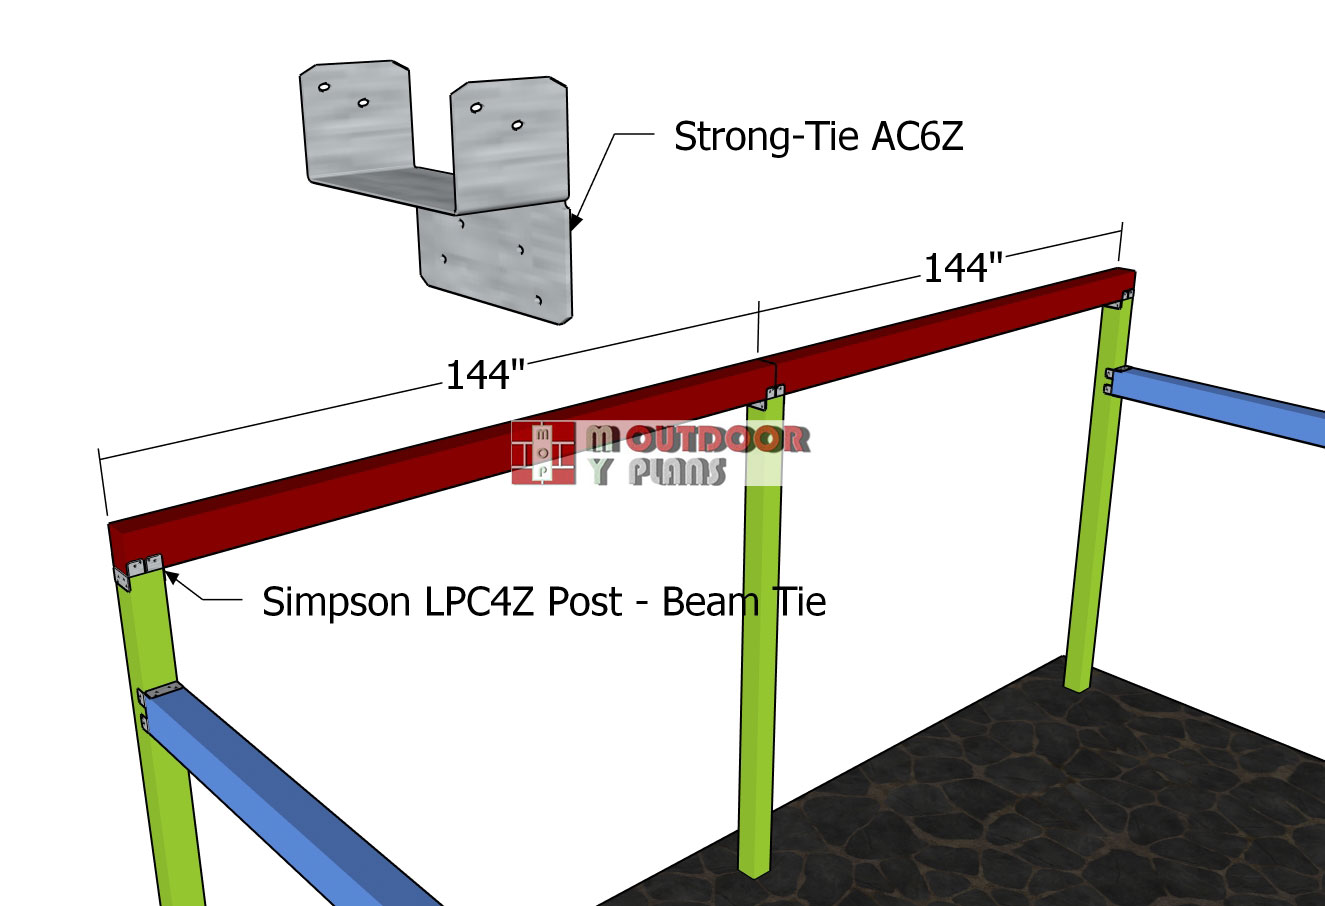
Now, it’s time to install the beams on the short side of the carport. Position them so the edges are flush with the end posts, making sure everything lines up cleanly. Once set, drill pilot holes to prevent splitting, then drive in 8″ screws to lock those beams down tight. A solid connection here means a strong, long-lasting structure, so take your time and get it right. For the middle post, we’re bringing in some extra reinforcement—post-to-beam connectors like the AZ6.
These brackets keep the beam locked in place while adding serious structural integrity. Secure the connector using 1 1/2″ structural screws or nails, making sure everything is tight and properly aligned. With this setup, your carport will be rock-solid and ready to handle the elements like a champ.
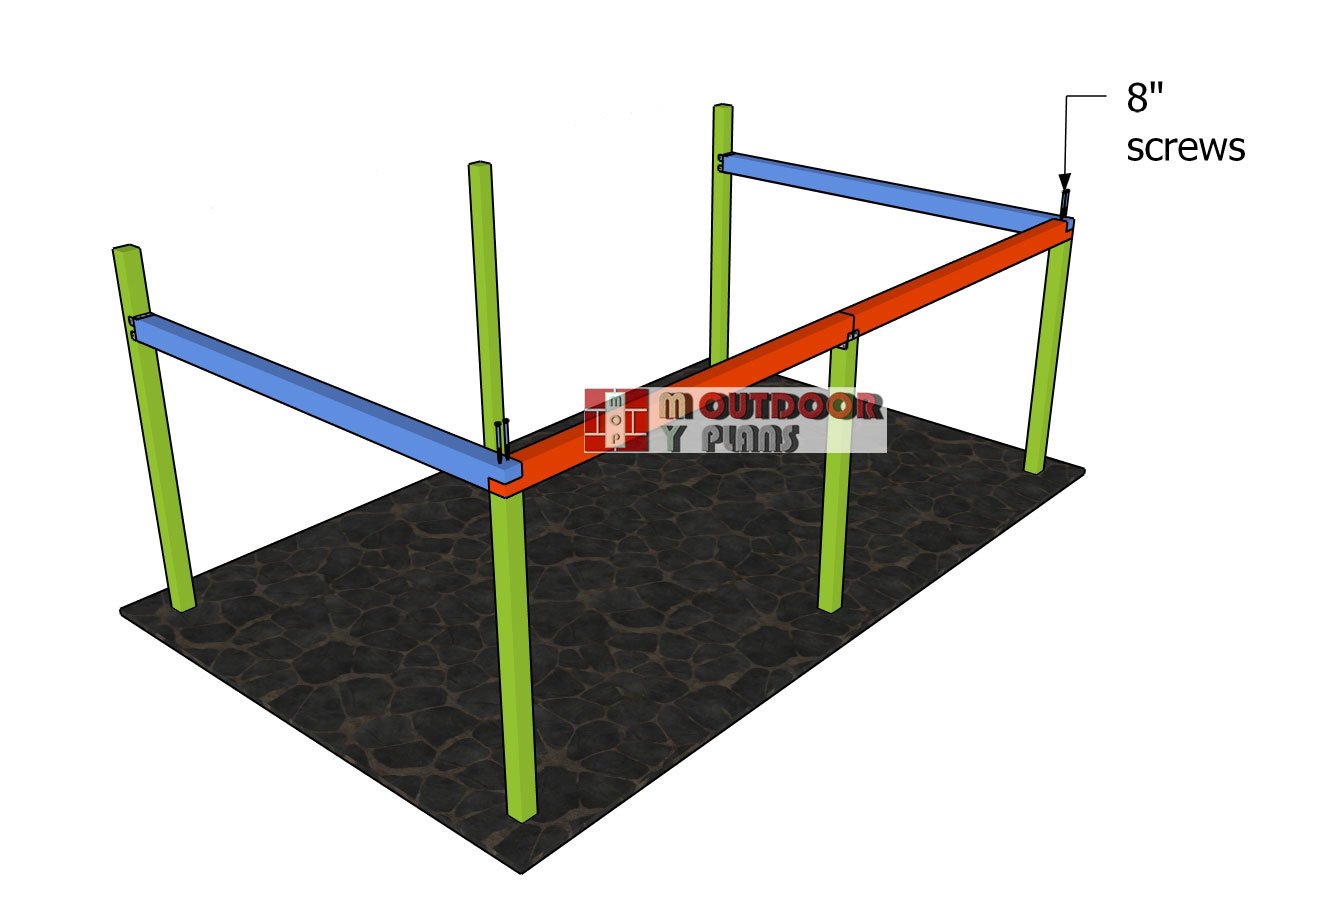
Fitting-the-crossbeams
Now, let’s get those 6×8 crossbeams secured to the front and back of the carport. Position the beams in place, making sure they’re perfectly level—this is where your spirit level earns its keep. Once aligned, attach the beams to the tall posts using heavy-duty connectors, locking them in with 1 1/2″ structural screws. This step ensures everything stays put, even when the weather throws a punch.
Crossbeam-detail
At the opposite end, you’ll secure the beams to the shorter posts. Drill pilot holes first to prevent splitting, then drive in 8″ screws through the beams and into the posts. Use at least two screws for each joint to keep things rock-solid. This setup not only reinforces the structure but also keeps your carport stable and ready to stand the test of time.
Installing-the-ridge-beams
Now, let’s install the ridge beams at the top of the tall posts. Carefully position each beam so the edges are flush with the posts—precision here is key for a strong and stable structure. Once everything is lined up, secure the beams using post-to-beam connectors. These brackets add serious reinforcement, keeping your roof framing locked in place.
Next, drive in 1 1/2″ structural screws through the connectors and into the beams to create a rock-solid connection. Double-check that everything is straight and level before moving on. A properly installed ridge beam will set the foundation for the rafters, ensuring your carport stays sturdy and square for years to come.
STEP 3: Adding the braces
Fitting-the-braces
Now, let’s reinforce the carport by installing the 36″ long diagonal braces. Start by making precise 45-degree cuts on both ends of each brace—these angled cuts ensure a tight fit against the posts and beams. Once cut, position the braces and check that they sit flush before securing them.
Drill pilot holes first to prevent the wood from splitting, then drive in 5 1/2″ screws to lock the braces in place. These diagonal supports are key to stiffening up the structure, reducing lateral movement, and making sure your carport stands firm against wind and daily use. A solid frame means a long-lasting build, so take your time to get these braces tight and secure.
Finishing touches
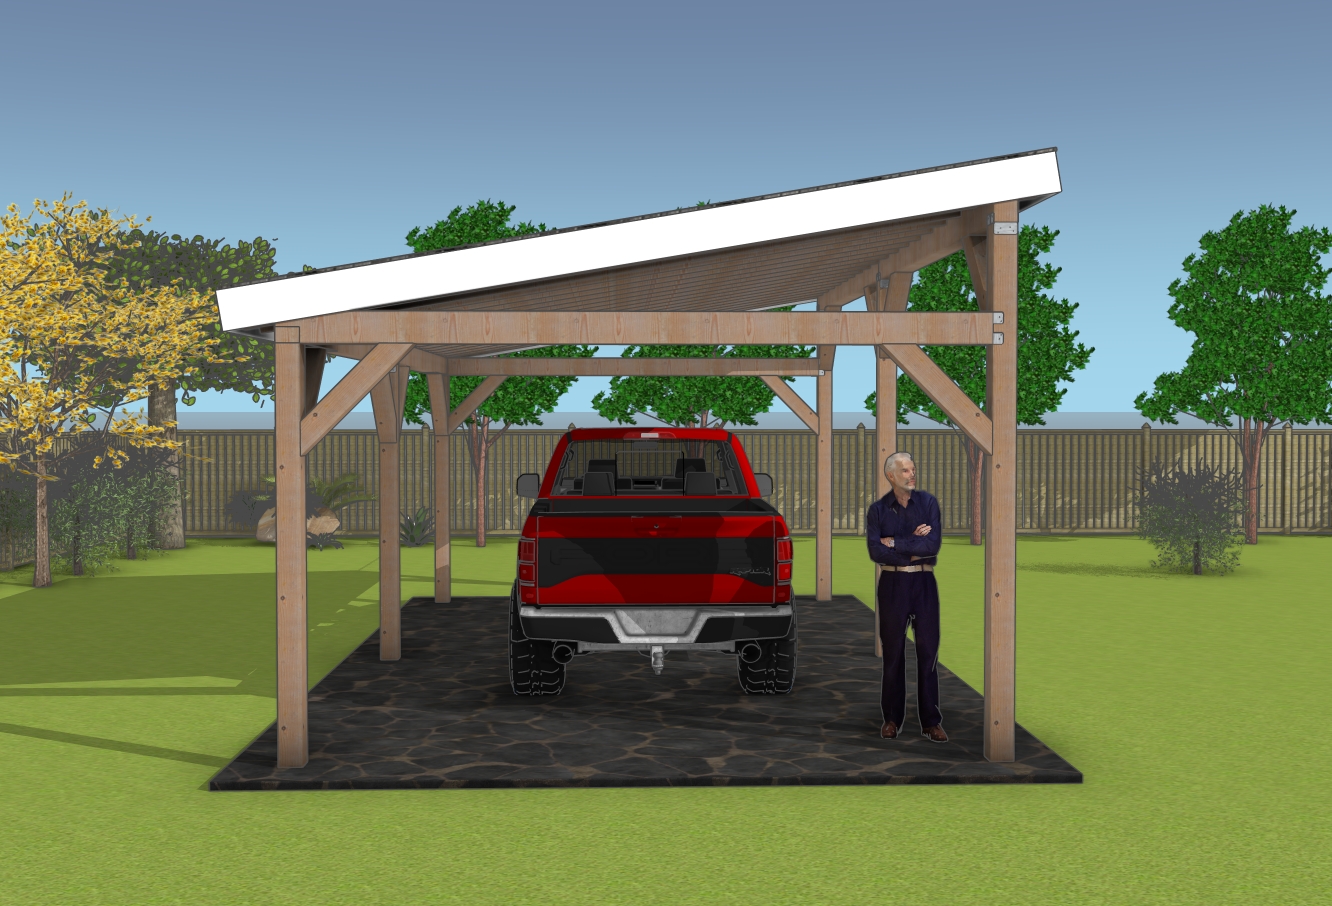
front view – 14×24 lean to carport
You can take this carport to the next level with a few practical and stylish add-ons. One of the best upgrades is installing gutters and a downspout system to direct rainwater away from the structure. This prevents erosion around the posts and keeps the area underneath drier. If you want to go a step further, consider adding a rain barrel at the downspout to collect water for gardening or other outdoor uses. Another functional upgrade is built-in storage—you can attach a small enclosed shed or shelving along one side of the carport to store tools, firewood, or outdoor gear, keeping everything organized and protected.
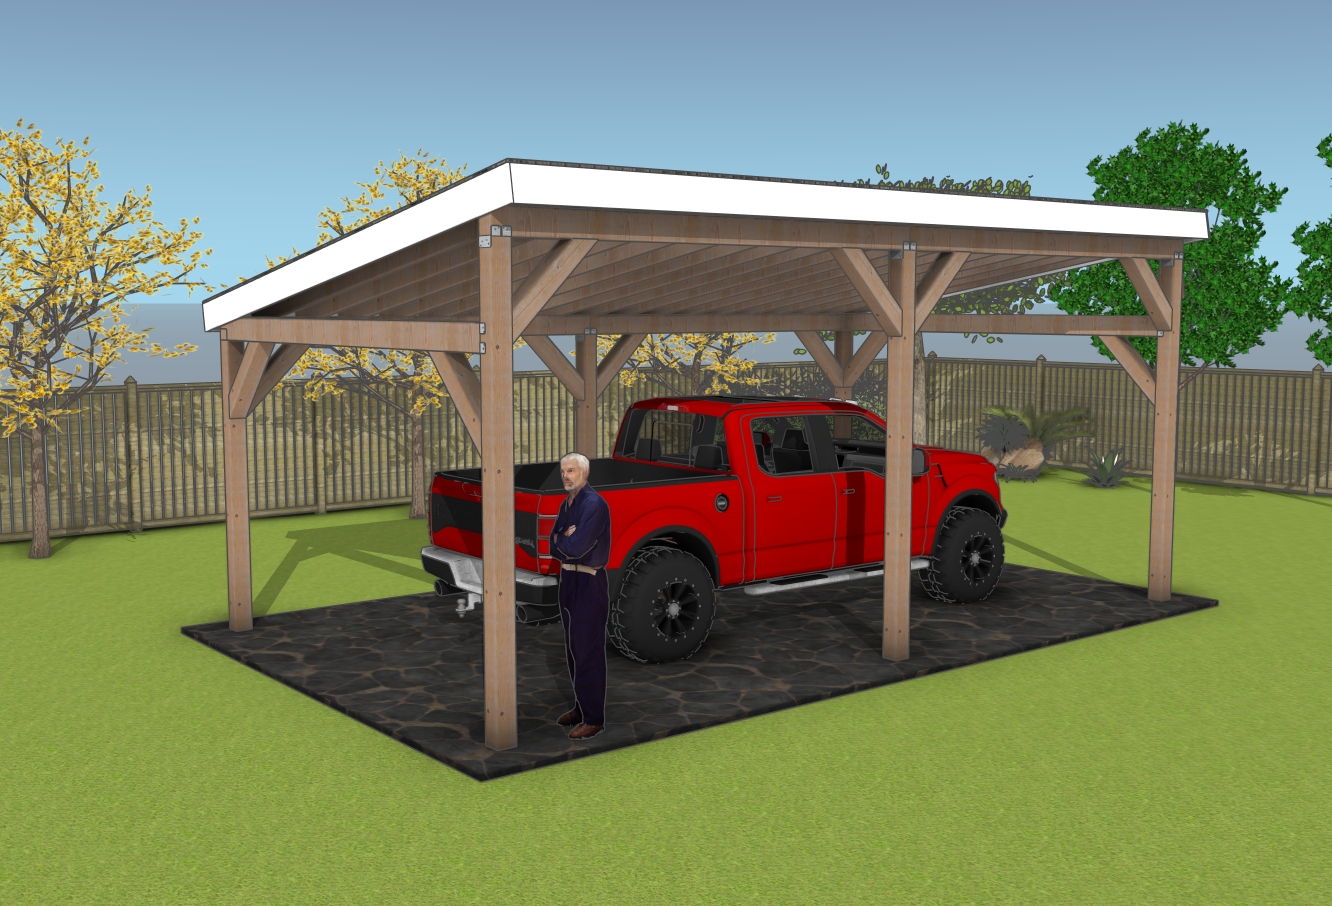
14×24 lean to carport plans
For extra comfort and aesthetics, think about lighting and privacy enhancements. Installing solar-powered LED lights or motion-activated floodlights will improve visibility at night and add a layer of security. If you want to block wind or create a more enclosed feel, consider attaching lattice panels, slatted wood screens, or even roll-down tarps to one or more sides. For a modern touch, you could even install decorative metal panels to give the carport a sleek, contemporary look. Whether you’re going for more functionality, weather protection, or just a better-looking space, these upgrades will elevate your carport and make it even more useful year-round.
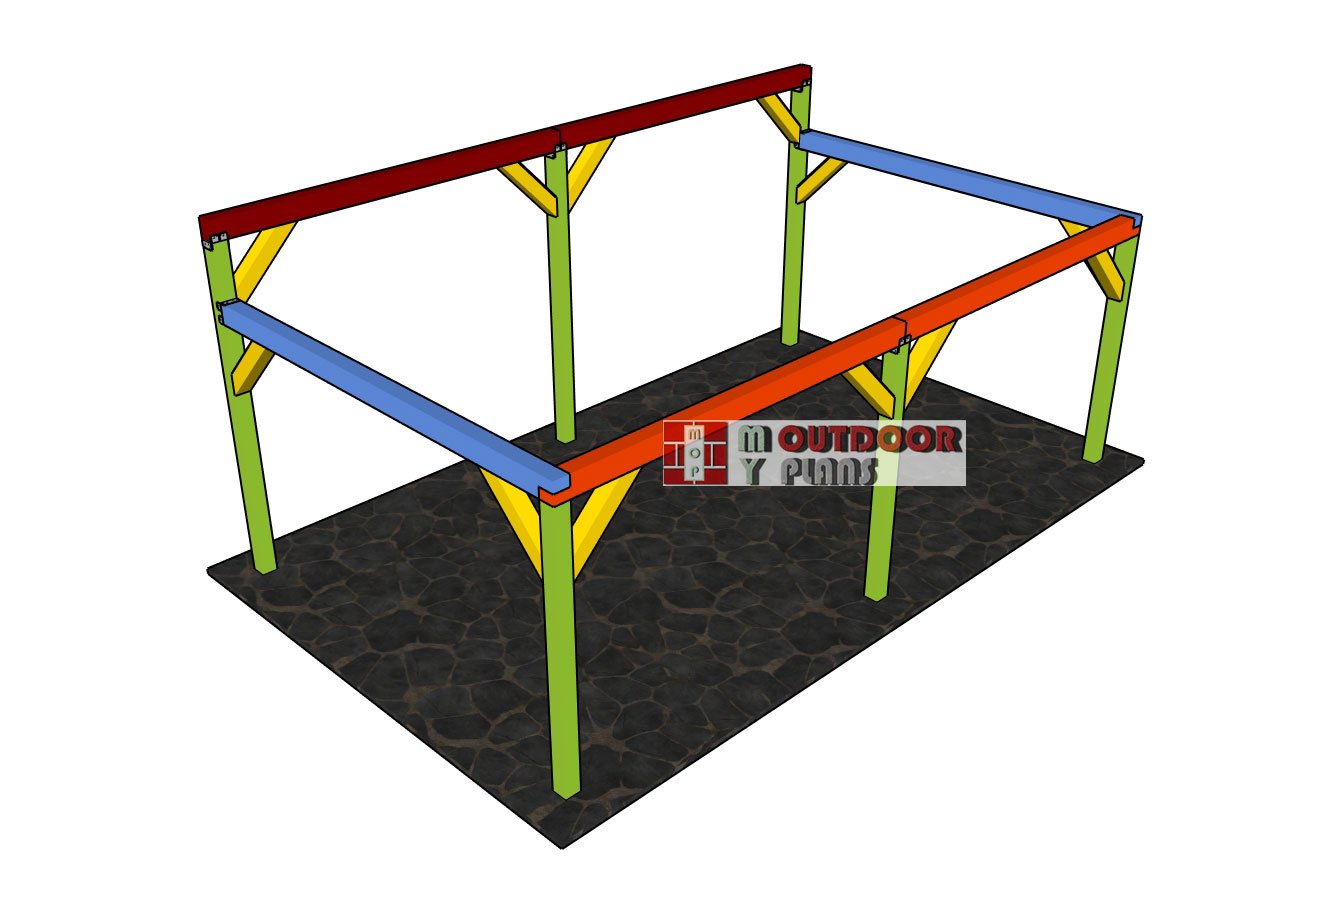
DIY large lean to carport plans
Check out PART 2 of the project, so you learn how to continue the outdoor gazebo project.
Top Tip: If you want to get PREMIUM PLANS for this project, in a PDF format, please press GET PDF PLANS button bellow. If you want the free version of the plans, please read the blog FAQs. Thank you for your support.

This woodworking project was about 14×24 lean pavilion plans. If you want to see more outdoor plans, we recommend you to check out the rest of our step by step projects.
