With the carport frame complete, it’s time to move on to the most important part—the lean-to roof. A solid, well-built roof is what makes this structure reliable, keeping your vehicle or outdoor gear protected from the elements year-round. In this part of the project, I’ll guide you through cutting and installing the rafters, securing them with rafter ties, and adding roof sheathing for a sturdy base. Precision is key here, so I’ll show you how to get those birdsmouth cuts just right for a snug fit on the support beams.
Once the framing is in place, we’ll move on to the finishing details, including installing underlayment, securing the drip edges, and adding asphalt shingles or metal panels for a weatherproof cover. Whether you’re aiming for a clean, classic look with shingles or a more modern, long-lasting metal roof, I’ll break down each step so you can get a professional-quality result.
When buying the lumber, you should select the planks with great care, making sure they are straight and without any visible flaws (cracks, knots, twists, decay). Investing in cedar or other weather resistant lumber is a good idea, as it will pay off on the long run. Use a spirit level to plumb and align the components, before inserting the galvanized screws, otherwise the project won’t have a symmetrical look. If you have all the materials and tools required for the project, you could get the job done in about a day.
Projects made from these plans
Building a Modern 14×24 Lean to Pavilion
Building-a-14×24-lean-to-carport
Cut & Shopping Lists
- F – RAFTERS – 2×8 lumber 190 1/2″ long – 19 pieces
- G – ROOF SHEETS – 1/2″ plywood 4’x8′ long – 8 pieces
- G – ROOF SHEETS – 1/2″ plywood 4’x4′ long – 2 pieces
- G – ROOF SHEETS – 1/2″ plywood 46 1/2″x8′ long – 2 pieces
- G – ROOF SHEETS – 1/2″ plywood 46 1/2″x4′ long – 2 pieces
- H – Trims – 1×10 lumber 12′ long – 4 pieces
- H – Trims – 1×10 lumber 192″ long – 2 pieces
- I – Asphalt Shingles & Tar Paper – 450 aq ft
Tools
![]() Hammer, Tape measure, Framing square, Level
Hammer, Tape measure, Framing square, Level
![]() Miter saw, Drill machinery, Screwdriver, Sander
Miter saw, Drill machinery, Screwdriver, Sander
![]() Post hole digger, Concrete mixer
Post hole digger, Concrete mixer
![]() Safety Gloves, Safety Glasses
Safety Gloves, Safety Glasses
Time
![]() One week
One week
Related
- PART 1: 14×24 Lean to carport pavilion plans
- PART 2: 14×24 Lean to carport roof plans
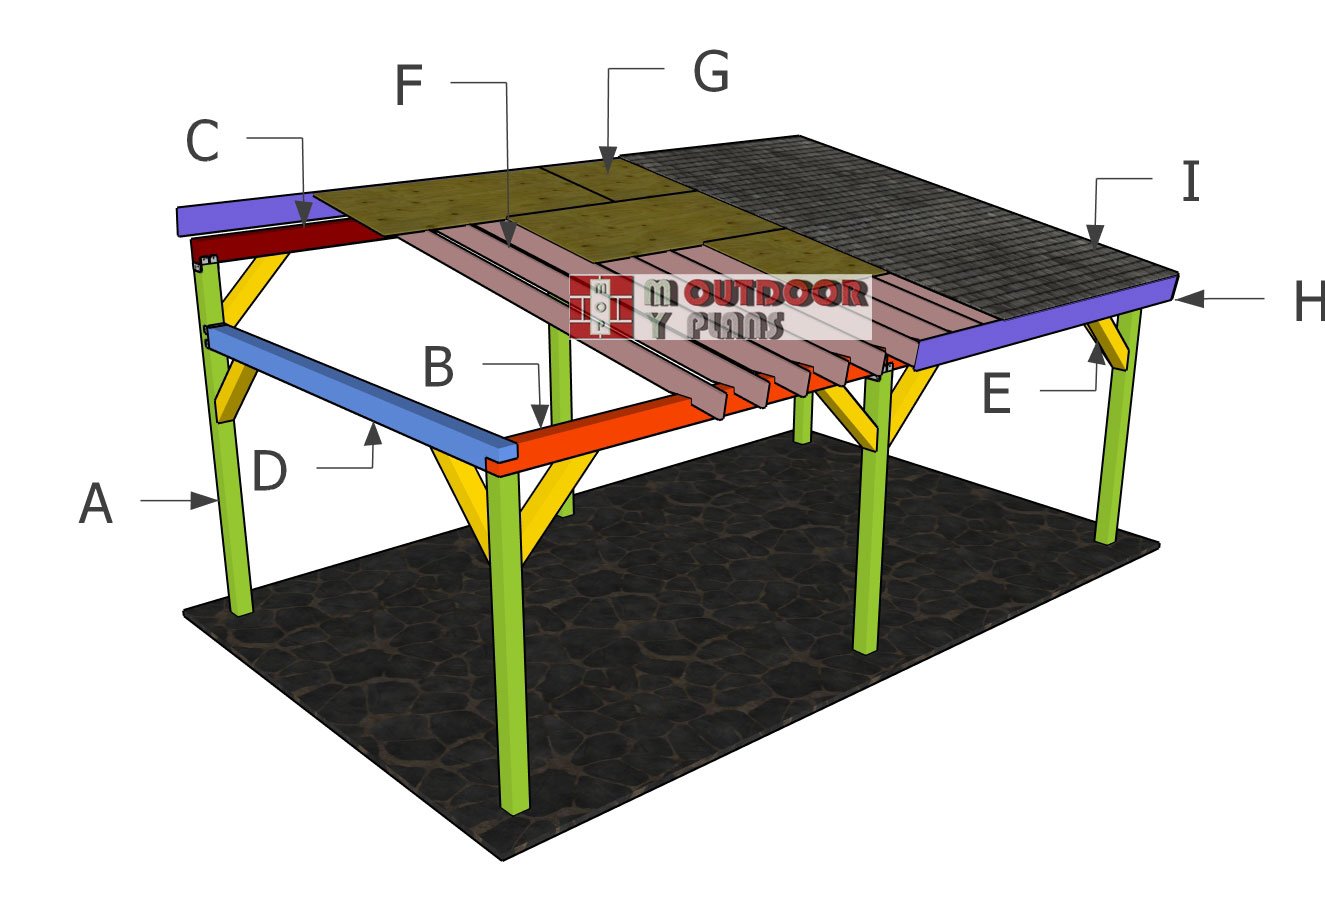
STEP 4: Building the roof
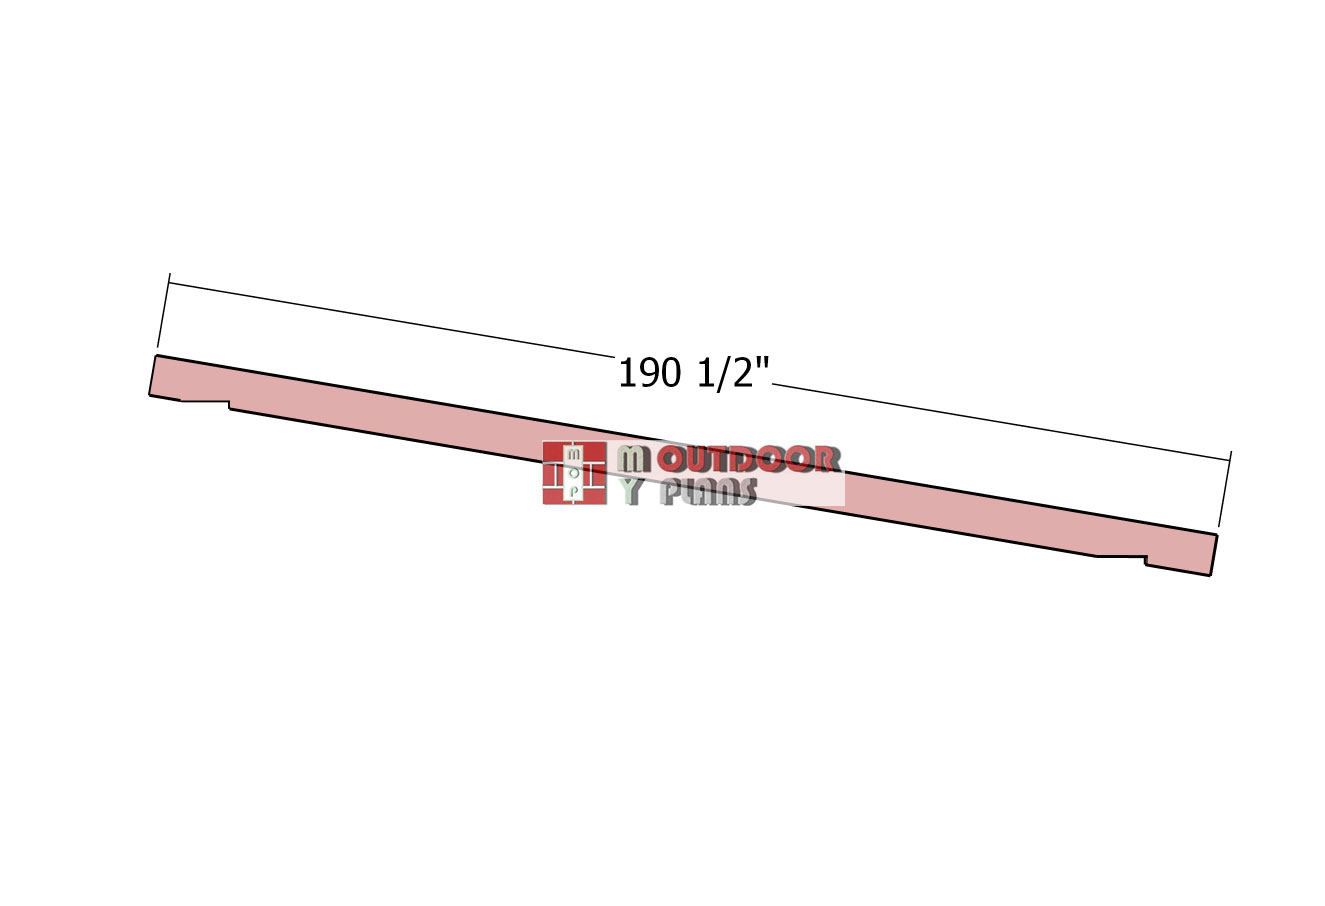
Rafters
Now, let’s cut and prep the 2×8 rafters for the roof. Start by marking the birdsmouth cut lines on each rafter—accuracy here is key to making sure they sit perfectly on the support beams. Once marked, grab your circular saw and carefully cut along the lines, stopping just short of the final edge. For a clean finish, use a handsaw or chisel to complete the cut and remove any excess material. After cutting, smooth out the edges with sandpaper to eliminate rough spots and splinters. These birdsmouth notches are essential for a snug, stable fit, helping the rafters sit securely on the beams and distribute weight evenly. A well-cut rafter means a strong and sturdy roof, so take your time and get it right!
Adding-the-roof-rafters
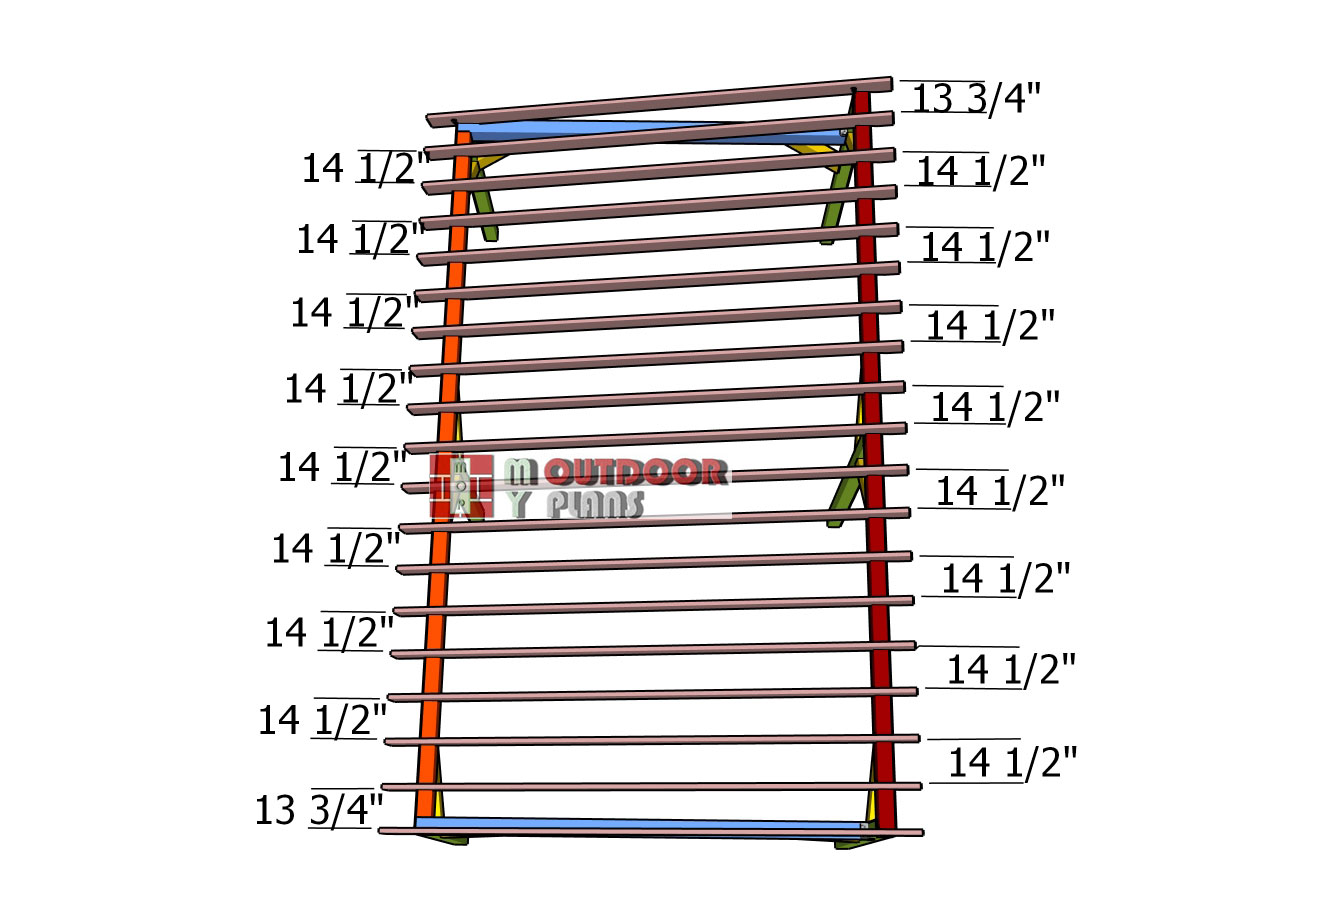
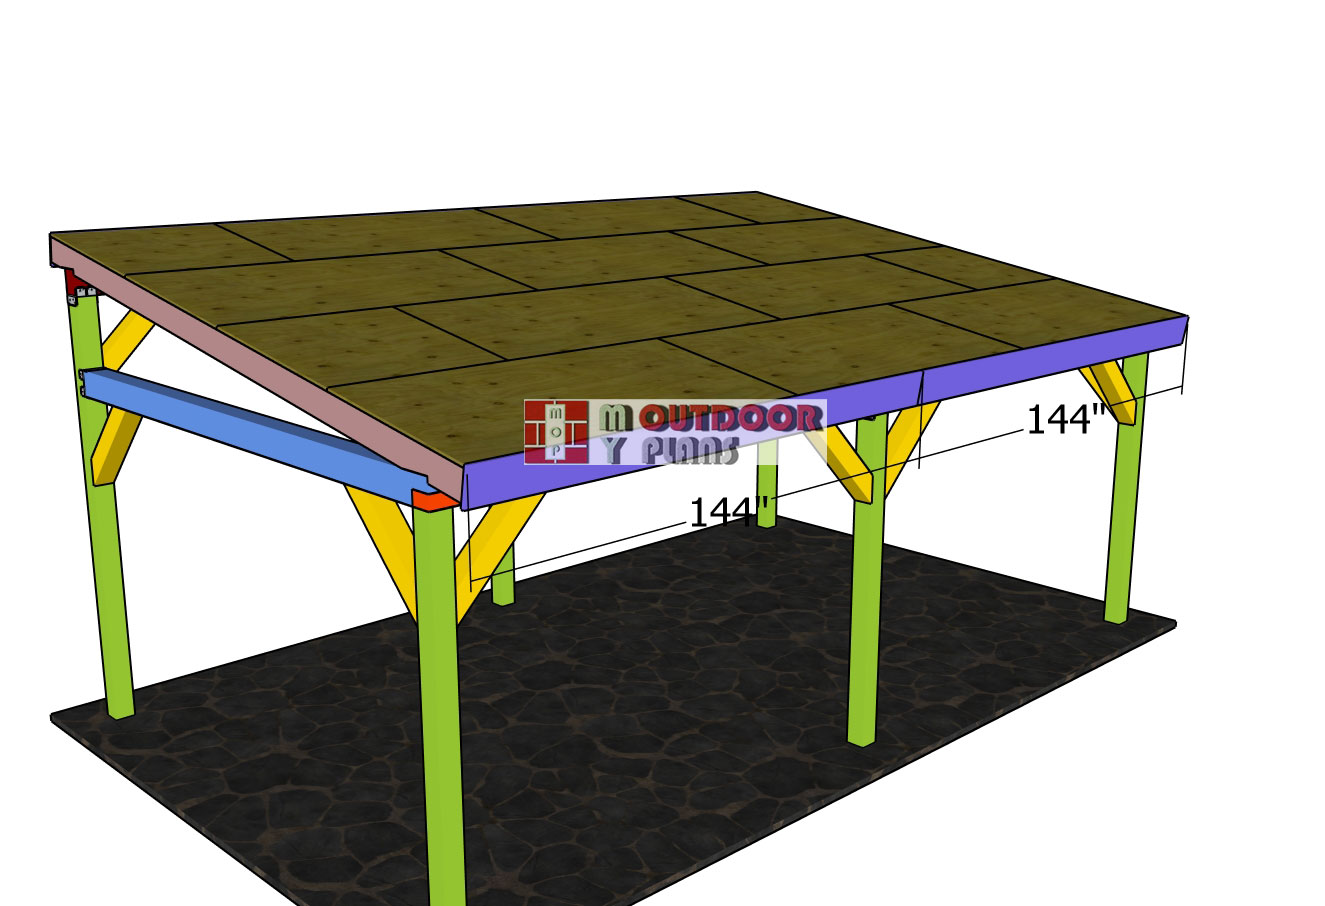
Now, let’s get those rafters installed on top of the carport. Position them every 16 inches on center (OC), following the spacing in the diagram for an even, well-balanced layout. This spacing ensures proper weight distribution and a solid foundation for your roof. Make sure each rafter sits snugly in its birdsmouth notch on the support beams.
Once everything is lined up, secure the rafters at both ends using rafter ties, like the H2.5A. These metal connectors add serious strength, keeping the rafters locked in place even when facing heavy winds or snow loads. Drive in the recommended structural screws or nails to make sure the ties are fully secured. With all the rafters in place, your carport’s roof structure is now solid and ready for the next step!
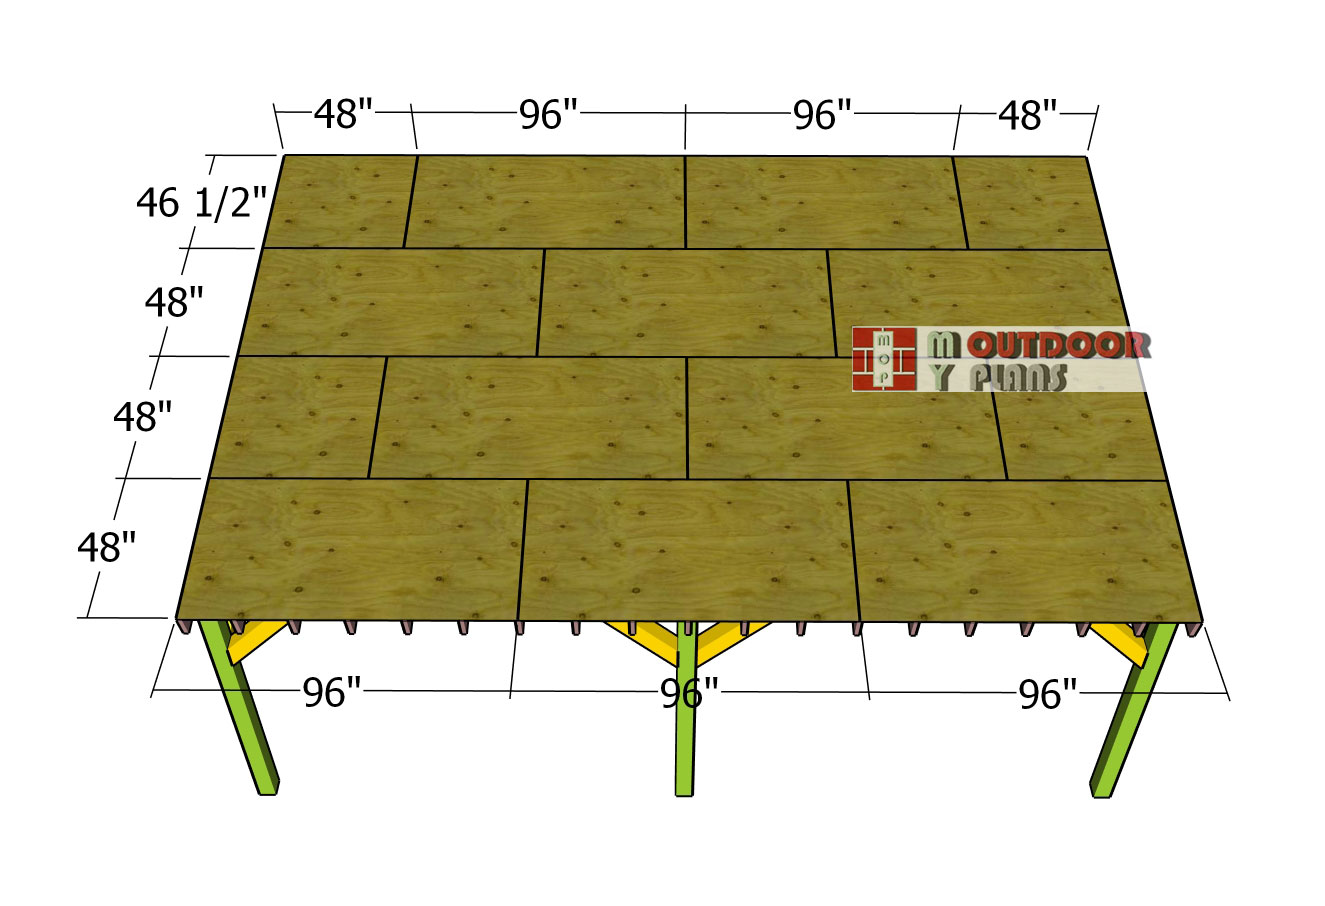
Roof-sheets
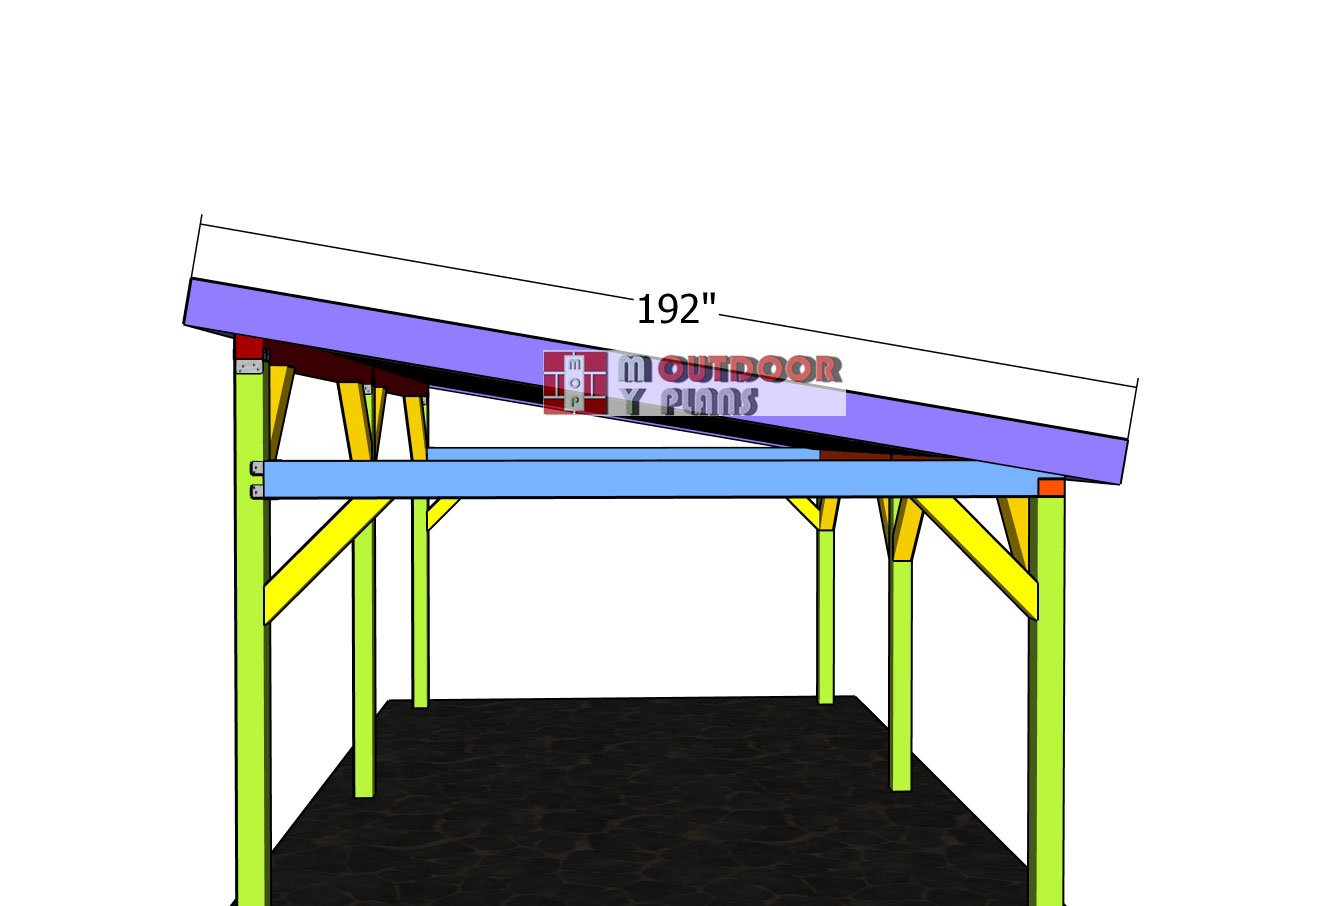
Attach the 1/2″ plywood sheets to the roof, beginning at the lower left and working your way toward the ridge line. Ensure there are no gaps between the sheets and fasten them with 2 1/2″ screws, spacing the screws every 8 inches along the rafters.
Make sure the edges of adjacent plywood sheets meet in the middle of the rafters for proper alignment and support. This method will give the roof a solid, stable surface, ready for the next phase of construction.
Side-roof-trims
Front-and-back-roof-trims
Next, attach the 1×10 trims to the sides of the pavilion, ensuring the edges are flush. Secure them firmly with 2″ nails. Once the side trims are attached, cut and install the trims for the gable ends of the pavilion. Again, use 2″ nails to secure these trims. This step will not only give the pavilion a clean, finished appearance but also help protect the edges from weather damage, enhancing both durability and aesthetics.
Installing-the-roofing
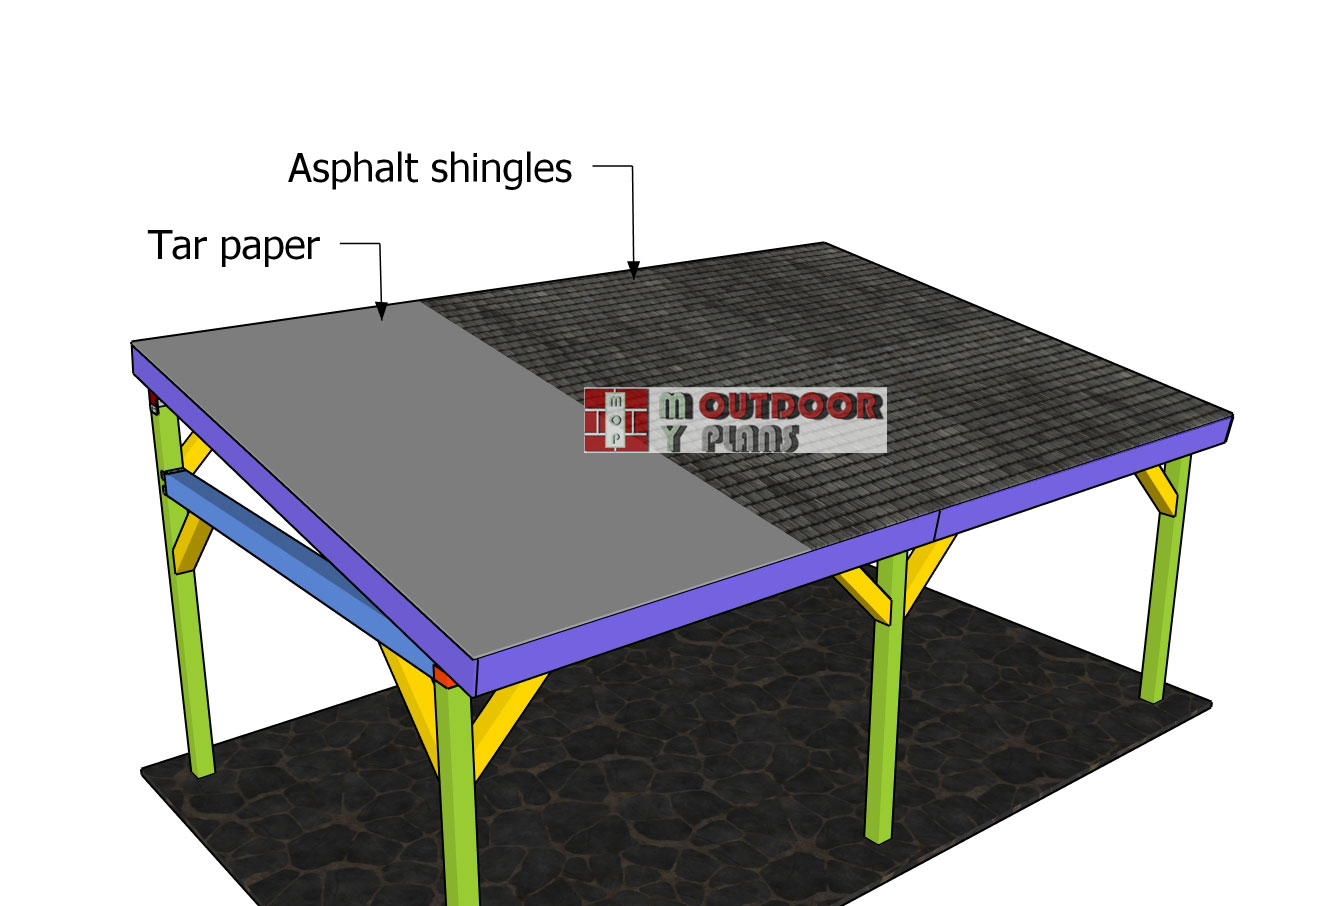
Installing asphalt shingles on a lean-to pavilion is a fantastic way to add long-lasting protection while giving your structure a clean, polished look. First up, you need a solid foundation—your underlayment. Start by rolling out roofing felt or synthetic underlayment from the bottom edge of the roof, working your way up. Overlap each row by at least 4 inches to keep water from sneaking in. Use staples or roofing nails to secure it, ensuring it’s tight and smooth. At the top, let the underlayment overhang slightly so it tucks neatly under the pavilion’s ridge flashing (if applicable). Think of this as the waterproof jacket for your roof—it’s got one job, and it does it well.
Next, it’s time to lay down the shingles. Begin at the lower edge of the roof with a starter strip—this helps prevent wind damage and stops water from creeping underneath. Then, start placing your shingles row by row, following the manufacturer’s guidelines for staggered alignment. Nail them down with four to six roofing nails per shingle, driving them just above the cutouts. As you work your way up, keep an eye on the pattern and spacing. When you reach the top, install ridge shingles or cut standard shingles into smaller sections to cap it off. Take a step back and admire your work—your lean-to is now looking sharp and ready to handle the elements.
Finally, let’s talk about drip edges—these small metal strips play a big role in keeping water away from your pavilion’s structure. Install the drip edge along the eaves first, tucking it under the underlayment to direct water off the roof. On the rake edges, install it over the underlayment to keep wind-driven rain from getting underneath. Secure it with roofing nails every 12 inches, making sure it sits flush. A well-installed drip edge helps your roof last longer and keeps everything beneath it dry. And just like that, your pavilion now has a rock-solid, weatherproof roof—built to last and looking great.
Finishing touches
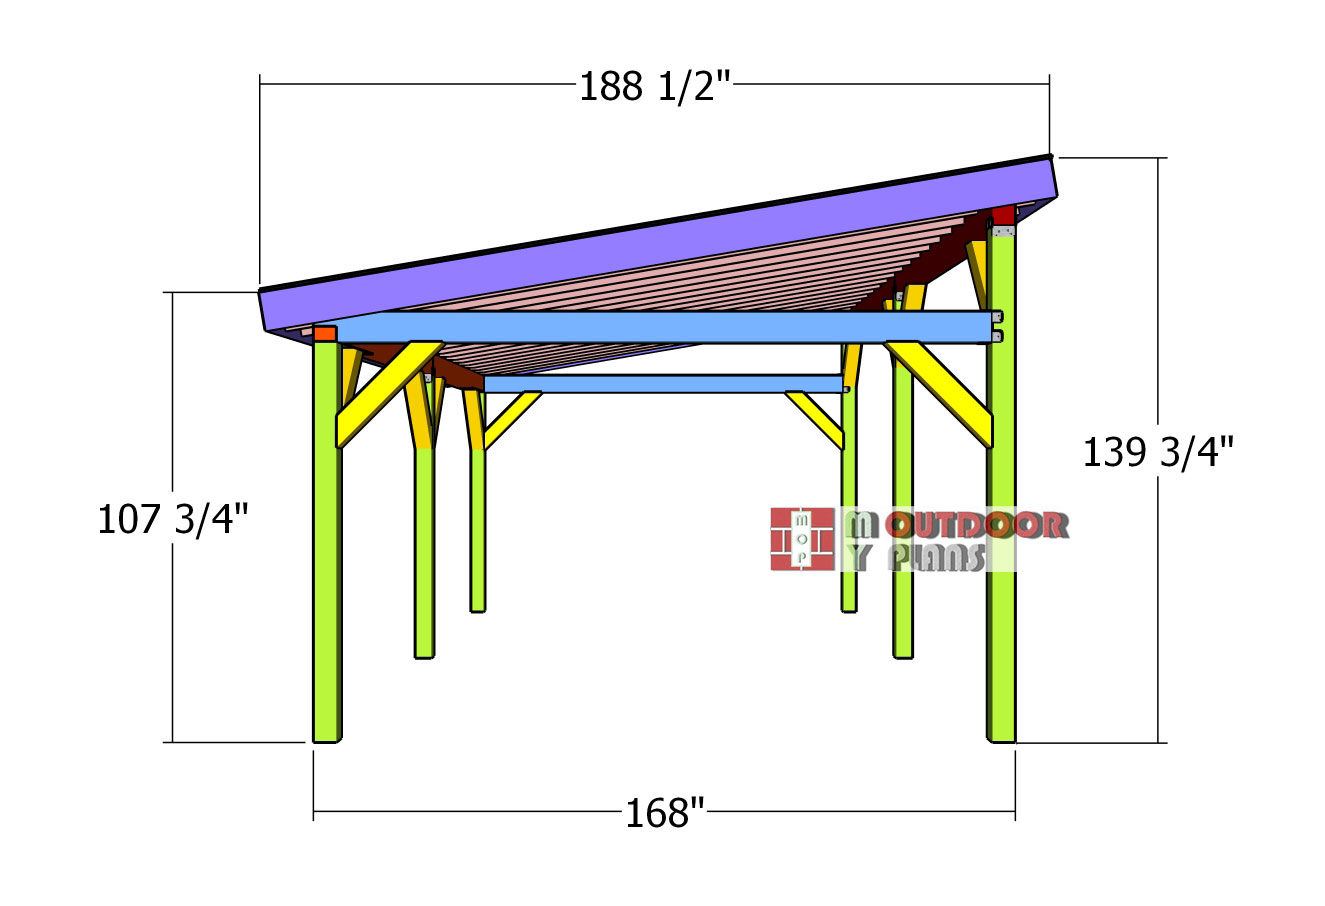
Front-view-dimensions
Now that the main structure is up, it’s time for the finishing touches that will take your carport from “built” to “polished.” Start by filling any visible screw or nail holes with wood putty. This step smooths out imperfections and gives your carport a clean, seamless look. If you’re working with pressure-treated lumber, make sure the wood is fully dry before applying putty—otherwise, it won’t adhere properly. Let it dry completely before moving on to the next step.
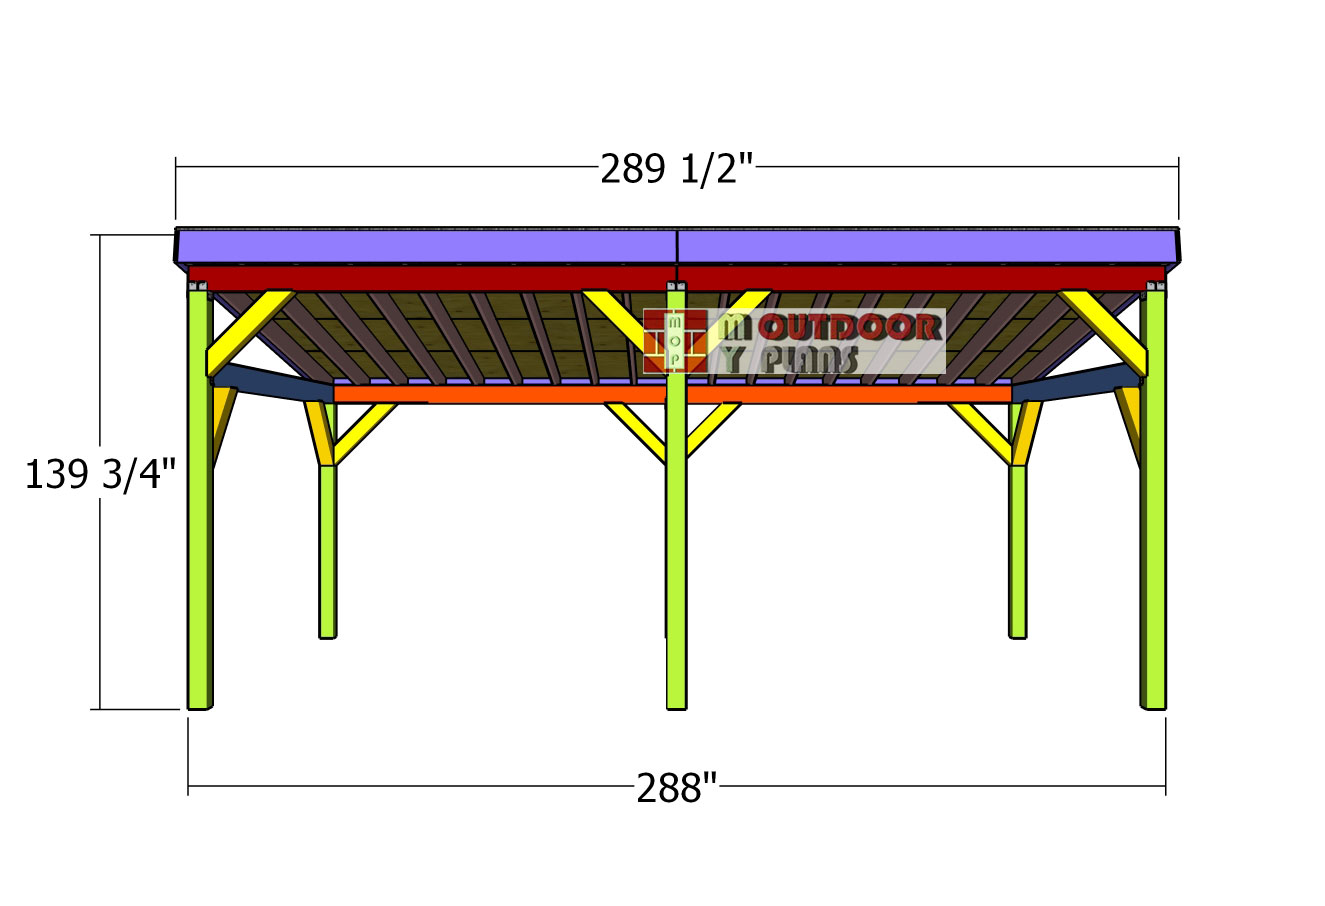
Side-view—dimensions
Once the putty is set, grab some sandpaper and smooth out the entire structure, focusing on rough edges and filled holes. A 120-150 grit sandpaper works great for this, knocking down any splinters or uneven spots while keeping the wood’s texture intact. If you want an ultra-smooth finish, do a final pass with a finer grit. This step isn’t just about looks—it also helps paint or stain adhere better and last longer. Now for the fun part—painting or staining. If you want a sleek, modern look, go with exterior paint, applying a quality primer first to ensure good coverage. If you prefer a natural, rustic vibe, stain is the way to go.
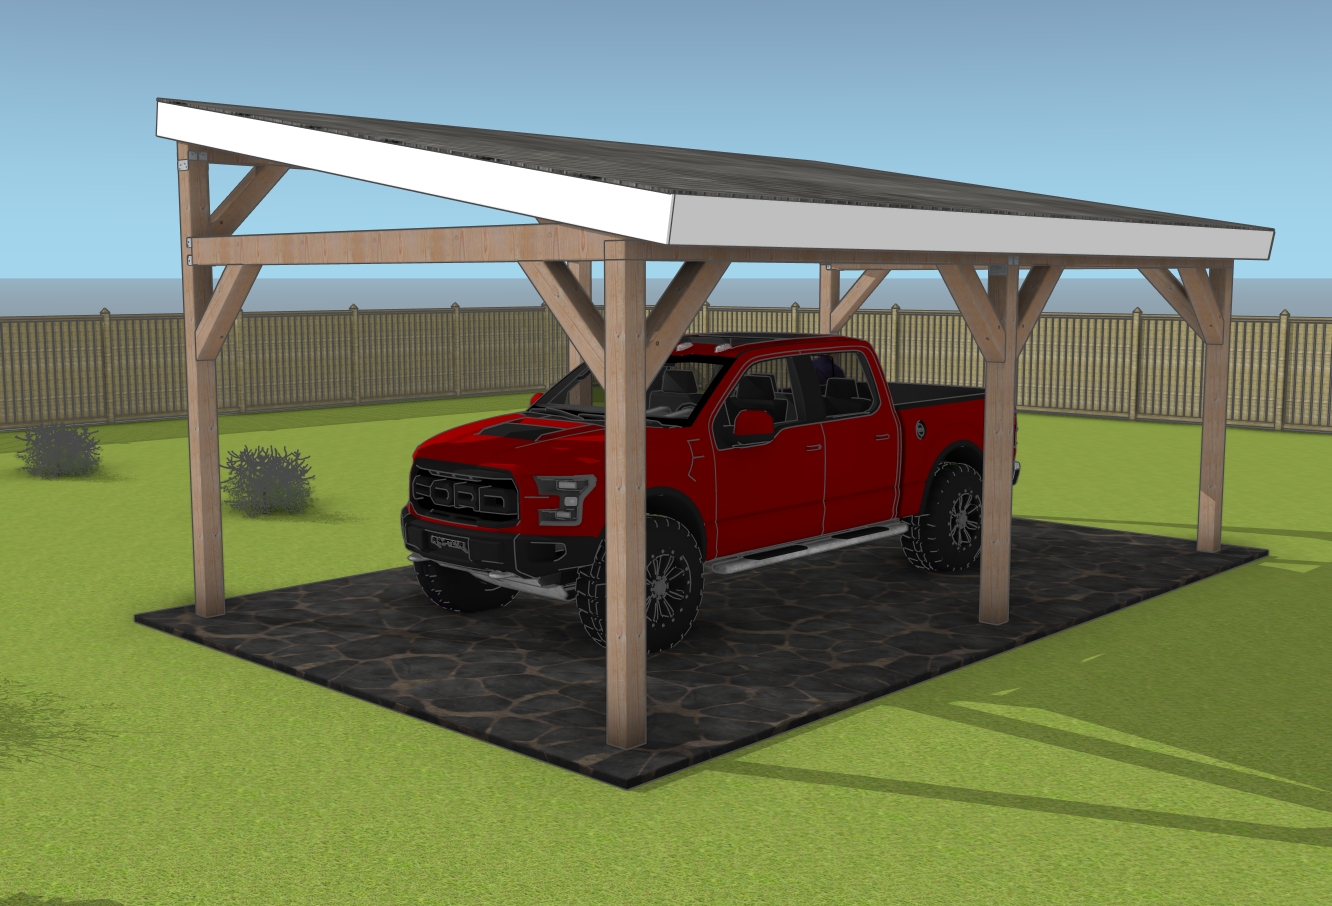
Build a carport – diy plans
A high-quality outdoor wood stain enhances the wood grain while protecting it from moisture and UV rays. Whichever option you choose, use a brush, roller, or sprayer to apply the finish evenly. Don’t forget to seal any cut ends, as those are the most vulnerable to weather damage. For some extra functionality, consider a few add-ons.
Installing gutters along the eaves will direct rainwater away from the carport, preventing erosion and keeping the area underneath dry. LED string lights or motion-activated lighting can add both style and security. If you want more coverage, lattice panels or privacy screens on one or more sides can provide shade and block wind. These final touches not only improve durability but also add personality, making your carport a practical and stylish addition to your space.
Check out PART 1 of the project, so you learn how to build the base for the carport.
This woodworking project was about simple lean to pavilion roof plans. If you want to see more outdoor plans, we recommend you to check out the rest of our step by step projects.
