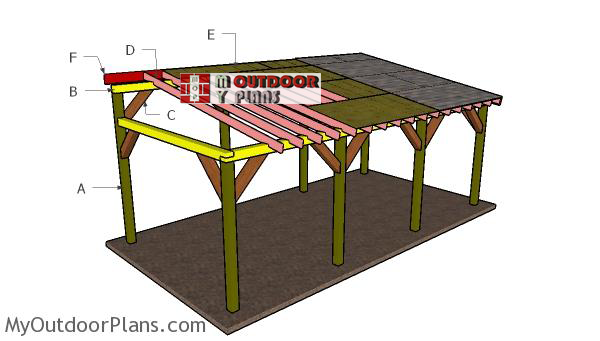
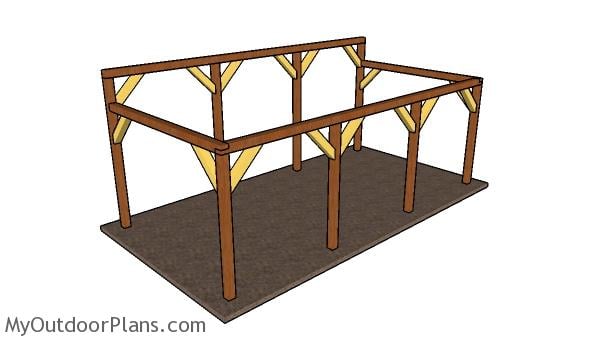
This step by step diy project is about 12×24 carport carport plans. I have designed this single car shelter with a lean to roof, so you can protect your car from the elements. This carport is sturdy and it is very easy to build, if you have basic tools and skills. Make sure you read the local building codes before starting the project, so you get aware of the legal requirements and make the necessarily adjustments. Take a look over the rest of my woodworking plans, if you want to get more building inspiration. Premium Plans for this project available in the Shop.
When buying the lumber, you should select the planks with great care, making sure they are straight and without any visible flaws (cracks, knots, twists, decay). Investing in cedar or other weather resistant lumber is a good idea, as it will pay off on the long run. Use a spirit level to plumb and align the components, before inserting the galvanized screws, otherwise the project won’t have a symmetrical look. If you have all the materials and tools required for the project, you could get the job done in about a day. See all my Premium Plans HERE.
Projects made from these plans
12×24 Do It Yourself Lean to Carport Plans
Building-a-12×24-carport
Cut & Shopping Lists
- A – 4 pieces of 6×6 lumber – 13′ long, 4 pieces – 11′ long POSTS
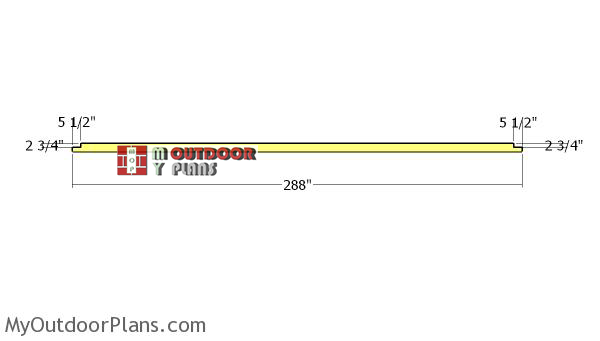
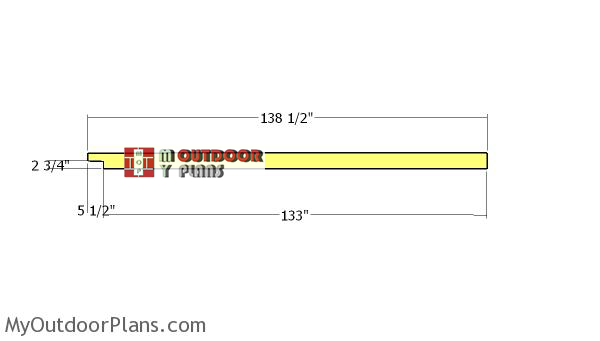
- B – 2 pieces of 6×6 lumber – 24′ long, 2 pieces – 138 1/2″ long SUPPORT BEAMS
- C – 16 pieces of 6×6 lumber – 36″ long BRACES
- 6 pieces of 6×6 lumber – 12′
- 4 pieces of 6×6 lumber – 14′
- 2 pieces of 6×6 lumber – 24′
- 8 pieces of 6×6 lumber – 6′
- 8″ screws
- 6″ screws
- wood glue, stain/paint
- wood filler
- post anchors (optional)
- beam to post connectors
- structural screws for connectors
- strong tie T
Tools
![]() Hammer, Tape measure, Framing square, Level
Hammer, Tape measure, Framing square, Level
![]() Miter saw, Drill machinery, Screwdriver, Sander
Miter saw, Drill machinery, Screwdriver, Sander
![]() Concrete mixer, Post hole digger
Concrete mixer, Post hole digger
Time
![]() One weekend
One weekend
Related
- PART 1: 12×24 Carport Plans
- PART 2: 12×24 Carport Roof Plans
12×24 Lean to carport plans
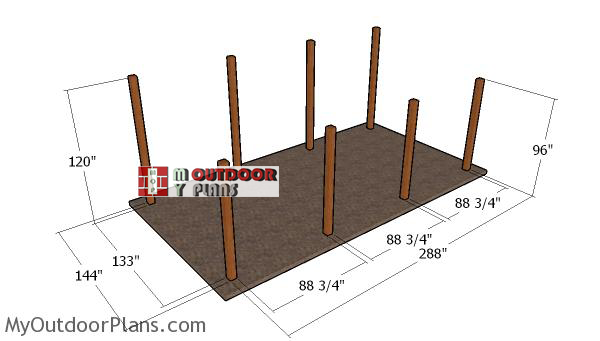
Laying-out-the-posts-for-carport
Next, you need to lay out the carport in a professional manner. Build batter boards and use string to layout everything in a professional manner. Apply the 3-4-5 rule to every corner and make sure the diagonal are equal, otherwise the corners won’t be square. Select the location for the carport with attention, making sure it complies with the local codes. Get a building permit if needed. Level the surface with attention, removing the vegetation layer.
Setting the posts in concrete
Use a circular saw to make cuts to the top of the posts so they are perfectly level.
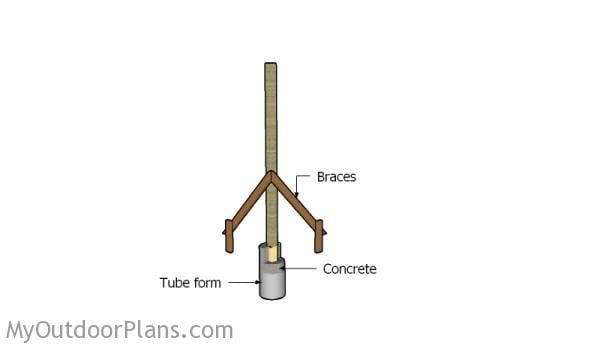
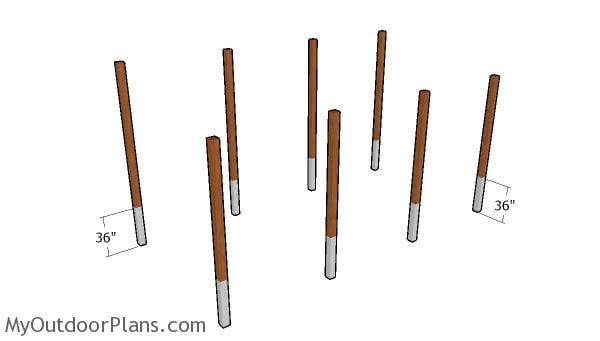
Setting the posts in concrete
You need to set the posts in concrete (about 3-6′ deep – make sure you read the local building codes for accurate information). Use a post hole digger to make the holes. Pour a 2″ layer of concrete on the bottom of the holes so you level them. Fit the tube forms and then the 6×6 posts. Use a spirit level to make sure the posts are plumb and then secure them temporarily into place with braces. Fill the tubes with concrete and let it dry out as shown on the bags. Make sure the top of the posts are level.

Plate
Use 6×6 lumber for the plate that goes on top of the tall posts.
Side-plate
Use 6×6 lumber for the plate that goes on top of the short posts. Use a circular saw to make the notches at both ends of the posts, so you can join them together with the front and back plates. Make parallel cuts inside the marked areas and then remove the excess with a hammer and a chisel.
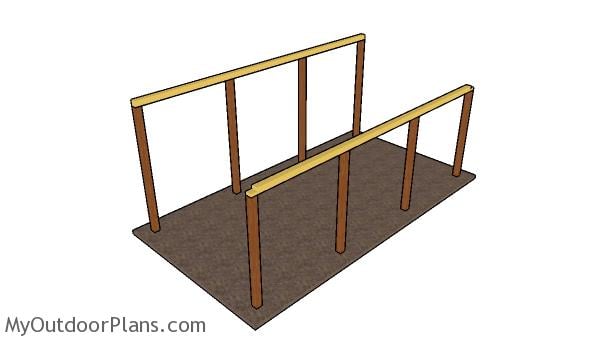
Fitting the top plates
Fit the 6×6 plates to the sides of the carport. Align the edges with attention and make sure the corners are square. Drill pilot holes through the plates and insert 8″ screws into the top of the posts.
Front-plates
Continue the project by cutting the front and back wall plates. Use a circular saw to make the notches at both ends of the beams. Set the blade at 2 3/4″ depth and make parallel cuts. Use a chisel and sandpaper to clean the recesses.

Front and back plates
Fit the plates to the front and back of the carport. Use a spirit level to make sure the plates are perfectly horizontal, before locking them into place with screws. Drill pilot holes and insert 8″ screws to lock them into place tightly.
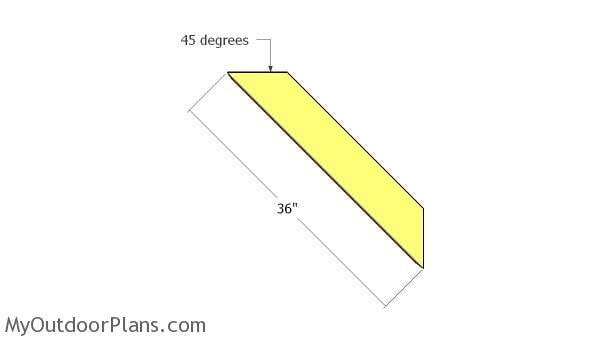
Braces
Use 6×6 lumber for the braces. Use a miter saw to make 45 degree cuts to both ends of the braces.
Fitting the braces
Plumb the posts with a spirit level and then attach the braces into place tightly. Drill pilot holes through the braces and insert 6″ screws, to lock them into place tightly.
12×24 Do It Yourself Lean to Carport Plans
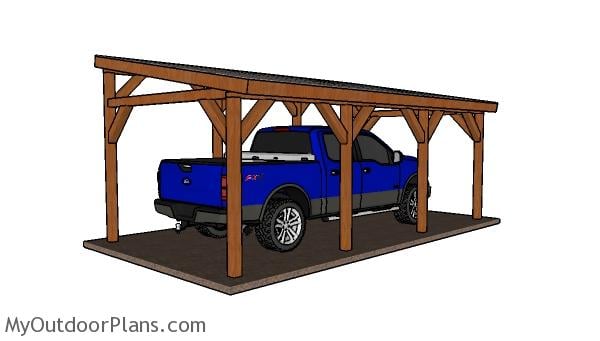
This large single carport features an elegant design, having a roof with a nice slope. You can adjust the slope of the roof, if you live in areas with high precipitations.

12×24 Do It Yourself Lean to Carport Plans – Side view
Please take a look over PART 2 of the project, so you learn more on how to build the lean to carport roof. You can make a few modifications to my design, so you can create storage space to the sides of the carport. Premium Plans for this project available in the Shop.
If you want to get PREMIUM PLANS for this project (different design and with re-engineered structure), in a PDF format, please press GET PDF PLANS button bellow. Thank you for the support.

This woodworking project was about 12×24 single carport plans. If you want to see more outdoor plans, check out the rest of our step by step projects and follow the instructions to obtain a professional result.

16 comments
12×24 free standing lean to car port: its very unclear on how the top (upper) and bottom (lower) 24′ support beams (top plates) are to be fitted. the description only says to: ” use a circular saw to make notches to the top of the post, so you can fit the support beams. make a 1 1/2 inch deep parallel cuts inside the marked area. please describe in more detail on how these pieces are to be fitted. thanks chris
You use framing screws. Drill pilot holes and then insert screws that are double in length than the depth of the wood.
As the post above states… notches with circular saw on posts as marked….
There is no picture of the marking on the posts… there are no measurements. It seems the one picture is missing as how to notch the posts.
Are you able to provide the missing information?
Please and thank you
There was an error in the instructions. You don’t nee to make any notches to the top of the posts, just cut them flat making sure they are at the same level. For this carport there is no need to notched joints for the posts.
I love this design. It is so simple and has the look of post and beam barn construction. The 24’ long 6×6 might be a lot to handle— have you ever spliced shorter 6x6s to make a longer beam?
Yes, you can do that, using a half lap joint.
Looking for plans for 24 x 24 lean to car port for 3 cars
I don’t have plans for that at the moment.
Your materials list and materials don’t match. Just about as clear as mud.
What do you mean”? Can you be more specific? You can’t find 11′ ft beams that is why in the materials list they appear 12 ft for example.
Hello do you have anything like this but with a smaller drop for the roof. Like 6 -12 inch drop instead of 2 feet?
No plans for a lower roof pitch
Can you build a concrete surface form on the posts so not to be 3 ‘ underground?we asphalted, don’t want to dig….can we make a form to encapsulate the first 3’ of the post
No, doesn’t work that way
Would you use pressure treated for this or another type of lumber that would need to be sealed? Can you make suggestion?
I would use PT for the posts