This step by step diy project is about outdoor rabbit hutch plans. If you want to grow rabbits, you need to build a basic hutch as to protect them from bad weather and keep them safe from predators. Make sure you sanitize the wooden components regularly. In addition, adjust the size of the backyard hutch according to the rabbit breed you are going to grow. This aspect is essential as rabbits require different conditions according to their breed.
Generally speaking, there are many designs and sizes you can choose from when building a rabbit hutch, so we strongly advise you to check all the options before starting the actual construction. Always choose professional plans and invest in the best quality lumber you can afford (pressure treated lumber, cedar, pine). Use a quality saw to adjust the size of the components at the right dimensions. See all my Premium Plans HERE.
Projects made from these plans
It’s that simple to build a rabbit hutch!
Cut & Shopping lists
- A – 2 pieces of 2×2 lumber – 32 3/4” long, 2 pieces – 28 1/2″, 1 piece – 48″, 3 pieces – 45″ FRAME
- A – 3 pieces of 2×2 lumber – 21” long, 1 piece – 20 1/2″ FRAME
- B – 1 piece of 1/2″ plywood – 24”x48″ long FLOORING
- C – 1 piece of 1/4″ plywood – 21″x22 1/2” long, 2 pieces of 2×2 lumber – 21″ long INTERIOR WALL
- D – 12 pieces of 1×4 lumber – 24 3/4” long, 6 pieces – 13 3/4″, 6 pieces – 48″ SLATS
- E – 2 pieces of 2×2 lumber – 17 1/4″” long, 2 pieces – 29 3/4″ long DOOR
- F – 1 piece of 1/2″ plywood – 27 3/4″x52 1/2″ long, asphalt shingles ROOFING
- 6 pieces of 2×2 lumber – 8′
- 9 pieces of 1×4 lumber – 8′
- 1 piece of 1/2″ plywood – 4’x8′
- 1 piece of 1/4″ plywood – 2’x2′
- 100 pieces of 2 1/2″ screws
- 100 pieces 1 1/4″ screws
- 2 hinges
- 15 sq of tar paper
- 15 sq ft of shingles
Tools
![]() Hammer, Tape measure, Framing square, Level
Hammer, Tape measure, Framing square, Level
![]() Miter saw, Drill machinery, Screwdriver, Sander
Miter saw, Drill machinery, Screwdriver, Sander
![]() Post hole digger, Concrete mixer
Post hole digger, Concrete mixer
![]() Safety Gloves, Safety Glasses
Safety Gloves, Safety Glasses
Time
![]() One day
One day
Building a rabbit hutch
Building-a-rabbit-hutch
Top Tip: Building a hutch for rabbits is a complex project, as you have to face many challenges. Choose the right design and size for your construction is hard, but the end result will most certainly add value to your garden.
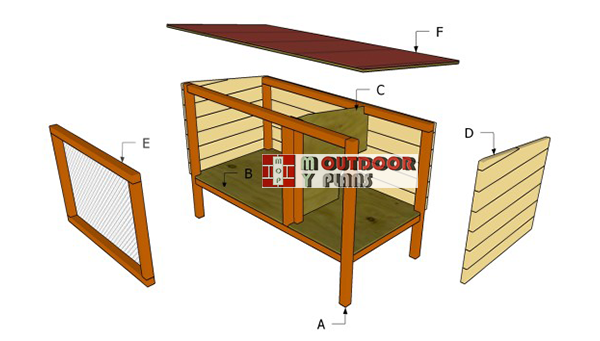
Outdoor Rabbit Hutch Plans
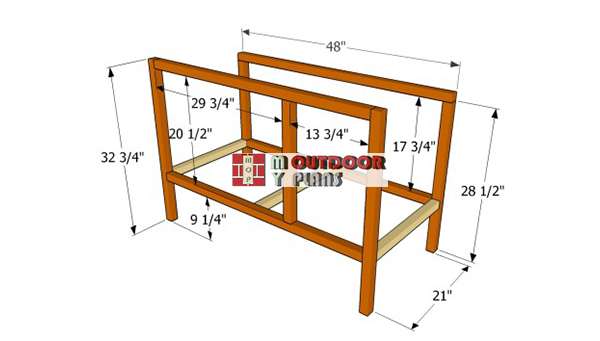
Building-the-hutch-frame
The first step of the outdoor project is to make the frame of the rabbit hutch. As you can notice in the free plans, we recommend you to build a light structure using 2×2 lumber.
Top Tip: Cut the wooden components at the right size and lock them together with 2 1/2″ galvanized screws, after drilling pilot holes. Check if the corners are right-angled and plumb the post with a spirit level.

Attaching the floor
Continue the woodworking project by attaching the 1/2″ plywood flooring. In order to fit into place, around the posts, we recommend you to cut small notches in the piece of plywood with a good circular saw.
Attach the plywood sheets to the floor and lock it into place with 1 1/4″ galvanized screws of finishing nails. It is essential to check if the corners are right-angled after fitting each component.
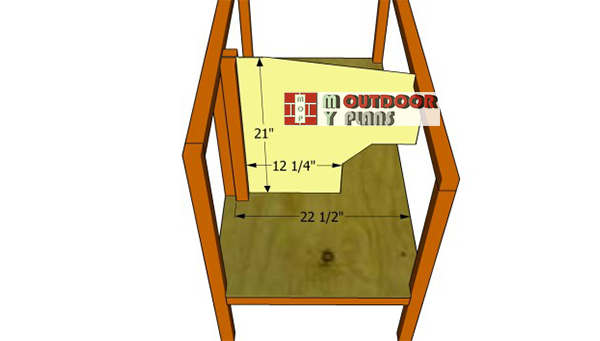
Installing-the-interior-partition
The next step is to install the interior wall, out of 1/4″ plywood. Cut the plywood sheet at the right size and fit it inside the rabbit hutch, as shown in the image. If you want to get a professional result, we recommend you to plumb the wall with a spirit level.
Top Tip: Mark the cut lines with a pencil before making the cuts with a saw. It is essential to take accurate measurements, otherwise the wall won’t fit into place.

Installing the back wall
Attach 1×4 slats to the back of the hutch, making sure you align them at both ends. In addition, we recommend you to drill pilot holes at both ends and to insert the screws into the frame. Add waterproof glue between the slats, if you want to increase the bond of the structure.

Attaching the slats
Continue the project by attaching the slats to the front and to the sides of the hutch. Align the slats at both ends and secure them to the frame with screws.
Top Tip: Use a circular saw to adjust the size of the slats.
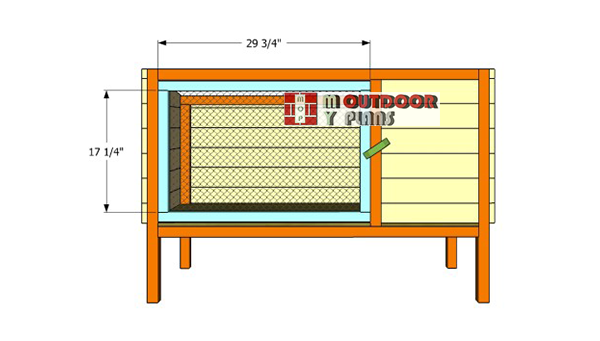
Building-the-door
Building the front door for the hutch is an easy procedure, as you need just 2×2 lumber and a piece of chicken wire. Assemble the wooden frame on a level surface and attach it to the hutch with metal hinges.
Top Tip: Work with attention and make sure the door opens properly. Build a straight-forward latch by securing a piece of lumber to the frame with a long nail (pre-drill the lumber).

Installing the roof
One of the last steps of the project is to build the roof of the hutch. Therefore, you should cut a small piece of 1/2″ plywood and lock it into place with several nails or galvanized screws.
Afterwards, cover the roof with asphalt shingles, as to make the structure waterproof. Make sure the shingles overhang the structure about 1″ on all sides, to enhance the water drainage. Fitting tar paper is optional but highly advisable.

Outdoor rabbit hutch plans
Last but not least, take care of the final touches. Therefore, fill the gaps with wood putty and let the compound dry out for several hours, before sanding the surface with medium grit sandpaper. Afterwards, clean the surface with a cloth and apply several coats of wood stain or paint, to protect the wood from rot.
Top Tip: You could fit lattice panels between the posts, if you want to create storage space under the rabbit hutch. In addition, the panels would add character to your construction.
This woodworking project was about outdoor rabbit hutch plans. If you want to see more outdoor plans, we recommend you to check out the rest of our step by step projects. SHARE our projects and follow us on the social networks to help us keep adding free woodworking plans. LIKE us on Facebook to be the first that gets our latest updates and submit pictures with your DIY projects.
EXPLORE MORE IDEAS FOR:
 |
 |
 |
 |
23 comments
I built this rabbit hutch and would like to build a smaller scale model for my son’s guinea pig but I don’t know how to get the right dimensions to do so ,could someone please help ?
Can you please share a few images with your project, so that everyone else can see your work? I will make the plans, but what dimensions do you have in mind? Indoor or outdoor? With run or without run?
Guinea pigs are fair size adults close to rabbit recommend sticking with same size consider A frame for summer with screen bottom allow to munch on grass as long as it not been sprayed with chemicalsome
I built this for my daughters new rabbit, came out great, except you made no provisions for cleaning out the rabbits sleeping area. I made the right-hand side panel removable, held on with four threaded 1\4 -20 studs, now when she needs to clean out that area its easy to reach.
Thank you for sharing your modification. That sounds really good idea that will make cleaning easier. I would love to see you project and I’m sure the rest of the builders as well.
Novice builder confusion! The lumber sizes say one piece of 2×2 at 48″ and 2 at 45″. None of the pieces are label(which would be helpful) so I added up the labeled measurements of spaces and think I need three 45″ 2×2’s. Top and bottom rails of front frame and bottom of back of the frame. Is this correct?
Yes, you are right. I made the modifications to the cut list. If you have more question, I would be more than glad to assist you with the build. Good luck with your DIY project!
I would suggest using half-round or similar for the floor – instead of the solid floor. This will allow urine and droppings to drop right onto the lawn. If your cage is on a paved area, you could add a removable tray at the bottom for easy cleaning.
Thank you for the tip!
Building this hutch and was getting pretty far along when we found out we were getting a second rabbit -_-
…so now I am working on building an addition to a rabbit’s house. Will post pictures if I can when it’s done. One suggestion I have is that you do the floor partially with plywood and the area outside of the rabbit’s little hideaway with 1/2 inch wire mesh for the droppings to just fall out, rather than to have to clean them oneself. Excellent plan though overall, really enjoying making this
Thank you for the suggestion and I’m looking forward to seeing your project.
I would like to build this hutch but would like it a little smaller and a double.
Unfortunately, I don’t have enough time to design custom projects.
What tools do I need to make this?
You need a drill, a saw, a carpentry square, a ruler. See my recommendations here: http://myoutdoorplans.com/support-us/
I see no mention of wire in your materials list. what kind did you use?
Hardware cloth. Something like this: https://amzn.to/2SRAkqt
Hi, I was wondering if it is structurally safe to not include the interior wall in order to help with cleaning.
Yes, you can remove it. It has no structural role.
Hi! Do you have to coat it with a finish if it’s for indoors? Also are there finishes to stay away from that aren’t safe for bunnies?
Also, Is pine okay to use? I read cedar is deadly for rabbits. I just want to make sure. I usually get spruce pine but maybe I should get the treated wood?
I built this hutch described here. The only thing I added were hinges to the top and feet to the bottom of the legs.
As soon as we moved the hutch into place, one of the legs broke in half. I suggest 4x4s for the legs. It’s quite heavy for those 2×2 legs.
I don’t know who wrote the intro to this project but NEVER USE CEDAR for rabbits. Cedar is toxic to rabbits.