This step by step diy article is about outdoor cat house plans. Building a wooden house for you cat is a great idea, as it will protect it from bad weather. In addition, if you know the basic woodworking techniques and buy quality materials, you can get the job done in just a few hours. From our experience, we recommend you to build the frame of the cat house out of 2×2 lumber, as you could add rigid insulation boards.
Drill pilot holes trough the components before driving in the wood screws, to prevent the wood from splitting. In addition, align all the components at all ends, if you want to get the job done properly and build a cat house with a nice appearance. Plumb the walls before locking them into place and check if the plates are horizontal. In addition, adjust the design and size of the box to your needs. See all my Premium Plans HERE.
Projects made from these plans
Cut & Shopping Lists
- A – 2 pieces of 2×2 lumber – 24”, 3 pieces – 21”, 1 piece of 3/4” plywood – 24×24″ PLATES
- B – 8 pieces of 2×2 lumber -11”, 4 pieces – 24” long, 4 pieces – 21” long WALLS
- C – 30 sq ft of 1/4” plywood EXTERIOR WALLS
- D – 6 pieces of 2×2 lumber – 20”, 1 pieces of 2×2 lumber- 24” RAFTERS
- E – 1 piece of 3/4” plywood – 22 1/4×24 1/2” , 1 piece – 21 1/2×24 1/2” ROOFING SHEETS
- F – 10 sq ft of roofing felt, 10 sq of asphalt shingles ROOFING
- 9 pieces of 2×2 lumber – 6′
- 1 piece of 3/4″ plywood – 4’x4′
- 1 piece of 1/2″ plywood – 4’x8′
- 10 sq ft of tar paper, shingles
- 200 pieces of 2 1/2″ screws
- 200 pieces of 1 5/8″ screws
- paint
Tools
![]() Hammer, Tape measure, Framing square
Hammer, Tape measure, Framing square
![]() Miter saw, Drill machinery, Screwdriver, Sander
Miter saw, Drill machinery, Screwdriver, Sander
Time
![]() One day
One day
Related
Building a cat house
Building-an-outdoor-cat-house
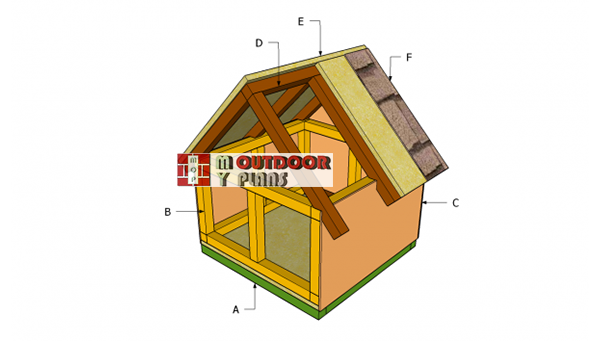
Build a nice wooden box for you cat, if you want to protect her from bad weather. As you can see in the image, the concept is straight forward: you just need to build a simple frame and attach the outside walls.
Top Tip: You should remember that you should always adjust the size and design of the house to you needs.
Outdoor Cat House Plans
Building-the-base-of-the-dog-house
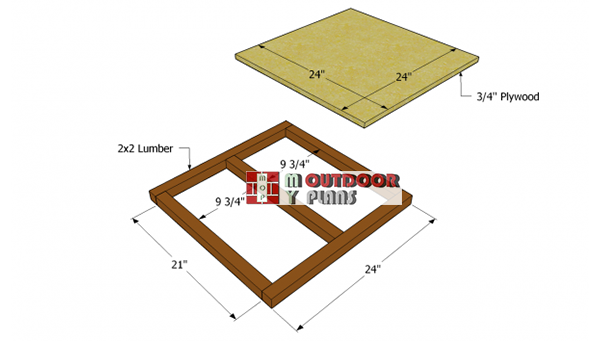
The first step of the project is to build the floor of the cat house. In order to get a durable result, we recommend you to build the frame of the floor out of 2×2 lumber. Attach a piece of 3/4” plywood to the frame and secure it into place with 1 5/8” screws, after cutting it to the right size.
Top Tip: Make sure the edges of the plywood are flush with the frame, before driving in the 1 5/8″ galvanized screws.

Installing the walls
Continue the woodworking project by installing the wall frames on top of the floor, as in the plans. Build the frame of the walls using 2×2 lumber, on a level surface, as they are light and provide lots of support to the construction.
Plumb the walls, align them into place and drive in 2 1/2” wood screws trough the bottom plates into the floor. Secure the adjacent walls tightly, by driving in 2 1/2” wood screws.
Installing-the-rafters
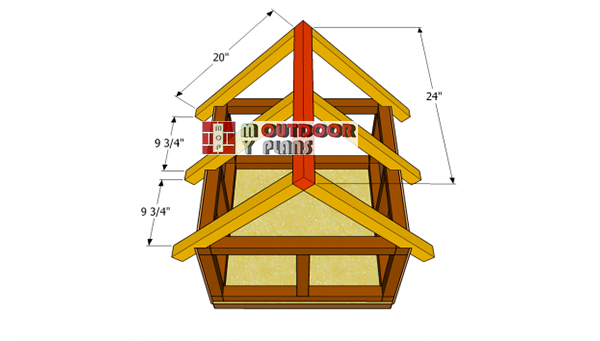
Attach the side walls, made of 1/4” to 3/4” plywood. Afterwards, build the rafters, using the information from the plans. Cut small notches at one end of the rafters, as to fit into place properly. Drill pilot holes and secure them to the frame with 2 1/2” wood screws.
Fit the ridge board and make sure it is perfectly level. Drive in screws trough the ridge board into the common rafters.
Exterior-wall-plans
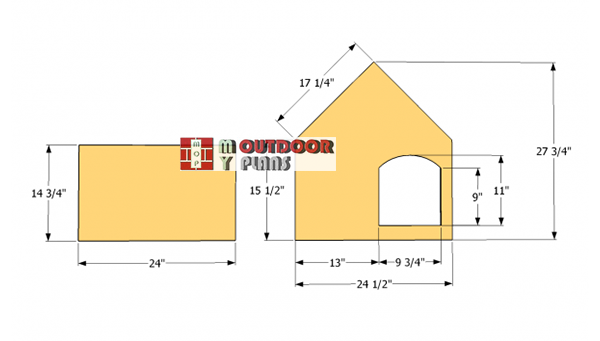
As you can see in the image, you should build the exterior walls out of 1/4” to 3/4” plywood. In order to make the cuts accurately, we recommend you to mark the cut lines on the plywood sheets with calk. Next, use a circular saw to make the cuts, without tearing the edges.
In order to cut out the door opening, we recommend you to drill a starting hole and get the job done with a jigsaw.

Attaching the plywood ends
Attach the exterior walls to the frames, align them at both ends and drive in 1 1/2” screws/nails into the studs, every 6”. Make sure you drive in the nails properly, otherwise the pet might injure.

Building the rafters
Build the rafters using the information in the diagram. The notches are made considering the walls are made from 1/2″ plywood.

Fitting the roofing sheets
Cover the wooden rafters with 3/4” plywood, by cutting the sheets at the right size (see in the plans). Attach the sheets over the rafters, align them thoroughly at both ends and drive in 2” wood screws, every 6”.
Top Tip: If you want to get the job done as a professional, the sheets should overhand 2” on the frond and back ends. Sand the cut edges with medium-grit sandpaper.

Installing the shingles
Cover the roofing sheets with tar paper, as in the image, starting with the bottom. The strips of roofing felt should overlap about 2”, otherwise the roof won’t be waterproof. Install a 12” wide strip on the top ridge, to protect the cat house from bad weather.
Next, install asphalt shingles over the roof of the dog house, after reading the manufacturer’s instructions.

Outdoor cat house plans
Last but not least, you have to take care of the final touches. Therefore, we recommend you to fill all the holes with wood filler and to let the compound to dry out properly. In addition, sand the surface with 120-grit sandpaper and vacuum the residues thoroughly.
Top Tip: Protect the cat house from bad weather by applying several coats of paint. Make sure all the screws are inserted properly. If you are looking for plans for an insulated cat house, I have created a design that I think it will suit your needs perfectly.
This article was about outdoor cat house plans. If you want to see more outdoor projects, we recommend you to check out the rest of the projects.
6 comments
These are nice plans.
I’d need to insulate it though.
And the insulation would have to be sandwiched in between wood so the cats wouldn’t scratch it out.
You can add insulation between the studs and then attach 1/4″ or 1/2″ plywood sheets to the interior of the cat house.
Thank you – this is just what I needed!
Welcome. Looking forward to seeing how it comes out!
My son is doing a project for school. These look great, but the plan are maybe too small for 3-4 cats? How would I go about making this a bit bigger. ( or making sure I get enough materials to the school) any help would be appreciated.
You can use my dog house plans: http://myoutdoorplans.com/animals/insulated-dog-house-plans/ if you want something bigger.