This step by step woodworking project is about insulated dog house plans free. If you want to protect your pet from extreme weather, you should consider building an insulated dog house. In most of the aspects, building a dog house with insulated walls is almost the same job as making a regular one. The only things you should add to the construction is rigid foam sheets and the interior plywood walls. Don’t forget that you should adjust the size of the dog house, according to the needs of your pet. The dog should be able to turn around easily inside the house.
There are certain aspects you should pay attention to, as to obtain a professional result. Pre-drill the lumber before inserting the screws, to prevent the wood from splitting. In addition, align all the components at both ends before inserting the screws. Don’t forget to plumb the walls with a spirit level and to ensure the top ridge is perfectly horizontal. Measure the components several times, before cutting them, otherwise they might not fit together properly. See all my Premium Plans HERE.
Projects made from these plans
Cut & Shopping Lists
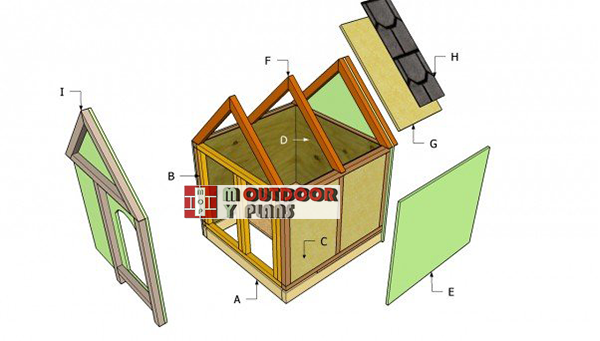
- A – 2 pieces of 2×4 lumber 36” long, 4 pieces of 2×4 lumber 33” long FLOORING
- B – 14 pieces of 2×2 lumber 24” long WALL STUDS
- B – 4 pieces of 2×2 lumber 36” long, 4 pieces of 2×2 lumber 33” long WALL PLATES
- C – 4 pieces of 1 1/2” thick 15 3/4 x 24”, 1 pieces 14 1/4 x 24”, 4 pieces 15 1/2 x 22” INSULATION
- D – 2 pieces of 1/4” plywood 27 x 33”, 2 pieces of 1/4” plywood 27 x 32 1/2” INTERIOR WALLS
- E – 2 pieces of 5/8” siding 37 1/4 x 50”, 2 pieces of 5/8” siding 31 1/4 x 36” EXTERIOR SIDING
- F – 10 pieces of 2×2 lumber, 26 1/4” long, cut at 45º at both ends RAFTERS
- G – 1 piece of 3/4” plywood 30 x 40 1/4”, 1 piece of 3/4” plywood 29 1/4 x 40 1/4” ROOFING SHEETS
- H – 50 sq ft of asphalt shingles ASPHALT SHINGLES
- I – 20 ft of 1×2 or 2×2 lumber TRIMS
- 2 1/2″ screws
- 1 5/8″ screws
- 2″ nails
Tools
![]() Hammer, Tape measure, Framing square
Hammer, Tape measure, Framing square
![]() Miter saw, Drill machinery, Screwdriver, Sander
Miter saw, Drill machinery, Screwdriver, Sander
Time
![]() One weekend
One weekend
Check out this video tutorial! It’s that easy to build your own insulated dog house!
[youtube id=”tgswR5lCfvE” width=”600″ height=”350″]
Dog house with insulation
Insulated-dog-house-plans
Building an insulated dog house is a great project, especially f you want to protect your pet from coldness during wintertime and from hot weather during summer times. If you want to get the job done by yourself, you just should use proper plans for your needs and buy quality materials.
Top Tip: Build the frame of the dog house out of 2×2 lumber. Fit 1 1/2” thick rigid foam insulation sheets inside the frame of the dog house. Attach 5/8” grooved siding to the outside of the frame.
Insulated Dog House Plans

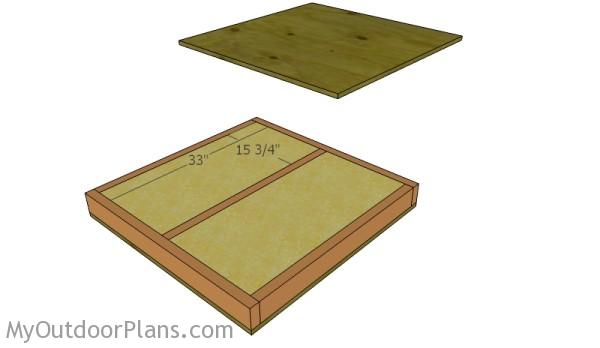
Floor-frame-plans
The first step of the project is to build the base of the dog house. Therefore, build the joists from 2×4 lumber and assemble the frame together with 2 1/2” screws. Ass you can see in the image, you should align the components at both ends, before driving in the screws.
Pre-drill the rim joists, to prevent the wood from splitting. In addition, make sure the corners are right-angled, using a carpentry square.

Attaching the flooring sheet
The next step of the project is to build the flooring from 3/4” plywood and to secure it to the joists. Before driving in the 2” nails to the joists, every 4”, you should make sure the edges of the sheet are flush with the frame.
Top Tip: Use a circular saw with a fine blade to get the job done quickly. Place the blade of the saw over the cut line and get the job done accurately on all edges.
Floor insulation
You could insulate the floor for the dog house, as well. Fit rigid insulation sheets to the frame of the floor and then attach the 3/4″ plywood floor into place.
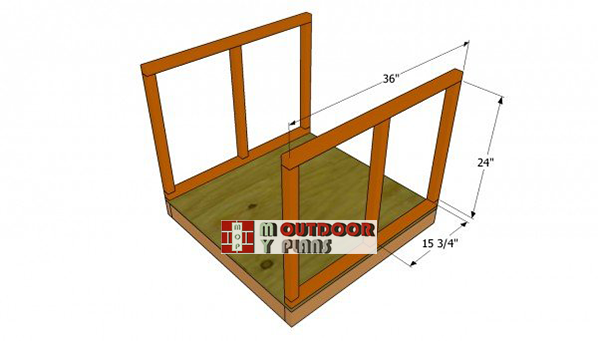
Installing-the-side-wall-frames
Build the frame of the walls from 2×2 lumber, on a level surface. Secure the wall studs to the bottom and top plates, making sure the corner are right-angled. Insert the 3” wood screws, after drilling the pilot hole trough the plates.
Top Tip: Place the frames on the flooring, making sure they are flush with the side edges. Pre-drill the plates, before inserting the 3” screws to the flooring. Plumb them with a spirit level.

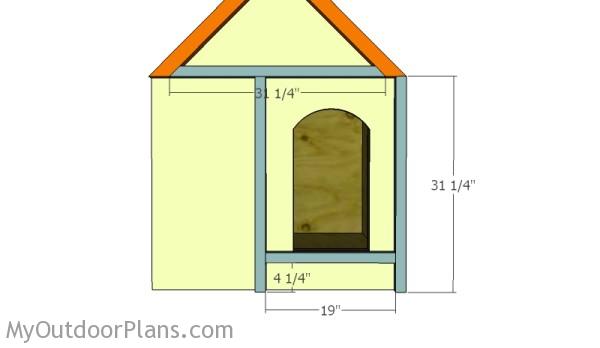
Installing the front wall
Building the front and the back faces of the dog house is a straight forward job, if you use the same techniques described above. Measure the distance between the side walls, before cutting the wooden components.
As you should notice in the plans, you have to leave enough room for the door opening. Double the walls suds, to provide support to the exterior siding around the opening.
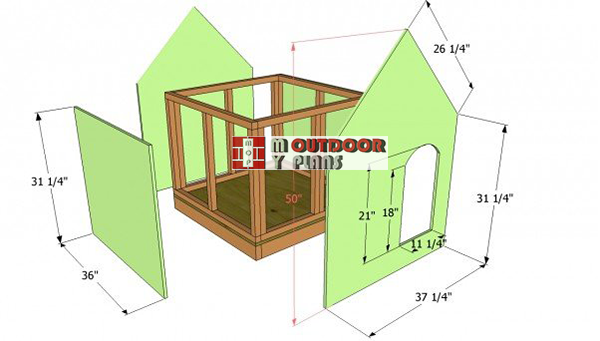
Attaching-the-exterior-panels
Build the exterior walls from 5/8” siding or 3/4” plywood, using the free plans. In order to make accurate cuts, we recommend you to draw the cut lines on the sheets and use a circular saw with a fine blade. Secure the pieces to the frame with 2” nails.
Cut the door opening with a jig saw, after drilling a starting hole with a large drill bit. Make sure the walls are plumb, before attaching the siding.

Build the front face of the dog house
Use this diagram to cut the front wall in a professional wall.

Fitting the insulation sheets
In order to protect your pet from extreme temperatures, we recommend you to fit 1 1/2” rigid foam insulation sheet between the wooden studs. Therefore, cut the sheets to the right size with a hand saw. Afterwards, place them between the studs, in all the cavities.
If you want to install thicker insulation sheets, you should consider building the frame from 2×4 lumber. Nevertheless, in most of the cases, the 1 1/2” thick foam sheets will get the job properly.
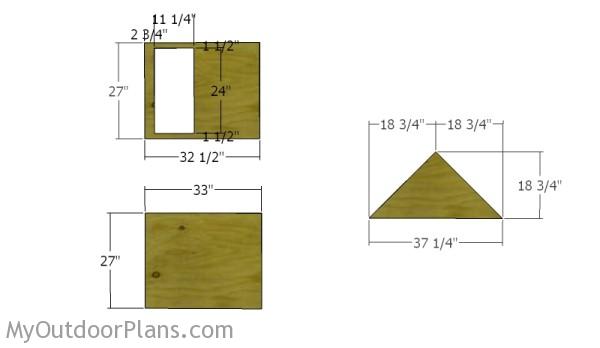
Interior walls
Build the interior walls from 1/4″ plywood. Use the diagram to the cut the panels to the right dimensions. The 27″x33″ panel is for the sides.

Installing the interior walls
Continue the project by fitting the interior walls, made out of 1/4” plywood. First of all, you should install the side panels, after measuring their size. Fit the plywood sheets into place and secure them with 1 1/4” along the frame, every 6”.
Next, install the back and the front interior walls, in the same manner described above. Make sure the sheets are in a good condition and the nails are inserted properly, otherwise the pet might injure.
Dog-house-roof-plans
Build the rafters from 2×2 lumber, making sure you cut their ends at 45º. All the rafters should have the same shape and size, otherwise the roof won’t have a symmetrical look.
Top Tip: Fit the rafters into place, align them thoroughly at both ends and lock them to the top plates with 3” screws. Pre-drill the rafters with a drill machinery, to prevent the wood from splitting. Join the rafters together at top, using several 2 1/2” screws.

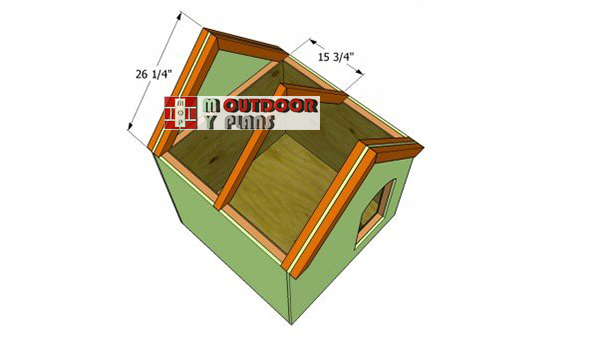
Installing the roof insulation
In order to get the job done like a professional, install the interior 1/4” plywood panel and fit the 1 1/2” thick foam sheets between the rafters. This step is essential for the insulated dog house, as you need to keep the construction well protected against bad weather on all sides.
Ensure there are no gaps between the foam sheets and the rafters. If there are gaps, the cold air will get trough and cool the interior of the dog house.

Attaching the roofing sheets
Use the same techniques described above to install the insulation boards on the opposite side of the dog house, before installing the roofing sheets. As you should notice in the image, you have use 3/4” plywood and 2” wood screws, to secure the sheets into place.
Leave a front and back overhang of 1 1/2”, if you want to get a beautiful appearance. Make sure one side of the roofing cover the other one.

Installing the shingles
The next step of the woodworking project is to cover the roofing sheets with tar paper and secure it into place with staples. Then, install the asphalt shingles starting with the bottom left part of the roof, making sure they cover the trims.
Top Tip: We strongly recommend you to snap a chalk line to guide you when installing the shingles. In this manner the rows will be perfectly parallel, from bottom up to top.
Fitting the front trims
Attach the 2×2 trims to the front of the dog house.

Insulated dog house plans
Last but not least, you have to take care of the finishing touches. Fill the holes with wood putty and seal the gaps with a waterproof filler. Let the compound dry out for at least several hours before sanding the surface with 120-grit sandpaper.
Top Top: Apply several coats of paint, in order to protect the insulated dog house from rot. Add the 2×2 trims to the exterior walls, to get an unique design and a neat look.
This article was about insulated dog house plans free. If you want to see more outdoor plans, check out the rest of our step by step projects and follow the instructions to obtain a professional result.
EXPLORE MORE IDEAS FOR:
 |
 |
 |
 |
1 comment
So I don’t know much ab0ut dog houses because I’ve always kept my dogs inside. Do you think I need an insulated one for a dog that has to live outside all the time until we find a foster home when we live in Atlanta, GA? Still warm now, but this baby might still be in there when cold weather hits. Usually winter is mild but you never know.