This step by step woodworking project is about how to build a nesting box. Building a chicken nesting box is a nice weekend project, especially if you want to protect the chickens from bad weather. Work with attention and with good judgement, as you need to plan everything from the very beginning, otherwise the nesting box might not be large enough for your needs. Buying the right materials is also important, if you want to get the job done as a professional.
If you want to have an easy access to the nests, you could install several small doors to the back of the chicken coop. In addition, if you want to keep the expenditures under control, you should try to use simple techniques and solutions. Align the components at both ends before driving in the screws, and pre-drill the lumber, if you want to get durable and rigid joints. See all my Premium Plans HERE.
PART 1: Free Chicken Coop
PART 2: How to Build a Nesting Box
Projects made from these plans
How to Build a Nest Box
Building-a-chicken-coop
Cut & Shopping Lists
- E – 2 pieces of 3/4” plywood – 12″ x 14” long SIDES
- E – 1 piece of 3/4” plywood – 12″ x 34 1/2” long, 1 piece – 12″x36″ long FRAME
- E – 2 pieces of 3/4” plywood – 12″ x 13 1/4” long PARTITIONS
- E – 1 piece of 3/4” plywood – 14″ x 38” long TOP
- 1 piece of 3/4″ plwyood – 4’x8′
- 2 1/2″ screws
- 1 5/8″ screws
- 1 1/4″ screws
- wood filler
- wood glue
- stain/paint
Tools
![]() Hammer, Tape measure, Framing square
Hammer, Tape measure, Framing square
![]() Miter saw, Drill machinery, Screwdriver, Sander
Miter saw, Drill machinery, Screwdriver, Sander
Time
![]() One day
One day
Related
- Part 1: Chicken coop plans
- Part 2: How to build a nesting box
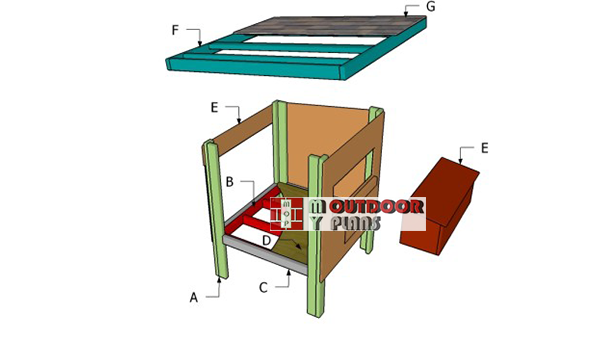
Building a nest box

Building the sides of the nesting box
The first step of the woodworking project is to build the sides of the nest box. In order to get the job done in a professional manner, we recommend you to mark the cut lines on the plywood piece and to get the job done with a circular saw. Smooth the edges with sandpaper and remove the residues.
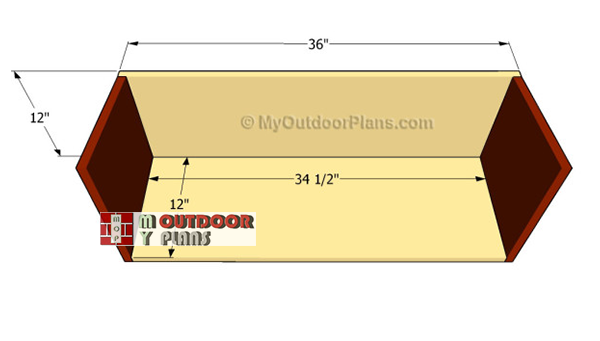
Building-the-frame-of-the-coop-nest-box
The next step of the woodworking project is to build the frame of the nesting box. Cut the components out of 3/4″ plywood at the right size, as described in the diagram. Drill pocket holes at both ends of the bottom component and secure it to the sides with 1 1/4″ screws. Attach the front face to the side components by inserting several 1 1/4″ screws.

Fitting the partitions
Fitting the partitions to the nesting box is the nest step of the garden project. Mark the cut lines on the 3/4″ plywood and make the cuts using a circular saw. Drill pocket holes and secure the partitions to the frame, making sure they are equally-spaced.

Fitting the top
Attaching the top to the nesting box is one of the last steps of the project. Cut the component out of 3/4″ plywood. Don’t forget that you need to secure the top to the chicken coop using metal hinges, after centering it with great care.
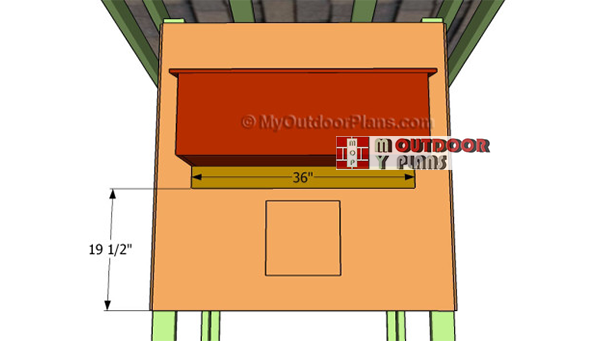
Fitting-the-nesting-box
Attach a 2×3 support to the face of the chicken coop, making sure it is perfectly horizontal. Fit the nesting box to the opening and lock it into place tightly. Leave no gaps between the components and make sure the joints are rigid.

Free chicken coop plans
Last but not least, you should take care of the final touches. Therefore, attach chicken nests the outside of the coop and secure it into place with nails. Make sure the nails are inserted properly, otherwise the chickens could easily injure.
Top Tip: If you have followed the instructions and used quality materials, the chicken coop should be similar to the one in the image. Take your time and plan thoroughly.
This article was about how to build a nesting box. If you want to see more outdoor plans, we recommend you to check out the rest of our projects. LIKE us on Facebook to be the first that gets our latest updates and submit pictures with your DIY projects.

1 comment
I followed the design with a few modifications. I have four walls, no chicken wire on the low end of the roof. That side is now holding a nesting box with two nest not three. My first attempt at cutting out and making a doer wasn’t good side the plywood bends. I made an opening then made a plywood door that was several inches side to side and top to bottom and made a rail for the door to slide on with a rail on top to keep it in place. I then added a screen small enough to keep bugs out for ventilation.