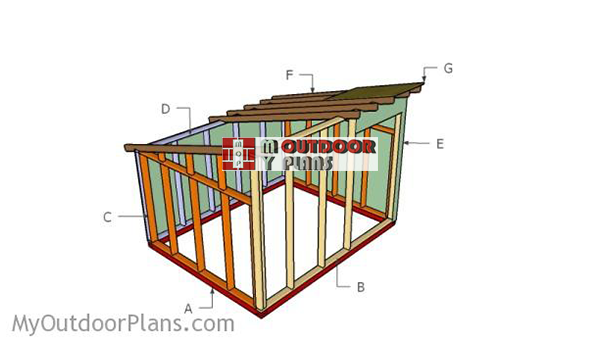
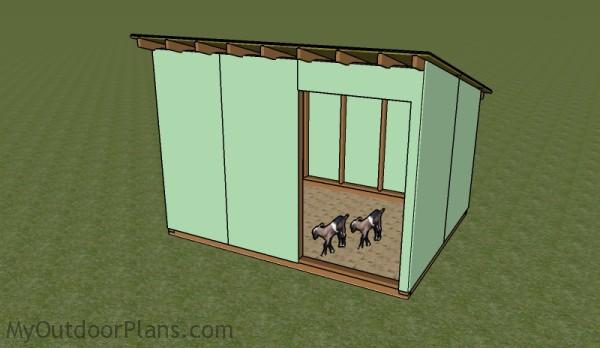
This step by step diy woodworking project is about 8×10 goat shelter plans free. The project features instructions for building a basic goat shelter. This is a heavy duty construction that will stand time for many years in a row. The construction features a large access opening to the front of the shed. Make sure you take a look over the rest of plans to see alternatives and more projects for your garden.
When buying the lumber, you should select the planks with great care, making sure they are straight and without any visible flaws (cracks, knots, twists, decay). Investing in cedar or other weather resistant lumber is a good idea, as it will pay off on the long run. Use a spirit level to plumb and align the components, before inserting the galvanized screws, otherwise the project won’t have a symmetrical look. If you have all the materials and tools required for the project, you could get the job done in about a day. See all my Premium Plans HERE.
Projects made from these plans
It’s that easy to build a goat shelter!
Goat Shelter Plans
Building-a-goat-shelter
Cut & Shopping Lists
- A – 2 pieces of 4×4 lumber – 96″ long, 2 pieces – 120″ long SKIDS
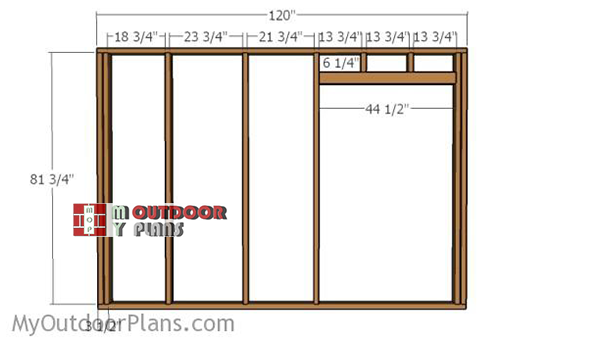
- B – 2 pieces of 2×4 lumber – 120″ long, 7 pieces – 81 3/4″ long, 2 pieces – 44 1/2″ long, 2 pieces – 6 1/4″ long FRONT WALL
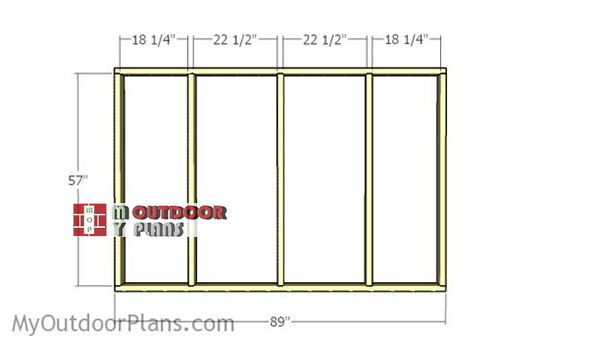
- C – 2 pieces of 2×4 lumber – 89″ long, 5 pieces – 57″ long, 1 piece – 5 1/2″ long, 1 piece – 11 3/4″ long, 1 piece – 18 1/4″ long 2xSIDE WALL
- D – 2 pieces of 2×4 lumber – 120″ long, 8 pieces – 57″ long BACK WALL
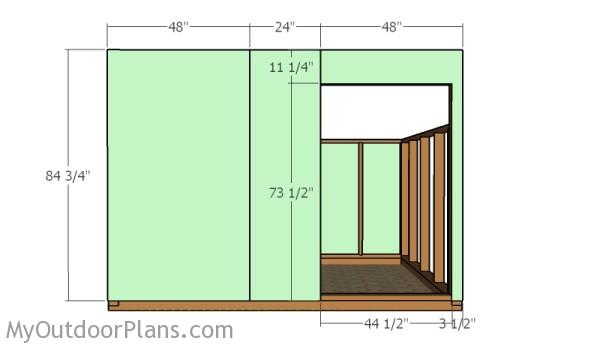
- E – 2 pieces of 3/4″ plywood – 48″x84 3/4″ long, 1 piece – 24″x84 3/4″ long, 2 pieces – 48″x60″ long, 1 piece – 24″x60″ long, 2 pieces – ” 48″x75″ long, 2 pieces – 48″x87 3/4″ long WALLS
- F – 9 pieces of 2×4 lumber – 120″ long RAFTERS
- G – pieces of 3/4″ plywood – 31 1/2″x48″ long, 2 pieces – 48″x96″ long, 1 piece – 24″x31 1/2″ long, 1 piece – 24″x96″ long ROOFING SHEETS
- 500 pieces of 2 1/2″ screws
- 500 pieces of 1 1/4″ screws
- 12 pieces of 1/2″ or 3/4″ plywood – 4’x8′
- 2 pieces of 4×4 lumber – 8′
- 2 pieces of 4×4 lumber – 10′
- 22 pieces of 2×4 lumber – 10′
- 12 pieces of 2×4 lumber – 8′
- 2″ brad nails
- tar paper, asphalt shingles
- wood glue, stain/paint
- wood filler
Tools
![]() Hammer, Tape measure, Framing square, Level
Hammer, Tape measure, Framing square, Level
![]() Miter saw, Drill machinery, Screwdriver, Sander
Miter saw, Drill machinery, Screwdriver, Sander
Time
![]() One day
One day
How to build a goat shelter – base
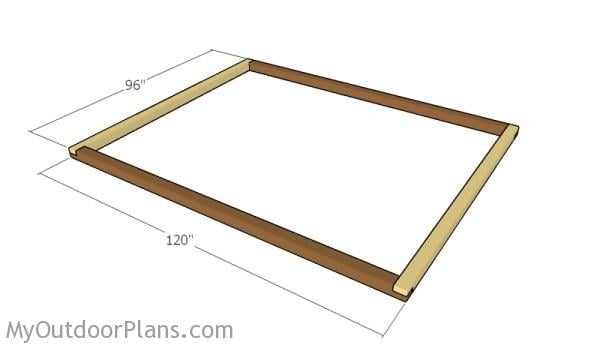
Assembling the skids
The first step of the project is to assemble the base for the goat shed. Cut the components from 4×4 lumber.
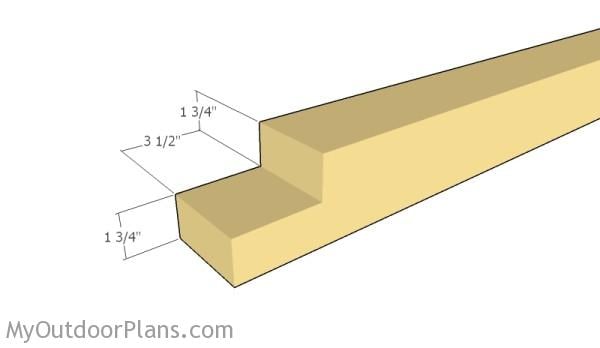
Making the notches
Use a circular saw to make the notches at both ends of the beams. Use a chisel to clean the recess, making sure the corners are square.
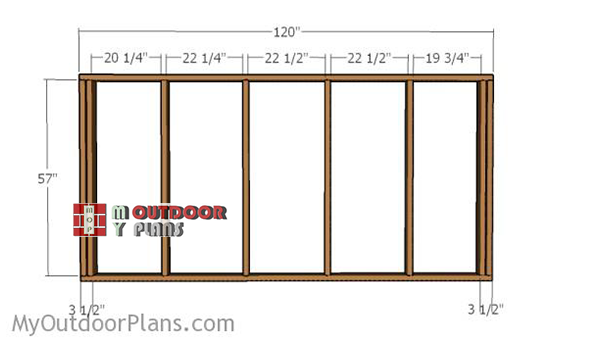
Assembling the frame of the shed
Building-the-back-wall-frame
Next, you need to assemble the walls for the goat shelter. Cut the components from 2×4 lumber. Drill pilot holes through the plates and insert 2 1/2″ screws into the studs. Use the information from the diagram to get the job done in a professional manner. Make sure the corners are square for a professional result.
Building-the-front-wall-frame
Build the front wall from 2×4 lumber. As you notice in the plans, you need to create a door opening for easy access. Build a double 2×4 header for adding strength to the structure. Make sure the edges are aligned, as well as if the corners are square.
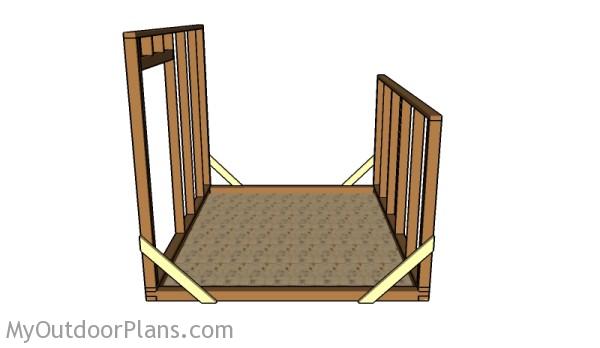
Fitting the front and back walls
Fit the front and the back walls to the skids, as shown in the diagram. Drill pilot holes through the bottom plates and insert 3 1/2″ screws into the skids. Use temporary braces to secure the walls into place after plumbing them with a spirit level.
Building-the-side-walls
Build the side walls from 2×4 lumber. Drill pilot holes through the plates and insert 2 3 1/2″ screws into the studs. Take accurate measurements before inserting the screws, to get the job done in a professional manner.
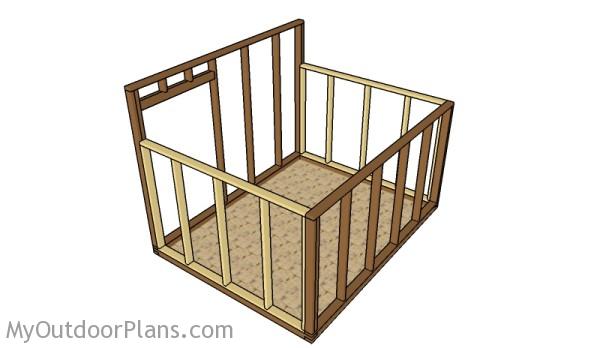
Fitting the side walls
Fit the side walls to the goat shelter, as shown in the plans. Make sure the edges are aligned and check if the corners are square. Drill 3 1/2″ screws through the plates into the skids. In addition, insert 2 1/2″ screws into the adjacent walls to enhance the rigidity of the structure.
Fitting the wall panels
Fitting the front panels
Fit the 3/4″ plywood panels to the front of the goat shed. Align the edges with attention and secure the panels to the framing using 1 1/4″ screws or nails. Make the cuts to the panel around the door opening.
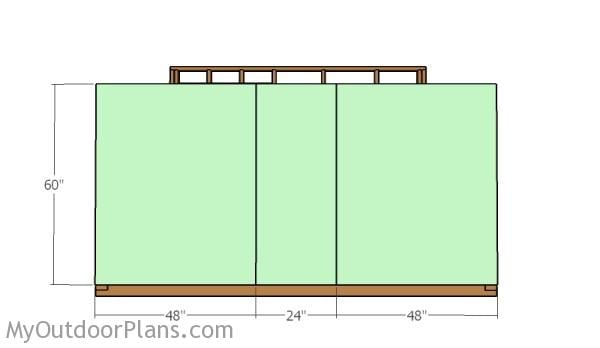
Building the back wall
Fit the 3/4″ plywood panels to the back wall, as shown in the diagram. Leave no gaps between the panels for a professional result. Use 1 1/4″ screws or nails to lock the panels to the frames, every 8″ along the framing.
Building the lean to roof
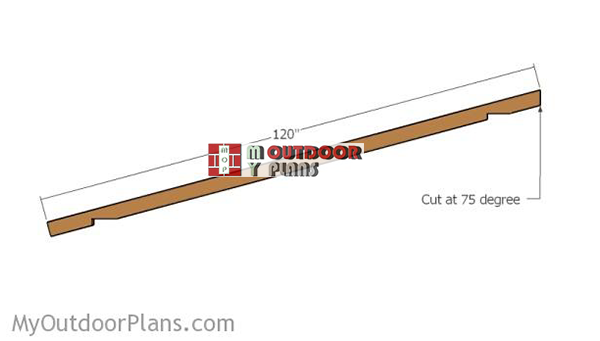
Building-the-rafters
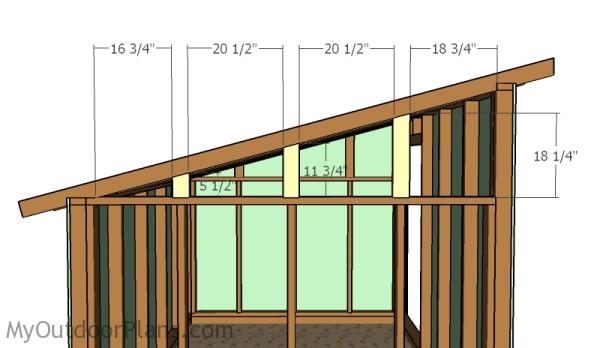
Build the rafters from 2×4 lumber. Cut one end of the rafters at 75 degrees.

Making the top notch
As you can easily notice in the plans, you need to make notches to the top of the rafters. Mark the cut lines and get the job done with a circular saw.
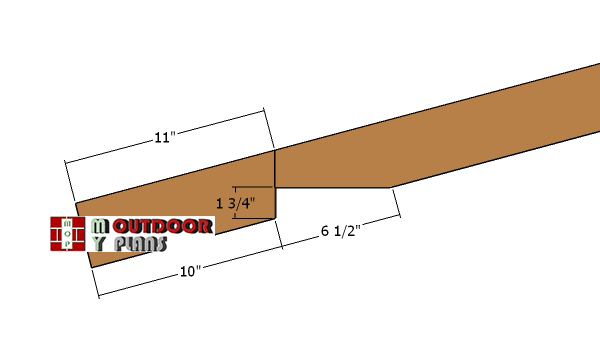
Bottom-notch—lean-to-rafter
Also make notches to the bottom of the rafters using the information form the diagram.
Fitting the rafters
Place the rafters to the top of the structure. Use the information from the diagram to space the rafters properly. Drill pilot holes through the rafters and insert 3 1/2″ screws into the top plates.
Fitting the rafter supports
Fit the supports to the sides of the shed. Cut the top of the supports at 75 degrees.
Fitting the side panels
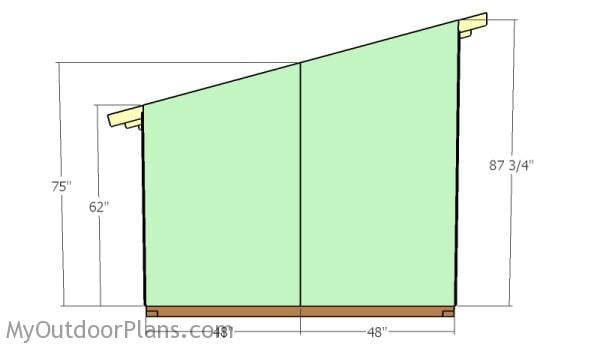
Fit the 3/4″ plywood panels to the sides of the goat shed. Cut the top of the panels at an angle to fit into place properly.
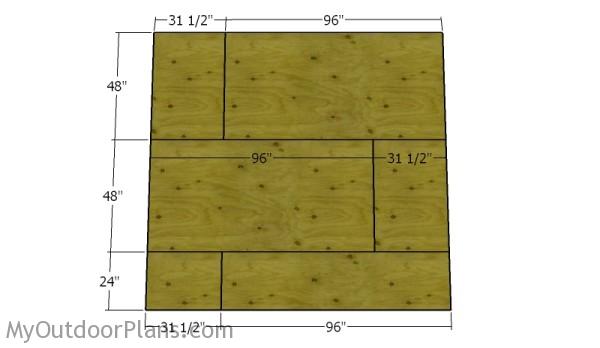
Fitting the roofing sheets
Ones of the last steps of the outdoor project is to attach the roofing sheets to the rafters. Use 3/4″ tongue and groove plywood sheets. Leave no gaps between the sheets. Drill pilot holes and insert 2″ screws along the rafters, every 8″.
Alternatively, you can fit corrugated metal sheets to the rafters, if you want to save money and time.

Side Overhangs
When fitting the sheets, make sure you leave 3 1/2″ overhang on both sides of the shed.
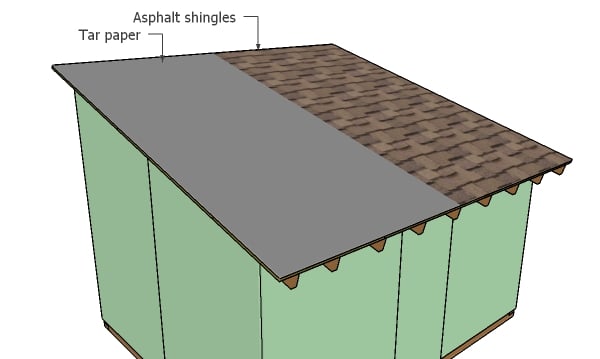
Fitting the roofing
Cover the roof with tar paper, making sure the strips overlap at least 2″. Then install the asphalt shingles starting with the bottom of the roof. Read here more about how to install the asphalt shingles.
Goat Shelter Plans
Fill the holes and dents with wood putty and let it dry out for several hours. Use 120-200 grit sandpaper to smooth the surface. Remember that you can adjust the design and size of the goat shelter to suit your needs. Check out the rest of the shed plans here and other animals plans here.
Top Tip: If you want to enhance the look of the project and to protect the components from decay, we recommend you to apply paint or stain. If you want to get PREMIUM PLANS for this project, in a PDF format (different design with re-engineered structure), please press GET PDF PLANS button bellow. Thank you for the support.

This woodworking project was about free 8×10 goat shelter plans. If you want to see more outdoor plans, we recommend you to check out the rest of our step by step projects. LIKE us on Facebook and Google + to be the first that gets out latest projects and to hep us keep adding free woodworking plans for you.
28 comments
Using the goat shed plans, how do you attach the 4×4 skids to each other?
Half lap joints. You can see that in the second diagram.
how do you keep the skids from rotting out when there sitting on the ground?
You use pressure-treated lumber, which is more resistant.
the opening won’t be to drafty for the goats?
This is a summer field shelter. If you want to shelter the goats during the winter, you should consider building a door.
This a good easy way of building a goats house
Thank you for the feedback!
Thank you so much for these plans. I have searched all over the web looking for the perfect plans to build my goats shelter. These have got to be the best plans I’ve found. And the easiest to follow. Again Thank you!
You’re very welcome. Let me know how it comes out. I’d love to see a few pics of the shelter once you are done.
Nice web site and lots of good ideas. Is there a way to download the SketchUp plan files – I want to modify a bit (make smaller for my site) and will be happy to send you back the revised file.
Thanks again.
-Bob
No. I don’t share the original files.
I tried printing out these plans so I could look them over at my leisure and actually use them if I decide to. For some reason I just got 13 blank pages. Please advise.
Did you use the print widget on the left side of the screen?
Hi. I would like to try to build this goat shelter for my goats. Do the plans come with a shopping list for the lumber and plywood?
Page 1 includes a material list.
Awesome plans I’m going to build this this weekend however a better material list would;d be helpful
Does anyone have an estimate of how much it costs to build this ?
Plans pretty straightforward. However, you referenced 3 1/2” screws but these aren’t listed in supplies. I search for these at big box store but they only have 3”. Did you mean 3 1/2 or 3”, or perhaps lag bolt?
Thank you.
Regular screws, not lag screws. 3″ works but these would be better: https://amzn.to/31VJw0q
Thank you for the advice and link!
Thank you for full set of goat barn plans! We were originally looking at prefabricated sheds/barns for our three elderly goats, but at $2k-$3k for a small structure it really wasn’t feasible. Your plans for the wall and roof allowed us to come in comfortably under $1k (Lowe’s looked at the list you provided and they were able to give us a contractor’s discount which saved us even more). It looks great and the goats like it. Thank you for sharing!
Question on Rafters. Building the rafters
Build the rafters from 2×4 lumber. Cut one end of the rafters at 75 degrees. Is 75 Degrees correct. I’m using a speed square.
Make 15 degree cuts, Once you make the cuts, the rafters will have the ends at 75 degrees.
Since its not possible to buy plywood in the demensions listed, how many pieces of 4×8 do I need to do this? Thanks
I’ve updated the materials list.
Bought everything on the list.. the list is wrong.. needed 22 8′ 2x4s not 12 ..
How many goats would this work for??