This step by step project is about free deer stand plans. If you want to learn more about building a basic wooden deer stand that can be disassembled and moved from one location to the other, we recommend you to pay attention to the instructions. Work with attention and adjust the size and the design of the portable deer stand to suit your needs and tastes.
There are several aspects that any person should take into account before starting the woodworking project. First of all, you need to use weather-resistant lumber, such as cedar, pine or redwood. Drill pocket holes at both ends of the components, if you want to lock them together tightly. In addition, add wood glue to the joints and check if the corners are right-angled. Plan everything from the very beginning, if you want to get a professional result. See all my Premium Plans HERE.
Projects made from these plans
Free Deer Stand Plans
Building-a-deer-stand
Cut & Shopping Lists
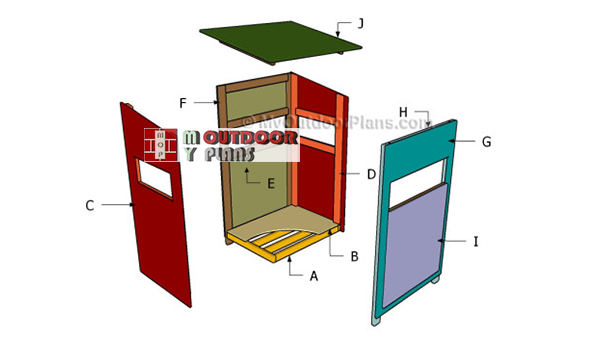
- A – 2 pieces of 2×4 lumber – 45″ long, 5 pieces – 35 1/2″ long JOISTS
- B – 1 piece of 3/4″ plywood – 48″ x 35 1/2″ long FLOOR
- C – 1 piece of 3/4″ plywood – 4o” x 80″ long 2xSIDES
- D – 2 piece of 2×4 lumber – 28 1/2″ long, 1 piece – 69 3/4″ long, 1 piece – 75 1/4″ long 2xSIDES
- E – 1 piece of 3/4″ plywood – 48″ x 79 1/2″ long FACE
- F – 2 pieces of 2×4 lumber – 83 1/2″ long, 3 pieces -41″ long FACE
- G – 1 piece of 3/4″ plywood – 48″ x 73″ long BACK
- H – 2 pieces of 2×4 lumber – 77″ long, 3 pieces -41″ long BACK
- I – 1 piece of 3/4″ plywood – 41″ x 42 1/2″ long, 2 pieces of 2×4 lumber – 41″ long, 2 pieces – 35 1/2″ long DOOR
- J – 1 piece of 3/4″ plywood – 48 1/2″ x 57 1/2″ long, 2 pieces of 2×4 lumber – 36″ long ROOF
- 16 pieces of 2×4 lumber – 8 ft
- 5 pieces of 3/4″ plywood – 4’x8′
- 1 5/8″ screws
- 2 1/2″ screws
- wood glue
- wood filler
- wood stain
- brackets for stand
Tools
![]() Hammer, Tape measure, Framing square
Hammer, Tape measure, Framing square
![]() Miter saw, Drill machinery, Screwdriver, Sander
Miter saw, Drill machinery, Screwdriver, Sander
Time
![]() One day
One day
Related
Building a deer stand
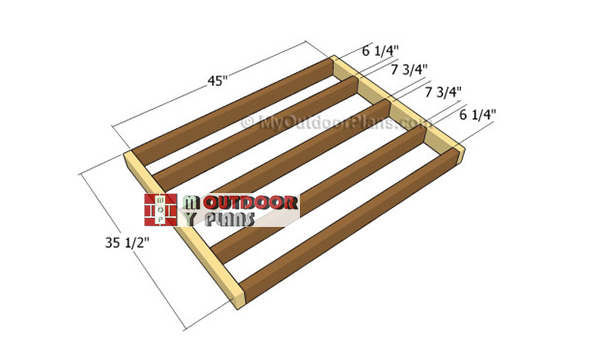
Building-the-floor-frame
The first step of the woodworking project is to build the floor for the deer stand. As you can easily notice in the project, we recommend you to cut the components at the right size, after taking accurate measurements.
Drill pilot holes through the perimeter joists and insert 2 1/2″ screws into the perpendicular components. Make sure the corners are right-angled and leave no gaps between the components.

Attaching the floor
The next step of the woodworking project is to cut the floor out of 3/4″ plywood at the right size. Smooth the cut edges with fine-grit sandpaper and attach it over the joists. Drill pilot holes along the edges and secure it to the joists with 1 1/4″ galvanized screws. Leave no gaps between the components and check if the edges are flush.

Building the sides
Continue the project by building the sides of the deer stand. In order to get a professional result, we recommend you to mark the cut lines over the 3/4″ plywood sheet and to get the job done with a circular saw.
Drill the starting holes to create the windows inside the plywood panels. Afterwards, use a jigsaw to get the job done, but make sure the blade goes over the cut lines.
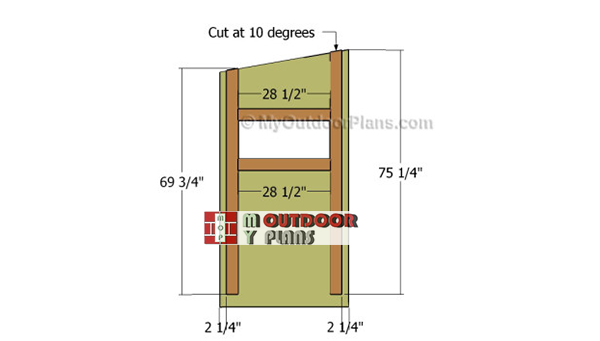
Attaching-the-frame-to-side-panels
In order to enhance the rigidity of the side walls, we recommend you to attach 2×4 studs over the sheet. As you can easily notice in the diagram, we recommend you to cut the components at the right size and to attach them over the sheet with 2″ screws.
Take accurate measurements and drill pilot holes before inserting the screws, to prevent the wood from splitting. Add glue to the joints to enhance the bond of the components.

Attaching the sides to the floor
Attach the sides to the floor, making sure you leave no gaps between the components. Plumb the sides with a spirit level and lock the panels to the floor by inserting 2″ screws.

Front face
Building the front face for the portable deer stand is easy, but you need to take accurate measurements and to get the job done with a proper saw. Make sure the corners are right-angled and the plywood sheets are in a good condition. Smooth the exposed edges before continuing the project.

Attaching the frame to the front face
Next, attach the 2×4 studs to the plywood panel, in order to get a professional result. Cut the components at the right size and attach them to the plywood face using 2″ galvanized screws. Add glue to the joints and make sure the edges are flush. In addition, you could lock the studs one to another, by drilling pocket holes and inserting 2 1/2″ screws.

Building the back face
Build the back of the deer stand in the same manner described above. Work with attention and take accurate measurements. Smooth the edges with sandpaper and make sure the corners are right-angled.
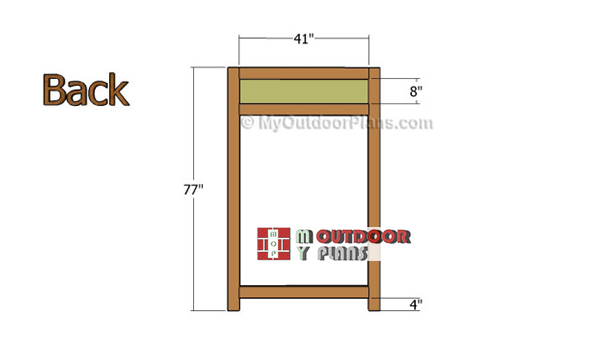
Attaching-the-frame-to-back-wall
Attach the 2×4 studs over the plywood panel, as described in the panel. Drill pilot holes and insert 2″ galvanized screws into place. In addition, add glue to the joints and remove the excess using a damp cloth.

Building the door
Use the plywood piece that was cut out of the back wall and use it for making the door of the deer stand. Smooth the edges with sandpaper and remove the residues with a vacuum cleaner. Make sure the plywood panel is in a good condition and the corners are right-angled.

Building the door frame
Attach the 2×4 framing to the door panel, as described in the diagram. Work with attention and leave no gaps between the components. Check if the edges are flush and leave no gaps between the components. Add glue and pre-drill holes before inserting the screws, to prevent the wood from splitting.

Assembling the deer stand
One of the last steps of the project is to attach the door to the deer stand. As you can easily notice in the diy diagram, we recommend you to fit the door into place and to attach it to the back face of the structure by using several metal hinges.
Top Tip: Make sure the door opens and closes properly before continuing the outdoor project. Fit a door latch inside the door, to lock it properly. Smooth the edges with sandpaper.

Building the roof
Building the roof of the deer stand is a straight forward process, but you need to take accurate measurements before assembling the components together. In order to get a professional result, we recommend you to cut the components at the right size.
Drill pilot holes through the plywood and insert 2 1/2″ screws into the 2×4 supports. Align everything with attention and leave no gaps between the components.

Free deer stand plans
Last but not least, you should take care of the finishing touches. Therefore, fill the holes with wood putty and let the compound to dry out for several hours. Smooth the surface with medium-grit sandpaper along the wood grain.
Top Tip: Apply several coats of stain or paint to enhance the look of the portable deer stand and to protect the components from decay. Check out the rest of the projects to see more related projects.
This project was about free deer stand plans. If you want to see more outdoor plans, we recommend you to check out the rest of the projects. Don’t forget to share our projects with your friends, by using the social media widgets.
EXPLORE MORE IDEAS FOR:
 |
 |
 |
 |
4 comments
I built this blind and was very impressed with how sturdy it was. I have 2 suggestions. Use a common 4/5 deck board and split in 2 with a 22.5 degree angle and use as a sun/rain visor on the 4 windows. Also, I noticed after build and paint you need a drip edge on the front side of the roof. If not, it will rain on the inside of the blind.
Thank you adding your valuable input. I would love to see a few images with your work and I think the rest of the readers would also appreciate the inspiration.
Not real sure how you built this…The dimensions on the front section aren’t adding up, as there is a difference of 8 inches. The runner height is 83.5, and If you add dimensions up, your board thickness x4 @ 1.5+4+39+12+14.5 you only get 75.5. Is it just me, or is this measured wrong.
Disregard realized the issue.