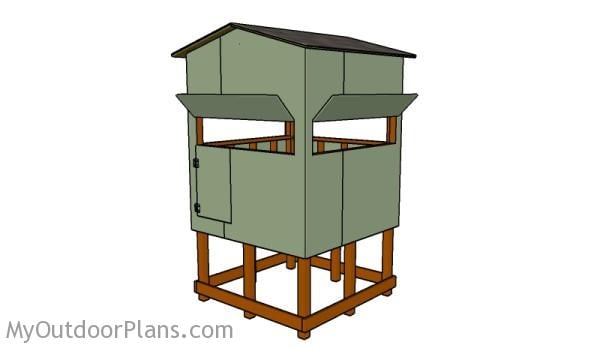
This step by step diy woodworking project is about elevated deer blind plans. The project features instructions for building an elevated 6×6 deer blind. This project features opening on all sides and a roof with 15 degree slope. Make sure you take a look over the rest of plans to see alternatives and more projects for your garden.
When buying the lumber, you should select the planks with great care, making sure they are straight and without any visible flaws (cracks, knots, twists, decay). Investing in cedar or other weather resistant lumber is a good idea, as it will pay off on the long run. Use a spirit level to plumb and align the components, before inserting the galvanized screws, otherwise the project won’t have a symmetrical look. If you have all the materials and tools required for the project, you could get the job done in about a day.
Projects made from these plans
Elevated Deer Blind Plans

Building-an-elevated-deer-stand
Cut & Shopping Lists
- A – 8 pieces of 4×4 lumber – 77 1/2″ long POSTS
- B – 4 pieces of 2×6 lumber – 72″ long, 8 pieces – 69″ long JOISTS
- C – 1 piece of 3/4″ plywood – 48″x72″ long, 1 piece – 24″x72″ long FLOOR
- D – 2 pieces of 2×4 lumber – 65″ long, 2 pieces – 72″ long, 2 pieces – 62″ long, 4 pieces – 22 1/2″ long, 4 pieces – 32 1/2″ long BACK WALL
- E – 2 pieces of 2×4 lumber – 65″ long, 2 pieces – 72″ long, 2 pieces – 62″ long, 4 pieces – 22 1/2″ long, 4 pieces – 32 1/2″ long FRONT WALL
- F – 6 pieces of 2×4 lumber – 72″ long, 2 pieces – 65″ long, 4 pieces – 22 1/2″ long, 4 pieces – 32 1/2″ long 2xSIDE WALL
- G – 2 pieces of 3/4″ plywood – 24″x83 3/4″ long, 2 pieces – 48″x83 3/4″ long, 2 pieces – 24″x90 3/4″ long, 2 pieces – 48″x93 3/4″ long WALLS
- H – 2 pieces of 2×4 lumber – 9″ long, 1 piece – 72″ long TOP RIDGE
- I – 12 pieces of 2×4 lumber – 35 3/4″ long RAFTERS
- 8 pieces of 4×4 lumber – 8′
- 12 pieces of 2×6 lumber – 6′
- 51 pieces of 2×4 lumber – 6′
- 2 pieces of 2×3 lumber – 6′
- 8 pieces of 3/4″ plywood – 4’x8′
- 1 1/4″ screws
- 1 5/8″ screws
- 2 1/2″ screws
- filler, stain
- glue
Tools
![]() Hammer, Tape measure, Framing square, Level
Hammer, Tape measure, Framing square, Level
![]() Miter saw, Drill machinery, Screwdriver, Sander
Miter saw, Drill machinery, Screwdriver, Sander
Time
![]() One week
One week
How to build an elevated deer blind
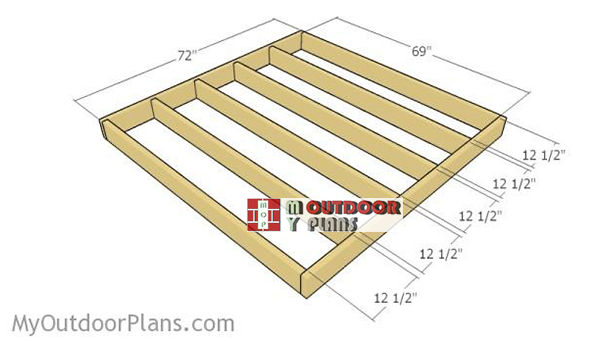
Building-the-floor-frame
The first step of the project is to build the frame for the deer blind. Cut the components from 2×6 lumber. Drill pilot holes through the rim joists and insert 2 1/2″ screws into the regular joists. Place the joists equally-spaced and make sure the corners are square.
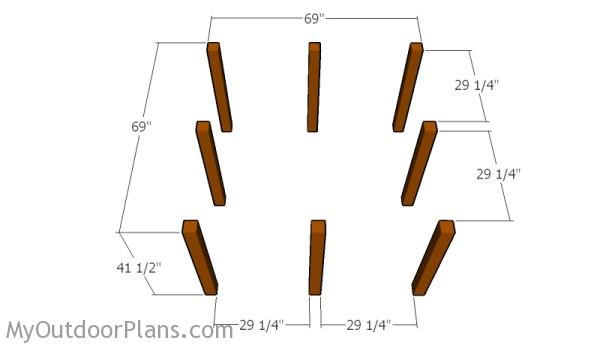
Fitting the posts
Next, you need to fit 4×4 posts into the ground. You can adjust the size of the elevation to suit your needs. Use batter boards and string to align the posts. Measure the diagonals and apply the 3-4-5 rule to the corners.
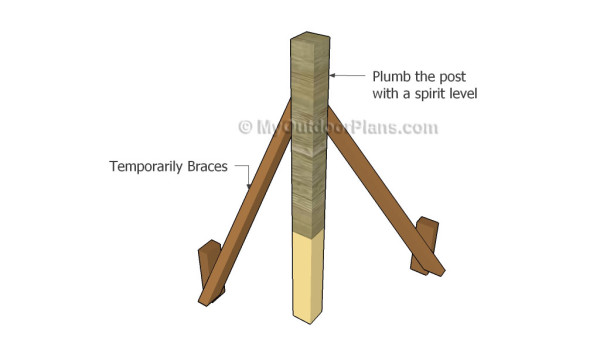
Installing the post
You have to set the posts 3′ into the ground. Plumb the posts with a spirit level. Use temporary braces to lock the posts into place while the concrete dries out. Use a spirit level to make sure the top of the posts are horizontal.

Fitting the floor frames
Fit the frame to the top of the posts and lock it into place with 3 1/2″ screws. Make sure the frame is horizontal and drill pilot holes to prevent the wood from splitting. Fit another frame to the bottom of the posts, in order to enhance the rigidity of the structure.
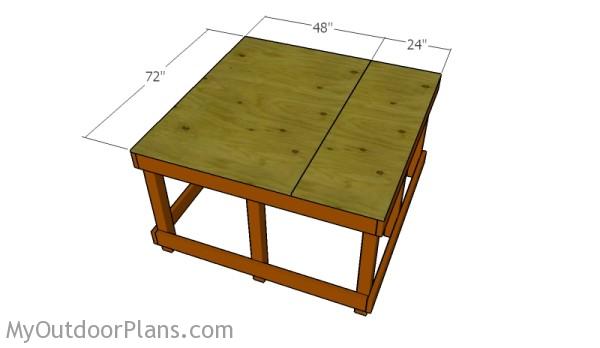
Attaching the floor
Use 3/4″ plywood sheets for the floor of the deer blind. Align the edges with attention and leave no gaps between the components. Use 1 5/8″ screws to lock the sheets to the joists, every 8″.
Building-the-side-walls
Build the side walls from 2×4 lumber. Cut the components at the right dimensions. Drill pilot holes through the plates and insert 2 1/2″ screws into the studs.
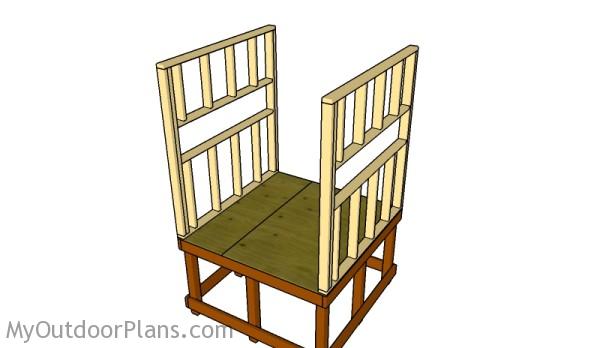
Fitting the side walls.
Fit the side walls to the floor of the deer blind. Align the edges with attention, plumb the walls with a spirit level, drill pilot holes and insert 3 1/2″ screws into the floor.
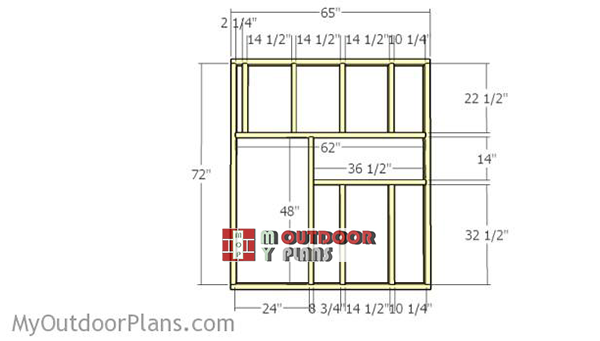
Building-the-back-wall-frame
Build the back wall from 2×4 lumber. As you can see in the diagram, you need to frame the door opening in the left side.
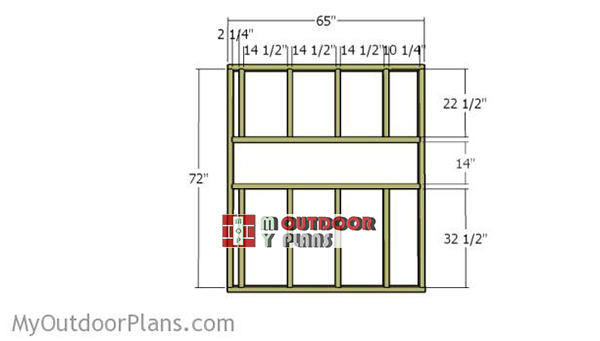
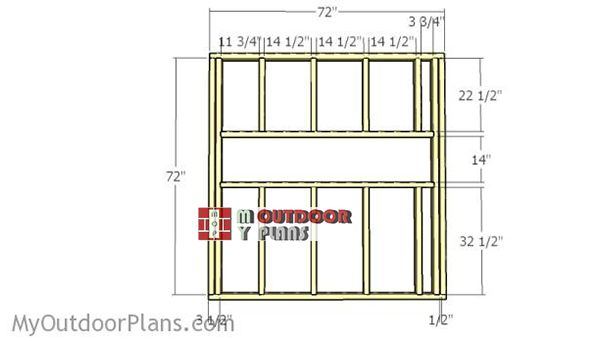
Framing-the-front-wall-frame
Build the front wall of the elevated deer stand. Assemble everything with attention. Make sure the corners are square and leave no gaps between the components.
Assembling the deer blind frame
Fit the front and back walls to the floor. Drill pilot holes through the bottom plates and insert 3 1/2″ screws into the floor. Make sure the corners are square and align the edges before locking the walls together. Secure the adjacent studs together. Drill pilot holes and insert 2 1/2″ screws.
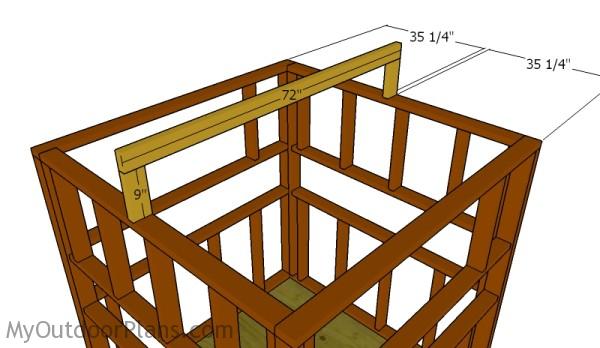
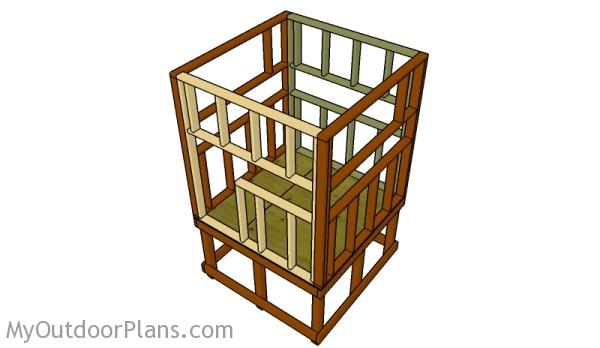
Building the top ridge
Next, you need to install the top ridge to the top plates. Build the components from 2×4 lumber. Drill pilot holes and insert 2 1/2″ screws to lock the components together. Use a spirit level to make sure the supports are plumb and check if the top ridge is horizontal.
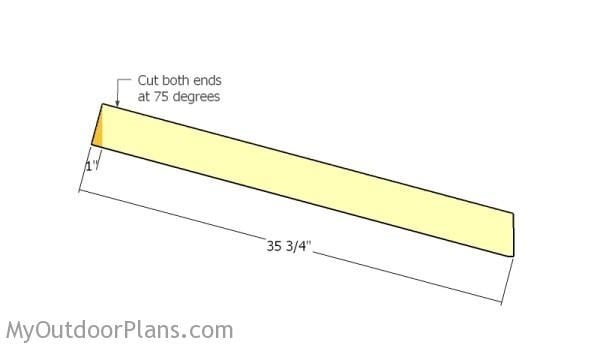
Building the rafters
Build the rafters from 2×4 lumber. Cut both ends of the rafters at 75 degrees.
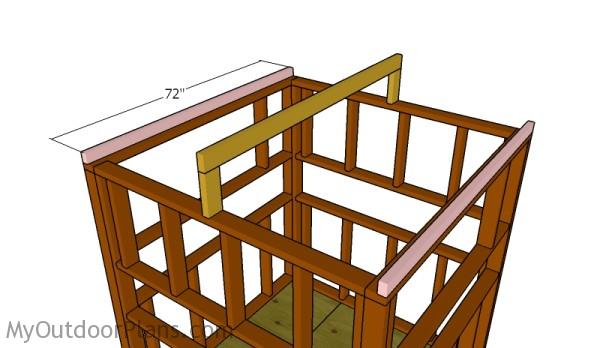
Rim rafters
Fit the end rafters to the top plates, as shown in the diagram. Build the components from 2×3 lumber. Fit the components to the top plates, drill pilot holes and secure them into place using 3 1/2″ screws.
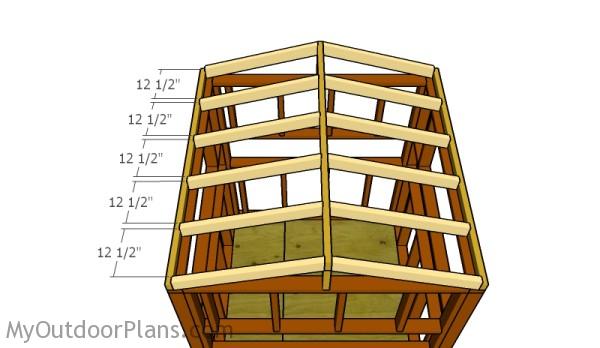
Fitting the rafters
Fit the rafters to the rafters to the top of the deer box. Place the rafters equally-spaced. Drill pilot holes and secure the rafters to the top ridge and to the top plates using 3 1/2″ screws.

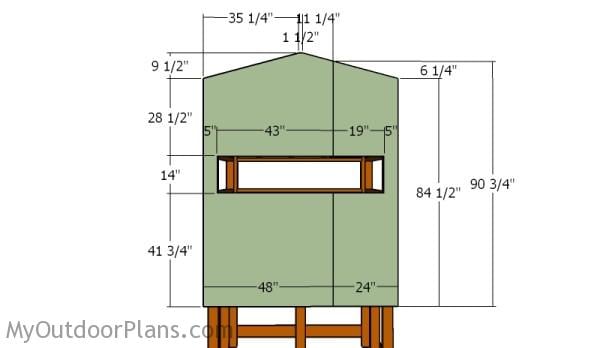
Building the front panels
Build the panels for the front wall from 3/4″ plywood. Use a saw to make the notches to the sheets and smooth the cut edges.
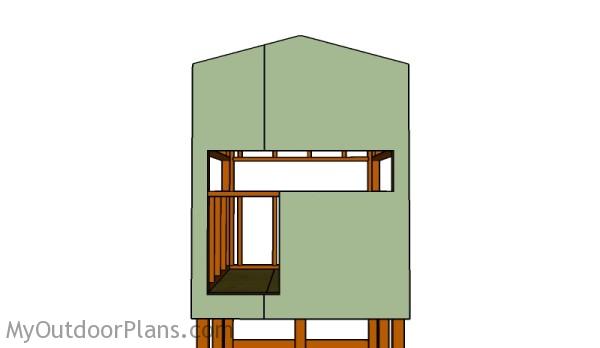
Fitting the front panels
Fit the panels to the back wall and align the edges with attention. Use 1 5/8″ screws or nails to secure the sheets to the framing, every 8″.
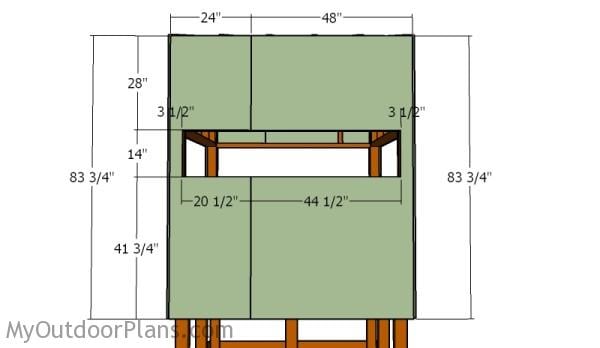
Back panels
Build the panels for the front wall from 3/4″ plywood. Insert 1 5/8″ screws or nails to secure the panels to the studs, every 8″.
Side panels
Build the side walls from 3/4″ plywood. Take accurate measurements and make the cuts with a circular saw. Align the edges and secure them to the framing using 1 5/8″ screws or nails.
Elevated Deer Blind Plans
This deer blind has a basic design and can be built by any person with common woodworking skills. You can adjust the dimensions of the deer box, while using the same techniques described in the plans
Top Tip: Make sure you check out the part 2 of this project, to learn more about how to build the roof and the door for the elevated deer box. If you want to get PREMIUM PLANS for this project, in a PDF format, please press GET PDF PLANS button bellow. Thank you for the support.

This woodworking project was about free elevated deer blind plans. If you want to see more outdoor plans, check out the rest of our step by step projects and follow the instructions to obtain a professional result.

EXPLORE MORE IDEAS FOR:
 |
 |
 |
 |
10 comments
In the discreption of materials needed for posts its says “six 4×4 posts needed”.
But my question is in the prints it shows 8 posts.
Also what it’s the 3-4-5 rule?
Yes. You’re right about the number of posts and I have updated the list. 3-4-5 rule is the Protagoras theorem. Measure 3 feet on one side, 4 feet on one side and them measure the hypotenuses, which shall be 5′.
Do you have plans for a 6’x8′ hunting blind?
No, just 6×6. But I have plans for a 6×8 ice fishing house. You can see the plans here: http://myoutdoorplans.com/shed/6×8-ice-fishing-house-plans/
The overall dimension for the floor frame is listed at 72”. Adding the spacing dimensions(62.5” total) plus the real width dimension for each 2×6 (which is 1.5” or 9.5” total) the sum equals 71.5”. This could be made up by using 12.75”for the first and last spacing, do you agree?
It doesn’t matter, you can as well leave that to the last joist spacing. It doesn’t matter because the overall length of the frame is less than a plywood sheet, so you won’t have any but joints on a joist. Just try to space them as equally as possible.
do you have the plans for a 8×9 hunting blind
do you have the plans for a 7×4 hunting blind
Correction to the “Protagorus Thoerem”. In mathematics , the Pythagorean theorem , also known as Pythagoras’ theorem , is a fundamental relation in Euclidean geometry among the three sides of a right triangle . It states that the area of the square whose side is the hypotenuse (the side opposite the right angle ) is equal to the sum of the areas of the squares on the other two sides .
Nice plans. However, nowhere does it say how high above the ground it’s. But with the 77.5″ posts and 3 feet in the ground would suggest 3′ 6″ feet off the ground with plywood flooring. tThat’s a lot of work lumber for just 3 feet off the ground. Can I substitute 77.5″ 4×4’s with 10 foot 4×4’s?