This step by step woodworking project is about simple dog house plans. If your dog needs a new house and you a new challenge, why not build it by yourself in just a weekend. First of all you have to design the dog house around the needs of you dog, as to make sure it can turn around easily inside the construction and rest properly. Build the floor from 2×4 lumber and the frame from 2×2 lumber, using simple carpentry techniques and common tools. Buy quality lumber, that is weather-resistant, if you want to build a durable doghouse, ensuring you check if the beams are square and in a good condition.
Pre-drill the lumber before inserting the screws, to prevent the wood from splitting. Measure the components several times before making the cuts, to avoid costly mistakes. Align all the components at both ends before driving in the screws. In addition, use a spirit level to ensure the walls are plumb and the top ridge is perfectly horizontal. Insert the screws properly, otherwise your dog might injure itself easily. See all my Premium Plans HERE.
Projects made from these plans
Cut & Shopping Lists
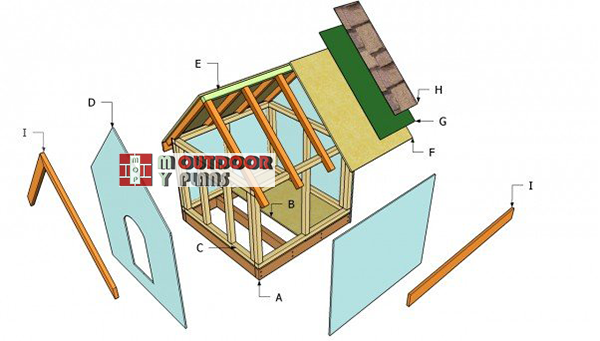
- A – 2 pieces of 2×4 lumber 36” long, 4 pieces of 2×4 lumber 33” long JOISTS
- B – 1 sheet of 1/2” plywood 36×36” FLOORING
- C – 13 pieces of 2×2 lumber 22”, 4 pieces of 2×2 lumber 36”, 4 pieces of 2×2 lumber 33” WALL FRAMES
- D – 70 sq ft of 5/8” plywood EXTERIOR SIDING
- E – 8 pieces of 2×2 lumber 29” long, 1 piece of 2×2 lumber 36” long RAFTERS
- F – 1 pieces of 1/2” plywood 30 1/2 x 37 1/4”, 1 piece of 1/2” plywood 31 x 37 1/4” ROOFING SHEETS
- G – 20 sq ft of tar paper ROOFING FELT
- H – 20 sq ft of asphalt shingles ASPHALT SHINGLES
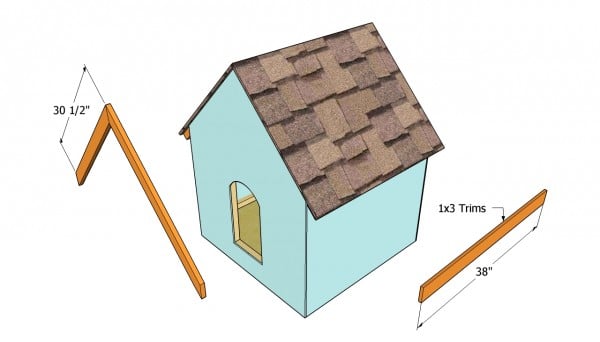
- I – 2 pieces of 1×37 1/4” long, 4 pieces of 1×3 32 1/2” long – cut at 45º at both ends TRIMS
- 100 pieces of 2 1/2″ screws
- 100 pieces of 1 1/4″ screws
- 2″ brad nails
- tar paper, asphalt shingles
- wood glue, stain/paint
- wood filler
Tools
![]() Hammer, Tape measure, Framing square
Hammer, Tape measure, Framing square
![]() Miter saw, Drill machinery, Screwdriver, Sander
Miter saw, Drill machinery, Screwdriver, Sander
Time
Free Simple Dog House
Simple-dog-house-plans
Building a dog house is not as complex as it might look at first glance, if you use the right plans for your needs, as well as proper tools and woodworking techniques. Design the wooden house around the needs of your dog, making sure it has enough room to turn around easily.
Top Tip: If you want to get the job done by yourself in just a weekend, we recommend you build the frame from 2×2 lumber and to attach 1/2” plywood sheets to the exterior. Seal the gaps and apply several coats of paint, to protect it from rot.
Simple Dog House Plans
Floor-frame-plans
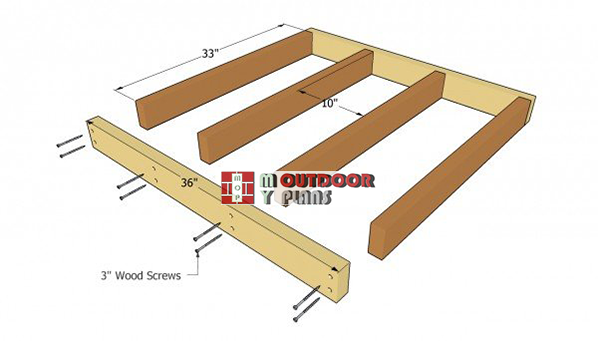
The first step of the project is to build the floor of the dog house, using 2×4 joists. Therefore, cut the joist at the right size and join them together with 3” screws. Drill pilot holes before inserting the screws, to prevent the wood from splitting.
Top Tip: Make sure the diagonals of the frame are equal and check the corners for squareness, otherwise make adjustments. Work on a level surface, in order to obtain a professional result.
Attaching the plywood floor
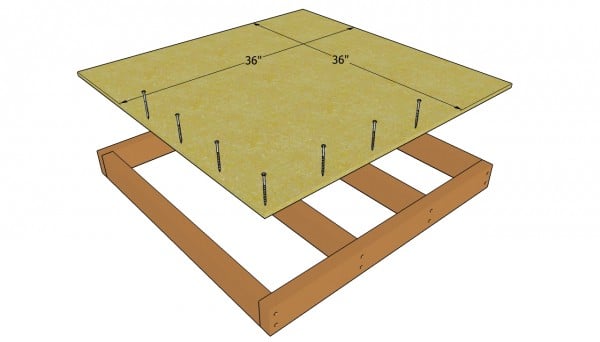
Afterwards, attach the plywood floor and secure it into place with 2” wood screws. Cut the flooring from 1/2” thick plywood, using a circular saw with a sharp blade. Draw the cut lines and try to guide the blade exactly over the line.
Top Tip: If the frame is properly built, the plywood floor will fit perfectly over it. Otherwise, you need to adjust the corners of the frame, until the corners are square.
Attaching-the-side-wall-frames
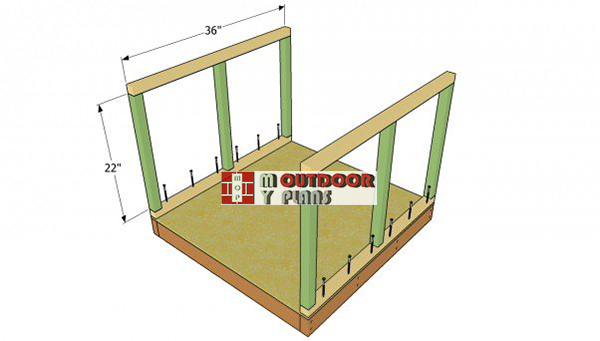
The next step of the project is to install the side walls of the dog house. Therefore, build the frames on a sturdy surface, making sure the diagonals of the rectangle are equal and the corners right-angled. Drive in 3” wood screws trough the plates in the wall studs, after drilling pilot holes.
Plumb the frames with a spirit level and lock them into place with several 3” wood screws. Pre-drill holes in the plates and insert 3” wood screws.
Installing-the-front-and-back-wall-frames
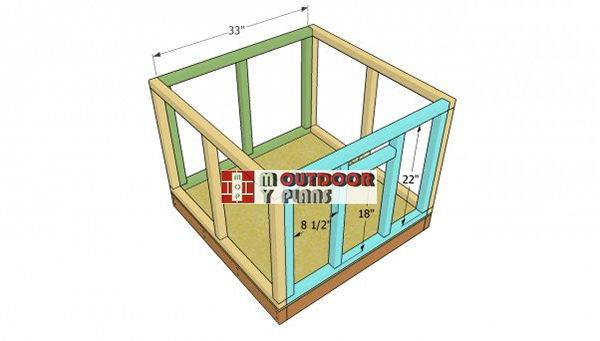
Continue the construction process by fitting the front and back ends of the dog house. Build the back wall frame in the same manner as described above. The middle stud will increase the rigidity of the fame. Drive in 2 1/2” screws in the adjacent studs, to lock the perpendicular frames together.
Leave enough room for the dog to enter the house, as in the image. Install a small blocking above the entrance to make the whole frame more rigid.
Attaching the exterior siding
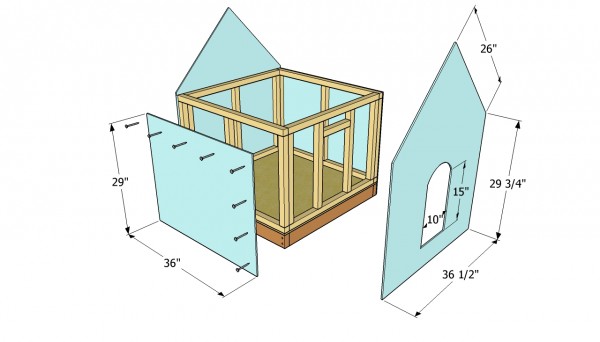
Attaching the exterior siding is a straight forward job, if you use the right materials and techniques. Cut the exterior siding from a sheet of 5/8 plywood, using a circular saw with a sharp blade. Secure the panels into place with 1 1/4” nails, every 4” along the wall studs and plates.
Make sure the plywood panels are large enough to cover the base of the doghouse. In addition, cut the door opening using a jigsaw with a fine blade.
Installing-the-roof-of-the-dog-house
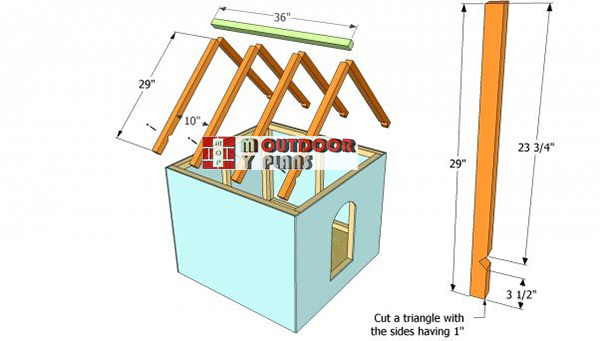
The roof of the dog house has a simple structure, as anybody can assemble the rafters. Cut the rafters at the right size, making sure they are perfectly equal one with another. Afterwards, notch the rafters with a circular saw, as in the plans. In this manner, the rafters would fit properly and the roof structure will be rigid.
Top Tip: Lock the rafters together by installing the top ridge. Don’t forget to drill pilot holes in the top ridge and to drive in 3” wood screws.
Attaching the roofing sheets
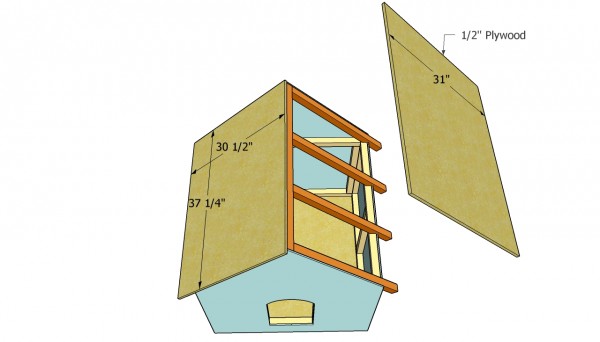
Cut two pieces of a 1/2” plywood sheet and install them into place with 1 1/2” screws, along the rafters and the top ridge. The second sheet of plywood would cover the top edge of the first one, so make sure you cut it slightly larger.
Top Tip: The plywood sheets should overhang about 3/4” on the front and on the back of the dog house, on order to leave enough space for the wooden trims.
Installing the trims
The next step of the project is to install the 1×3 trims into place. Cut the front and the back trims at 45º and secure them to the dog house, using 1 1/4” finishing nails. Attach the side trims to the front and back trims, as well as to the rafters.
Cover the roofing sheets with tar paper and secure it into place with staples. Afterwards, install asphalt shingles starting with the bottom left part of the roof, making sure they cover the trims. Snap a chalk line to guide you when installing the shingles.
Simple Dog house Plans
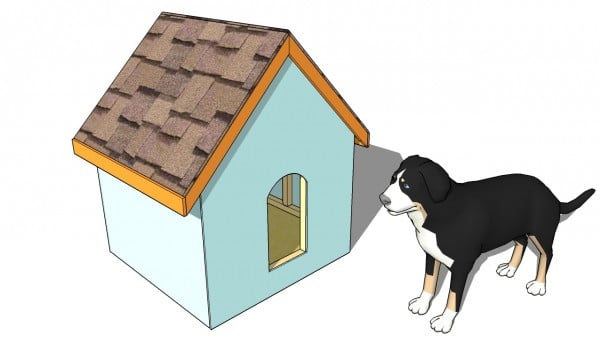
Last but not least, you have to take care of the finishing touches. Fill the holes with wood putty and seal the gaps with a waterproof filler. Let the compound dry out for at least several hours before sanding the surface with medium-grit sandpaper.
Top Top: Apply several coats of paint, in order to protect the simple dog house from rot. Make sure the screws are installed properly, otherwise your dog could injure.
This woodworking project is about simple dog house plans. If you want to see more outdoor plans free, we recommend you to check out the rest of our step by step projects.

14 comments
Gets very cold up here in Canada usually 40 degrees below is normal without the windchill. Thank you sir for the dog house plans, I am sure that sammy my Jack russel Terrier will be especially delighted, i will add the heated lamp 60 watt inside of a paint can or other non combustible material, thank you again.
I am looking forward to seeing how your projects turns out. Don’t forget to share a few images to inspire others!
Do you have the sketchup download file?
I don’t share the model. I hope you understand why.
What do you mean, you don’t share the model?
I don’t share the model file for the program I’ve designed this.
So this design has a gap between the bottom of the roof in between the rafters. Doesn’t seem like this will be very warm. I wish I would have realized this before I cut out my walls this way. Going to have to make a few modifications to eliminate the gap.
The only modification you need to make is to fit blockings between the rafters. If you live in a cold climate you should have used the insulated dog house plans here: http://myoutdoorplans.com/animals/insulated-dog-house-plans/
hi
Hi
Thank you for your dog house plan. Hopefully I will be able to figure out and build a house for my dog.
You;re welcome! Looking forward to seeing your project.
Kind of stupid to share a plan that can’t be printed. Waste of my time looking at this. “I hppe you understand” Nope I don’t its frickin stupid
Kind of stupid to read something and not understand anything. The plans are free to print, read the FAQs again, maybe second time you’ll get it.