This step by step woodworking project is about diy workbench plans. If your re an amateur handymen or you have a large garage and need a sturdy workbench, the instructions in this article will solve your problem. In order to build the workbench by yourself, first you have to make the frame and then to install the bottom shelf and the top slats. Use pressure treated lumber, cedar or pine if you want to build a durable workbench and protect it from rot.
Choose the lumber with great attention, making sure all the slats are perfectly straight and in a good condition. Use a spirit level to plumb the sides of the workbench and to check if the top of the table is horizontal. Align the components at both ends and always pre-drill the wooden parts before inserting the screws, to prevent the wood from splitting. Add wood glue to the joints, to enhance the bond. See all my Premium Plans HERE.
Projects made from these plans
Cut & Shopping Lists
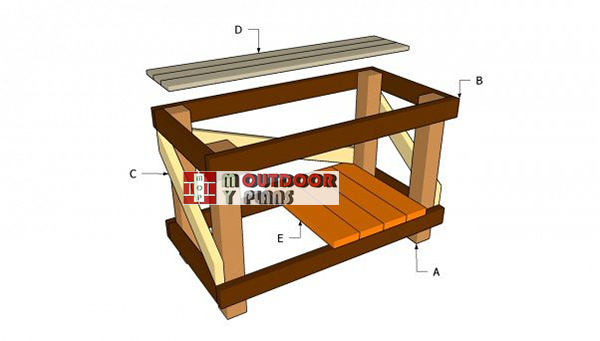
- A – 4 pieces of 4×4” lumber 30” long LEGS
- B – 4 sheet of 2×4 lumber 48” long, 4 pieces of 2×4 lumber 21 1/2” long SUPPORTS
- C – 2 pieces of 2×4 28 1/2” – cut at 35º, 1 piece of 2×4 lumber 48 1/2” – cut at 18.5º BRACES
- D – 7 pieces of 2×4 lumber, 48” long TOP
- E – 7 pieces of 2×4 lumber, 24 1/2” long SHELF
Tools
![]() Hammer, Tape measure, Framing square
Hammer, Tape measure, Framing square
![]() Miter saw, Drill machinery, Screwdriver, Sander
Miter saw, Drill machinery, Screwdriver, Sander
Time
![]() One day
One day
Diy Workbench Ideas
DIY-workbench-ideas
Building a workbench by yourself is a straight forward project, if you use the right plans, materials and tools. Although there are many plans and designs you could choose from, in this article we show you detailed instruction for building a sturdy workbench from 2×4 slats and 4×4 lumber.
Top Tip: Don’t forget to attach the cross-braces to the frame, as they provide support and make the workbench sturdy. Use a good spirit level to plumb the frame of the workbench, before locking the components together with screws.
Diy workbench plans
Installing-the-wooden-supports-for-workbench
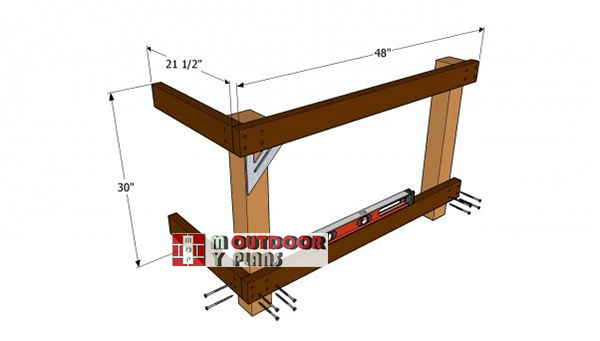
First, build the frame of the workbench. In order to get the job done in a professional manner, we recommend you to split the frame in two halves. In this manner, after building the wooden parts, you can join them together a lot easier.
As you should notice in the plans, you have to lay the 4×4 legs on a level surface, attach the 2×4 supports and lock them into place with screws. Leave 4” from the ground to the bottom supports.

Building the frame of the workbench
Use a carpentry square to make sure the corners are right-angled. In addition, measure the diagonals, to make sure the sides of the frame are even. After building the two halves of the workbench frame, you should join them together and use a spirit level to plumb them.
Drill pilot holes trough the short supports and drive in the 3” screws. Don’t forget to countersink the head of the screws, before inserting them.

Installing the bottom shelf
The next step of the woodworking project is to attach the slats to the bottom supports. In order to get the job done and to build a sturdy shelf, you can use 2×6 lumber. Irrespective of your choice, fit the slats into place, align them at both ends and drill pilot hole before driving in the 2 1/2” screws.
Top Tip: Smooth the ends of the slats, in order to obtain a neat appearance. Countersink the head of the screws.

Attaching the top of the workbench
Attaching the tabletop of the workbench is a straight forward task, if you have followed our instructions. Cut the slats to 48”, sand their ends, drill pilot holes and secure them to the supports with 2 1/2” screws. About two screws at both ends will make the structure rigid.
Top Tip: If you are going to place heavy items on the tabletop, we recommend you to secure a middle apron to the frame, before fitting the top slats.
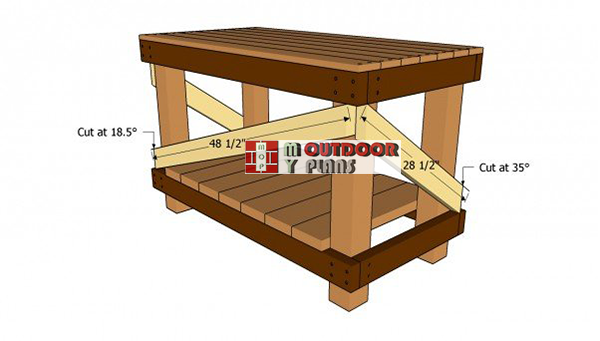
Installing-the-diagonal-braces
In order to make the frame of the diy workbench rigid, install several brace to the outside of the frame, as you can see in the image. Use a miter saw to make he angle cuts and to obtain accurate results. Lock the braces into place with several C-clamps, before driving in the screws.
Top Tip: Leave one side of the bench open, otherwise you won’t have a proper access to the bottom shelf.

Diy workbench plans
Last but not least, you have to take care of the finishing touches. Therefore, you have to fill the holes with a good filler and to let it dry out for at least several hours. Then, sand the wooden surfaces with 120-grit sandpaper, along the wood grain and vacuum the residues.
Top Tip: Apply a coat of primer to the wooden components, before staining the workbench with appropriate products against rot.
This article was about diy workbench plans free. If you want to see more plans for your garden, we recommend you to check out the rest of our step by step projects.
EXPLORE MORE IDEAS FOR:
 |
 |
 |
 |