This step by step woodworking project is about firewood shed plans. In this article we describe the main techniques and methods required for this backyard construction, along with a complete list of materials. I have designed the plans to keep the expenditures under control and to involve the least amount of work possible, so that you can learn how to build a wood shed. In order to save money, you should go to several lumberyards and ask an estimate for the materials required for this job and choose the best offer in terms of quality and price. Afterwards, you should get a drill machinery, a circular saw, a handsaw with fine teeth, a hammer, a spirit level and a tape measure.
When buying the lumber, you should select the beams with great care, making sure they are straight and without any visible flaws (cracks, knots, twists, decay). Use a spirit level to plumb and align the components, before inserting the galvanized screws, otherwise the firewood shed won’t have a symmetrical look. If you have all the materials and tools required for the project, you could get the job done in about a day or at most a weekend. You should also check out the rest of my firewood shed plans, if you want more alternatives when it comes to storage capacity of design.
Projects made from these plans
Cut & Shopping Lists
- A – 4 pieces of 8x8x16” concrete blocks FOOTINGS
- B – 4 pieces of 2×4 lumber 69” long JOISTS
- C – 2 pieces of 2×4” lumber 36” long RIM JOISTS
- D – 90 pieces of 3” galvanized wood screws SCREWS
- E – 18 pieces of 2×4 lumber 36” long DECKING
- F – 2 pieces of 2×4 lumber 48”, 2 pieces of 2×4 lumber 48” cut at 15º FRONT POSTS
- G -16 pieces of 3” lag screws LAG SCREWS
- H– 2 pieces of 2×4 lumber 39 1/4” – cut at 15º, 2 pieces of 2×4 lumber 38” BACK POSTS
- I – 2 pieces of 2×4 lumber 68”, 2 pieces of 2×4 lumber 30” – cut at 15º at both ends RIM RAFTERS
- J – 2 pieces of 2×4 lumber 37 1/2” long – cut at 15º at both ends RAFTERS
- K – 1 piece of 3/4″ tongue and groove plywood – 40 1/4″x75″ long ROOFING SHEETS
- L – 20 sq ft of tar paper ROOFING UNDERLAYMENT
- M – 20 sq ft of asphalt shingles SHINGLES
- N – 12 pieces of 1×6 lumber 36” long SIDE WALLS
- O – 5 pieces of 1×6 lumber 70 1/2” long BACK WALL
- P – 2 pieces of 1×3 lumber 76 1/2”, 2 pieces of 1×3 lumber 40 1/2” – cut at 15º at both ends TRIMS
- 22 pieces of 2×4 lumber – 8′
- 11 pieces of 1×6 lumber – 6′
- 1 piece of 3/4″ plywood – 4’x8′
- 3 pieces of 1×3 lumber – 8′
- 200 pieces of 2 1/2″ screws
- 200 pieces of 1 5/8″ screws
- 20 sq ft of tar paper
- 20 sq ft of asphalt shingles
- 4 concrete blocks – 8x8x16″
- super splitting axe
Tools
![]() Hammer, Tape measure, Framing square, Level
Hammer, Tape measure, Framing square, Level
![]() Miter saw, Drill machinery, Screwdriver, Sander
Miter saw, Drill machinery, Screwdriver, Sander
Time
![]() One day
One day
Firewood shed plans free
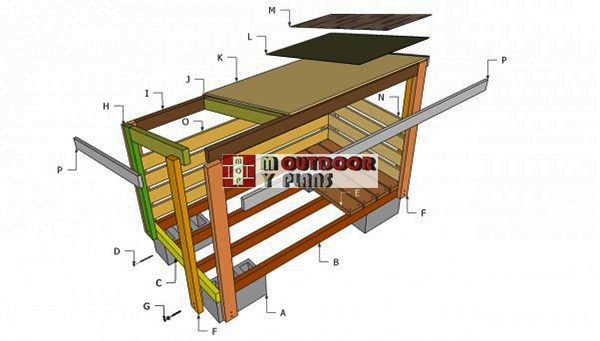
Firewood-shed-plans-2×6
A firewood storage shed is a straight-forward project if you choose the right plans for your needs and budget. In addition, this woodworking project would take only a full day of work, if you use appropriate materials and master the basic carpentry skills. As compared to other complex projects, building a simple firewood storage shed required common tools, such as: a circular saw, a drill machinery, a framing square and a tape measure.
Top Tip: If you follow our free firewood shed plans you will learn how to build a basic 6×3′ construction, but should adjust its dimensions to fit your own needs. If you make a few changes to the shed, you should also adjust the list of materials required for the job.
Firewood storage shed plans

Placing the concrete blocks
First of all, you have to prepare the location for the wood shed. Therefore, you have to level the terrain and place four large concrete blocks on the corners of the shed. This is a cheap method to build the footing of the shed, but you could also pour a concrete slab for a permanent construction.
Measure the diagonals and adjust the position of the blocks till they are equal. Apply the 3-4-5 rule along each corner, to ensure they are square.
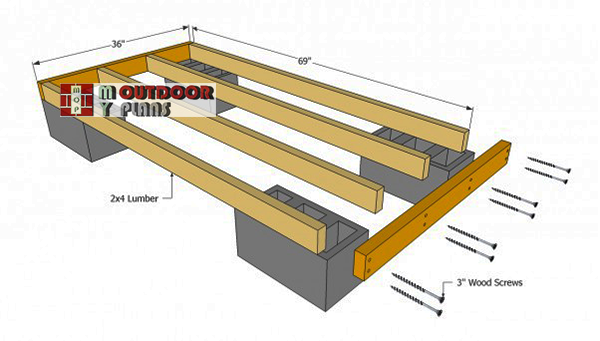
Building-the-shed-floor
Next, build the floor frame using 2×4 lumber. In order to get the job done like a pro, you have to place the joists equally spaced. In addition, use a spirit level to make sure the floor is horizontal, before driving in the 3” screws trough the rim joists in the beams.
Top Tip: Don’t forget to drill pilot holes in the rim joists before inserting the screws, to prevent the wood from splitting. Drill the pilot holes at least 1/2” from the edges.

Attaching the slats
Next, install the 1×6 / 2×4 slats into place, leaving a small gap between them, to enhance the airflow. As you can see in the image, you have to drive 3” screws or nails trough the slats in the joists. Align the boards before locking them into position with the screws. Alternatively, you can also use 2x4s.
Top Tip: Place a nail or a piece of wood between the slats, in order to obtain consistent gaps. Pre-drill small holes, before inserting the nails.
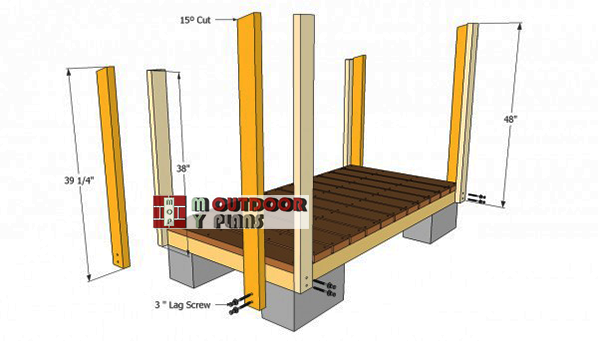
Installing-the-shed-posts
Install the 2×4 beams into place and lock them with 3” lag screws. Nevertheless, we recommend you to plumb the posts with a spirit level, before securing them with screws. Cut the top end of the side beams at 15º, in order to obtain a proper slope for the shed’s roof .
Top Tip: To enhance the bond between the adjacent 2×4 beams and to increase the rigidity of the shed, drive in 3” nails every 20”.

Building-the-shed-rafters
Build the rafters for the shed from 2×4 lumber. Make 15 degree cuts at both ends of the rafters, as shown in the diagram.

Attaching the end rafters
After you have set the corner beams into place, install the perimeter rafters. In order to build these components and to keep the expenditure under control, we recommend you to use 2×4 pressure-treated lumber. Level the components and lock them into position with several C-clams.
The best way to fasten the rafters to the frame is to toe-nail them with 3” screws. Therefore, drill several pilot holes and drive in the galvanized screws. Alternatively, you can drill pocket holes and insert 2 1/2″ screws.

Installing the rafters
Installing the rest of the rafters is a straight forward job, but you still have to pay attention to several aspects. First of all, place the 2×4 rafters equally spaced and align them at both ends, before securing them with screws.
Top Tip: Pre-drill several holes trough the 2×6 perimeter rafters and insert the nails directly in the 2×4 rafters. Work with good judgement, making sure you don’t over-tighten the screws, otherwise the wood might split.

Installing roofing sheets
Next, attach the roofing sheets. In order to get the job done quickly and in a professional manner, buy 3/4” tongue and groove plywood and secure it to the rafters with 2” steel wire nails, every 12”. Work with great care, making sure you don’t damage the frame of the shed.
Top Tip: The sheets should overhang enough to cover the trims. Use a handsaw with sharp teeth to cut the plywood along the rafters.

Installing the roofing sheets
Cover the whole surface of the roof with tar paper, starting with the bottom. Afterwards, you have to install the asphalt shingles one by one, from the bottom of the roof to the top. Secure the shingles into place using a nail gun and 1/2” screws.
Top Top: Snap a chalk line to guide you when installing the next rows. In addition, make sure the shingles overhang the edges of the roof at least 1/2”, to drain the water properly.

Installing the side walls
You can install the back and the side walls in many ways, but the easiest method is to cut 1×6 slats and to attach them to the corner beams from the interior, by using 2” screws / nails. As you can notice, you could save money by leaving 1-2” between the slats. Moreover, In this manner the airflow would dry the firewood quicker.
Align the slats with a spirit level, before driving in the galvanized nails.

Installing the trims
If you want to build a firewood shed with a neat appearance, we recommend you to hide the edges by installing 1×3 wooden trim. Moreover, secure the trims into place with finishing nails and fill the holes with wood putty. After the compound hardens, you should sand the surface with a sander.
Top Tip: In order to protect the firewood storage shed from wood decay or water damage, apply several coats of varnish or paint resistant to water.

Firewood shed plans
If you follow our instructions and use the right materials, you should build a durable shed with a nice appearance. You could adjust the size of the shed to fit your needs, but you need to place more concrete blocks under the frame, if you plan to store a large quantity of firewood. check out my free barn shed plans, as well.
Top Tip: Plan everything from the very beginning if you want to get a professional result and a quick construction process. As you can see, anyone can learn how to build a wood shed, if you follow the right plans.
If you want to get PREMIUM PLANS for this project (different design with re-engineered structure), in a PDF format, please press GET PDF PLANS button bellow. Thank you for the support.

This woodworking project is about firewood shed plans free. If you want to see more outdoor plans, check out the rest of our step by step projects and follow the instructions to obtain a professional result. SHARE our projects and follow us on the social networks to help us keep adding free woodworking plans LIKE us on Facebook to be the first that gets our latest updates and submit pictures with your DIY projects.
EXPLORE MORE IDEAS FOR:
 |
 |
 |
 |
51 comments
Great! thanks
Thanks you, Jack! I am glad it was helpful. Let me know if you have any questions regarding the project and if you do build the shed by yourself, make sure you submit it so we can all see it!
I’m thinking about using this for part of my Eagle Scout Project and would like to know an estimate cost. Thanks
It really depends on the materials you use for your project. If you use pallet wood the cost would be just for the screws and for the concrete blocks. One of the persons that built this used discounted lumber and spent under 50 $ on the materials. Don’t forget to share a few images, if you decide to build this shed.
These plans have a few mistakes in them. The 37 1/2 boards need to be cut at 15 degrees.
Thanks for pointing that out. However, if one actually takes the time to read all the instructions, everything would be very clear. But I will add this detail to the cut list, to prevent errors.
You have 2×6 on the list but not the final wood list?
I mentioned in the article that 2×6 might be an overbuild, so if you want a quick project and to keep things simple, use 2x4s. I modified the cut list to eliminate confusion. Thanks for pointing that out!
How much wood (cords) will this store?
About 1/2 cords of wood. If you want to store more cords, you should take a look over the rest of the firewood shed projects here: http://myoutdoorplans.com/category/firewood-shed/
Very nice shed, and I’m planning to build it. I see a discrepancy between the materials list and the instructions, though. The list specifies 2×4 boards for the decking (item E) and 1×6 only for the side and back walls (items N and O). But the instructions show using 1×6 for the decking, which makes more sense to me anyway.
Thank you for stopping by. It has little importance if you use 1x6s or 2x4s for the decking. It is a matter of personal choice. The materials list takes into consideration 2x4s for the decking slats, so if you want to use 1x6s, make sure you make the modifications before buying the materials.
julian – I’m confused about a seeming error in your illustrations for the posts. In one diagram you show the front and back posts as flush with the deck and the side posts overlapping them. In a following diagram, you show the front and back posts overlapping the side posts. However, if you follow the second diagram, the lag screws for the front and back posts would have to go into the end grain of the base frame. That wouldn’t be good . What am I missing?
It’s just an illusion. In all diagrams the front and back posts overlap the side posts. Regarding your second concern (fitting the lag screws in the end grain of the base frame), you could make the front and back joists longer and the side joists shorter. In this manner, you can avoid fitting the screws into the end grain of the side joists.
Thanks for your response. Unfortunately, I had already constructed the base before I noticed the problem. What happens if I overlap the front posts instead? It wouldn’t look as neat, but trim could cover it. Would it change dimensions or in any other way cause a probleem with the plans?
You shouldn’t worry that much about the base. The side posts will provide lots of support and you can use regular 2 1/2″ screws for the front ones instead of lag screws, so it doesn’t split the end grain. In addition, by locking the front to the side posts the frame will be super rigid. Regarding the second issue, fitting the posts the other way around will influence the plans (the side rafters should be longer and the front and back ones should be shorter than in plans). If you aren’t prepared to make modifications to the plans, you should take the posts off and fit them again properly.
Thanks. You’ve given me all the info I need to choose between the two options. I’m not worried about changing the plans a bit, so I’ll take a look and choose one of the options you’ve suggested. I’ll check back once the whole shed is built.
Julian:
I would like to make my floor sit on 4×4 skids instead of the cinder blocks. What lumber changes do I need to make for the flooring [as they will have to be installed length wise] ]and joists [as they will have to be installed front to back]?
Why don’t you just install 3-4 skids perpendicular on the floor joists? If you want to install the skids lengthwise you would need to redo the whole design of the floor which is more complex than I could explain a sentence.
Thank you Julian:
Installing the skids perpendicular will also work and makes it easier to just add to the materials list.
I am confused in what types of screws to use.
The material list says 2 1/5 Inch Screws and 1 5/8 Screws, but the diagrams are all larger sizes?
Why?
The sizes in the diagrams are a little bit over-engineered. It really doesn’t make too much difference so you could save some money by using the standard sizes.
I am so confused as to ow to download these plans!!:(
Please read the FAQs: http://myoutdoorplans.com/faq/
Now what is a 2×3?
I’m sorry, I meant a 1×3?
Please read this to understand better the lumber sizes: http://myoutdoorplans.com/imperial-to-metric-conversion/
Did you use pressure treated wood for this project?
That will be ideal. However, if you want to save some bucks, you can use pressure treated lumber just for the floor and posts.
So what size and type of screws are needed? In he A-P list it says 3″ but in the total materials it says 2 1/2″ and 1 5/8″.
For 1 1/2″ thick lumber you need to use 2 1/2″ or 3″ screws. For 3/4″ thick lumber you need to use 1 5/8″ screws.
I am super excited to try this project – I need somewhere to store my kids bikes – and show my husband my great DIY skills…. fingers crossed for my 1st woodwork project.
That’s great. I am sure you will do a great job. Good luck and let me know how it comes out!
Are there any suggestions to build this on top of something else besides concrete blocks but won’t rot? Just for esthetic purposes…
1×6 boards are not easy to come by except for select common boards which are expensive. Is there a place you can find cheap, non-finish/trim 1×6 boards? I have not seen them at HD or Lowes.
You can use 1x4s or 1x8s as well. Just use what materials are easier to find.
Hello – I’m using these plans to build a 4×8 size shed, do you see any issue using 5/8 fence board for the side/back walls..instead of 1×6 when the actual thickness is .75?
No, I don’t see any issue with that. Use what materials you have.
Thanks, wasn’t sure how fence board might hold up compared to 1×6..but for cost and the fact they are cedar I might give them a try!
Cedar is a lot better than pine. I think they will hold up fine. The slats don’t have structural role, just to protect the firewood and to keep them stacked together.
Any suggestions if I prefer a rib steel roof for snow to slide off. Adjustments to the plans?
Fit some 1x2s over the rafters, every 16″ on center, at least.
I’m interested in the expected cost of this project. Called my local lumber yard and they priced the lumber at about $240 (pine). I’m seeing many of the individuals projects saying $30 or <$30 and wondering how that's possible? Does everyone just have the wood on hand already?
Excellent project! I loved how mine turned out. I would recommend in the instructions to specifically state that the vertical posts need to be wrapped around the base, the image is not as clear. Also, the last trim piece should read a length of 41 1/2″ in the cut list, instead of 40 1/2″ to accommodate the angled cuts just like the diagram for the 37 1/2″ rafters
Hello,
I’d like to ask if someone could provide plans for a simple wood shed size is 8′ x 10′.
Thank you,
Richard
Why do the Materials in D and G call for 3″ Wood and Lag Screws but the summary at the bottom have links that pull up 2.5″ and 1 5/8″ screws?
Confusing for a first time builder.
Thanks!
Use 2 1/2″ for the 3″ screws labeled.
Another question about the screws. The Alphabetized Materials List asks for 90 3″ Galvanized Lag Screws and 16 3″ Lag Screws, but the bulleted list asks for 200 each of 2 1/2″ and 1 5/8″ screws. Can you explain the discrepancy?
I gave you options. Woodworking is not brain surgery. 2 1/2″ or 3″ for 1 1/2″ thick material and 15/8″ for the 3/4″ thick material
I ordered a premium plan today and did not get an email with the plans
You bought it with a different email. I updated the email with the one you commented here, and I resend the plans