Welcome to Part 2 of the 8×12 Lean-To Shed build! Now that we’ve got the main structure framed, sided, and standing strong, it’s time to wrap things up with two of the most important finishing touches: the roof and the double doors. These last steps not only seal up the shed and give it that polished look, but they also make it functional and ready to store whatever you’ve got in mind.
In this post, I’ll walk you through how to install the asphalt shingles for a durable, weatherproof roof and then show you how to build and hang those big 6-foot doors like a pro. These parts might seem intimidating at first, but with a little patience and a few tips, you’ll knock them out with confidence. Let’s get back to it and finish this shed strong!When buying the lumber, you should select the planks with great care, making sure they are straight and without any visible flaws (cracks, knots, twists, decay).
Projects made from these plans
Building a lean to small shed
Building-a-8×12-lean-to-shed
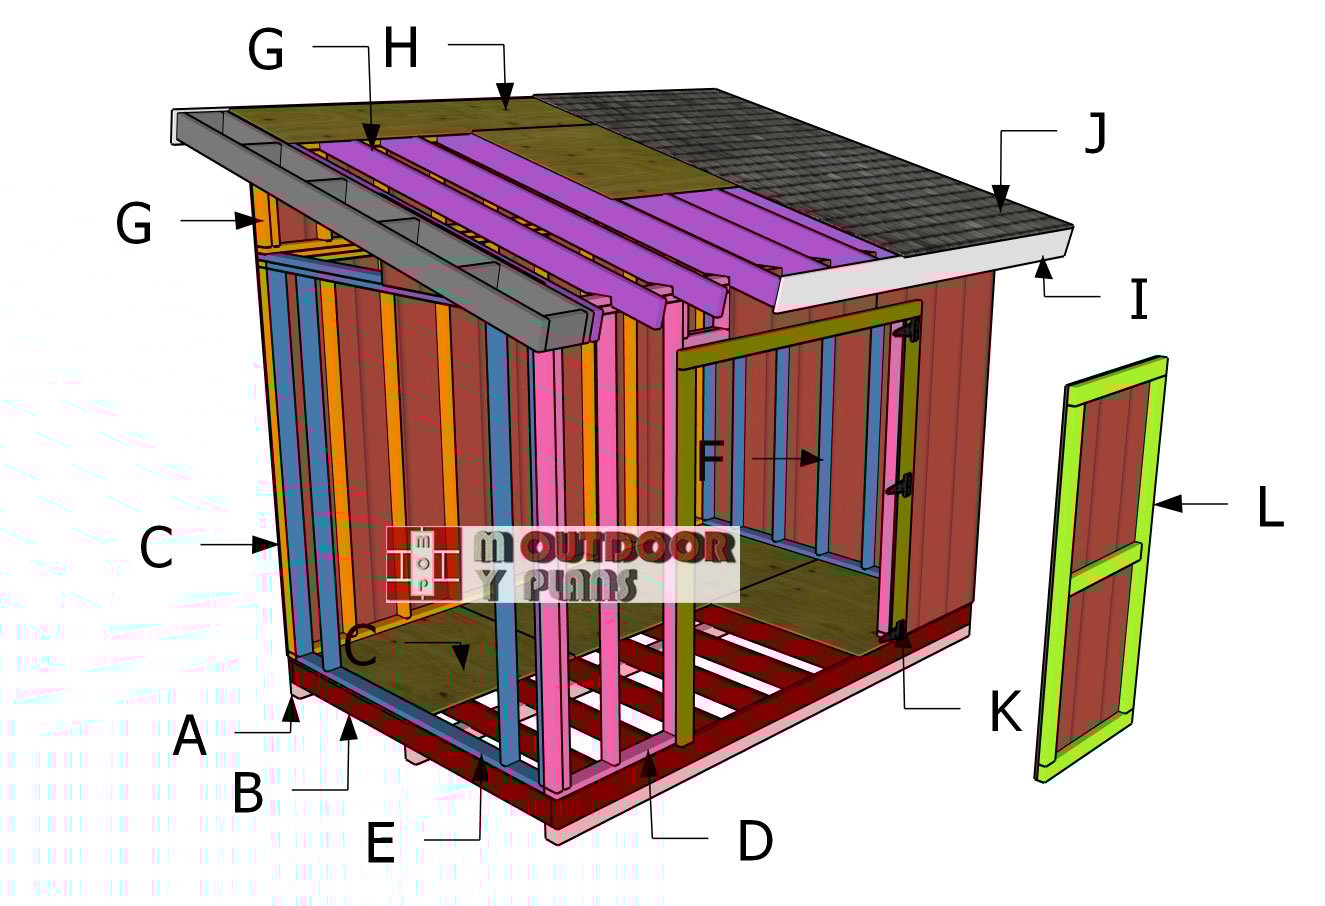
Cut and Shopping Lists
Tools
![]() Hammer, Tape measure, Framing square, Level
Hammer, Tape measure, Framing square, Level
![]() Miter saw, Drill machinery, Screwdriver, Sander
Miter saw, Drill machinery, Screwdriver, Sander
![]() Safety Gloves, Safety Glasses
Safety Gloves, Safety Glasses
Time
![]() One week
One week
Step 3: Building the lean to roof
Building-the-rafters
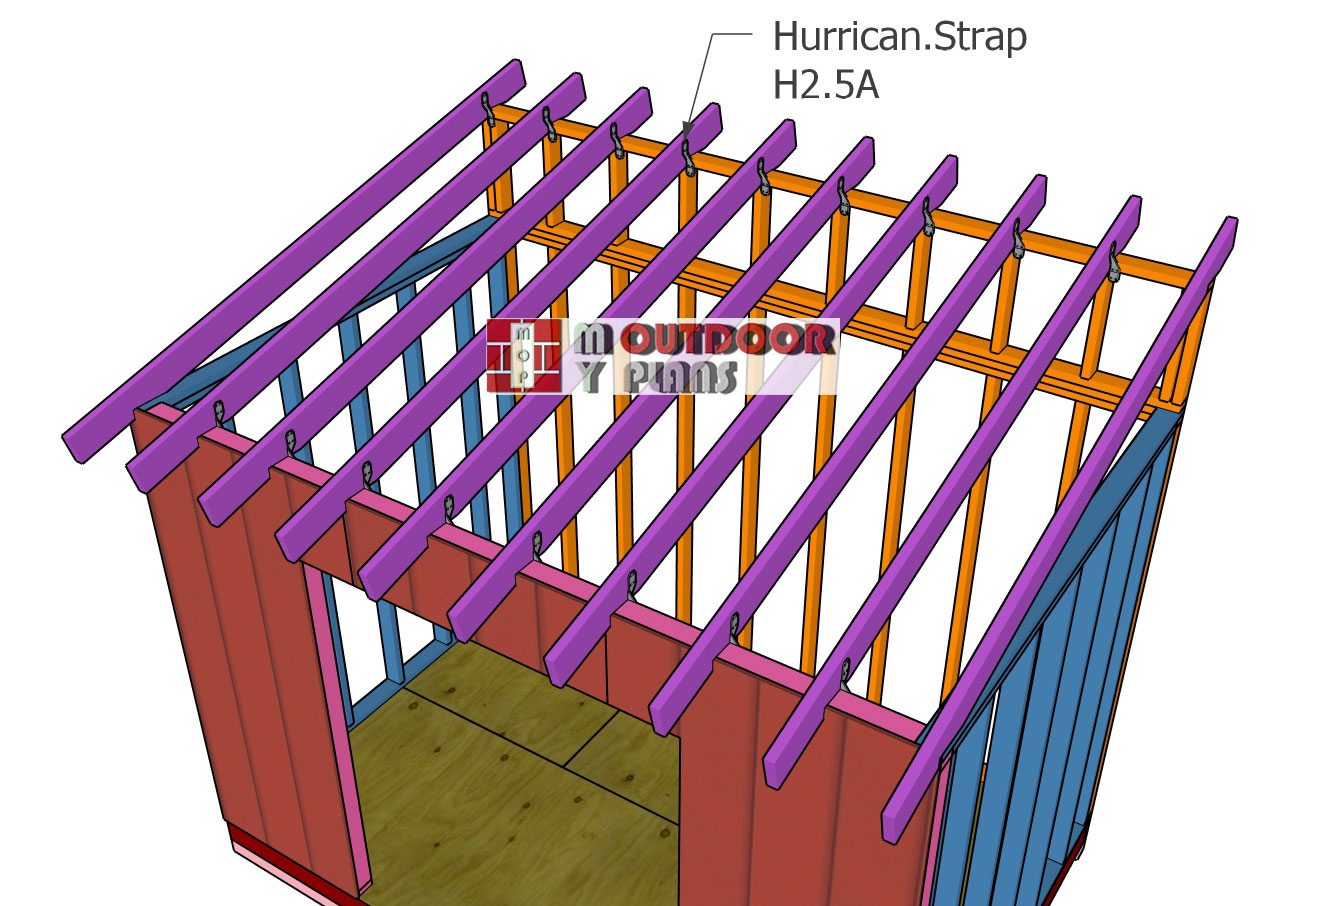
Rafter-tie-detail
Side-siding-sheets
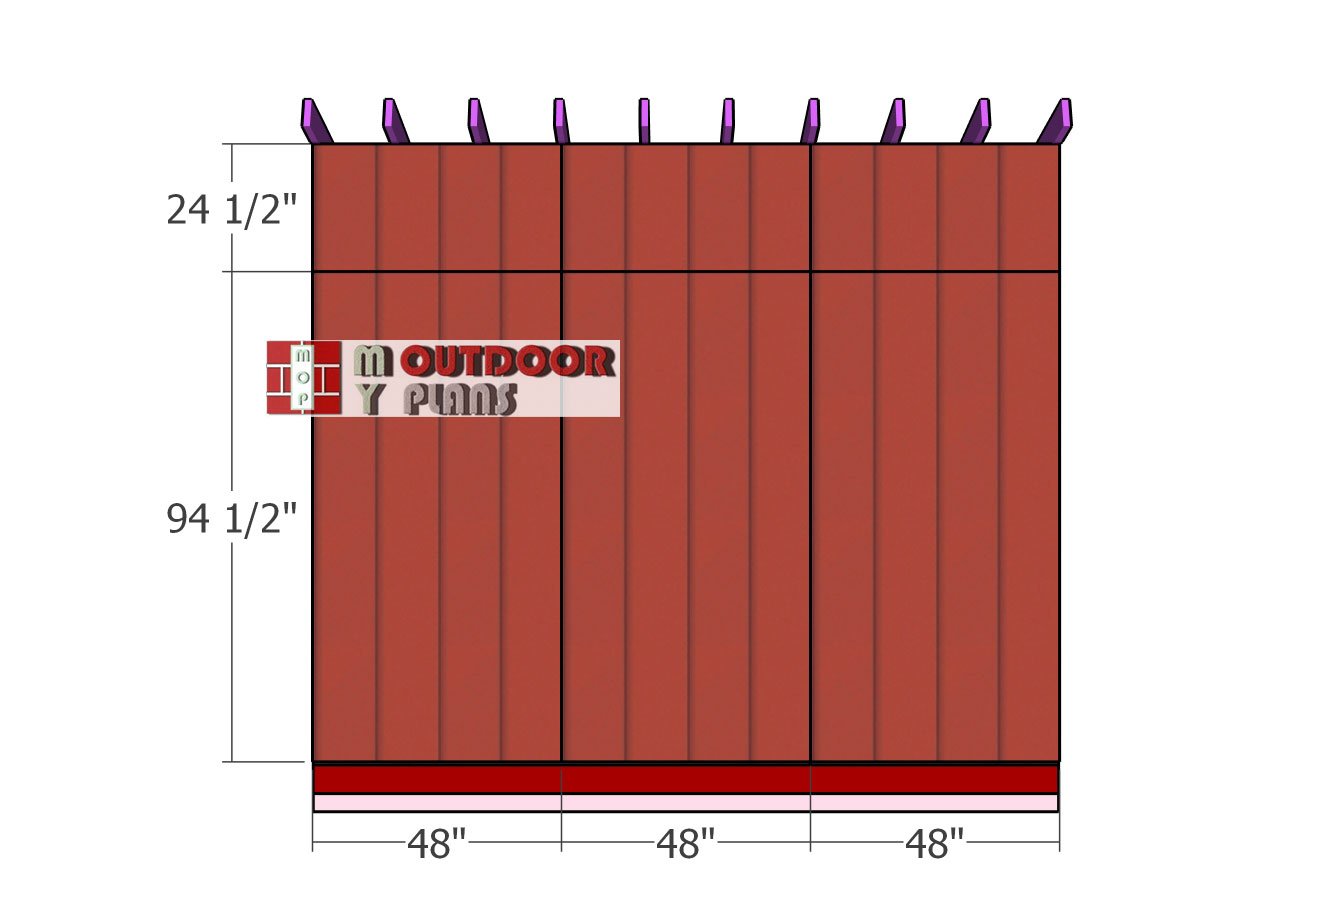
Back-wall-siding-sheets
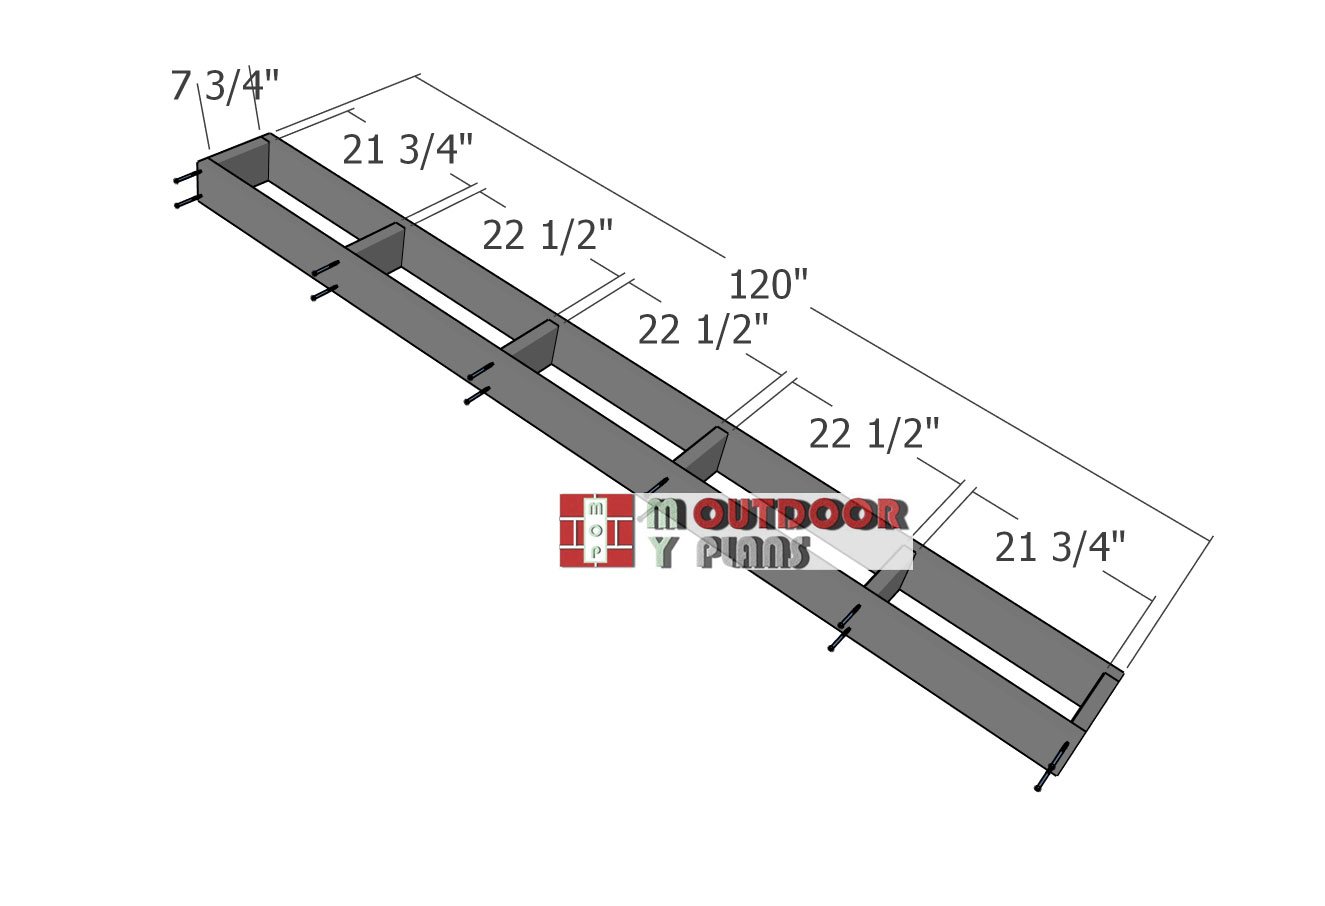
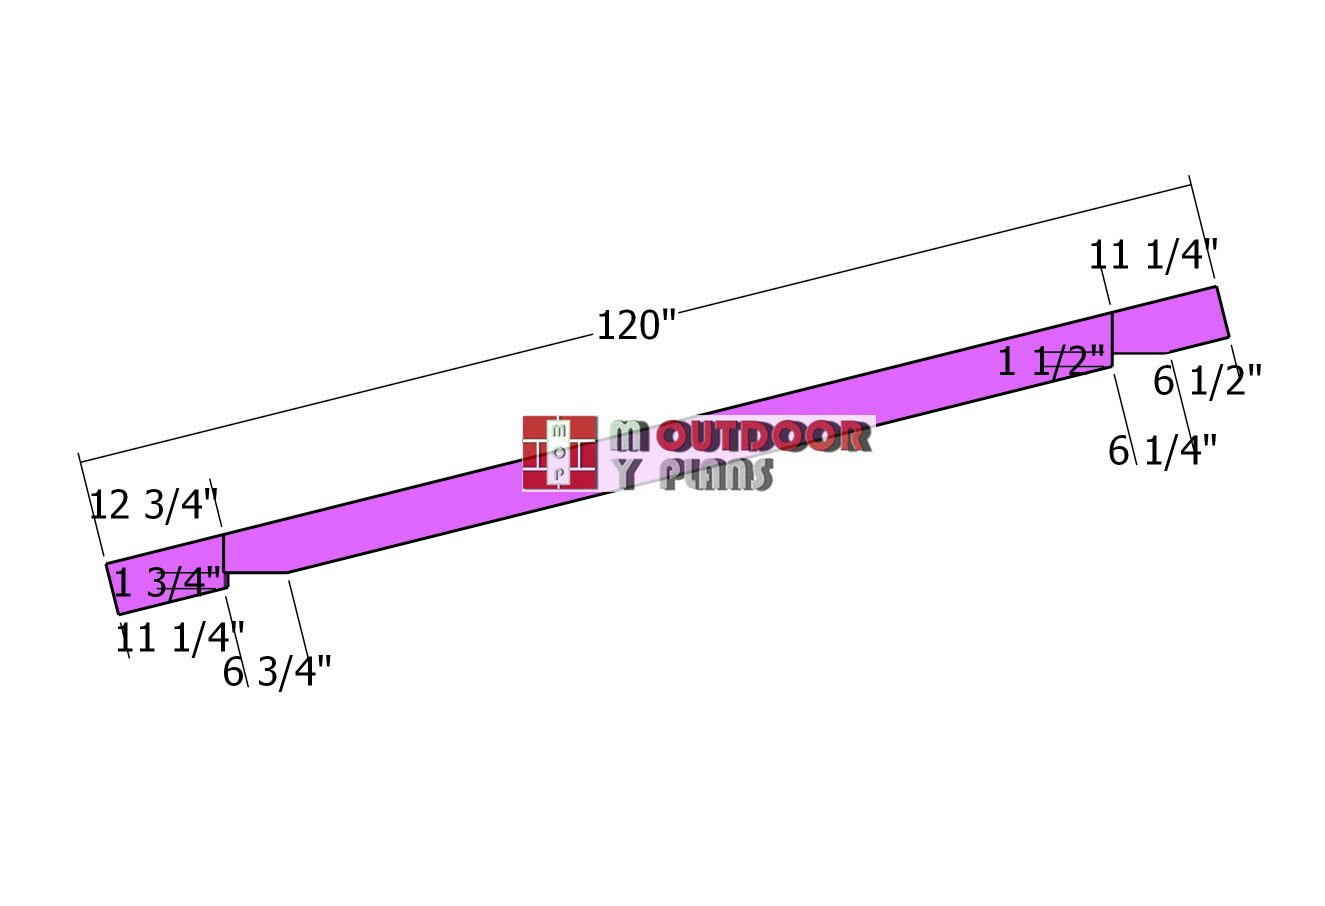
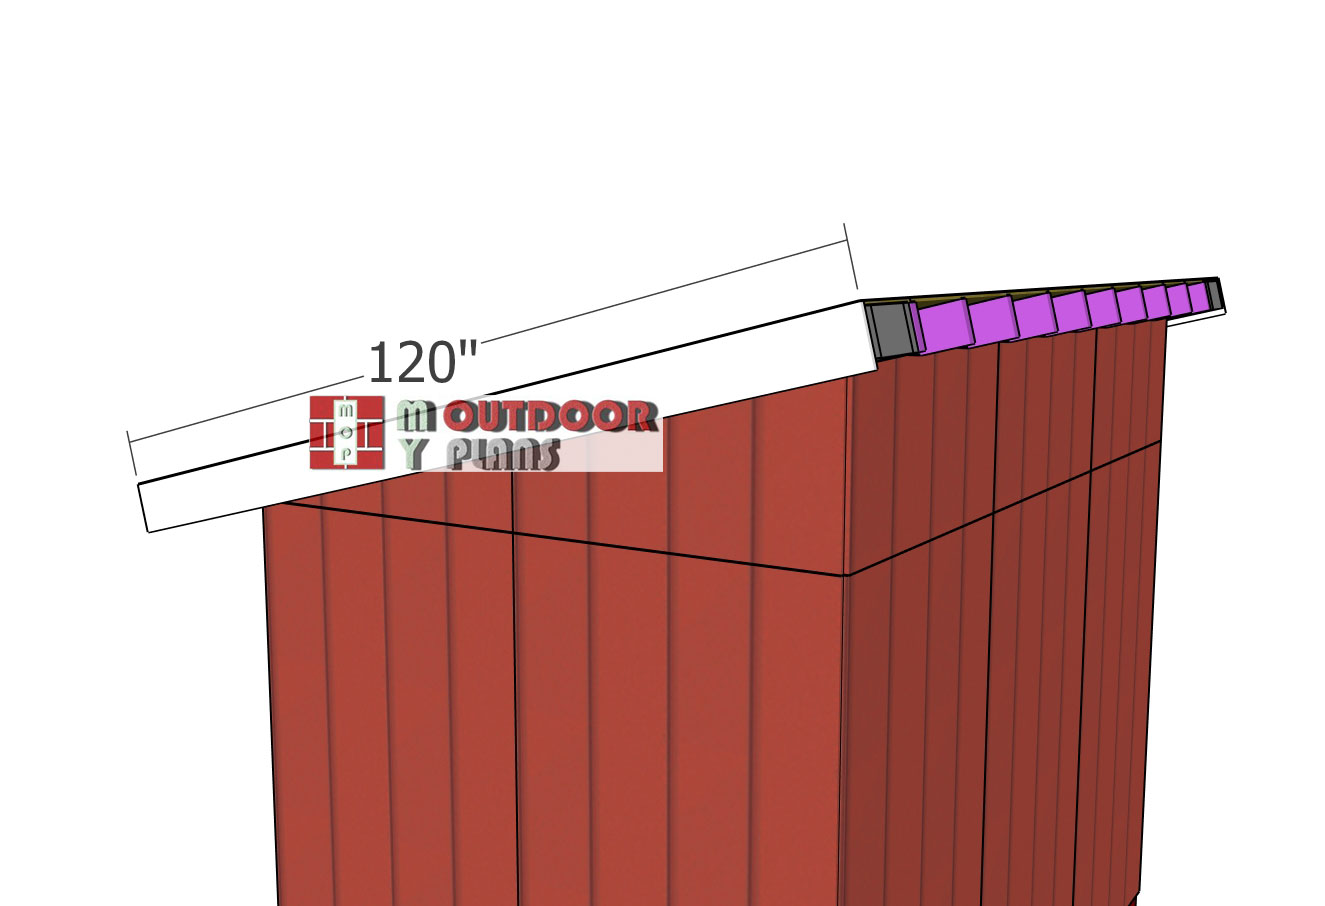
Assembling-the-side-overhangs
Alright, let’s build those shed overhangs using 2×6 lumber. Start by cutting all your pieces to the exact dimensions from the diagram—accuracy really matters here to make everything fit snug and look sharp. Lay the pieces out on a flat surface so everything stays lined up as you go.
Drill pilot holes through the outer beams, then attach the blocking pieces using 3 1/2″ screws—two screws per joint to keep things locked in tight. This setup gives your overhangs the strength they need to handle wind and weather, while also giving your roofline a clean, finished look that really pulls the whole shed together.
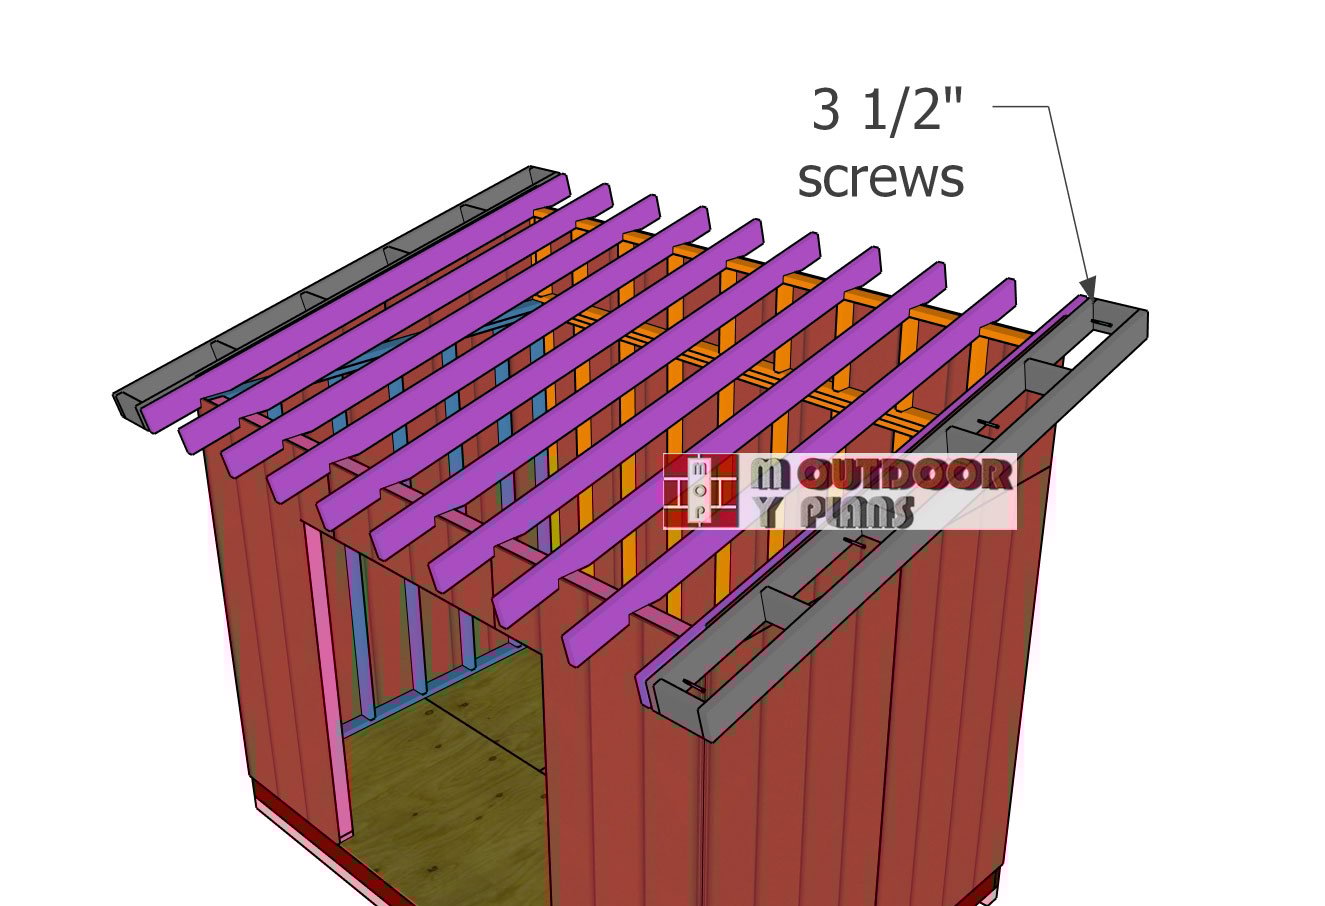
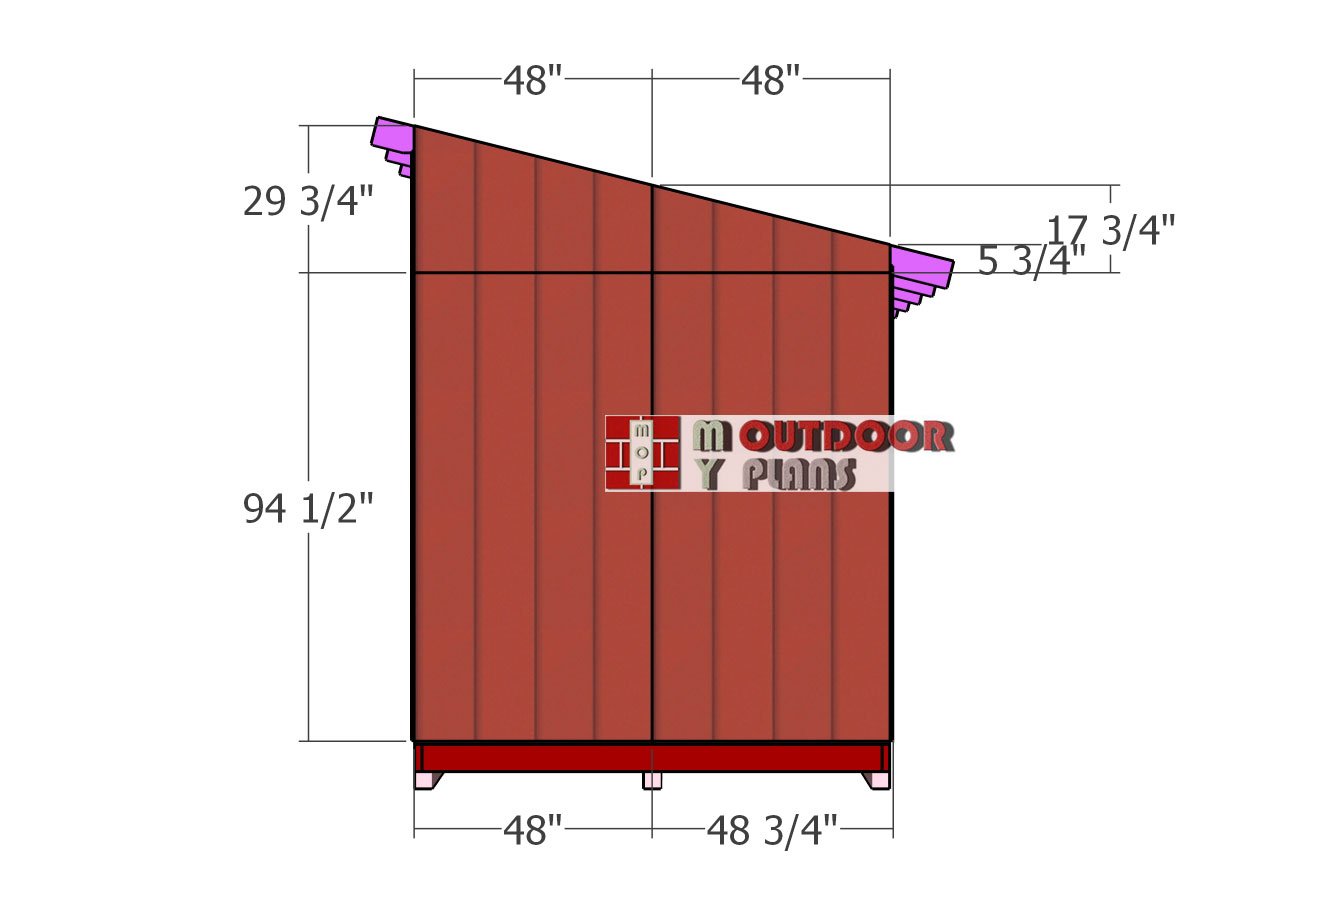
Fitting-the-side-overhangs
Now it’s time to install those overhangs on the sides of the shed. Line them up so the edges are flush with the roof rafters, then drill pilot holes to keep the wood from splitting. Once everything’s lined up, drive in 3 1/2″ screws every 12 inches to lock them in place nice and secure.
This step not only gives your shed that clean, finished look, but it also adds solid support and protection for the roof edges. Take your time here—good alignment now means a sharp-looking shed when it’s all done.
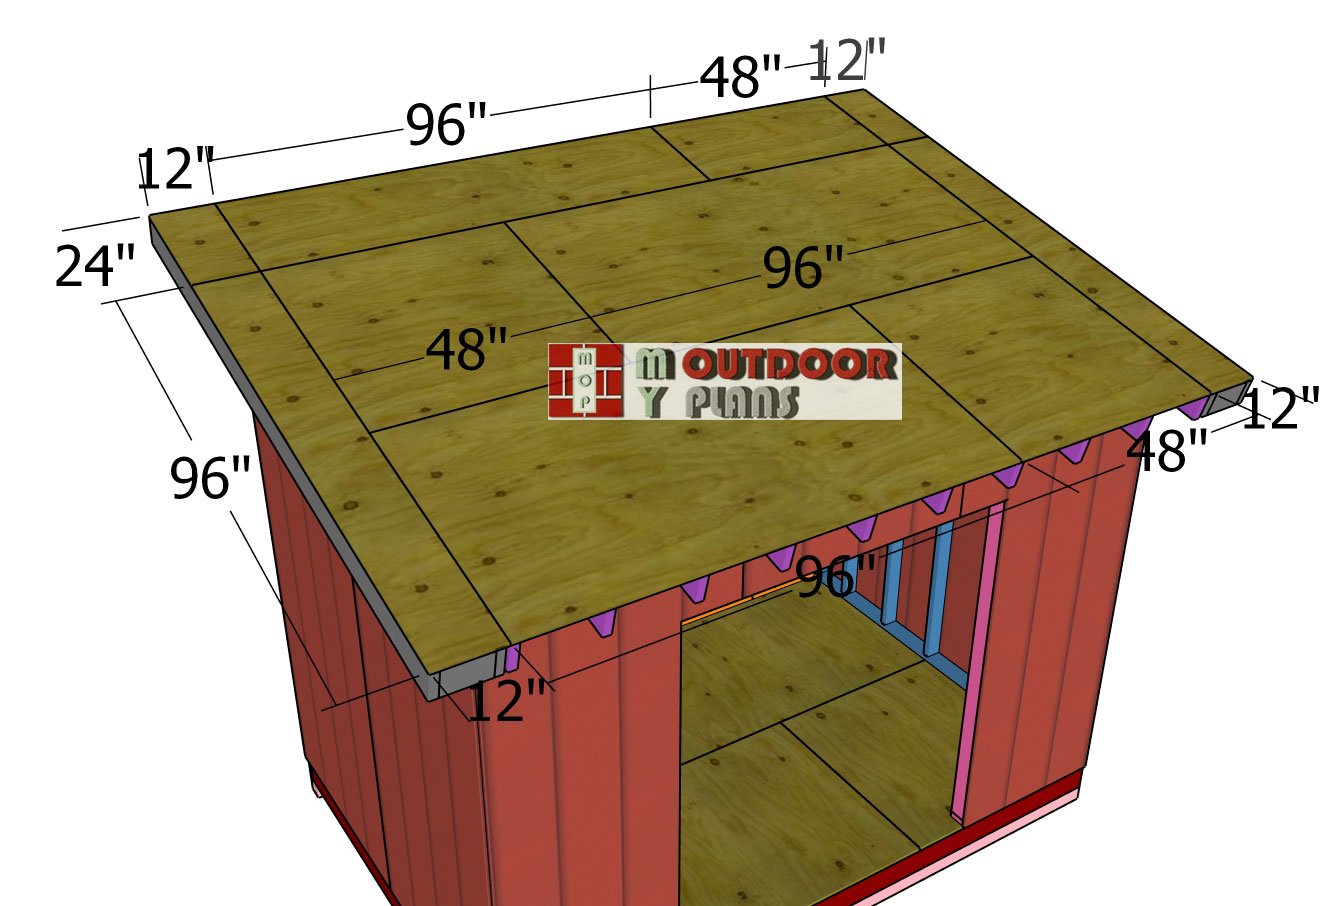
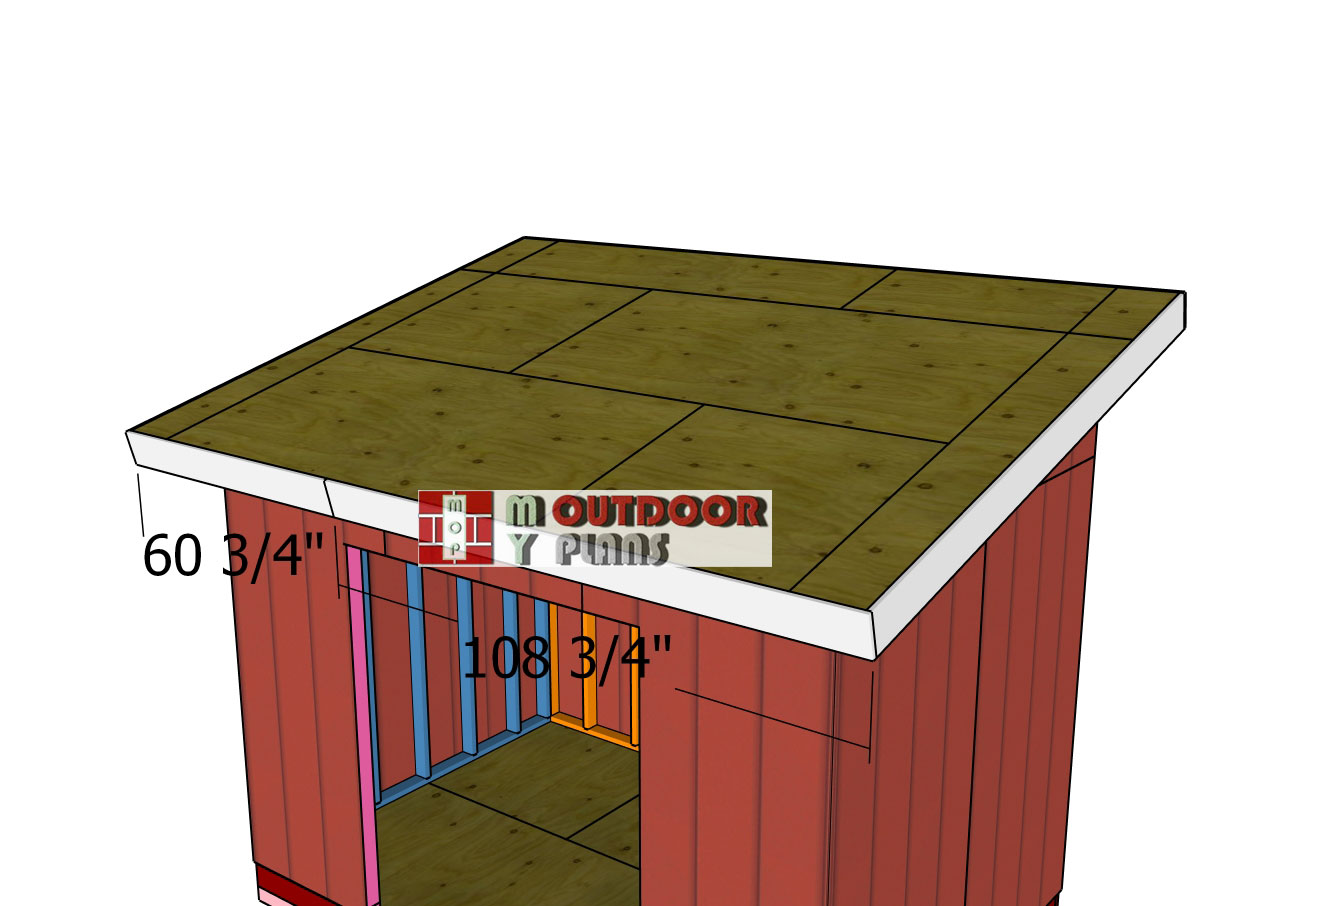
Fitting-the-roof-sheets
Let’s get that roof decked out! Grab your 1/2″ plywood sheets and start laying them across the rafters, making sure everything fits nice and snug. Line up the edges so they’re flush—no gaps, no guesswork. Taking your time here will pay off big in the final look and strength of the roof.
Drill pilot holes through the plywood into the rafters, then drive in 1 5/8″ screws every 8 inches to lock it all down tight. This gives you a rock-solid base for your roofing material and makes sure your shed’s ready to handle wind, rain, or whatever else the weather dishes out.
Side-roof-trims
Time to add those final touches that really pull the whole build together! Grab your 1×8 trim boards and attach them to the sides of the roof. Line them up so they sit flush with the edges and top—this gives your shed a sharp, professional finish. Secure the trim using 8d nails, spaced evenly along the framing.
Not only does this step give your shed some serious curb appeal, but it also helps protect those roof edges from weather and wear. It’s a small detail that makes a big difference in both looks and longevity.
Front-and-back-roof-trims
Let’s finish off that roofline strong! Attach the trim boards to the front and back of the shed, lining them up flush with the ends of the rafters for a clean, seamless look. Take a minute to check your alignment from both ends—this is one of those finishing touches that really makes a difference.
Drive 8d nails into the rafter ends, spacing them out evenly to lock the trim in place. Not only does this step give your shed a crisp, polished edge, but it also helps protect the exposed roofline from the elements. Style and function—can’t beat that!
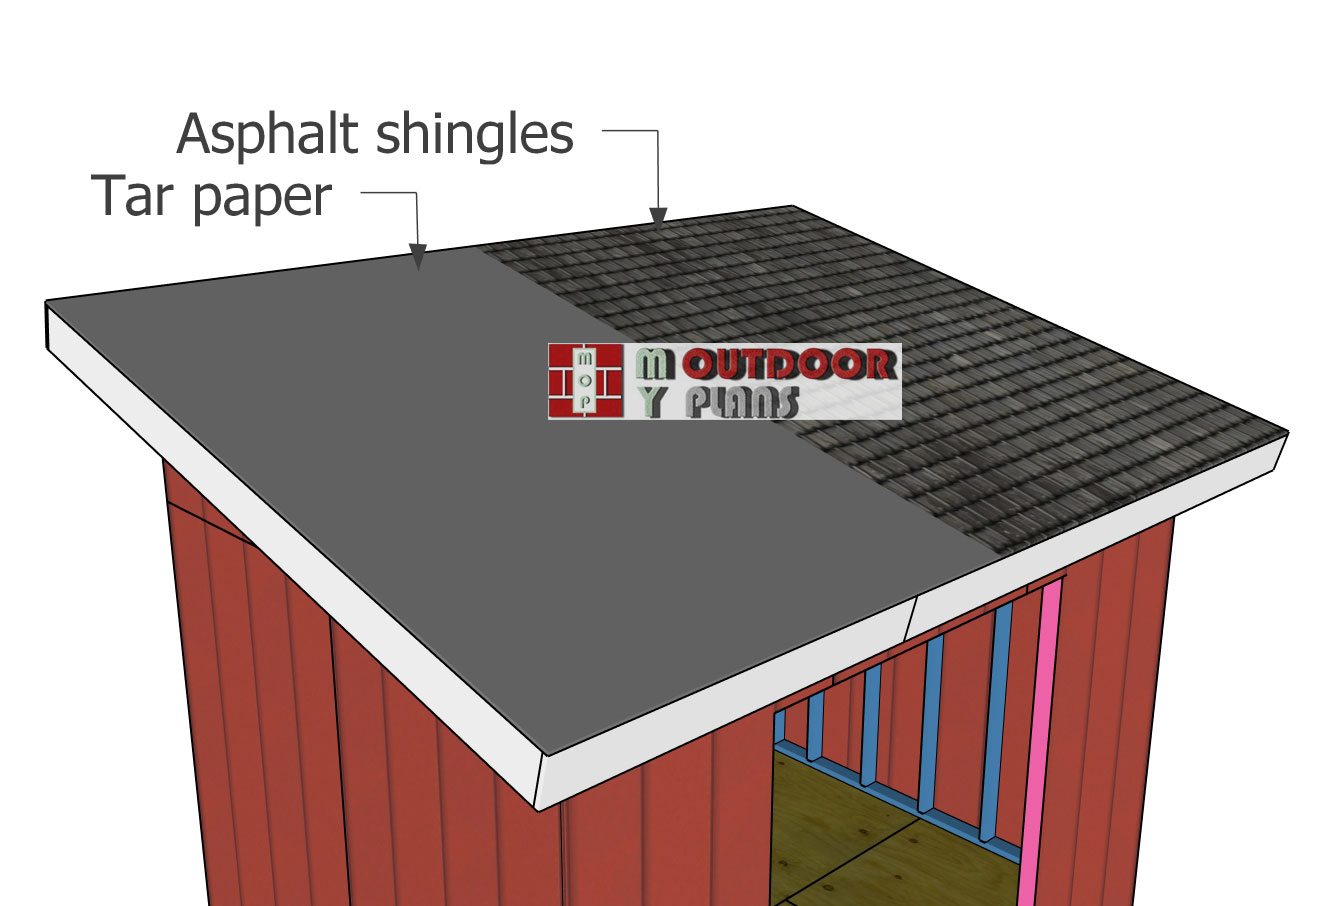
Attaching-the-roofing—lean-to-shed
Let’s get that roof finished up with some asphalt shingles—it’s a simple, solid way to protect your shed from the weather. Start by rolling out roofing felt or tar paper over the plywood roof deck. This layer adds an extra barrier against moisture. Secure it with staples or roofing nails, and make sure you overlap each row by about 4 inches to keep water from sneaking in. Next, install drip edge flashing along the eaves and rakes.
This helps direct water away from the roof edges and protects the wood underneath. Now you’re ready for shingles! Start at the bottom edge and work your way up, overlapping each row just like the manufacturer says. Nail each shingle in place so the heads get covered by the next row up—keeps it watertight and looking sharp. Take your time getting everything lined up nice and straight. A little extra care here makes for a clean, professional-looking roof that’ll hold strong for years to come.
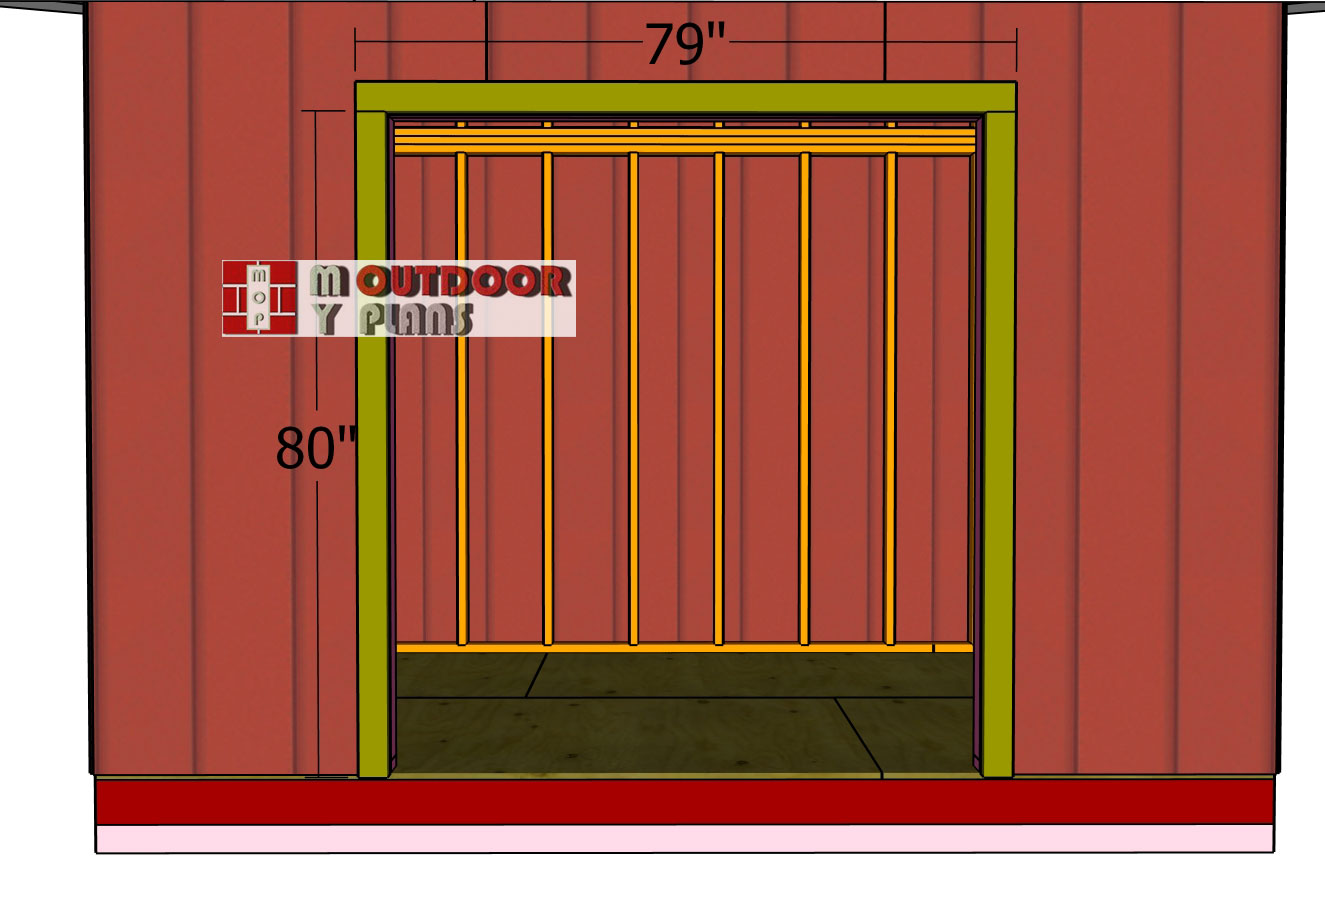
Door-jambs
Let’s get those door jambs installed and ready to roll! Grab your 2x4s and fit them around the door opening, making sure the edges are flush with the wall framing. Drill pilot holes to keep the wood from splitting, then secure the jambs with 3 1/2″ screws, spacing them every 8 inches for a tight, sturdy hold.
This step gives your doors a solid base to hang from and really cleans up the opening with a nice, finished look. It’s one of those details that makes everything feel solid and professional.

Shed-door-frame
Start by cutting your 2x4s to size for the door frames—this gives you a strong, reliable base that’s built to last. Drill pocket holes at the ends of all the vertical and horizontal pieces to create tight, secure joints. Lay everything out flat and square up the corners—it’s worth taking the time to get it just right. Once everything’s aligned, drive in 2 1/2″ screws through the pocket holes to lock the frame together.
Now grab those siding panels you saved earlier and line them up with the frames. Make sure they’re flush all around for that crisp, clean look. Secure the panels using 8d nails spaced evenly along the edges. This ties the whole door together and gives you a solid, professional finish.
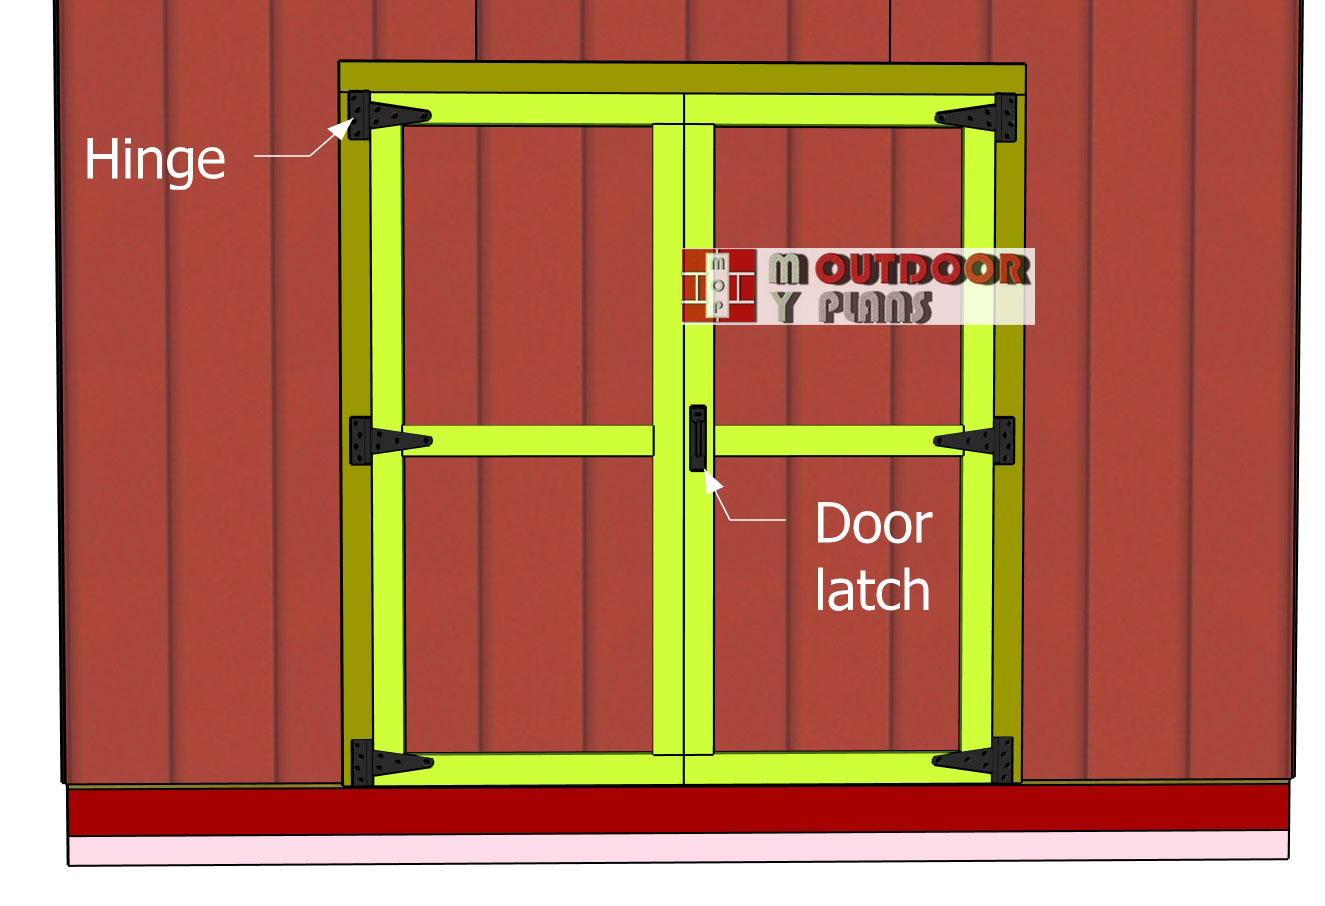
Attaching-the-double-doors
It’s time to hang those double doors and bring your shed to life! Set the doors in place and check that they’re sitting evenly in the opening—nice, even gaps all around the jambs will give you that clean, professional finish. Attach the doors using heavy-duty hinges, spacing them out evenly from top to bottom so they’ve got solid support.
Once the doors are swinging smooth, go ahead and install a sturdy latch to keep everything locked up tight. With this final touch, your shed’s officially ready to go—built strong, built right, and ready to protect whatever you’ve got to store.
STEP 4: Finishing Touches
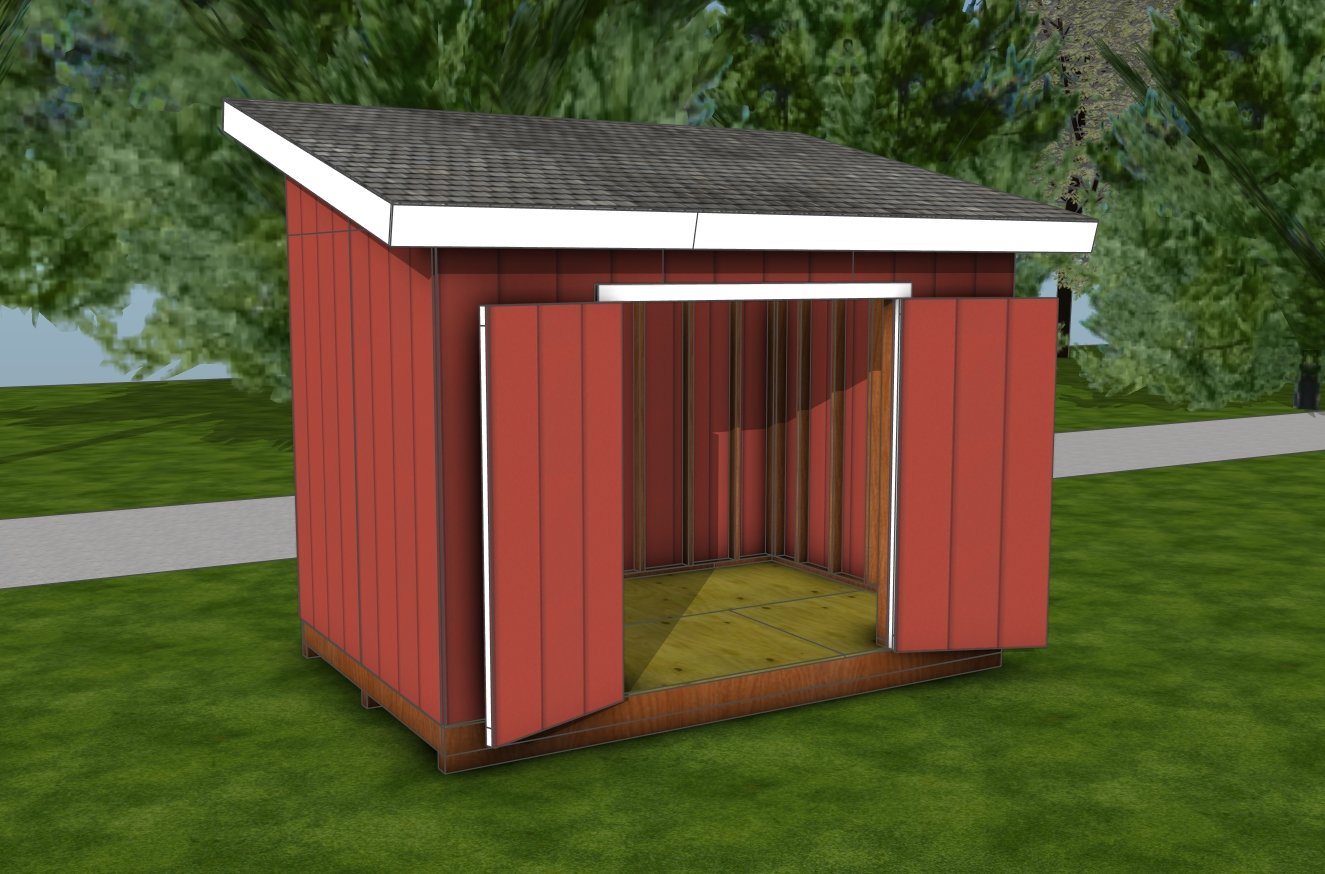
8×12 lean to shed – interior
With the main build wrapped up, it’s time for those finishing touches that really make your shed shine! Start by filling any screw or nail holes with wood filler, and smooth out any rough spots with a good sanding. This gives you a clean surface for painting or staining—and makes the whole shed look dialed in. Next, apply a quality exterior paint or stain that not only matches your style but protects the wood from sun, rain, and everything in between.
Be sure to run a bead of caulk around the doors and other joints to seal out moisture and drafts. These little details go a long way in making your shed both beautiful and built to last. To finish up the roof, cut 1/4″ plywood panels to fit under the overhang for the soffit. Secure them with 1 1/4″ screws, spaced evenly for a tidy, finished look. For proper airflow, install small vent covers or run continuous soffit vents in the plywood. Pair those with a gable vent or ridge vent, and you’ve got a solid ventilation system that’ll help prevent moisture problems like mold and rot. These final touches not only boost the look and lifespan of your shed—they make the whole build feel complete and professional.
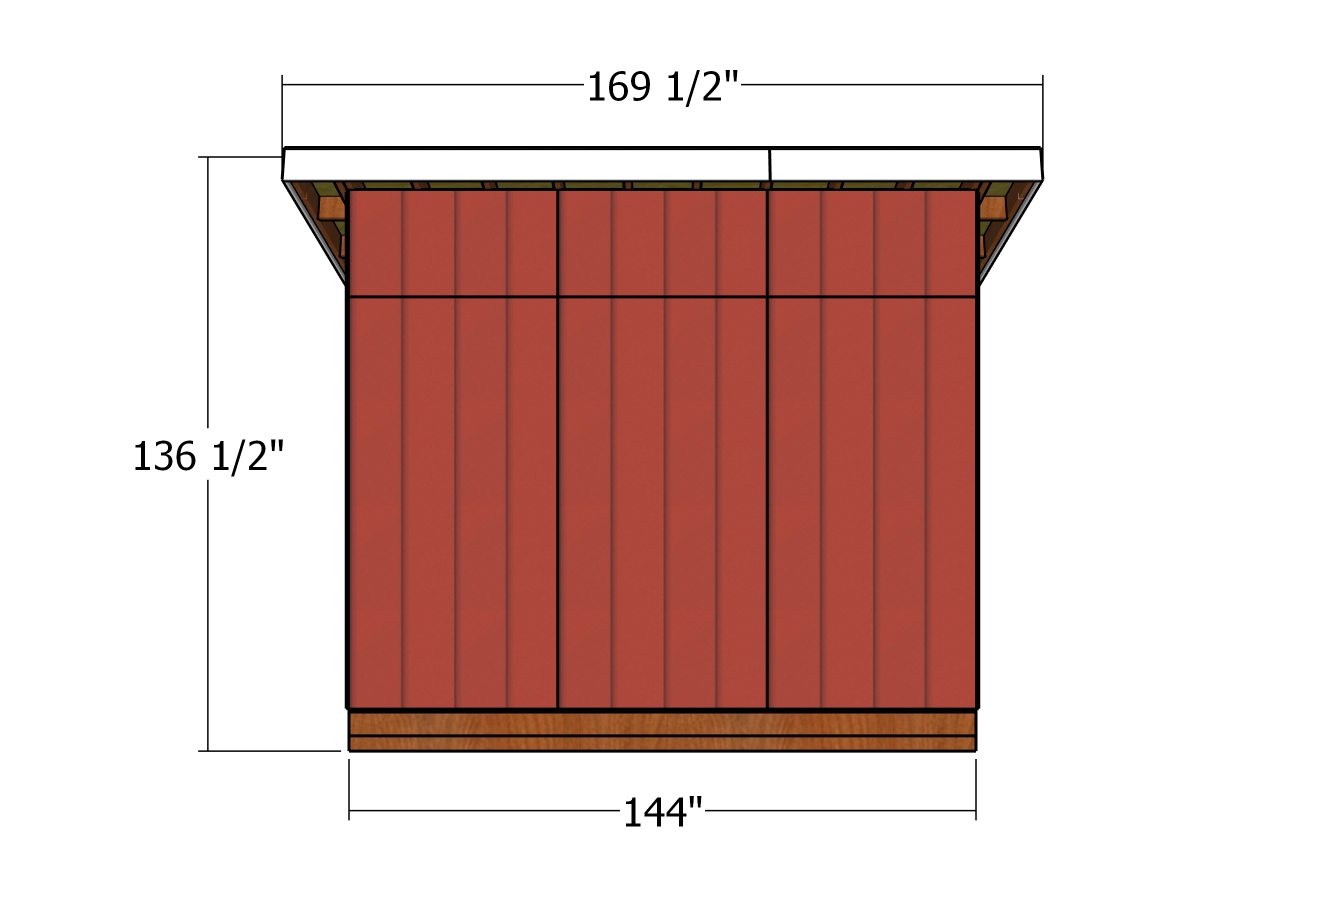
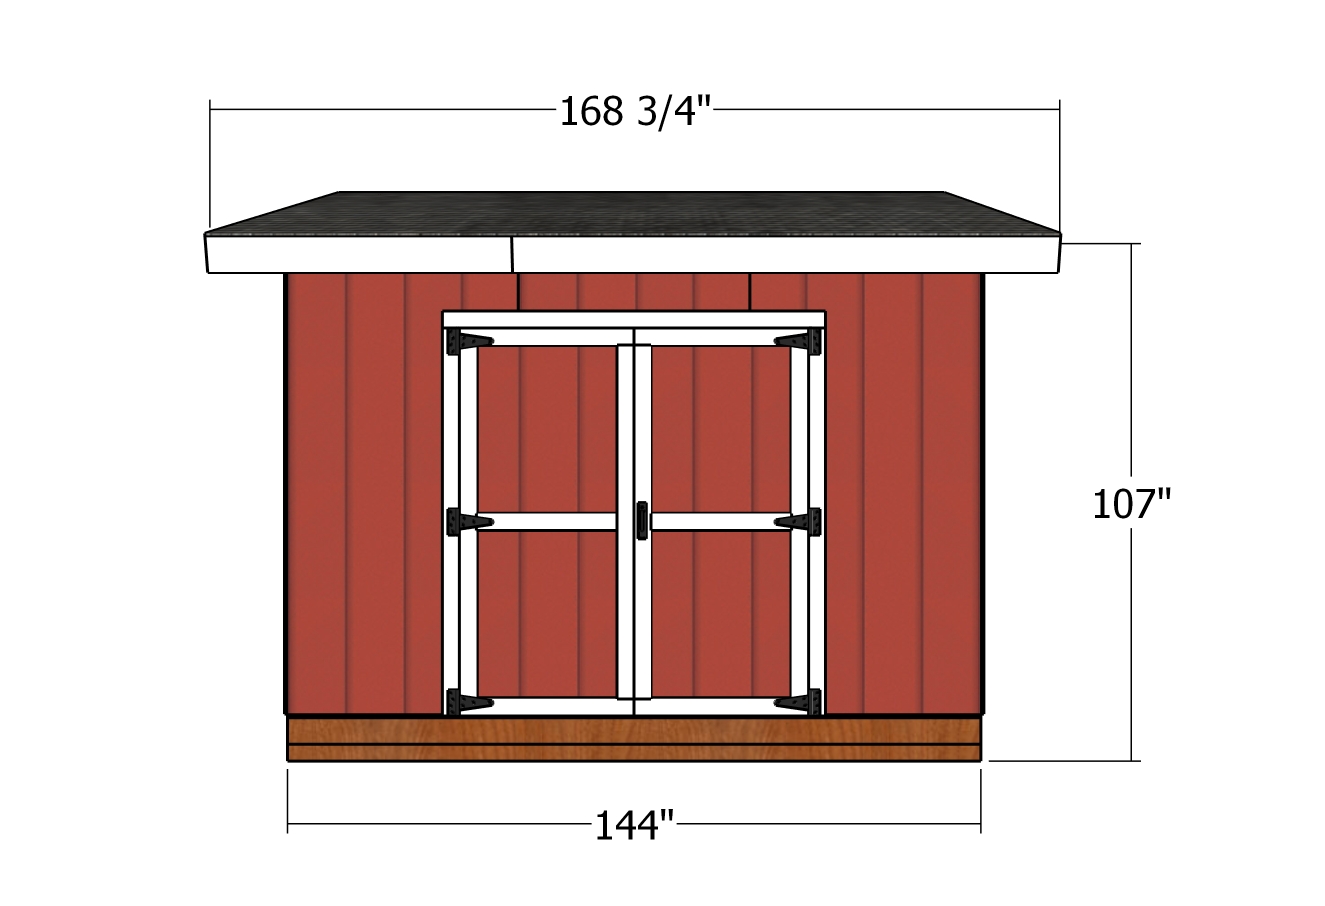
8×12 Shed – back view
And there you have it—this 8×12 lean-to shed isn’t just a weekend project, it’s a proper upgrade for your backyard! You’ve added solid, weatherproof storage, cleaned up your outdoor space, and let’s be honest—it looks fantastic. Whether you’re stashing tools, garden gear, or creating a little DIY hideout, this shed brings serious function and a whole lot of character to your property.
Plus, a good-looking structure like this always adds a bit of curb appeal and value if you ever decide to sell. But more than that—come on, how satisfying is it to build something this solid with your own hands? You’ve created something useful, something that’ll last for years, and something you can truly be proud of. It’s not just a shed—it’s a project with purpose, a bit of sweat, a lot of satisfaction, and a whole lot of “I built that.” Brilliant stuff!
If you enjoyed this build, be sure to check out PART 1, where I walk you through the step-by-step process of constructing the floor and wall frames.
This woodworking project was about 8×12 lean to shed roof plans. If you want to see more outdoor plans, check out the rest of our step by step projects and follow the instructions to obtain a professional result.
