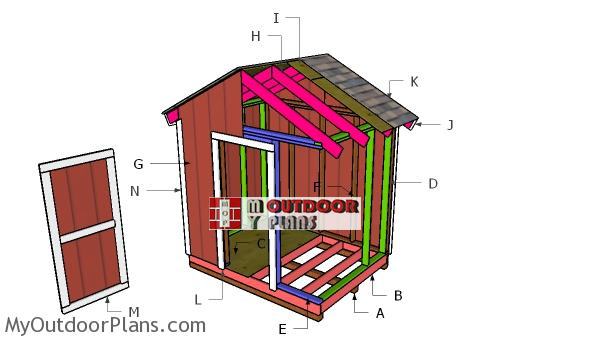
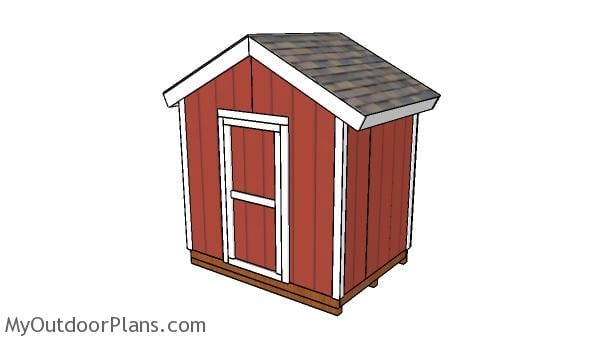
This step by step project is about 8×6 gable shed plans. I have designed this compact storage shed with double front doors, so you can shelter your tools and other items in a good order. This shed is sturdy and easy to build. Take a look over the local building codes before starting the project, as you need to comply with the legal requirements and in some cases even get a permit. Roof pitch is 6:12.
There are several aspects that any person should take into account before starting the woodworking project. First of all, you need to use weather-resistant lumber, such as cedar, pine or redwood. Drill pocket holes at both ends of the components, if you want to lock them together tightly. In addition, add wood glue to the joints and check if the corners are right-angled. Plan everything from the very beginning, if you want to get a professional result. See all my Premium Plans HERE.
Projects made from these plans
8×6 Gable Shed Plans
Building-a-8×6-gable-shed
Cut List
- A – 3 pieces of 4×4 lumber – 96″ long SKIDS
- B – 2 pieces of 2×6 lumber – 96″ long, 7 pieces – 69″ long JOISTS
- C – 2 pieces of 3/4″ plywood – 48″x72″ long FLOOR
- D – 2 piece of 2×4 lumber – 65″ long, 1 piece – 72″ long, 4 pieces – 79 1/2″ long 2xSIDE WALL
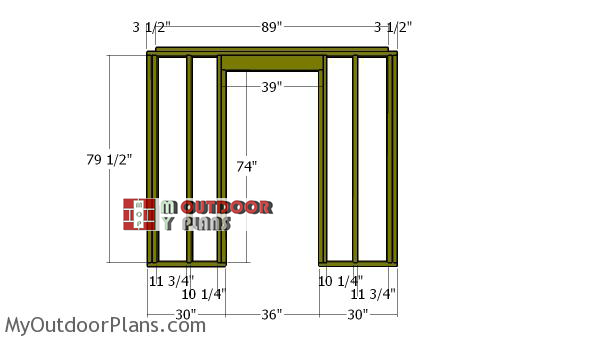
- E – 2 piece of 2×4 lumber – 30″ long, 1 piece – 89″ long, 1 piece – 96″ long, 8 pieces – 79 1/2″ long, 2 pieces – 74″ long, 2 pieces of 2×6 lumber – 39″ long FRONT WALL
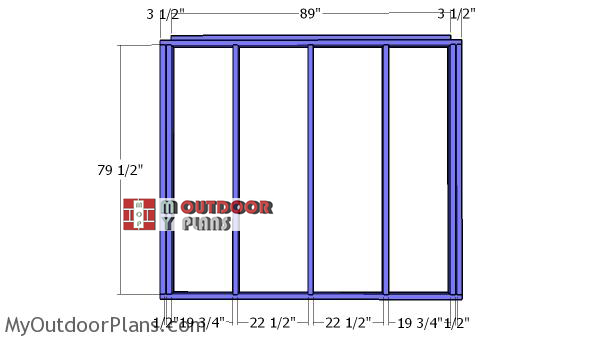
- F – 2 piece of 2×4 lumber – 89″ long, 1 piece – 96″ long, 7 pieces – 79 1/2″ long BACK WALL
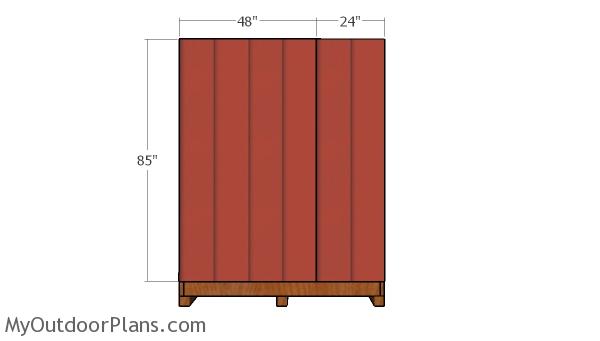
- G – 2 pieces of 5/8″ T1-11 siding – 48″x85″ long, 2 pieces – 24″x85″ long SIDING
Shopping List
- 3 pieces of 4×4 lumber – 8′
- 2 pieces of 2×6 lumber – 8′
- 4 pieces of 2×6 lumber – 10′
- 2 piece of 3/4″ plywood – 4’x8′
- 38 pieces of 2×4 lumber – 8′
- 2 pieces of 2×6 lumber – 8′
- 3 pieces of 5/8″ T1-11 siding – 4’x8′
- 3 1/2″ screws, 1 5/8″ screws
- wood glue, stain/paint
- hinges, latch, handle
Tools
![]() Hammer, Tape measure, Framing square, Level
Hammer, Tape measure, Framing square, Level
![]() Miter saw, Drill machinery, Screwdriver, Sander
Miter saw, Drill machinery, Screwdriver, Sander
![]() Safety Gloves, Safety Glasses
Safety Gloves, Safety Glasses
Time
![]() One week
One week
Related
- PART 1: 8×6 Gable shed plans
- PART 2: 8×6 Gable shed roof plans
- PART 3: 8×6 Gable shed door plans
Building a 8×6 gable shed
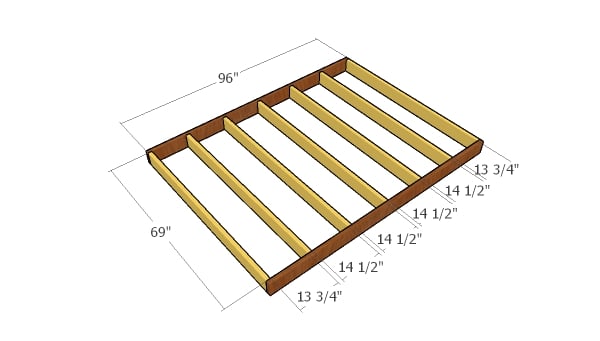
Floor frame
First, you need to frame the floor of the 8×6 shed. Build the components for the frame out of 2×6 lumber, making sure you take accurate measurements. In addition, use a saw to adjust the components to their size. Drill pilot holes through the perimeter joists and insert 3 1/2″ screws into the perpendicular components. Make sure the corners are square.
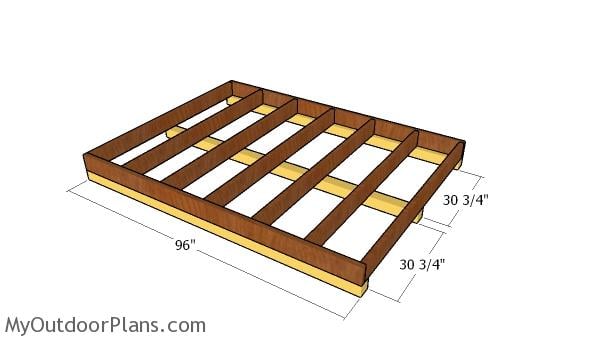
Fitting the skids
As you can easily notice in the diagram, I recommend you to build the skids out of 4×4 lumber. Mark the cut lines on the beams and get the job done by using a circular saw. Smooth the cut edges with fine-grit sandpaper and remove the residues with a vacuum. Repeat the process for the other two skids. Insert 3 1/2″ screws into the skids, after drilling pilot holes. Check if the edges are flush.
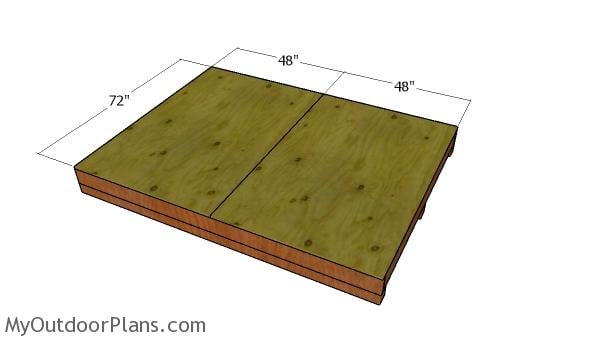
Floor sheets
Afterwards, attach the 3/4″ plywood floor to the frame. Use a 3/4″ plywood sheet, as you don’t have to make any adjustments. Make sure the corners are right-angled and the edges perfectly aligned before securing the sheet to the joists. Drill pilot holes through the sheets and insert 1 1/4″ screws into the joists, every 8″. Leave no gaps between the components, if you aim for a durable and professional result.
Building the shed wall frames
Front-wall-frame—8×6-shed
The next step of the shed project is to frame the front wall of the construction. As you can easily notice in the diagram, you need to build the components out of 2×4 lumber. Take accurate measurements and adjust their size to the right dimensions, to suit your needs. Drill pilot holes through the plates and insert 3 1/2″ screws into the studs. Make sure the corners are square and install a double 2×6 header to the front wall.
Back-wall-frame
Continue the woodworking project by framing the back wall. As you can see in the image, you need to double the studs placed at both ends of the wall, in order to add strength to the structure. Use the same techniques described above to assemble the back wall frame together.
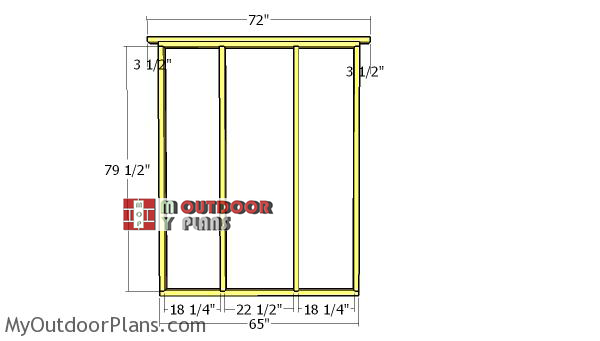
Side-wall-frames
Repeat the process for the side walls of the shed. Take accurate measurements before adjusting the size of the components, otherwise they won’t fit each other properly. Pre-drill the plates before inserting the 3 1/2″ screws into the studs, to prevent the wood from splitting. Make sure the corners are square and place the studs equally-spaced. Invest in high quality materials and work with attention.
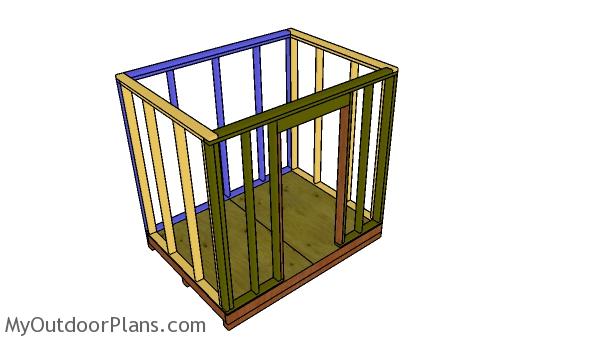
Assembling the shed walls
Next, you need to start the assembly with the front and back walls. Make sure the edges are flush and plumb them with a spirit level before securing them to the floor with galvanized screws. Drill pilot holes through the bottom plates and insert 3 1/2″ screws into the floor of the 8×6 shed. Use 2×4 temporarily braces, until you fit the side walls. Fit the side walls and then lock the adjacent walls together with screws.
Fitting the shed siding sheets
Side wall sheets
After assembling the frame of the storage shed, we recommend you to install the 5/8″ T1-11 siding to the sides of the structure. Align the sheets to the top of the wall frames, making sure the edges are perfectly flush. Leave no gaps between the components and insert 2″ finishing nails into the studs, every 8″.
8×6 Gable Shed Plans
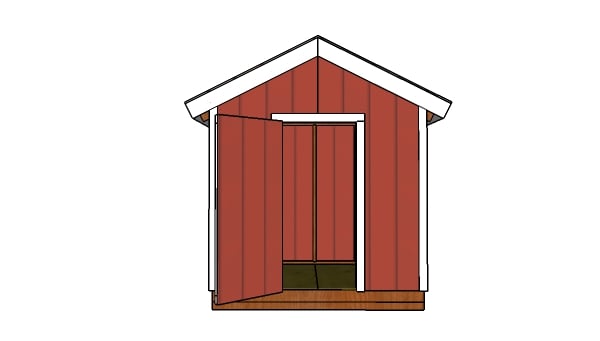
Make sure you check out PART 2 and PART 3 of the storage shed project, so you learn how to build the gable roof and the double front doors.
8×6 Gable Shed Plans
Last but not least, you should take care of the finishing touches. Therefore, fill the holes with wood putty and let the compound to dry out for several hours. Smooth the surface with medium-grit sandpaper along the wood grain. See a list with all my Premium Plans HERE.

8×6 Gable Shed – dimensions
Building an 8×6 gable shed will likely cost you between $1,000 and $2,000, depending on the materials and finishes you choose. The gable roof design adds a classic look and provides extra overhead space, making the shed both functional and visually appealing. This investment gives you a compact yet versatile storage solution that fits well in most backyards.

8×6 gable shed plans
The gable roof not only adds a touch of classic charm but also enhances the shed’s functionality by providing extra headroom and improved ventilation. This shed is more than just a storage space – it’s a well-crafted solution that combines style with utility, giving you a durable structure that will serve you well for years to come.
Top Tip: Apply several coats of stain or paint to enhance the look of the shed and to protect the components from decay. Check out the rest of the projects to see how to build the roof and the door. If you want to get this project as a PDF file, with 1 full Cut list and 1 full Shopping list, please check the GET PDF PLANS button bellow.

This project was about 8×6 shed plans. If you want to see more outdoor plans, we recommend you to check out the rest of the projects. LIKE us on Facebook to the the first that gets our latest projects and send us pictures with your woodworking projects.

3 comments
If I’m putting this shed on a concrete or asphalt foundation, do I still need the wooden floor frame?
No, But you need to anchor the wall plates into place properly.
I would like this design with the door on the short side. Do you have anything like that?