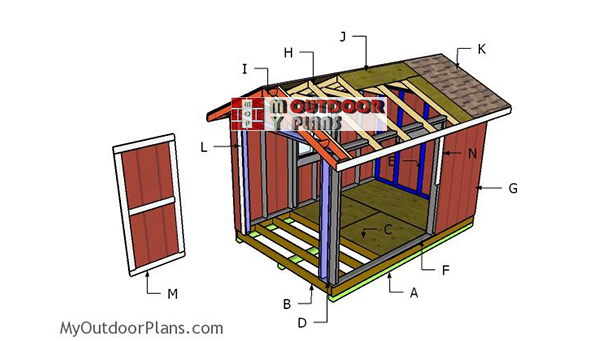
This step by step diy project is about 8×12 gable shed plans. This is PART 2 of the storage shed project, where I show you everything you want to know about framing the gable roof. Take a look over the rest of my woodworking plans, if you want to get more building inspiration. Remember that you need to select the site for the shed with attention and that you have to comply with a few legal regulations.
When buying the lumber, you should select the planks with great care, making sure they are straight and without any visible flaws (cracks, knots, twists, decay). Investing in cedar or other weather resistant lumber is a good idea, as it will pay off on the long run. Use a spirit level to plumb and align the components, before inserting the galvanized screws, otherwise the project won’t have a symmetrical look. If you have all the materials and tools required for the project, you could get the job done in about a day. See all my Premium Plans HERE.
Projects made from these plans
8×12 Shed Roof Plans
Building-a-8×12-gable-shed
[tabs tab1=”Materials” tab2=”Tools” tab3=”Time” tab4=”Related Plans”] [tab id=1]
- G – 4 pieces of 5/8″ T1-11 siding – 48″x26 1/4″ long SIDING
- H – 14 pieces of 2×4 lumber – 66″ long, 7 pieces – 40 3/4″ long, 2 pieces – 11 1/2 ” long, 2 pieces – 6″ long RAFTERS
- I – 8 pieces of 2×4 lumber – 66″ long, 20 pieces – 7″ long OVERHANGS
- J – 2 pieces of 3/4″ plywood – 48″x96″ long, 2 pieces – 48″x48″ long, 2 pieces – 16 1/4″x96 long, 2 pieces – 16 1/4″x48″ long, 4 pieces – 10 3/4″x64 1/4″ long ROOF
- K – 200 sq ft of tar paper, 200 sq ft of asphalt shingles ROOFING
- K – 2 pieces of 1×6 lumber – 165 1/4″ long TRIMS
- 22 pieces of 2×4 lumber – 6′
- 6 pieces of 2×4 lumber – 8′
- 5 pieces of 3/4″ plywood – 48″x96″
- 1 piece of T1-11 5/8″ siding – 4’x10′
- 200 sq ft of tar paper, 200 sq ft of asphalt shingles
- 2 pieces of 1×6 lumber – 14′
- 1 piece of 1/2″ plywood – 4’x8′
- 2 1/2″ screws, 3 1/2″ screws, 1 5/8″ screws
- 4d nails, 6d nails
- rafter ties
- wood filler , wood glue, stain/paint
- shed hinges
[/tab] [tab id=2]
![]() Hammer, Tape measure, Framing square, Level
Hammer, Tape measure, Framing square, Level
![]() Miter saw, Drill machinery, Screwdriver, Sander
Miter saw, Drill machinery, Screwdriver, Sander
[/tab] [tab id=3]
![]() One day
One day
[/tab][tab id=4]
- PART 1: 8×12 Shed Plans
- PART 2: 8×12 Shed Roof Plans
- PART 3: Double Shed Doors Plans
[/tab][/tabs]
Building a 8×12 shed roof
Building-the-rafters
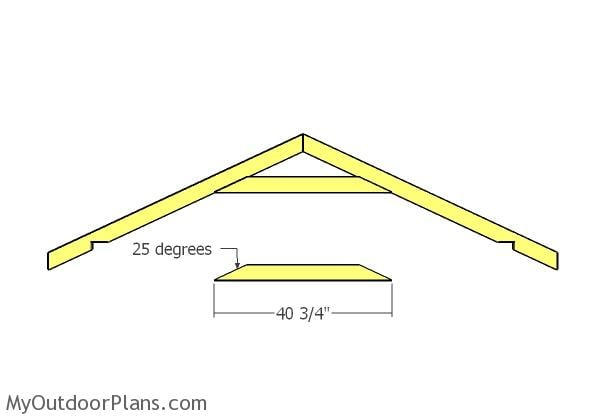
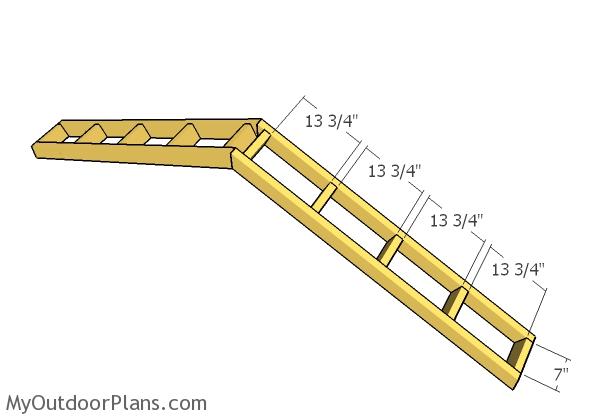
The first step of the woodworking project is to build the rafters for the shed. As you can easily notice in the diagram, you need to make 25 degree cuts to both ends of the slats and then cut the birdsmouth. Smooth the edges with sandpaper for a neat result.
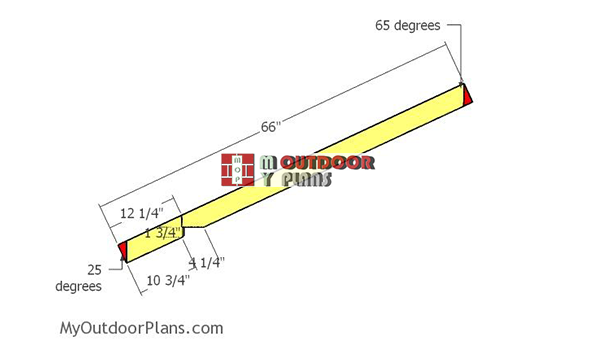
Bottom rafter
Build the bottom rafters from 2×4 lumber, as well. Make 65 degree cuts to both ends of the beams. Smooth the edges with sandpaper for a professional result. Lay all the rafters on a level surface and then leave no gaps between the components.
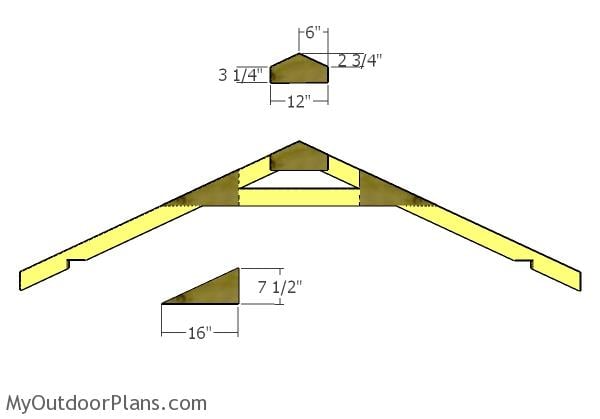
Fitting the gussets
Use 1/2″ plywood for the gussets and then lay them over the joints. Align the edges with attention, drill pilot holes through the gussets and insert 1 5/8″ screws into the rafters.
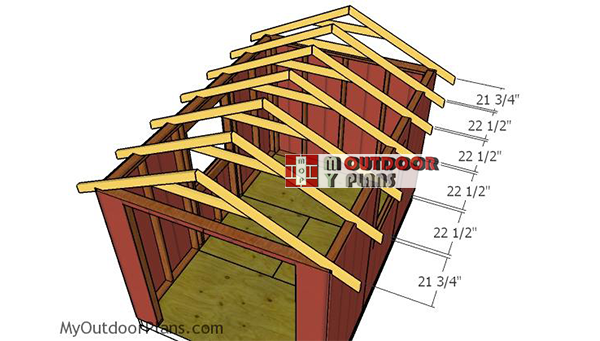
Fitting-the-trusses
Fit the trusses to the top of the shed, making sure you place them every 24″ on center. Use a spirit level to plumb the trusses and then lock them to the top plates with rafter ties.

Gable end supports
Fit a 2×4 support to the front and back gable ends of the shed. Drill pocket holes at both ends of the supports and then secure them into place with 2 1/2″ screws.
Assembling the overhangs
Assembling the overhangs for the shed is a straight forward project, as you need just 2×4 lumber. Drill pilot holes through the rafters and insert 2 1/2″ screws into the blockings. Place the blockings evenly spaced.

Fitting the overhangs
Fit the overhnags to the front and to the back of the shed. Align the edges with attention and drill pilot holes. Insert 3 1/2″ screws so you can secure the overhangs into place tightly.
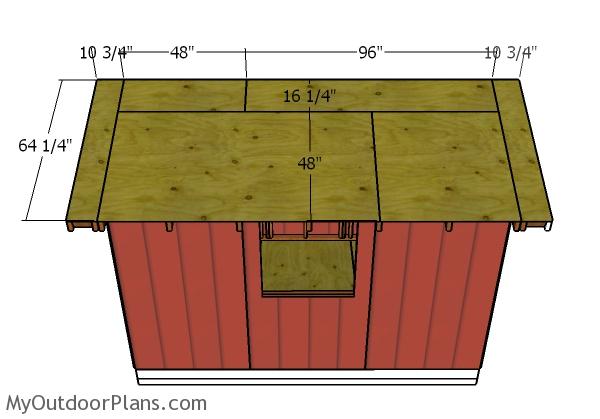
Fitting the roof sheets
Cut the 3/4″ plywood sheets for the roof of the 8×12 shed. Align the edges with attention, drill pilot holes and insert 1 5/8″ screws, so you can lock them into place tightly. Insert the screws, every 8″ along the rafters for a professional result. Leave no gaps between the sheets for a neat result.
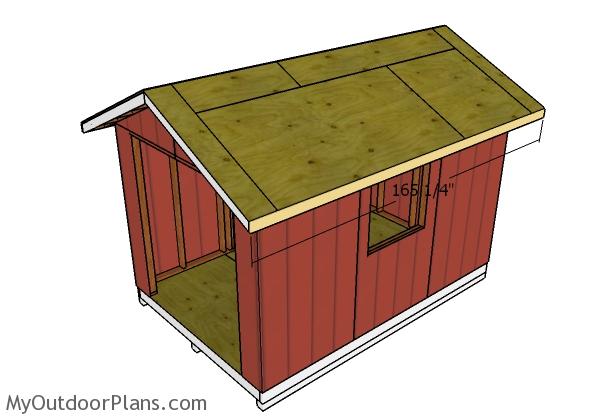
Side roof trims
Fit the 1×6 trims to the sides of the shed. Align the edges with attention and then lock them into place with 2″ brad nails.
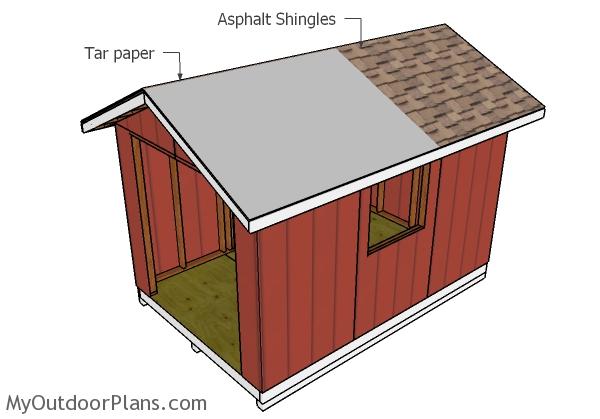
Fitting the roofing
Cover the roof of the shed with roofing felt, making sure the strips overlap at least 2″. Secure the tar paper to the plywood sheets with roofing staples. In addition, cut a large piece for the top ridge.
Fit the side drip edges over the roofing felt, while the bottom drip edges should be fit under. Read the instructions labeled on the asphalt shingle packs before installing them into place tightly. Start with the bottom left side of the roof and install them all the way to the top.

8×12 Shed Plans – Side view
You need to check out PART 3 of the shed, so you learn how to build the double doors and how to fit the rest of the trims. If you have’t looked over PART 1 yet, I recommend you to do it, as it will show everything you want to know about building the frame of the shed.
This woodworking project was about 8×12 garden shed plans free. If you want to see more outdoor plans, check out the rest of our step by step projects and follow the instructions to obtain a professional result.
 |
 |
34 comments
Nice plans for a 8X12 shed. I might do this one.
What’s wrong with using nails? (Galvanized for the foundation part)
There’s nothing wrong with nails, it’s just that most people don’t have a framing nail gun, but they have a drill.
what are the 2×6 trim it doesnt list that in the supllies im about to hang the trusses in and didnt plan for that when buying materials
The side trims for the roof are made from 1×6 not 2×6 lumber. The trims are not structural, they just make the roof look nicer by covering the end of the rafters.
also thanks this is my first shed and its coming out sick although ive spent about 1600 dollars so far on materials
What is the 1 piece of T1-11 5/8″ siding – 4’x10′ for and you don’t list 1/2″ plywood in the material list.
The sheet is for the gable end panels.
What is the pitch of this roof? I appreciate that you have the angles pre-figured and overall length of the rafters, but I’m trying to figure out what it will look like compared to the sketches. My rough math has it like an 8/12 which seems awfully steep for this type of shed.
It’s between 5/12 and 6/12.
How many total ties?
14 rafter ties
what is the overall height of the shed? I don’t need a permit for a shed that is less than 100 square feet and below 10 feet high.
It is just under 10′
Should the rafters be placed over the vertical wall studs or “every 24 inches” per the text instructions?
Yes, every 24″ On Center.
Just found this site searching for roof pitch info, love this site- very helpful. Recommended, 100%
Should I put plywood gussets on both sides of the truss also could I use metal ties instead of plywood
Yes, you can use metal plates. I used plywood for costs. Much cheaper to use plywood.
I cant find a step for installing The Gable end siding. I asume they should be installed after the end supports and before the overhangs?
Yes, that’s correct.
Are the rafters calculated for a 4′ 3/4″ run to go over the siding or to 4′? Using a rafter calculator I seem to be getting a run of exactly 4′ to the outer wall which suggests the siding on the walls needs to be installed below the top plate. The plans show 83″ for wall siding height which would cover the top plate. Not sure if I am reading your plans correctly.
The rafters are cut in such way to go over the siding sheets. Install the sheets first and then attach the trusses.
Can this style of trusses handle about 3-5 feet of snow?
5 ft of snow? That’s a lot 🙂 You need to place the trusses every 16″ on center first of all. Then I would change the slope of the roof and make it steeper. There is no problem with the truss shape per se, if you use strong tie plates for the joints and rafter ties.
I must be blind because I was looking for your downloadable 8×12 lean to shed plans on PDF and they are nowhere to be seen – what gives? Am I looking in the wrong place?
Please read the FAQs: https://myoutdoorplans.com/faq/
I have enjoyed your plans for the 8×12 shed (https://myoutdoorplans.com/shed/8×12-shed-roof-plans/) and am in process of building it now. I thought I would let you know that one thing you forgot to mention is how to install the gables — also no measurements are provided for those. Also not clear what this piece is for (also why 10’ tall?): 1 piece of T1-11 5/8″ siding – 4’x10′
Thanks for some nice plans!
Rob
I am loving these plans! Working on the shed right now, using a different base but your frame and roof.
What are the 2- 6″ 2x4s for in the rafters?
The pieces on the front and back trusses, vertical, in the continuation of the 11 1/2″ ones. They are not shown in the diagram.
Thank you!
Thought I saw a web page on this site with pictures of a rafter jig to assist with assembly. If yes- would you please provide the link. Many Thanks! PT
I was wondering what size of screw you recommend for securing the trusses for the roof to the top plate with ties. 1 5/8” and anything longer will poke through the back side of the truss. Thanks for any advice here.
1 1/2 structural screws, you have the link in the shopping list
Is there any instructions on adding flashing to keep water from entering at the bottom?