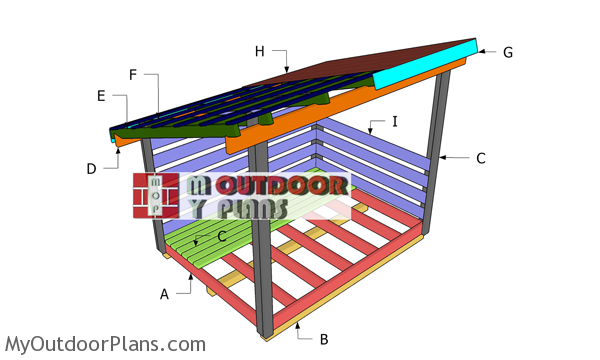
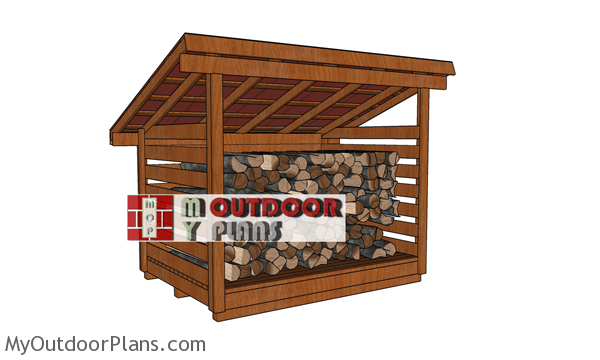
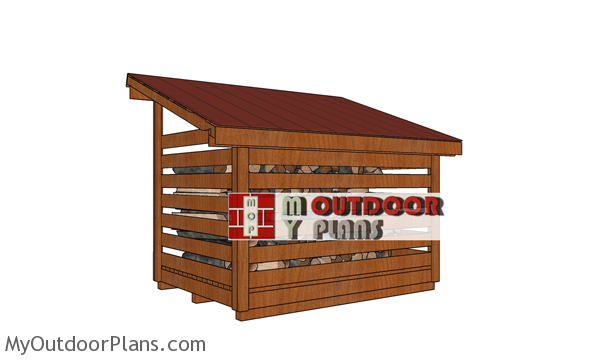
This step by step diy project is about 2 cord firewood shed plans. This is a 6×8 wood storage shed that you can build with common materials. This storage shed features a lean to roof and it is enclosed on all 3 sides, except for the front, so you can have an easy access in and out. You can build this shed under 750 usd. See the rest of my firewood shed free plans HERE. Take a look over the rest of my woodworking plans, if you want to get more building inspiration. Premium Plans for this project available in the Shop.
When buying the lumber, you should select the planks with great care, making sure they are straight and without any visible flaws (cracks, knots, twists, decay). Investing in cedar or other weather resistant lumber is a good idea, as it will pay off on the long run. Use a spirit level to plumb and align the components, before inserting the galvanized screws, otherwise the project won’t have a symmetrical look. If you have all the materials and tools required for the project, you could get the job done in about a day.
Projects made from these plans
2 cord Firewood Shed Plans
Building-a-2-cord-firewood-shed
Cut List
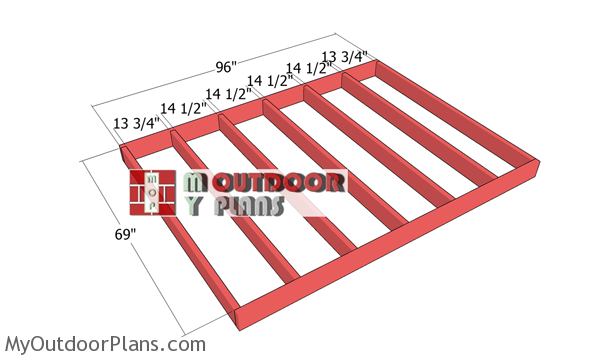
- A – 2 pieces of 2×6 lumber – 96″ long, 7 pieces – 69″ long FLOOR FRAME
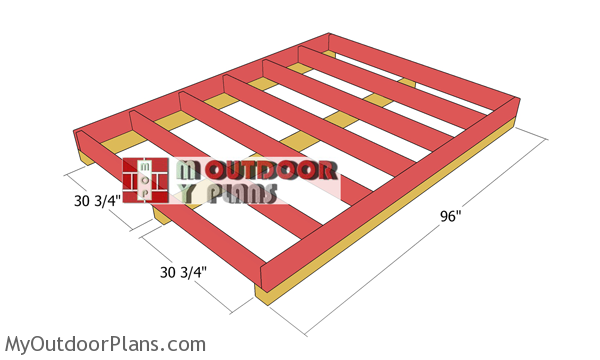
- B – 3 pieces of 4×4 lumber – 96″ long SKIDS
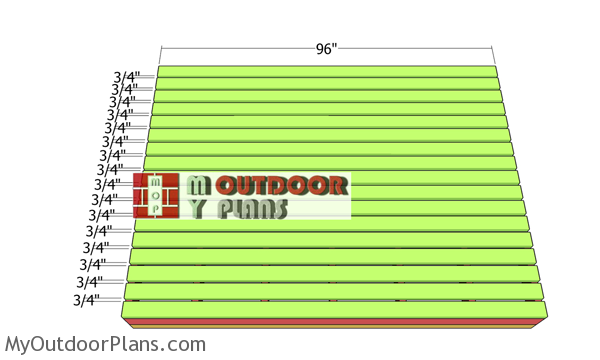
- C – 17 pieces of 2×4 lumber – 96″ long DECKING
- C – 2 pieces of 2×4 lumber – 86 3/4″ long, 2 pieces – 78 1/2″ long, 2 pieces – 61 3/4″ long, 2 pieces – 54 1/2″ long POSTS
- D – 2 pieces of 2×6 lumber – 120″ long SUPPORT BEAMS
Shopping List
- UNLOCK FULL SHOPPING LIST
- construction glue
- 2 1/2″ screws, 3 1/2″ screws, 1 5/8″ screws
- rafter ties
- 1 1/2″ structural screw
- wood filler , wood glue, stain/paint
Tools
![]() Hammer, Tape measure, Framing square, Level
Hammer, Tape measure, Framing square, Level
![]() Miter saw, Drill machinery, Screwdriver, Sander
Miter saw, Drill machinery, Screwdriver, Sander
Time
![]() One weekend
One weekend
Related
It’s that easy to build a 2 cord wood shed!
How to build a 6×8 wood shed
Assembling-the-shed-floor
First, you need to build the floor frame. Drill pilot holes through the 8 ft joists and insert 3 1/2″ screws into the perpendicular components. Align the edges flush and check if the corners are square. Place the joists every 16″ on center.
Fitting-the-skids—wood-shed
Use 4×4 lumber for the skids. It would be a great idea to use pressure treated lumber. Fit the skids under the floor frame, drill pilot holes and insert 3 1/2″ screws to lock them together tightly. Alternatively, you can use rafter ties and 1 1/2″ structural screws to lock them together tightly. Use 2 rafters for each skid.
Fitting-the-deck-boards—wood-shed
Fit the 2×4 boards to the floor frame. Set 1 5/8″ spacers between the boards to create even gaps. Drill pilot holes through the boards and insert 2 1/2″ screws to secure them into place tightly.
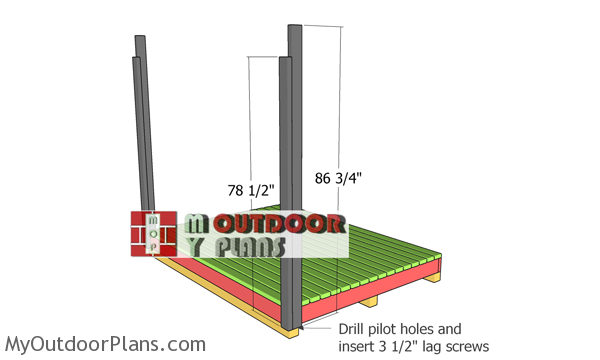
Fitting-the-posts-to-the-shed-floor
Use 2×4 lumber for the posts. Cut the posts at the right dimensions and attach them to the corners of the floor frame, as shown in the diagram. Use a spirit level to plumb the posts. Drill pilot holes and insert 3″ lag screws to lock them to the floor frame.
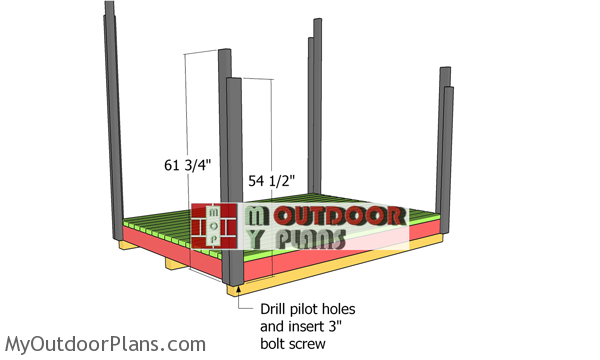
Fitting-the-posts-to-the-floor-frame
Fit the 2×4 posts to the back of the floor frame. Plumb the posts with a spirit level, drill pilot holes and insert 3″ lag screws.
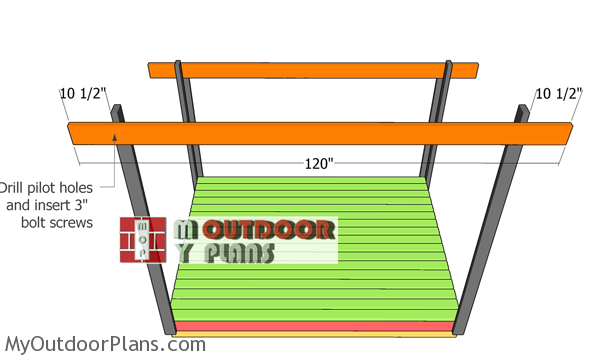
Fitting-the-support-beams
Use 2×6 lumber for the support beams. Fit the beams to the front and to the back of the shed, leaving 10 1/2″ overhangs on both sides. Drill pilot holes and insert 3″ lag screws into the posts. Use a spirit level to make sure the beams are perfectly horizontal.
How-to-build-a-6×8-firewood-shed
2-cord-firewood-shed—back-view
This is a medium sized firewood storage shed, therefore it might be the optimal choice between construction costs and utility. If you like the basic design and the beautiful appearance, this shed will become a statement in your backyard. I have many design ideas on this blog, so make sure you take a look over all the alternatives before taking a decision. Premium Plans are available in the SHOP.
If you want to get PREMIUM PLANS for this project, in a PDF format, please press GET PDF PLANS button bellow. Thank you for the support.

This woodworking project was about 2 cord firewood shed plans. If you want to see more outdoor plans, check out the rest of our step by step projects and follow the instructions to obtain a professional result.

4 comments
Hello I purchased plans for this 6×8 firewood shed. In the material listing it only states the length of lag bolts but not the size? Same for the screws. Can you provide this info please
Doesn’t matter. Anything you find will work
Hi, I purchased this plan for the 6×8 firewood shed. I have a question about the rafters, at one side the plan shows you have to make a 1 1/2″ x 1/2″ birdsmouth cut so that it rests properly on the support beam but at the other side the plan shows you have to make 7″ x 2 1/4″ birdsmouth cut although you have a same sized support beam there to rest on. Why is there a difference between the two cuts? Doesn’t the large 7″ x 2 1/4 cut make the rafter very thin at that place and therefore weaker?
Hi. It’s not weaker. It’s just the way I designed it. It has no impact on the rigidity of the roof. The roof it’s as sturdy as it can be.