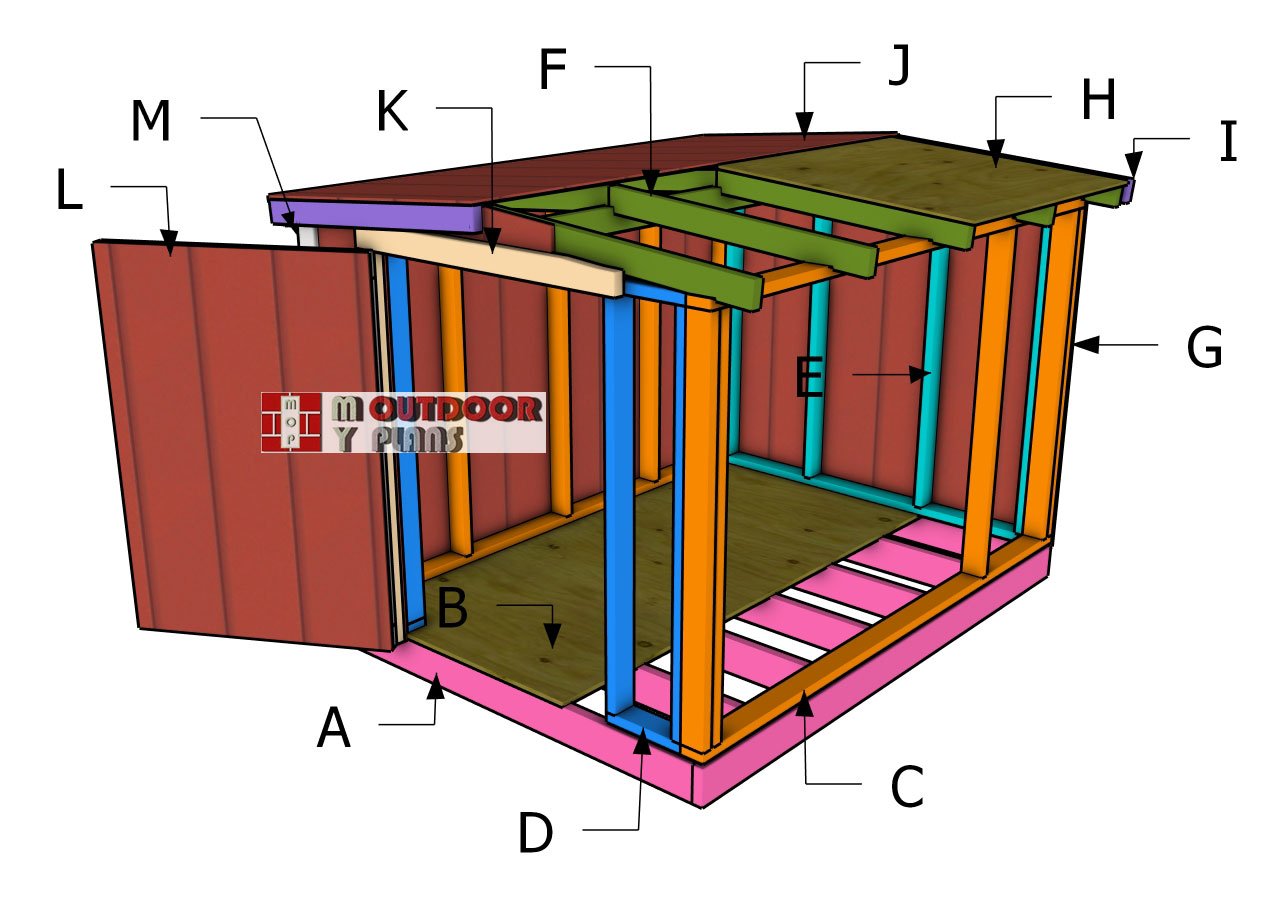
With the shed frame complete, it’s time to move on to the final steps that will bring everything together. In this part of the project, we’ll focus on building the roof and installing the front door, ensuring the shed is fully enclosed and weatherproof. The low six-foot height makes the roof installation straightforward, while the gable design provides durability and proper water runoff.
The metal roof will offer long-lasting protection, and the door will secure your storage space while allowing easy access. I’ll walk you through cutting and installing the rafters, attaching the roofing panels, and finishing the door for a professional and functional result. Let’s get started on the final steps of this build.
When buying the lumber, you should select the planks with great care, making sure they are straight and without any visible flaws (cracks, knots, twists, decay). Investing in cedar or other weather resistant lumber is a good idea, as it will pay off on the long run. Use a spirit level to plumb and align the components, before inserting the galvanized screws, otherwise the project won’t have a symmetrical look. If you have all the materials and tools required for the project, you could get the job done in about a day.
Projects made from these plans
6×8 Gable Shed Roof Plans
Building-a-6×8-short-shed
Cut and Shopping Lists
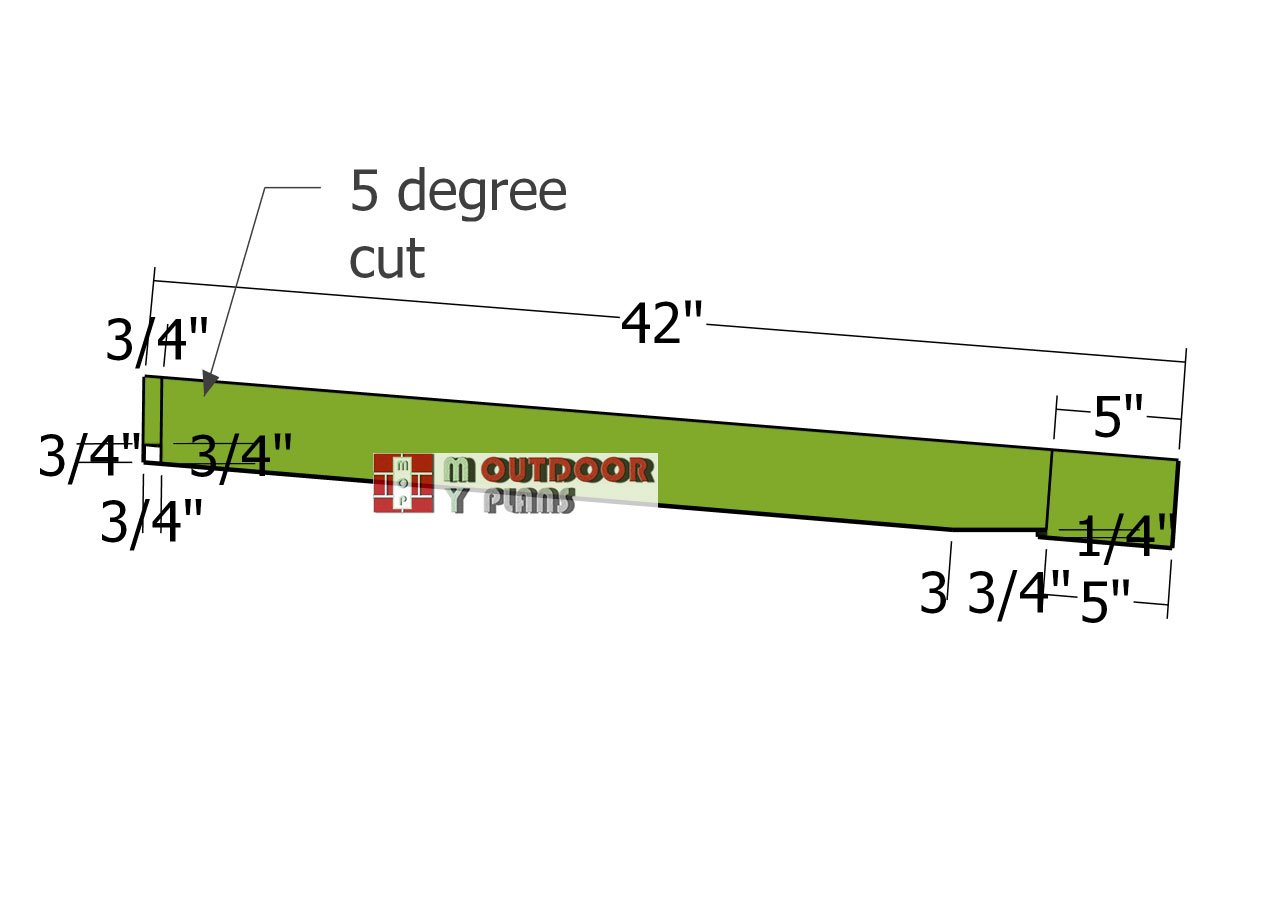
- F – 10 pieces of 2×4 lumber – 42″ RAFTERS
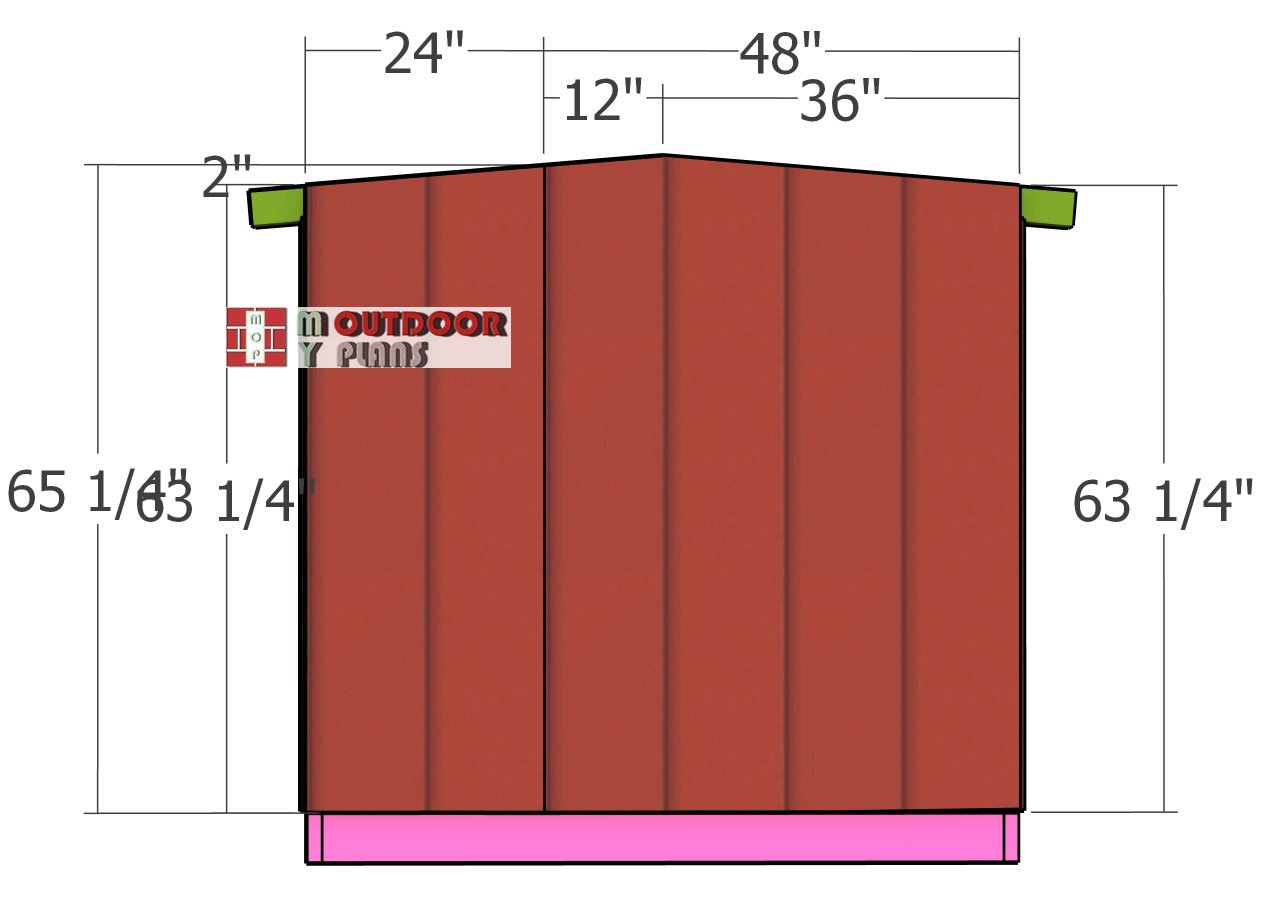
- G – 2 pieces of 5/8″ T1-11 siding – 48″x65 1/4″, 1 piece – 24″x63 1/4″ SIDING
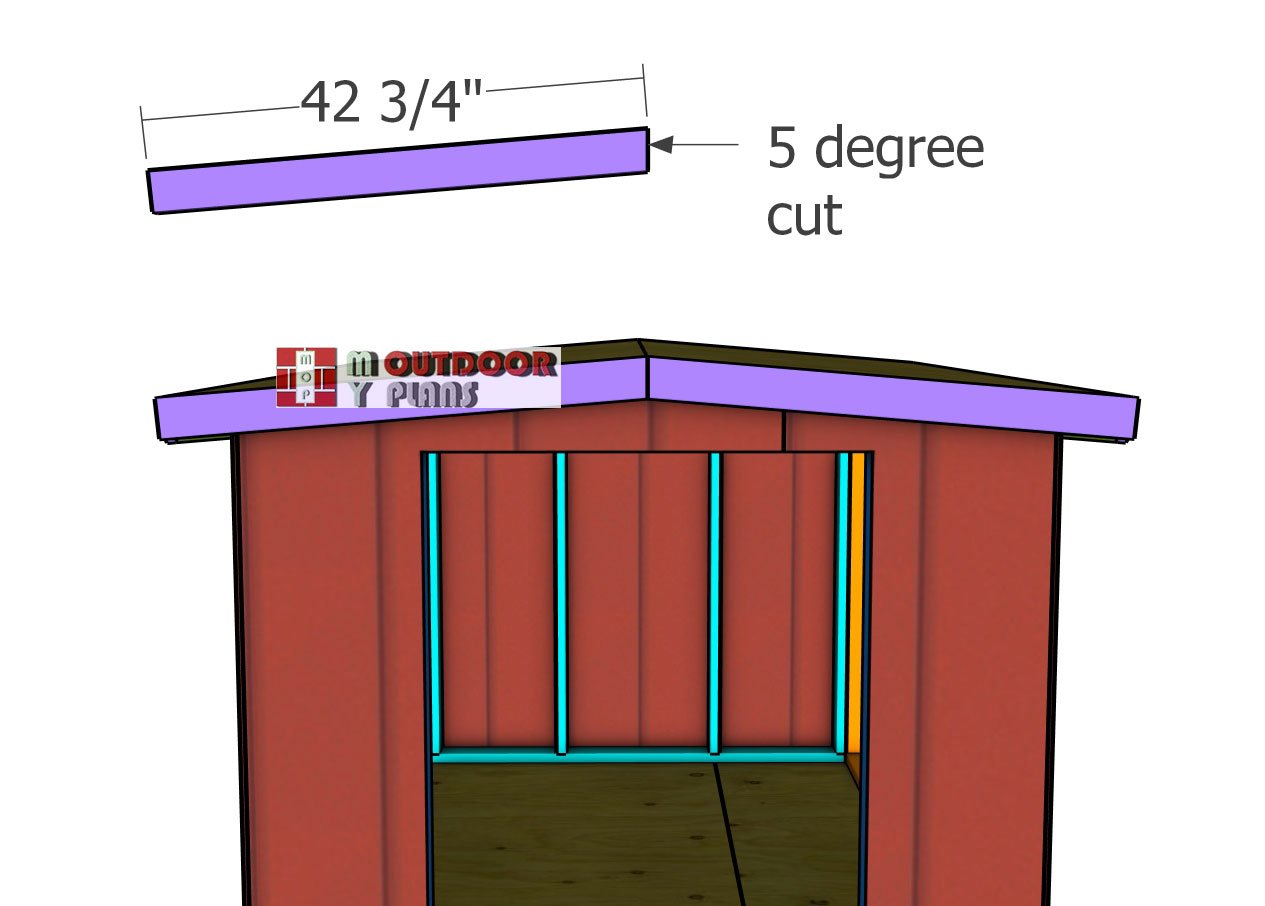
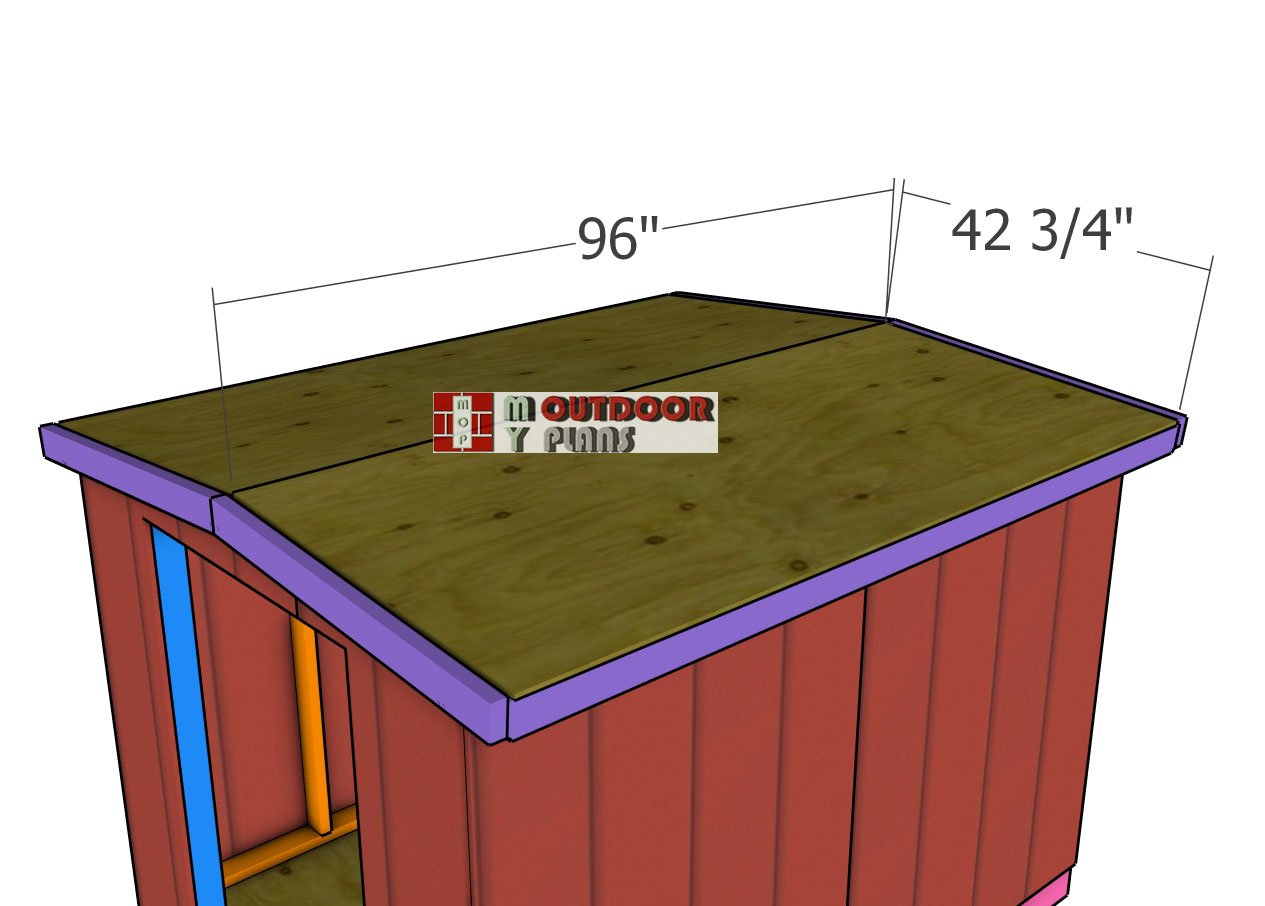
- H – 2 pieces of 1/2″ plywood – 42 3/4″x96″ ROOF SHEETS
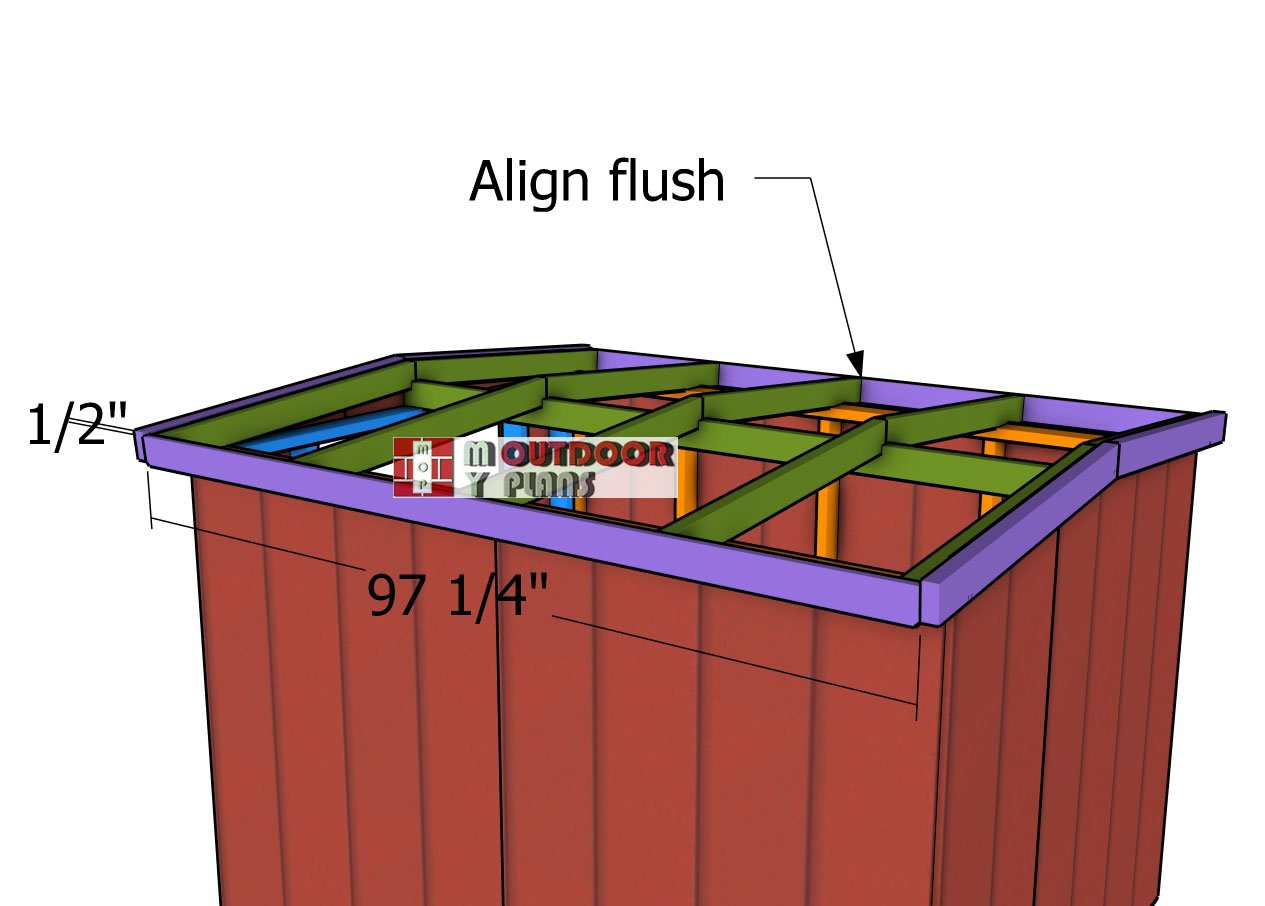
- I – 4 pieces of 2×4 lumber – 42 3/4″, 2 pieces of 1×4 lumber – 97 1/4″ ROOF TRIMS
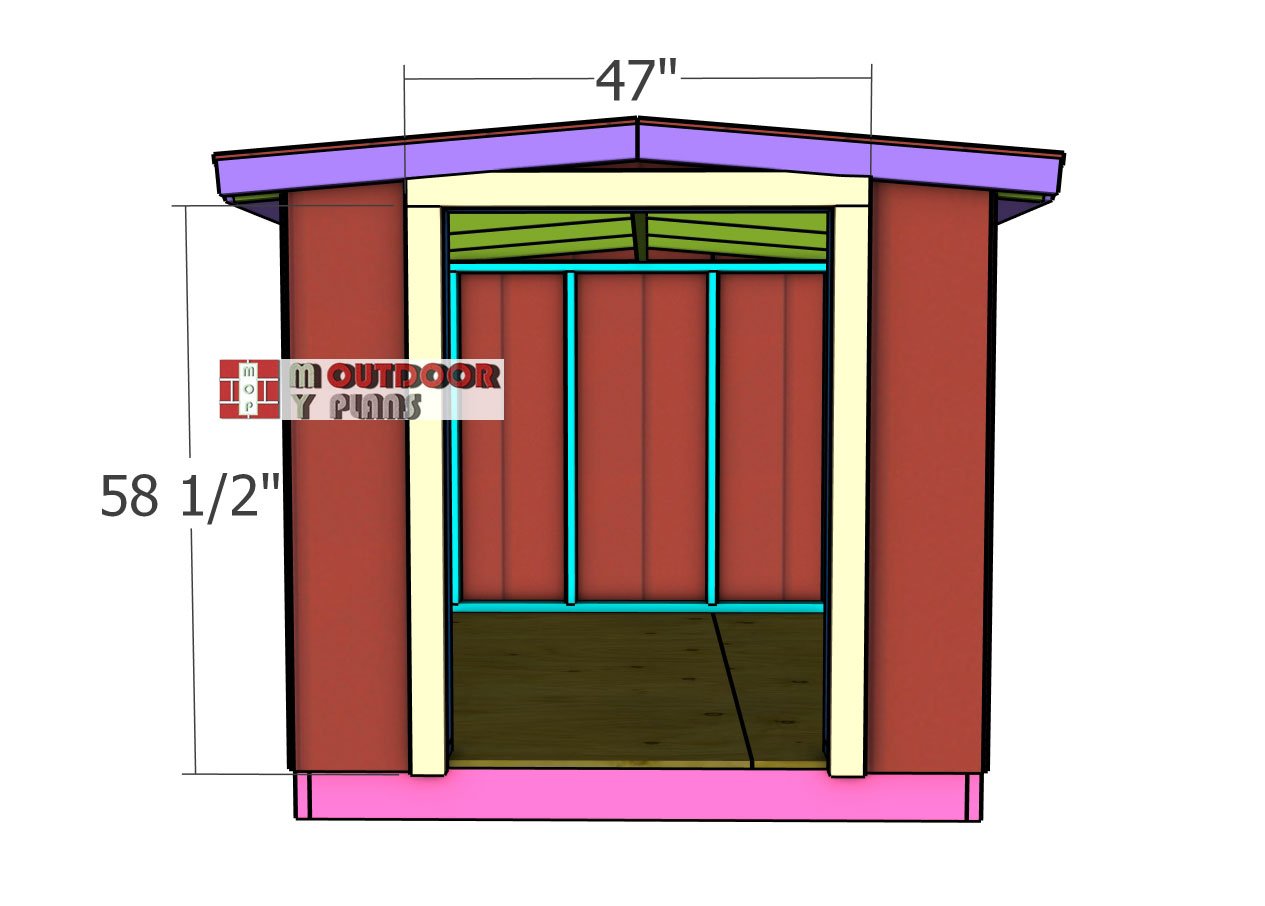
- K – 2 pieces of 2×4 lumber – 58 1/2″, 1 piece – 47″ DOOR JAMB
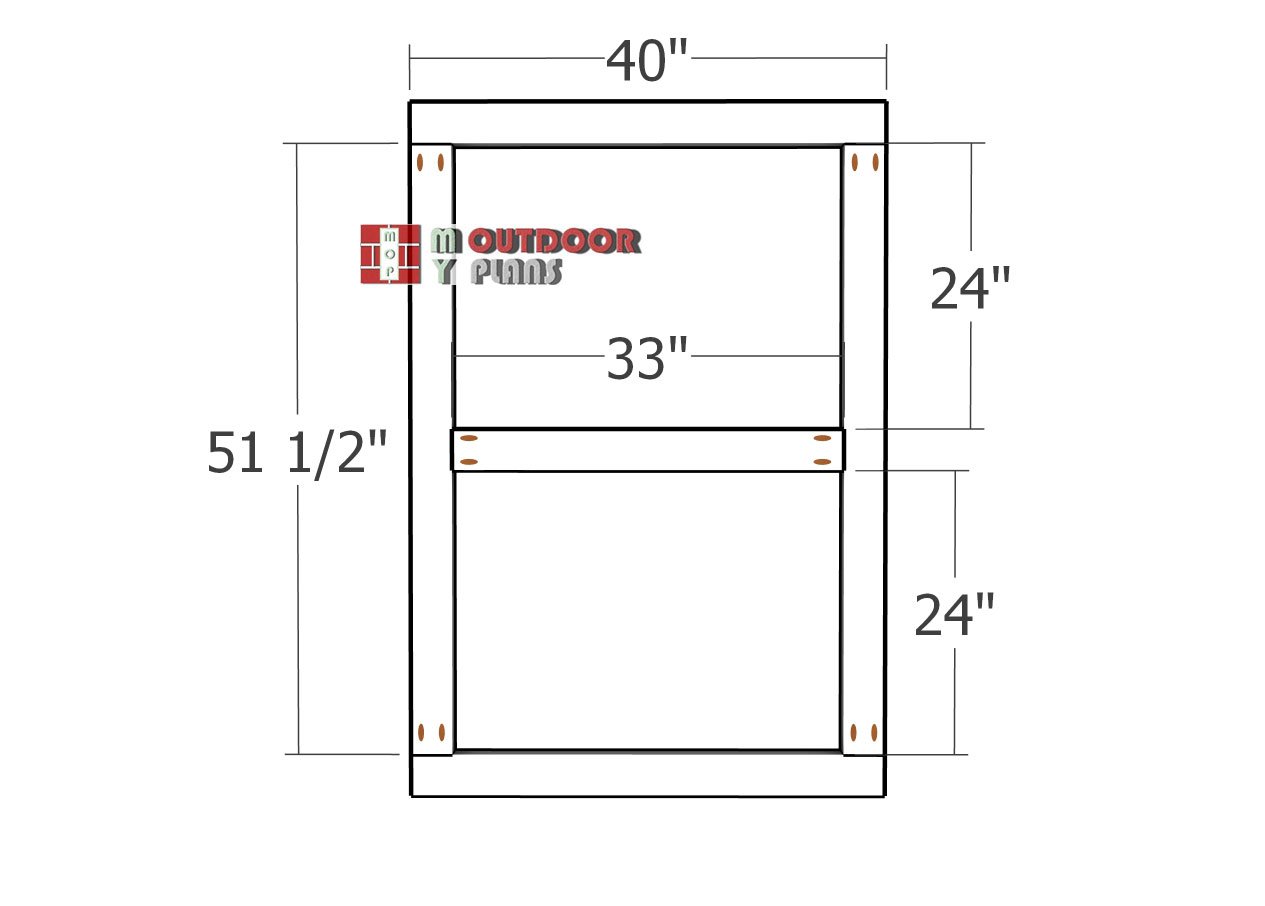
- L – 2 pieces of 2×4 lumber – 40″, 2 pieces – 51 1/2″, 1 piece – 33″, 1 piece – 40″x58 1/2″ DOOR
Tools
![]() Hammer, Tape measure, Framing square, Level
Hammer, Tape measure, Framing square, Level
![]() Miter saw, Drill machinery, Screwdriver, Sander
Miter saw, Drill machinery, Screwdriver, Sander
![]() Safety Gloves, Safety Glasses
Safety Gloves, Safety Glasses
Time
![]() One week
One week
Related
- PART 1: 6×8 Short Shed Plans
- PART 2: 6×8 Short Shed Gable Roof + Door Plans
Step 3: Building the gable roof
Rafters
Cut the gable roof rafters from 2×4 lumber, following the measurements in the diagram. Mark the cut lines carefully to ensure accuracy, paying special attention to the birdsmouth cuts, which will allow the rafters to sit securely on the top plates.
Use a circular saw to make the cuts, stopping just short of the final depth to avoid overcutting. Complete the birdsmouth cuts with a handsaw or chisel for a precise fit. Take your time to ensure consistency, as properly cut rafters will make roof assembly much smoother and more secure.
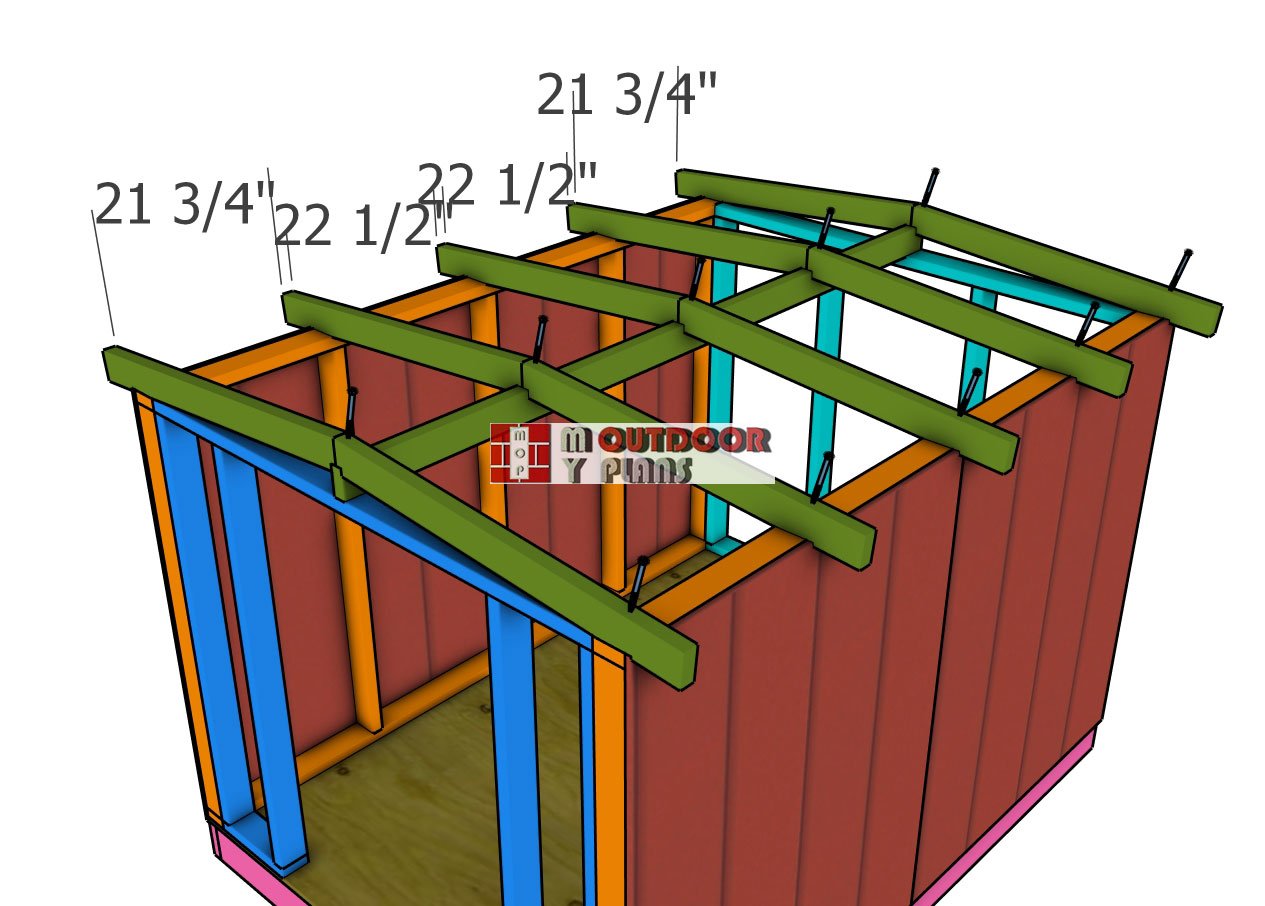
Attaching-the-rafters
Position the rafters on top of the shed, spacing them 24 inches on center for proper support. Align each rafter with the ridge beam and the top plates of the side walls, ensuring a snug fit at the birdsmouth cuts.
Drill pilot holes through the rafters to prevent splitting, then secure them in place using 4 1/2-inch screws. Drive the screws through the rafters into the ridge beam at the peak and into the top plates of the side walls for a strong, stable connection. Double-check alignment as you go to maintain an even roof structure before moving on to the next step.
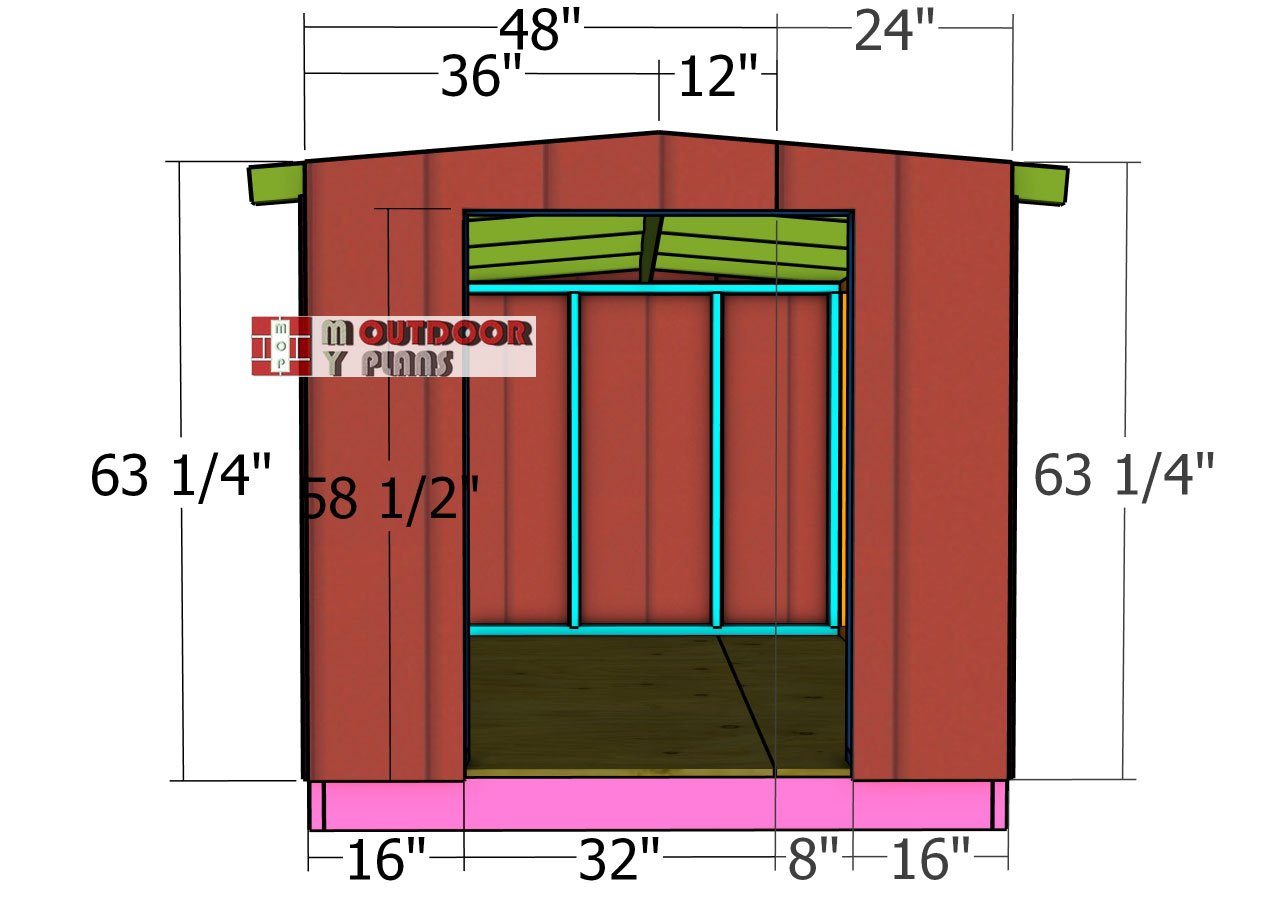
Front-wall-panels
Install the siding panels on the front of the shed, aligning the edges flush with the side walls for a seamless fit. Secure the panels to the framing with 6-8d nails, spacing them every 8 inches along the studs and edges to ensure a strong hold.
Once the siding is in place, mark the door opening clearly. Use a circular saw to cut along the lines, freeing the door area while keeping the cuts clean and precise. Take care not to cut into the framing, and finish any tight corners with a handsaw if needed. This step completes the front enclosure while keeping the door opening ready for installation.
Back-panels
Install the siding sheets on the back of the shed, making sure the edges align with the side walls for a uniform look. Secure the panels to the framing using 6-8d nails, spacing them every 8 inches along the studs and edges for a solid hold.
Double-check that the sheets sit flush against the structure before fastening them completely. If needed, trim the panels to fit properly, ensuring a clean and professional finish. Once secured, the back wall will add strength to the shed while providing full enclosure and protection from the elements.
Gable-trims
Cut the front and back roof trims from 2×4 boards, making precise 5-degree cuts at both ends to match the roof slope.
Drill pilot holes to prevent splitting, then secure the trims with 3 1/2-inch screws, spacing them every 8 inches along the framing. Double-check alignment as you work to maintain a straight and professional finish. These trims not only enhance the shed’s appearance but also help protect the roof edges from moisture and wear over time.
Side-roof-trims
Install the 1×4 trims along the sides of the shed, aligning them flush with the top of the rafters for a clean and even finish. Secure the trims using 2-inch finish nails, spacing them properly to ensure a firm hold.
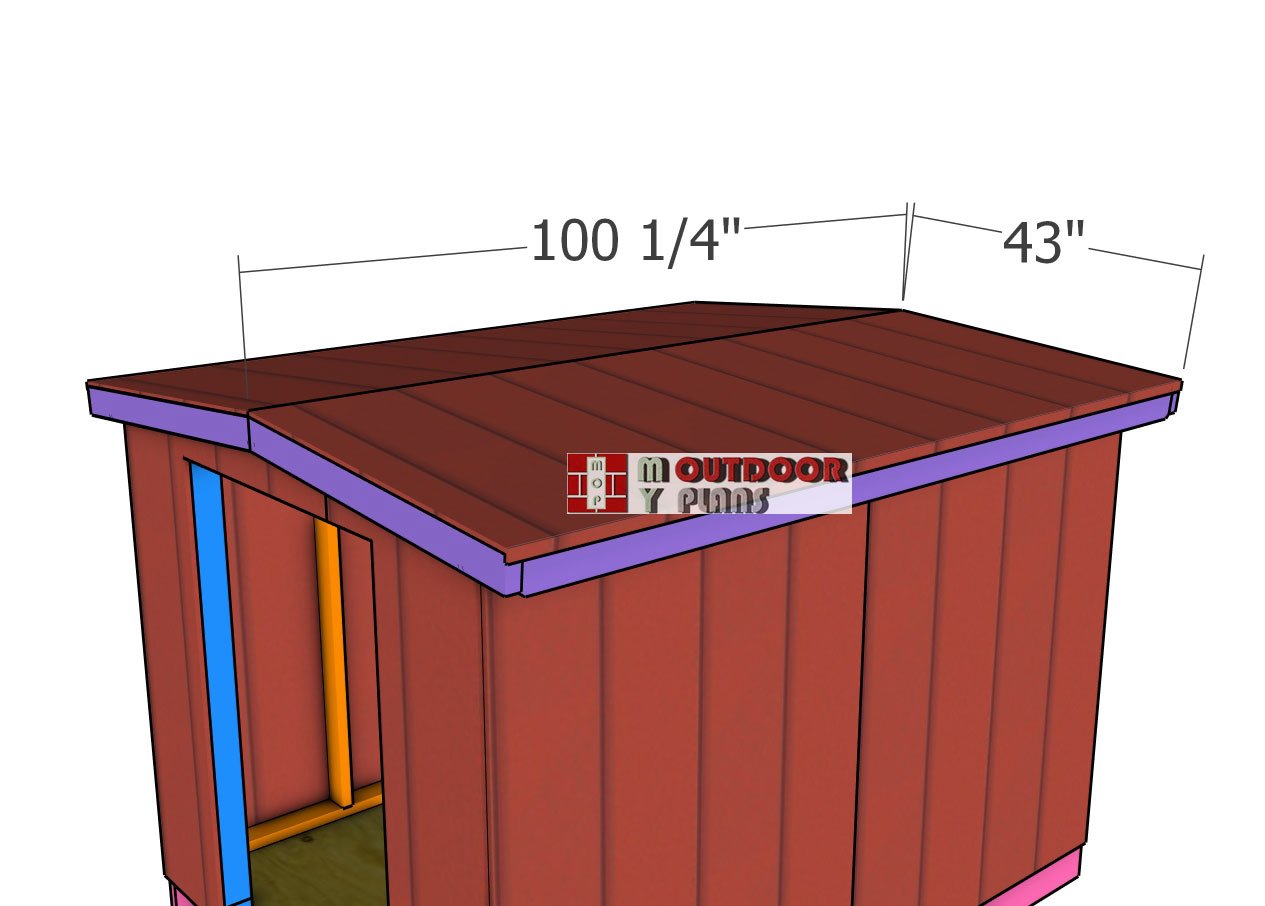
When installing the front and back roof trims, position them 1/2 inch higher than the side trims. This small elevation will allow the 1/2-inch plywood roof panels to fit neatly underneath, creating a seamless transition between the roof and trim. Double-check alignment as you fasten everything in place to ensure a professional and weather-resistant finish.
Fitting-the-roof-sheets
Cut the roof panels from 1/2-inch plywood according to the measurements in the diagram. Position the panels on top of the rafters, ensuring they fit snugly and align properly along the edges.
Secure the panels to the rafters using 1 5/8-inch screws, driving them in every 8 inches along the framing. Make sure the panels sit flush and do not overhang excessively beyond the roof structure. Double-check that the seams between panels are tight and properly supported by the rafters to create a strong and stable roof deck for the next steps of the build.
Fitting-the-roof-sheet
Before installing the panels, place a layer of roofing underlayment or synthetic felt over the sheathing to provide an extra barrier against moisture.
With the roof deck prepared, begin installing the metal roofing sheets from one side of the shed, making sure they overhang the edges by at least one inch for water runoff. Place the first panel square to the roofline, securing it to the purlins with roofing screws that have rubber washers to prevent leaks. Drive the screws into the raised ridges of the metal sheet to allow water to flow freely in the valleys. Overlap the next panel according to the manufacturer’s guidelines, typically by one or two corrugations, and continue fastening each panel securely along the roof frame.
To complete the installation, attach metal ridge caps along the peak of the gable roof, overlapping the panels to create a watertight seal. Use foam closure strips underneath the ridge cap to block out wind-driven rain and pests. Seal any exposed edges with roofing sealant to prevent leaks and improve durability. Finally, install drip edges along the eaves to direct water away from the walls of the shed, protecting the structure from moisture damage. With the metal roof in place, your shed will have a durable and weather-resistant covering that requires minimal maintenance for years to come.
Step 4: Building the shed door
Attaching-the-door-jambs
Cut the door jambs from 2×4 lumber to fit snugly around the front door opening. Position the boards along the sides and top of the opening, making sure they are flush with the framing for a clean and sturdy fit.
Drill pilot holes to prevent splitting, then secure the jambs with 3 1/2-inch screws, spacing them every 8 inches along the framing. Ensure the jambs are plumb and square, as this will help the door open and close smoothly. This step reinforces the door opening and provides a solid surface for attaching the door hinges later on.
Door-frame
Build the door frame with precision for a strong and reliable structure. Cut the 2×4 lumber to size according to the shed’s door opening dimensions. Drill pocket holes at both ends of the vertical and horizontal pieces to create secure joints that will hold up over time.
Lay the pieces on a flat surface, making sure the corners are perfectly square before assembly. Fasten the frame together by driving 2 1/2-inch screws into the pocket holes, ensuring a tight fit. This method reinforces the door frame, making it sturdy enough to handle frequent use while providing solid support for the shed door.
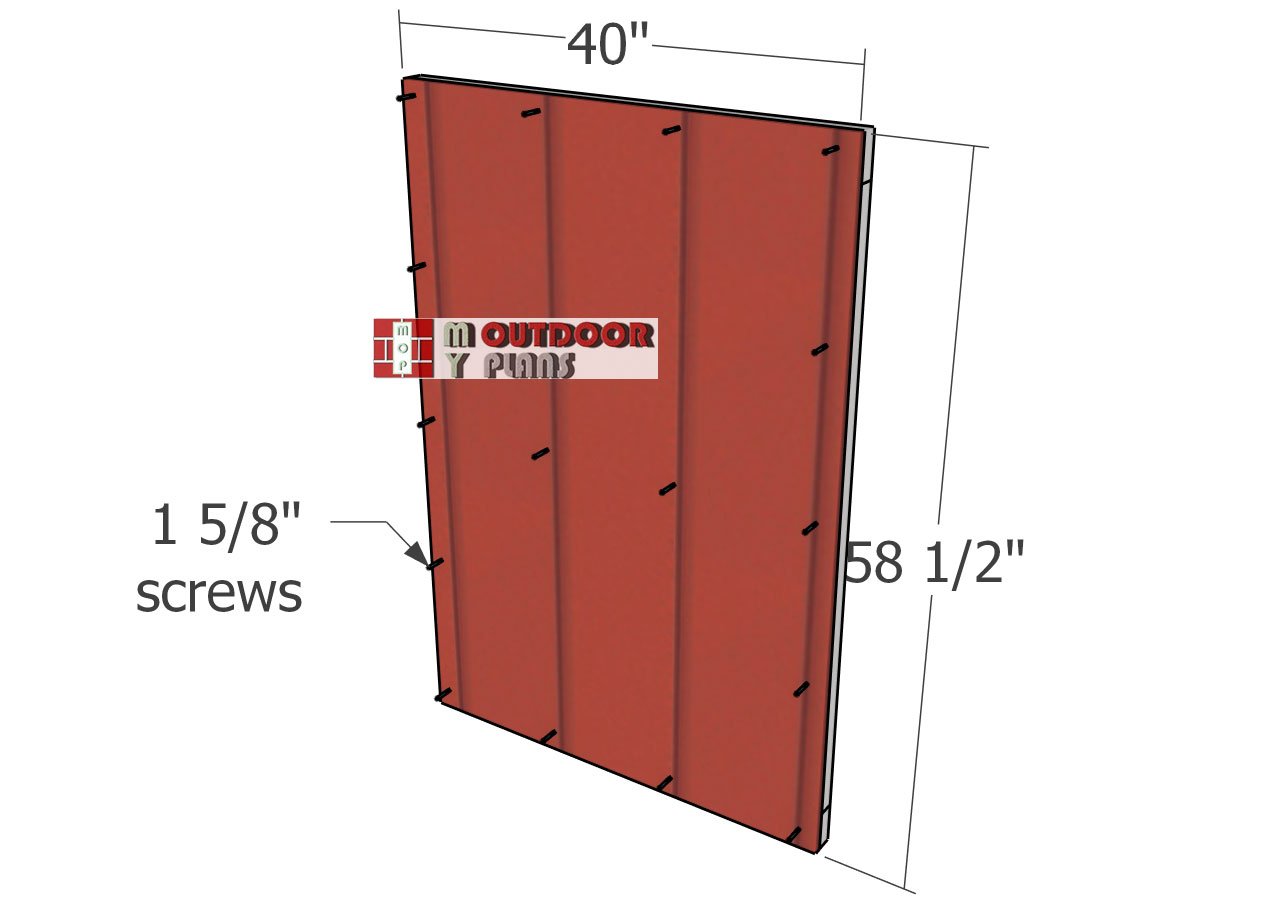
Attaching-the-door-panel
Position the door panel over the door frame, ensuring it aligns properly with all edges for a clean and balanced look. Hold the panel securely in place, then drill pilot holes to prevent splitting.
Secure the panel to the door frame using 1 5/8-inch screws, spacing them every 8 inches along the framing. Double-check that the panel sits flush with the frame and that there are no gaps or misalignments. This step ensures a strong, durable door that will function smoothly once installed on the shed.
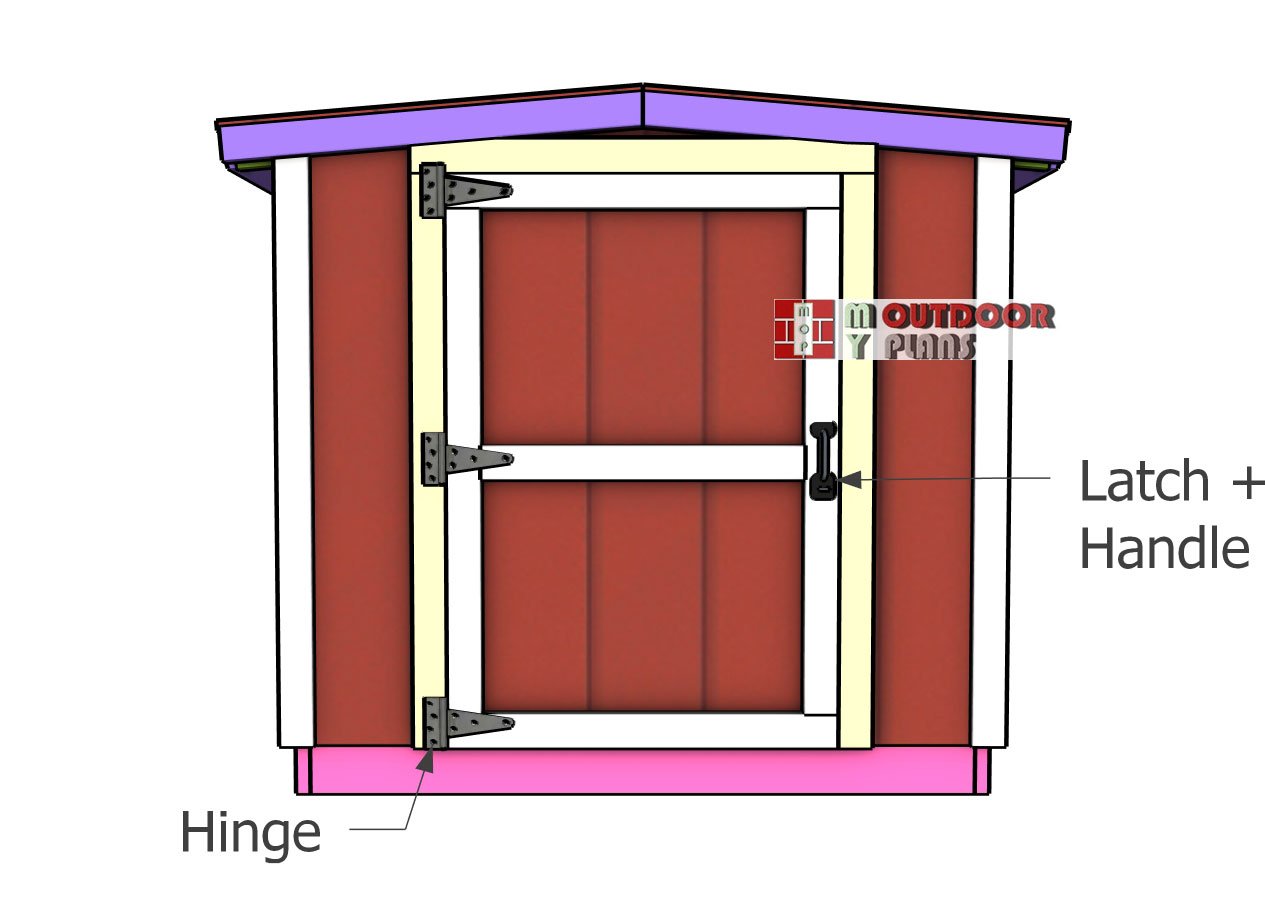
Fitting-the-door
Install the door by fitting it into the opening, ensuring it aligns evenly with the door jambs for a precise and professional fit. Use shims if necessary to create an even gap around the edges, allowing the door to swing smoothly without obstruction.
Attach the door to the jambs using heavy-duty hinges, spacing them evenly along the side for proper support. Secure each hinge with screws, making sure they are driven firmly into the framing. Finally, install a sturdy latch to keep the door closed and your belongings secure. With the door in place, your shed is fully functional and ready for use.
Step 5: Finishing touches
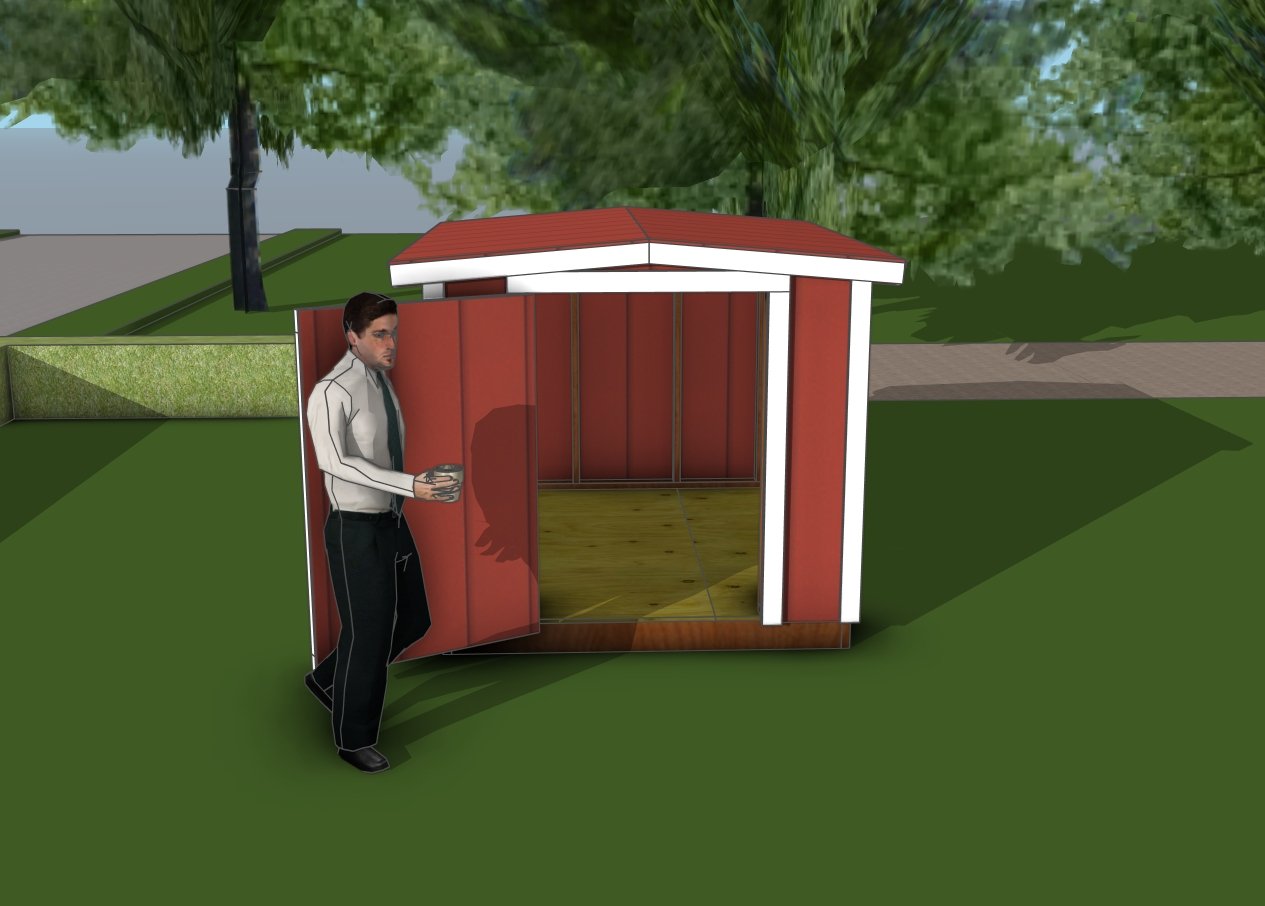
6×8 short shed – front view
To complete the shed, apply a weather-resistant stain or exterior paint to protect the wood from moisture, UV exposure, and general wear. Sealing the surfaces will not only enhance durability but also improve the shed’s appearance, allowing it to blend seamlessly with your backyard. If you used pressure-treated lumber, let it dry for a few weeks before painting or staining for the best results. Additionally, consider adding trim around the door and corners for a clean, polished look.
For added functionality, install a handle or lock on the door to secure your belongings. If you plan to use the shed in low-light conditions, consider mounting solar-powered lights near the entrance for visibility at night. You can also place gravel or pavers around the shed’s perimeter to improve drainage and prevent water from pooling near the structure. With these final touches, your shed is complete and ready to serve as a reliable storage space for years to come.
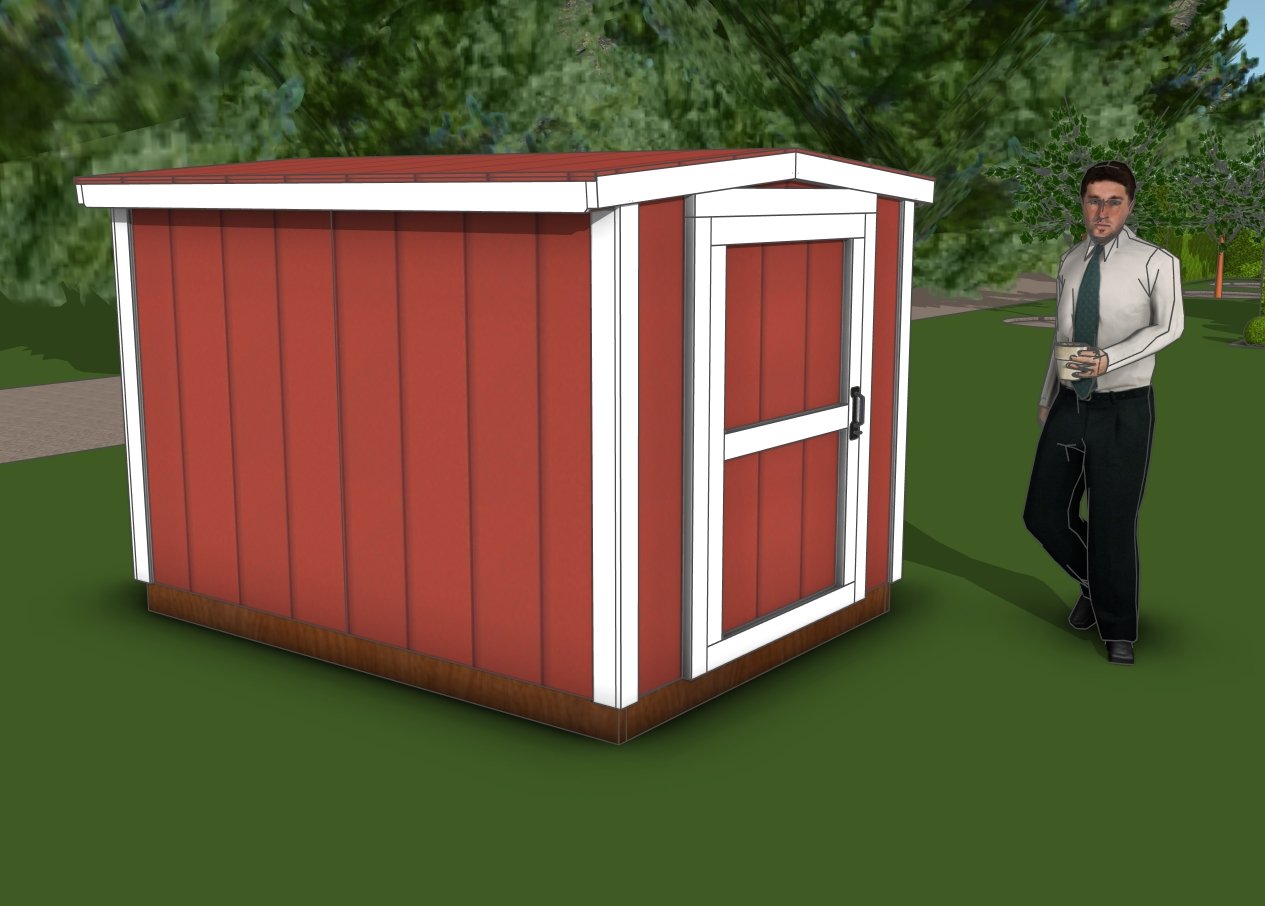
6×8 short shed plans DIY
This 6×8 gable shed is designed with a compact 6-foot height, making it an efficient storage solution while keeping material costs low. Though shorter than standard sheds, this design maximizes usable space by prioritizing floor area over headroom, making it ideal for storing garden tools, firewood, outdoor equipment, and seasonal items. The lower profile also helps the shed blend into smaller yards without overwhelming the space. Additionally, the shed’s manageable height makes construction easier, as there’s no need for oversized framing or complicated ladder work when assembling the roof.
To make the most of this shed, consider adding wall-mounted storage solutions like shelves, hooks, or pegboards to keep tools and supplies organized without taking up valuable floor space. A small workbench could also be integrated along one side, creating a functional area for DIY projects or gardening tasks. If airflow is a concern, installing small vent openings or a louvered vent at the back will help prevent moisture buildup inside. By optimizing interior organization and adding practical features, this shed becomes more than just a storage unit—it’s a highly functional and efficient addition to any backyard.
If you enjoyed this build, be sure to check out PART 1, where I walk you through the step-by-step process of constructing the floor and wall frames.
This woodworking project was about 6×8 gable shed roof plans. If you want to see more outdoor plans, check out the rest of our step by step projects and follow the instructions to obtain a professional result.
