This step by step diy project is about 24×24 gable shed plans. This large shed features two garage doors to the front and one side door for an easy access. You can pour a concrete foundation for the shed, if you are going to use it as a double garage. Take a look over the rest of my woodworking plans, if you want to get more building inspiration.
When buying the lumber, you should select the planks with great care, making sure they are straight and without any visible flaws (cracks, knots, twists, decay). Investing in cedar or other weather resistant lumber is a good idea, as it will pay off on the long run. Use a spirit level to plumb and align the components, before inserting the galvanized screws, otherwise the project won’t have a symmetrical look. If you have all the materials and tools required for the project, you could get the job done in about a day. See all my Premium Plans HERE.
Projects made from these plans
24×24 Shed Plans

Building-a-24×24-shed-gable-roof
Cut & Shopping Lists
- A – 4 pieces of 6×6 lumber – 24′ long SKIDS
- B – 2 pieces of 2×8 lumber – 288″ long, 19 pieces – 285″long FLOOR
- C – 15 pieces of 3/4″ plywood – 48″x96″ long, 6 pieces – 48″x48″ long FLOORING
- D – 4 pieces of 2×4 lumber – 20 1/2″ long, 2 pieces – 140 1/2″ long, 8 pieces – 91 1/2″ long, 4 pieces – 82 1/2″ long, 10 pieces – 3 1/2″ long, 4 pieces of 2×6 lumber – 99″ long, 1 piece – 288″ long FRONT WALL
- E – 3 pieces of 2×4 lumber – 144″ long, 16 pieces – 91 1/2″ long, 2 pieces – 78 1/2″ long, 5 pieces – 7 1/2″ long, 1 piece – 24″ long, 1 piece – 87″ long, 2 pieces – 46″ long, 2 pieces – 27″ long, 2 pieces of 2×6 lumber – 36″ long, 4 pieces – 27″ long SIDE WALL
- F – 4 pieces of 2×4 lumber – 144″ long, 16 pieces – 91 1/2″ long, 1 piece – 281″ long SIDE WALL
- G – 4 pieces of 2×4 lumber – 140 1/2″ long, 14 pieces – 91 1/2″ long, 1 piece – 288″ long BACK WALL
- H – 22 pieces of T1-11 – 48″x96″ long, 2 pieces – 12″x28 long SIDING
- 4 pieces of 6×6 lumber – 24′
- 21 pieces of 2×8 lumber – 24′
- 4 pieces of 2×4 lumber – 24′
- 16 pieces of 2×4 lumber – 12′
- 1/2″ plywood
- 63 pieces of 2×4 lumber – 8′
- 5 pieces of 2×6 lumber – 8′
- 18 pieces of 3/4″ plywood – 4’x8′
- 23 pieces of T1-11 – 4’x8′
- 6-8d nails, 2 1/2″ screws, 3 1/2″ screws
- wood filler , wood glue, stain/paint
Tools
![]() Hammer, Tape measure, Framing square, Level
Hammer, Tape measure, Framing square, Level
![]() Miter saw, Drill machinery, Screwdriver, Sander
Miter saw, Drill machinery, Screwdriver, Sander
Time
Related
- PART 1: 24×24 Shed Plans
- PART 2: 24×24 Shed Roof Plans
- PART 3: 24×24 Shed Door and Trims Plans
How to build a 24×24 gable shed
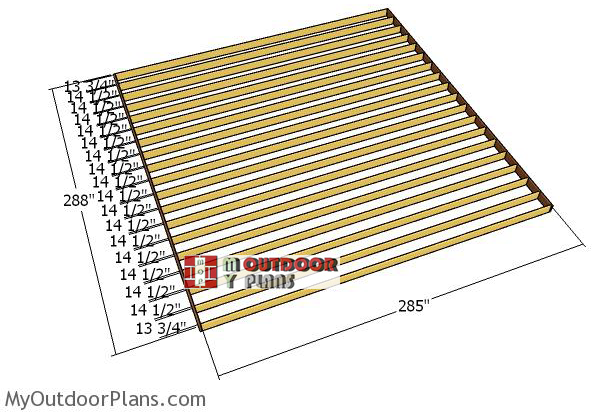
Assembling-the-floor-frame
The first step of the project is to frame the floor for the 24×24 storage shed. Therefore, use 2×8 lumber for the joists and cut them at the dimensions shown in the diagram. Drill pilot holes through the rim joists and insert 3 1/2″ screws into the perpendicular components. Place the joists every 16″ on center. You could also fit 2×8 blockings between the joists, so you can keep them equally spaced.
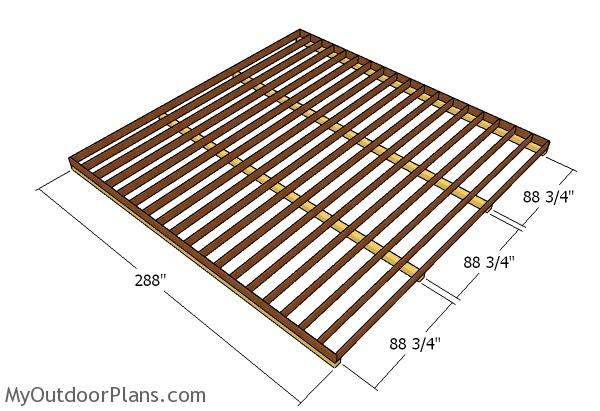
Fitting the skids
Select the location for the shed to suit your needs and making sure it complies with the local building codes. Level the surface with attention and then compact a thick layer of gravel. Fit the 6×6 skids and then attach the floor frame. Align the edges flush and use rafter ties to lock them together tightly.
If the local codes don’t allow you to use 6×6 skids, you might have to pour footings. Alternatively, you could even pour a concrete slab for the 24×24 shed and then frame the walls and the roof.
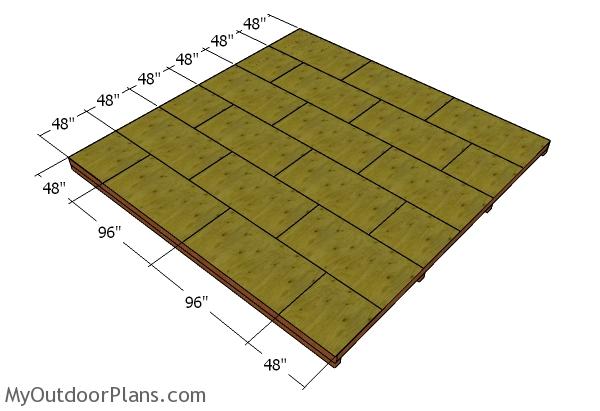
Floor sheets
The next step of the project is to lay the 3/4″ plywood sheets to the floor of the shed. Align the edges flush and leave no gaps between the sheets for a professional result. Insert 1 5/8″ screws, every 8″ along the joists, for a professional result. Follow the pattern shown in the diagram for a neat result.
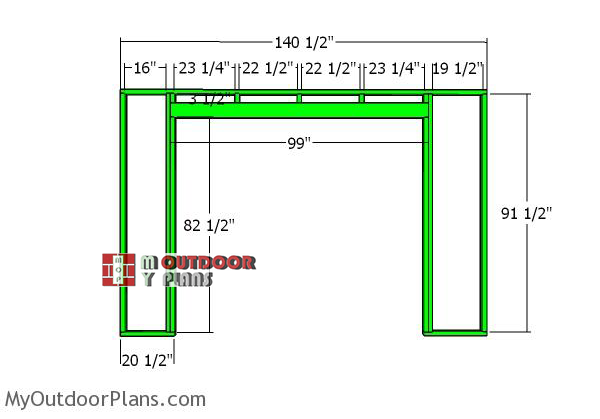
front-wall-frame
Considering the size of the 24×24 storage shed, the walls need to be made of two sections. In this manner, the sections are easier to manage and also the materials are less expensive. This shed has two 8′ wide openings to the front wall. You can make adjustments to the size of the opening to suit your needs.
Use 2×6 lumber and 1/2″ plywood for the double headers. Drill pilot holes through the plates and insert 3 1/2″ screws into the studs. Make sure the corners are square and align the edges flush.
Remember that you need to make adjustments to the plans according to the doors you are going to install. Some garage doors require a lot of space, so you might need to make 10′ tall doors. Moreover the size of the opening needs to be different according to the doors you are going to install.
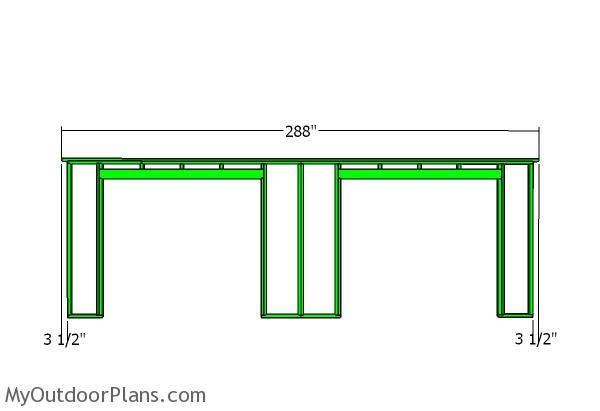
Front wall
Afterwards, you need to lock the two partitions together by fitting the 2×4 beam to the top of the front wall. As you can easily see in the diagram, the top plate should overhangs 3 1/2″ on both sides. Lock the two partitions together tightly with 2 1/2″ screws.
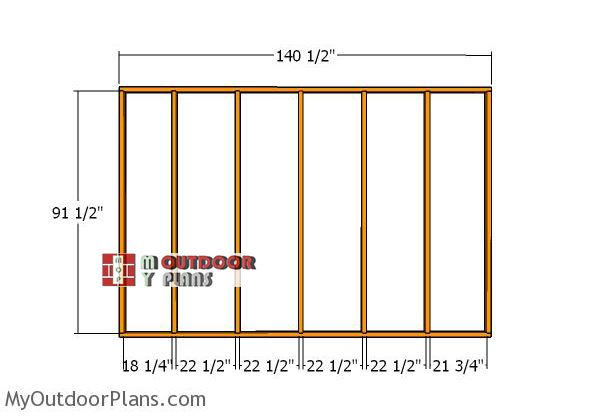
Back-wall-partition
Continue the project by assembling the two identical sections for the back wall. Drill pilot holes through the plates and insert 3 1/2″ screws into the studs. Place the studs every 24″ on center for a professional result, Make sure the corners are square and align the edges flush.
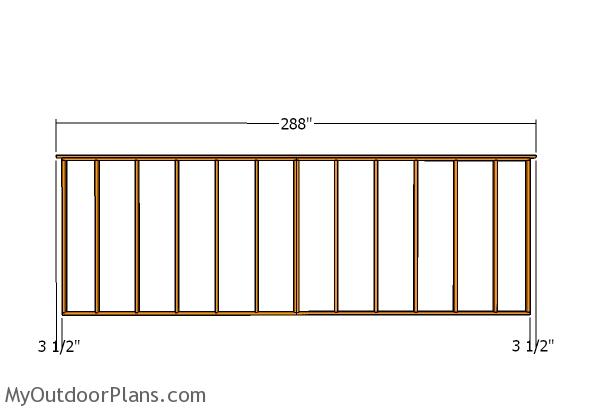
Back wall
Assemble the back wall together tightly by fitting the top 2×4 beam to the sections. The top plate should overhang 3 1/2″ on both sides of the wall. Lock the two sections together tightly with 2 1/2″ screws, after aligning the edges flush.
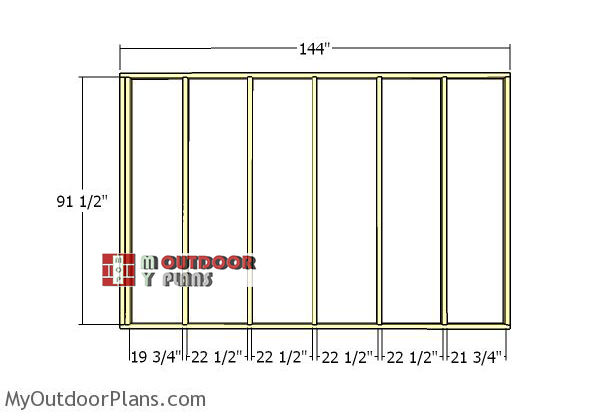
Side-wall-partition
Build the two identical partitions for the plain side wall. Use the same techniques described above for a professional result. Drill pilot holes through the plates and insert 3 1/2″ screws into the studs. Place double studs at one end of the sections.
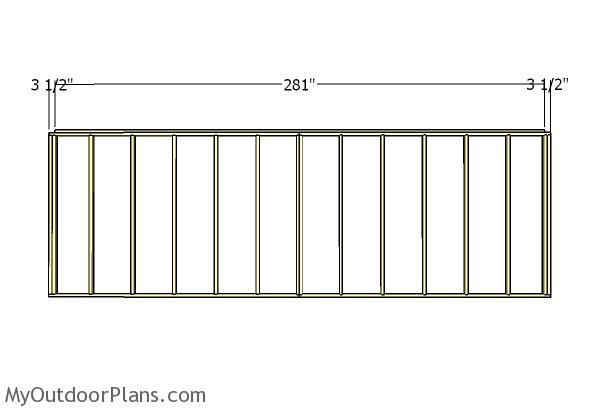
Side wall
Assemble the side wall together tightly by fitting the top 2×4 beam to the sections. The top plate should be inset 3 1/2″ on both sides of the wall. Lock the two sections together tightly with 2 1/2″ screws, after aligning the edges flush.
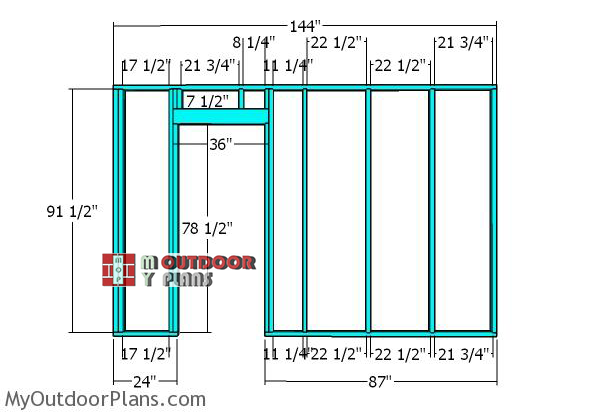
Side-wall-with-door
Next, you need to build the partitions for the opposite side wall of the shed. As you can easily see in the diagram, you need to frame a door opening, so you can have an easy access to the inside. Use 2×6 lumber for the double header.
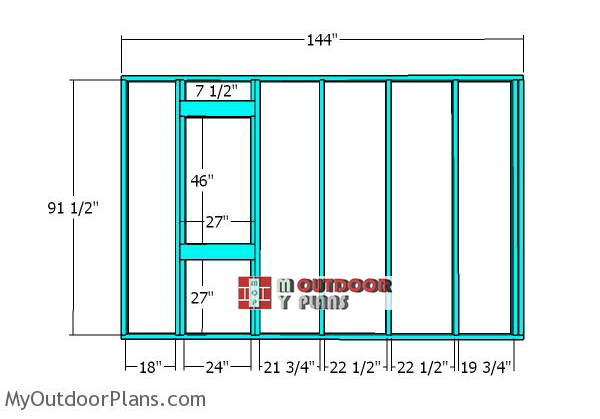
side-wall-with-window-frame
For the other section of the side wall, you need to frame a window opening.
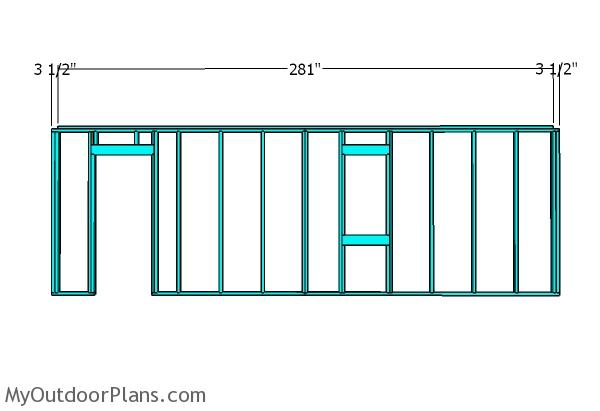
Side wall with window
Assemble the side wall with 2 1/2″ screws, by locking the sections together tightly. Moreover, fit a 2×4 plate to the top of the walls, making sure it is insert 3 1/2″ on both sides.
Assembling the shed frame
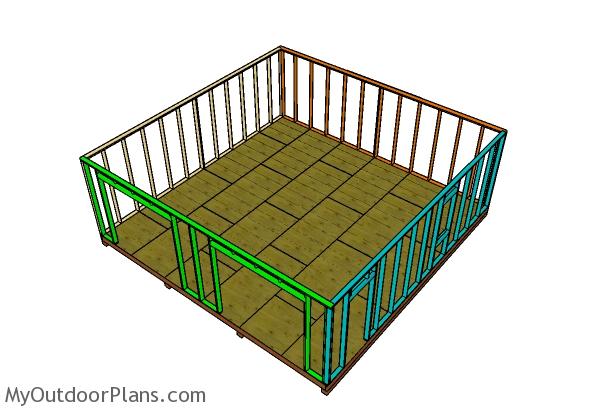
Fit the four wall frames to the floor of the shed. Align the edges flush and plumb them with a spirit level. Drill pilot holes though the bottom plates and insert 3 1/2″ screws to lock the walls into place tightly. Moreover, you have to lock the adjacent walls together tightly with 3 1/2″ screws. Make sure the edges are flush and the corners are square.

Side wall plain – panels
Fit T1-11 siding to the back wall and to the plain side wall of the 24×24 shed. Align the edges with attention and leave no gaps between the sheets. Use 6-8d nails to secure the sheets into place tightly, every 8″ along the framing.
Side wall – panels
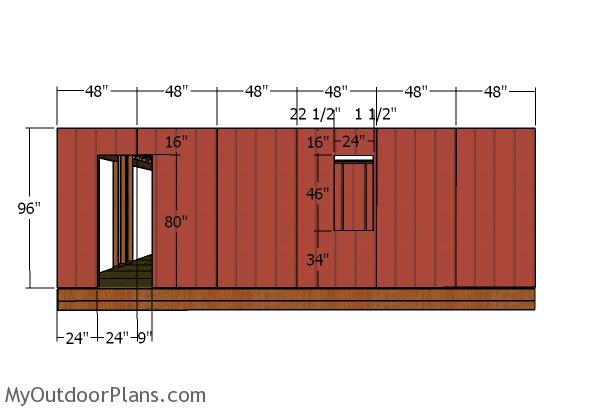
Fit the siding sheets to the other side wall, as well. As you can see in the plans, you need to make cuts so you can fit the panels around the door and the door opening.
Front wall panels
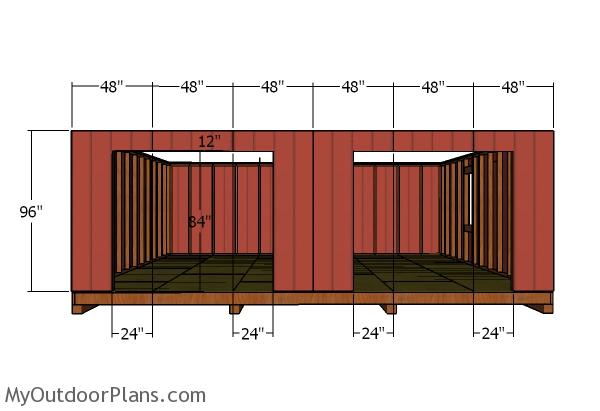
Fit the T1-11 siding sheets to the front of the 20×20 shed as well. Make the cuts to the panels that go around the door opening, so you can fit them into place tightly.
24×24 shed plans
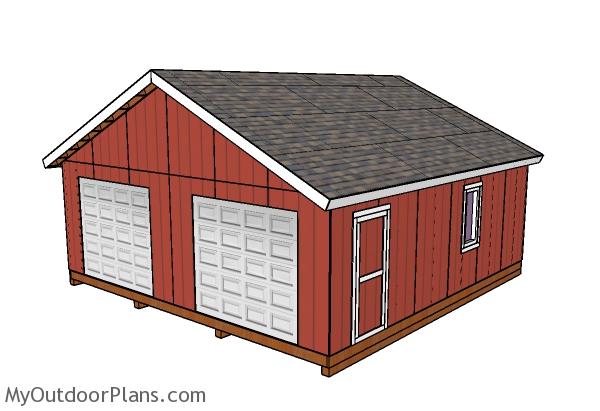
You really need to take a look over PART 2 and PART 3 of the project so you learn how to build the gable roof and how to fit the trims.
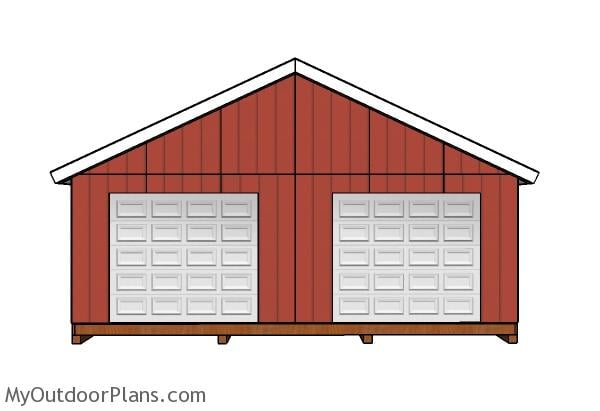
24×24 shed plans – Front view
This is a large shed and it requires some complex woodworking skills to get the job done by yourself. Moreover, you need to comply with the local building codes before starting the actual construction process.
This woodworking project was about 24×24 garden shed plans free. If you want to see more outdoor plans, check out the rest of our step by step projects and follow the instructions to obtain a professional result.


18 comments
Could you put a Gambrel roof on this shed? Or do you need the gable roof? Thx
A gambrel roof would make the building very tall. Unless you want a 2 storey building, there is no reason for that. It will just increase the costs.
Thank you so much you the info. I have been looking for a tutorial on your site for a gambrel roof. Do you have one?
I have many plans for gambrel sheds, but not of a 24’x24′ gambrel shed, if that you are looking for.
Great work. Where I can get this plan in PDF format for download?
Thanks. Please read the FAQs: http://myoutdoorplans.com/faq/
Great info. Will the wooden floor as designed work for a garage? Based on the lay of my lot, a concrete floor would cost too much.
No, that will not work.
OK then, would additonal skids or adding cross members make it work?
I can’t help you with that. It is just a bad idea from many points of view. It is not fire safe and it will probably not support the weight of your car on the long term. Pouring a concrete floor will solve all these inconveniences.
i cant find 2 x 4 x 24 in my area. can i use 2 x 4 x 12 or any other dimensions?
Yes, you can build the walls from 2 sections.
If I was to change the side wall height to 10ft would it change the angles on the trusses/rafters?
No, not at all.
Do you have a premium plan available for this model? The only thing the worries me is building the trusses/rafters!
No premium plans for this. Regarding the trusses, my best advice is to buy engineered trusses. That will save you time and you’re sure they are built according to your local codes.
Hello Sir, do you have any downloadable plans for this build, or is it only for viewing on your site. Thanks in advance
All plans are downloadable: https://myoutdoorplans.com/faq/