This step by step diy project is about 16×16 gable shed plans. I have designed this shed with a gable roof so you can store outdoor furniture and other items on your own property. This shed is easy enough to build by anyone with basic carpentry knowledge. If you add a few windows to one side of the shed, you can use it a workshop. Take a look over the rest of my woodworking plans, if you want to get more building inspiration. Remember that you need to select the site for the shed with attention and that you have to comply with a few legal regulations.
When buying the lumber, you should select the planks with great care, making sure they are straight and without any visible flaws (cracks, knots, twists, decay). Investing in cedar or other weather resistant lumber is a good idea, as it will pay off on the long run. Use a spirit level to plumb and align the components, before inserting the galvanized screws, otherwise the project won’t have a symmetrical look. If you have all the materials and tools required for the project, you could get the job done in about a day.
Projects made from these plans
Building a 16×16 Gable Shed
Building-a-16×16-shed
Cut & Shopping Lists
- A – 6 pieces of 4×4 lumber – 16′ long SKIDS
- B – 2 pieces of 2×6 lumber – 192″ long, 13 pieces – 189″ long FLOOR FRAME
- C – 6 pieces of 3/4″ plywood – 48″x96″ long, 4 pieces – 48″x48″ long FLOOR
- D – 2 pieces of 2×4 lumber – 192″ long, 1 piece – 185″ long, 11 pieces – 81″ long 2xSIDE WALL
- E – 2 pieces of 2×4 lumber – 185″ long, 1 piece – 192″ long, 9 pieces – 81″ long BACK WALL
- F – 2 piece of 2×4 lumber – 56 1/2″ long, 1 piece – 192″ long, 1 piece – 185″ long, 8 pieces – 81″ long, 2 pieces – 75 1/2″ long, 2 pieces of 2×6 lumber – 75″ long FRONT WALL
- G – 16 pieces of T1-11 5/8″ siding – 48″x88″ long SIDING
- 6 pieces of 4×4 lumber – 16′
- 15 pieces of 2×6 lumber – 16′
- 8 pieces of 3/4″ plywood – 48″x96″
- 11 pieces of 2×4 lumber – 16′
- 41 pieces of 2×4 lumber – 8′
- 2 pieces of 2×6 lumber – 8′
- 16 pieces of T1-11 5/8″ siding – 4’x8′
- 2 1/2″ screws, 3 1/2″ screws, 1 5/8″ screws
- 4d nails, 16d nails
- wood filler , wood glue, stain/paint
Tools
![]() Hammer, Tape measure, Framing square, Level
Hammer, Tape measure, Framing square, Level
![]() Miter saw, Drill machinery, Screwdriver, Sander
Miter saw, Drill machinery, Screwdriver, Sander
Time
![]() One day
One day
Related
- PART 1: 16×16 Gable Shed Plans
- PART 2: 16×16 Gable Shed Plans
- PART 3: Double Shed Doors Plans
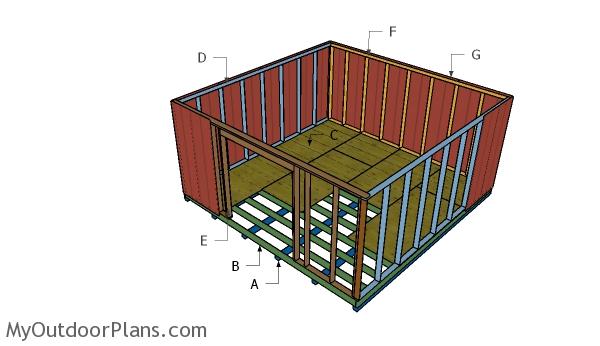
16×16 Gable Shed Plans
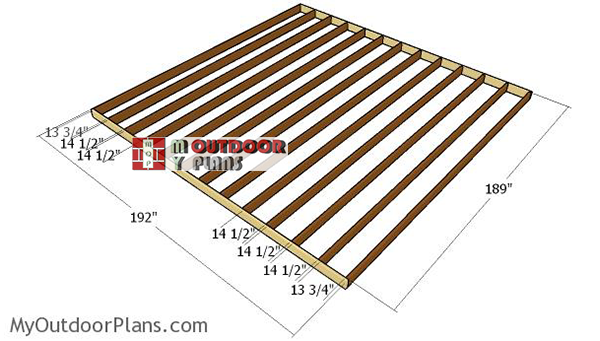
Building-the-floor-frame
The first step of the project is to build the frame for the floor. Cut the components at the right dimensions from 2×6 lumber. Align the edges flush and make sure the corners are square. Drill pilot holes through the rim joists and insert 3 1/2″ screws into the joists. Place the joists every 16″ on center for a professional result.
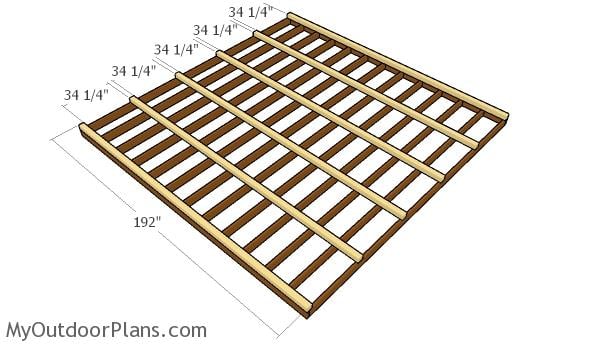
Fitting-the-skids
Attach 4×4 skids to the floor frame. Place the skids equally spaced and use screws or hardware to lock them together tightly.
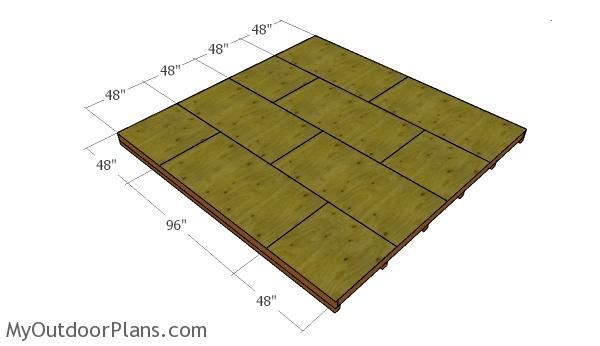
Attaching-the-flooring-sheets
Attach 3/4″ plywood sheets to the floor frame of the shed. Align the edges flush, making sure you leave no gaps between the components. Insert 1 5/8″ screws every 8″ through the sheets into the joists.
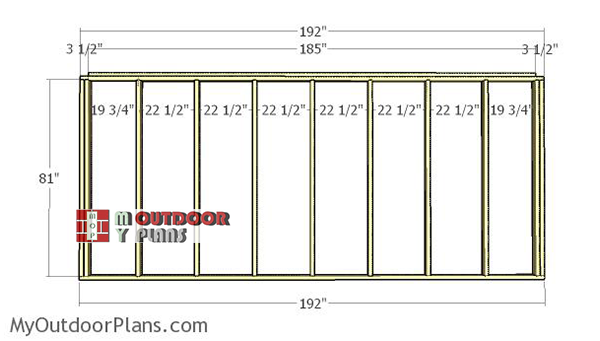
Building-the-side-wall-frames
Assemble the side walls frames from 2×4 lumber. Cut the studs and the plates at the right dimensions and then assemble the together with 3 1/2″ screws. Make sure the corners are square and align the edges flush for a neat result. Place the studs every 24″ on center for a neat result.
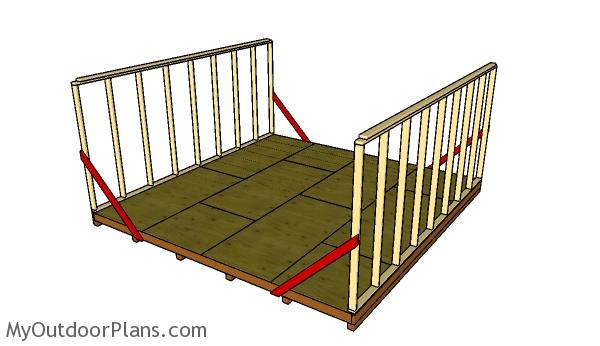
Fitting-the-side-walls
Fit the wall frames to the floor of the 16×16 shed. Use a spirit level to plumb the walls frames and lock them temporarily into place with 3 1/2″ screws, driven through the bottom plates. As you can easily notice in the diagram, you need to use 2×4 temporarily braces to secure the side walls.
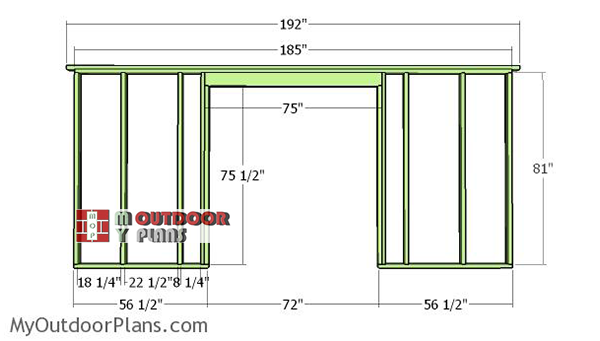
Building-the-front-wall-frame
Frame the front wall for the shed using 2×4 lumber for the studs and plates, while the double header requires 2×6 lumber. Cut the components at the dimensions described in the plans and then assemble everything together with 3 1/2″ screws. Make sure the corners are square and align the edges flush. You can easily adjust the size of the door opening to suit your needs.

Building-the-back-wall-frame
Frame the back wall in the same manner described above. You should use 3 1/2″ screws or 16d nails to lock the joints together tightly.
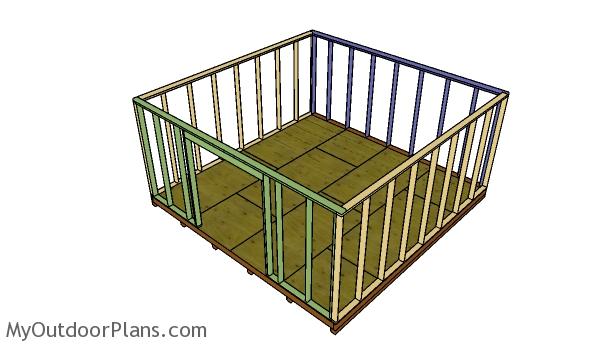
Assembling-the-shed-frame
Fit the front and the back wall frames to the shed floor, as shown in the plans. Make sure the corners are square and then align the edges flush. Use 3 1/2″ screws to lock the adjacent walls together tightly. In addition, drill pilot holes through the bottom plates and then insert 3 1/2″ screws into the floor of the shed.
Back-wall
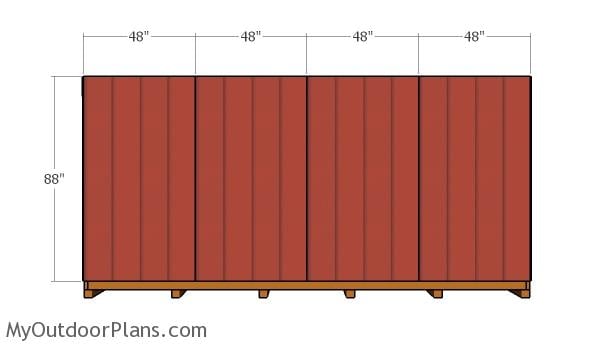
Attach 5/8″ T1-11 siding to the back wall of the shed. Align the edges flush with the top of the side walls and then secure the panels into place with 4d nails. Leave no gaps between the sheets for a professional result.

Siding-panels-side-walls
Attach the siding panels to the side walls in the same manner described above. Work with attention for a neat result.
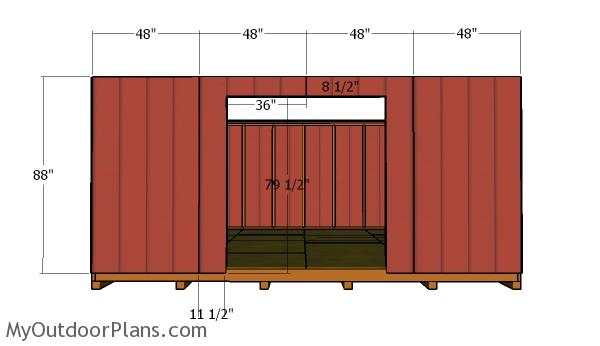
Front-wall
In order to attach the siding panels to the front wall, you need to make a few cuts so they can fit around the door opening. Align the edges flush and then secure the panels into place with 4d nails. Leave no gaps between the sheets for a neat result.
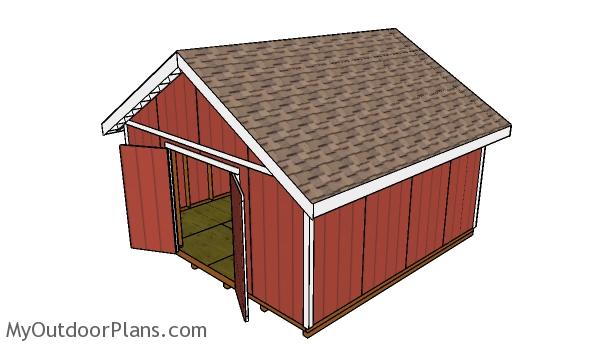
16×16-gable-roof-shed-plans
After building the frame for the shed, you need to install the gable roof. Check out PART 2 of the project to see the step by step instructions and diagrams, as well as a material list.
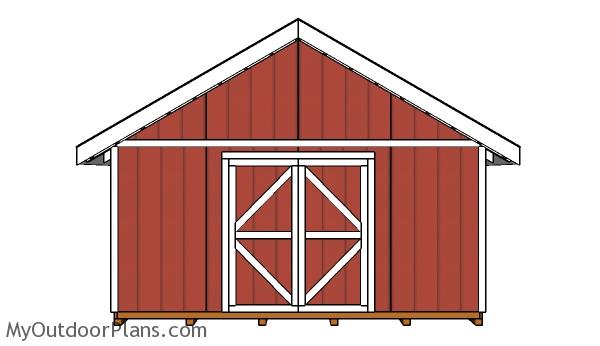
16×16-shed-plans-front-view
This is a simple project you should be able to build in a few weeks without much effort. Don’t forget to take a look over PART 2 and PART 3 to learn how to build the roof for the shed, as well as how to frame the double front doors.
If you want to get PREMIUM PLANS for this project (different design with re-engineered structure), in a PDF format, please press GET PDF PLANS button bellow. Thank you for the support.

This woodworking project was about 16×16 gable shed plans free. If you want to see more outdoor plans, check out the rest of our step by step projects and follow the instructions to obtain a professional result.

EXPLORE MORE IDEAS FOR:
 |
 |
 |
 |
40 comments
Once you got the 4x4x16 skids attached how did you go about turning it over?
You lay out the skids on the site and then attach the frame on top of them. The diagram was just for information purposes, so you can see easier the distance between the skids; you don’t need to attach them in this order.
From top of floor to ceiling is that done 8 foot hight or can I modify it for 8 foot height?
The wall height is not 8′, but you can easily modify that by adjusting the size of the studs to 91 1/2″.
I’m can’t find part 2 and part 3 for the roof plan on your site.
What do you mean lol? The whole roof plan is here: http://myoutdoorplans.com/shed/16×16-gamble-shed-roof-plans/
Like to try to build this 16×16 shed, is there away to download the plans?
Of course there is. See how here: http://myoutdoorplans.com/faq/
Which parts would you advise be made from pressure treated wood and which bits can be untreated?
Pressure treated for the joists.
He do you join the roof joists?
How do you join the roof joists and the rafters is what I mean?
That’s in PART 2 of the project. Bottom of the article NEXT button.
What was your overall cost to build this for materials?
Probably around 2000 dollars.
Do u have a plan that has a concrete pad instead of a floor plan made of wood
No, I don’t have plans for that.
If I would like the roof to have runoff front to back instead of side to side, would it be just as simple to turn the “roof” section, 90 degrees?
After asking, I feel like it was a stupid question. Just move the door to the “side” instead of the “front”.
Yes, that is the easier modification.
Do you have plans/instructions for adding plywood siding to the frame prior to siding? I want to use vinyl siding or hardy board instead.
Thanks
Adam
No, but that is a simple modification. Since the studs are 24″ OC, adding the plywood is straight forward.
Hey there, I was wondering is it possible to put deck on top instead of the roof.
I’m planing to make a shop underneath but am not sure will it hold.
And would put a concrete slab underneath
You would need a lean to, so you can drain the water. And you would need a stronger frame for the deck to be fully functional, such a post frame structure.
I would like to make this unit for a wood working shop. I would need at least 10′ roof. Can I just simply make the wall studs 120″ with no other modifications? or go 16″ OC instead of 24″
Make the studs 115 1/2″ (4 1/2″ are the plates) and place them every 16″ OC.
I’m debating on putting concrete blocks under the floor to eliminate any direct contact with the ground. (For preservation purposes) I’m thinking I should place 4 or 5 under each skid. Would I be correct in thinking I should do this under all six skids? Thanks in advance!!
Yes, the more the better. It is a heavy construction, so you need proper support.
This is an excellent guide, thank you. Following the measurements listed, do you know the height of the peak of the roof? Our zoning requires the midpoint of each rafter to be 10′ or less. I think this will work, but need to make sure.
It’s about there. Maybe a few inches more. You can reduce the height of the studs to compensate for that.
Is there a way to modify the back wall to allow for a window or air conditioner unit? Being in the deep south, humidity is horrendous. Any time spent in the shed itself would just be miserable. How would I go about doing so?
Do you have a plan for a 16×16 with a 4ft side porch?
I don’t have plans for that yet.
Hello, So I actually started building the shed, I finished floor. But when you get to last part of sheeting you have about 2inch left over since the actual size of plywood isnt 48inches like in your plan!! Same thing for the walls. The actual size of the T1-11 siding isn’t 48 inches like in your plans and you will endup with a gap at the end of every wall. This plan doesn’t make sense unless im understanding it wrong. If I do have it wrong please let me know. Thanks
Maybe it’s time to change the supplier. 4’x8′ plywood and T1 11 siding should be exactly 48″ wide, otherwise you can’t even install them over the wall and floor framing.
I ran into the same problem with tongue and grove plywood for the floor. It was also a pain to fit together. Next time I will use standard plywood. I just used a strip to fill in the gap on the floor and the t1-11 fits together just fine.
I’m also using 2×6 rafters and joists instead of trusses. I’m wanting to use the top as storage.
16 x 16 is exactly right for my build, however, I plan on putting it on a monolith slab with anchor bolts.
I also want a hip roof that is about 5:12 or so. I’d like a 12″ overhang and I plan on gutters.
Do you have a plan like that?
Thanks in advance, your site is just excellent.
No plan for that.
I am would like to put this shed up, I just need the foundation plans for the town building department.
We live in upstate NY so I was going to anchor it into the ground. Thank you
Could I build this in sections over the course of several months without risking weather damage to untreated wood?