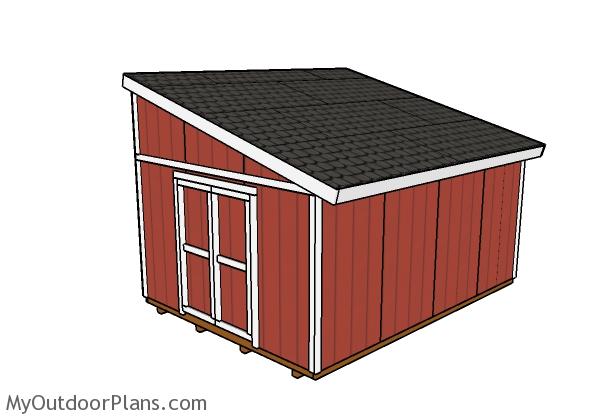
This step by step diy project is about diy 12×16 lean to shed plans. If you are looking for a large lean to shed project, I recommend you to check out these plans. This shed is both roomy and has a nice lean to appearance. Moreover, I have designed shed with many sizes so check them out, as well. Take a look over the rest of my woodworking plans, if you want to get more building inspiration.
Let’s talk about some epic add-ons for your 12×16 lean-to shed! First, you can trick it out with some solar panels to make it eco-friendly and power up your tools and gadgets. Next, add some LED lights and a sound system to turn it into the ultimate hangout spot. And how about a mini fridge and some comfy chairs to make it the coolest backyard chill zone ever? You know how they say it: “Go big or go home”!
When buying the lumber, you should select the planks with great care, making sure they are straight and without any visible flaws (cracks, knots, twists, decay). Investing in cedar or other weather resistant lumber is a good idea, as it will pay off on the long run. Use a spirit level to plumb and align the components, before inserting the galvanized screws, otherwise the project won’t have a symmetrical look. If you have all the materials and tools required for the project, you could get the job done in about a day. See all my Premium Plans HERE.
Projects made from these plans
It’s that simple to build your 12×16 storage shed!
12×16 Lean to Shed Plans
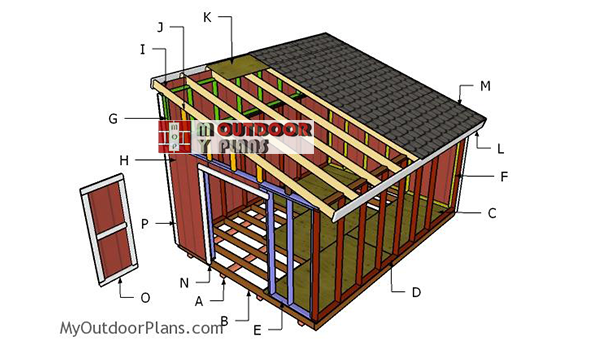
Building-a-12×16-lean-to-shed
Cut & Shopping Lists
- A – 4 pieces of 4×4 lumber – 192″ long SKIDS
- B – 2 pieces of 2×6 lumber – 192″ long, 13 pieces – 141″long JOISTS
- C – 5 pieces of 3/4″ plywood – 48″x96″ long, 2 pieces – 48″x48″ long FLOOR
- D – 2 pieces of 2×4 lumber – 192″ long, 1 pieces – 185″long, 11 pieces – 81″ long 2xSIDE WALL
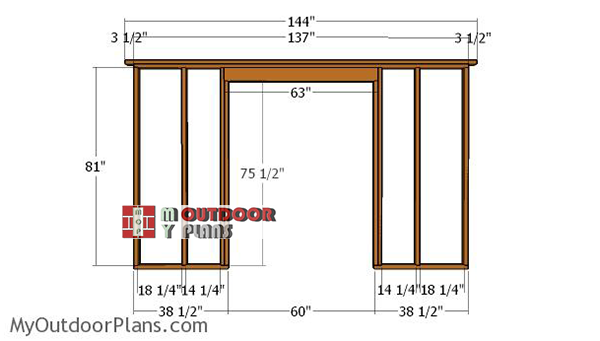
- E – 1 piece of 2×4 lumber – 144″ long, 1 piece – 137″ long, 2 pieces – 38 1/2″ long, 6 pieces – 81″ long, 2 pieces – 75 1/2″ long, 2 pieces of 2×6 lumber – 63″ long FRONT WALL
- F – 2 pieces of 2×4 lumber – 144″ long, 1 piece – 137″ long, 7 pieces – 81″ long BACK WALL
- 2 pieces of 2×6 lumber – 16′
- 13 pieces of 2×6 lumber – 12′
- 2 pieces of 2×6 lumber – 6′
- 4 pieces of 4×4 lumber – 16′
- 6 pieces of 3/4″ plywood – 48″x96″
- 6 pieces of 2×4 lumber – 16′
- 6 pieces of 2×4 lumber – 12′
- 36 pieces of 2×4 lumber – 8′
- 1 piece of 1/2″ plywood – 48″x96″
- 8d nails, 2 1/2″ screws, 3 1/2″ screws
- wood filler , wood glue, stain/paint
Tools
![]() Hammer, Tape measure, Framing square, Level
Hammer, Tape measure, Framing square, Level
![]() Miter saw, Drill machinery, Screwdriver, Sander
Miter saw, Drill machinery, Screwdriver, Sander
Time
![]() One day
One day
Related
- PART 1: 12×16 Lean to Shed Plans
- PART 2: 12×16 Lean to Shed Roof Plans
- PART 3: 12×16 Lean to Shed Double Doors Plans
How to build a lean to 12×16 shed
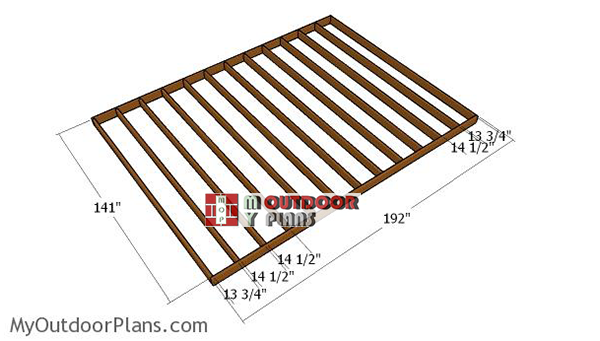
Building-the-floor-frame
Build the floor for the shed from lumber. Alternatively, you can pour a concrete floor if you want a permanent construction. Cut the joists from 2×6 lumber using a good saw. Align the beams, making sure the corners are square, drill pilot holes and insert 3 1/2″ screws to lock them together tightly.
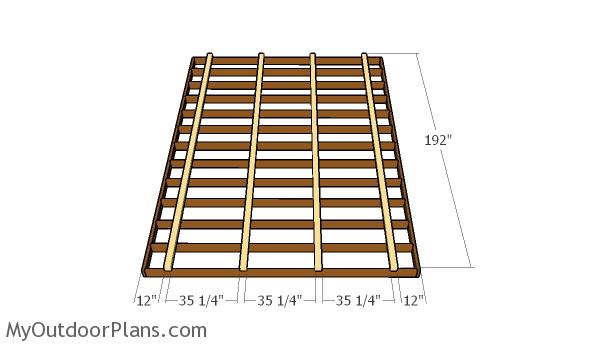
Fitting the skids
After assembling the floor frame, you need to attach the 4×4 skids. Use metal connectors to secure the skids to the joists, after aligning them or toenail them.

Fitting the plywood floor sheets
Continue the project by attaching the 3/4″ plywood sheets to the floor frame. Leave no gaps between the floor sheets and secure them into place with 1 5/8″ screws, every 12″ along the joists.

Building-the-side-walls
Assemble the side walls from 2×4 lumber. cut the studs and the plates at the right dimensions. Drill pilot holes through the top plates and insert 2 1/2″ screws into the studs, using the information from the diagram. Alternatively, you can use a framing gun and nails. Make sure the corners are square for a professional result.
Wall Studs
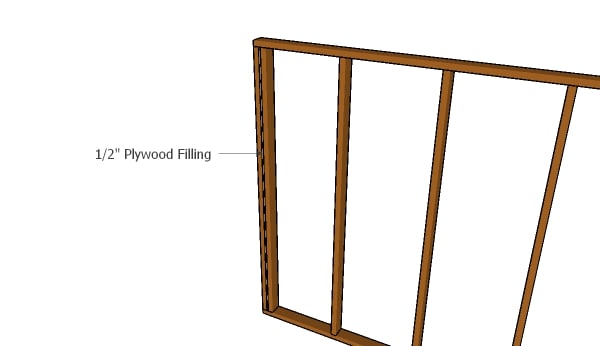
Fit 1/2″ plywood fillings to the end studs, so you reinforce the walls.
Building-the-front-wall
Continue the project by assembling the front wall. As you can notice in the diagram, you need to leave enough space for the door opening. You can easily adjust the size of the door to suit your nails. Use 2×6 lumber for the double header.
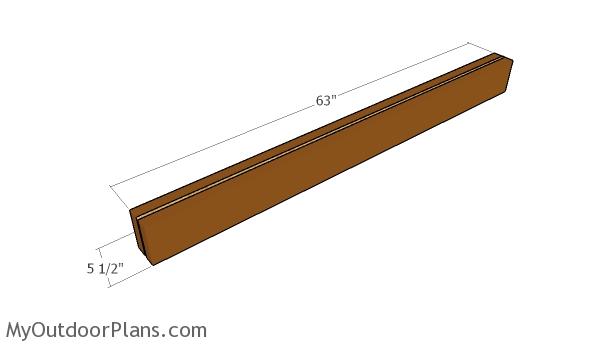
Building the double header
The double header for the door is made from 2×6 lumber filled with 1/2″ plywood. Cut the plywood to size and glue it to the headers with construction glue. In addition, drive a few screws or nails to lock everything tightly.

Building-the-back-wall
Build the back wall using the same techniques described above. You should also notice the double plates that will add more rigidity to the walls and to the overall framing.

Fitting the side walls
Lift the side walls and lay them to the floor of the shed. Align the edges with attention and use a spirit level to plumb the walls. Drill pilot holes through the bottom plates and insert 2 1/2″-3 1/2″ screws into the floor frame, every 8″. As you can notice in the plans, you need to secure the walls into place temporarily with braces.

Assembling the shed frame
Fit the front and back walls to the shed floor and lock them to the adjacent walls with 2 1/2″ screws. Make sure the corners are square and insert screws through the bottom plates into the floor, as well.
12×16-lean-to-shed-plans
Make sure you check PART 2 of the project, so you learn how to build the roof for this large lean to shed project. In addition, you could check the rest of the shed plans I have on this site for more building ideas.
If you want to see newer plans for a 12×16 lean to shed, that also features a side door and a window, with much stronger frame (suitable for snow), take a look over these plans.
Large-lean-to-shed-plans
Last but not least, you should take care of the finishing touches. Therefore, fill the holes with wood putty and let the compound to dry out for several hours. Smooth the surface with medium-grit sandpaper along the wood grain.

12×16 lean to shed – side view
Let’s dive into the cost of building a 12×16 lean-to shed. You can expect to spend about $1,500 to $2,500 on materials, depending on the quality you go for. High-quality lumber, durable roofing, and solid siding are key here. If you want to add extras like windows or shelves, you might need an additional $200 to $400. Overall, this shed is a smart investment for creating a versatile and durable storage space!
Top Tip: Take a look over PART 2 of the project, so you learn how to build the roof and the front double doors for this shed project.

12×16 lean to shed – front view
Last but not least, let’s get real about the benefits of building a 12×16 lean-to shed. First, it’s all about maximizing your space—you’re adding a versatile area for storage, hobbies, or even a mini office. Second, the lean-to design is efficient and stylish, giving your property a clean, modern look. And third, there’s the hustle—you’re putting in the work, learning new skills, and creating something valuable with your own hands. It’s a win all around!
If you want to get PREMIUM PLANS for this project (different design with re-engineered structure), in a PDF format, please press GET PDF PLANS button bellow. Thank you for the support.

This project was about 12×16 lean to shed plans. If you want to see more outdoor plans, we recommend you to check out the rest of the projects. LIKE us on Facebook to the the first that gets our latest projects and send us pictures with your woodworking projects.

- EXPLORE MORE IDEAS FOR -
 |
 |
 |
 |
10 comments
Great plans! I will be drawing my own modified version (12×15) of this plan to meet personal design choices (doors, windows, etc) and local code. I have a few questions that will help me come up with my design.
1) How do you decide which wall (front or side) has the double stud on the ends?
2) Why do you use an upper wall section as apposed to using longer 2x4s to construct the tall wall?
3) I want the door shifted off center. You place a stud in the center of the double doors to help construct the doors. Should the stud locations be shifted so that a stud is centered at the door as you have done?
1. Usually the side walls or the long walls have the double studs at both ends.
2. Using the top wall section allows me to join all the four walls together tightly with the top double plates. This create a stronger structure.
3. If you change the location of the double doors, offsetting them from the center, you don’t need to change the location of all studs. Just make the modifications so you can create the door opening.
Love the plans but where do I actually download the plans.
Please read the Faqs: http://myoutdoorplans.com/faq/
I can’t seem to get this to print. I’ve tried the printfriendly icon, it just spins the animation. I’ve tried the more button and chose to print and it prints only the first page, and then 8 additional pages of the “search, build, share” section on the right side of the page. 🙁
You should try with another browser. It works fine for me.
Plans show the skids being installed on top of the floor framing, but never tell you to flip it all over!
And you don’t see the skids under the floor in the rest of the diagrams? How would you be able to attach the plywood boards over the skids? I hope your comment is a joke, otherwise you shouldn’t build a shed by yourself, it will be a dangerous project. I made the diagram, so it’s more visible and understand how the skids go under the floor frame.
I have been looking for just the right set of plans for the shop that I am going to build this summer. And here they are. But of course I am going to put my own twist to them as far as my build goes.
But what I like best is the materials list and the sizes of lumber needed. This will help greatly in my budget planning.
One soue I plan on using a bunch will be the habitat for humanity outlet store for materials like windows and light fixtures. There is also another used materials store here in town where I will look for things to. Luckily I am spoiled when it comes to having tools, my other half has outfitted my current space completely for me.
Thank you very much for the plans. You have put a great effort to create these plans and other people are abusing it I am sorry for that. Your plans are free and now days in our lives almost nothing is free. So please let me take the opportunity to thank you again and again for your great work please keep doing your work and God bless you.