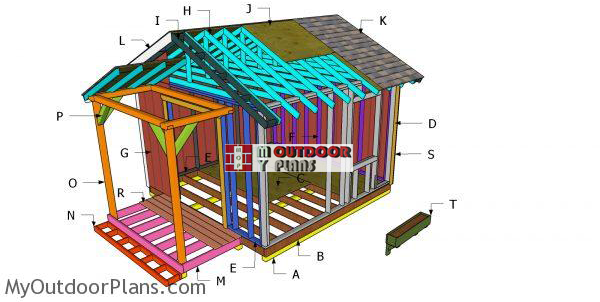
This step by step diy project is about 12×12 she shed with front porch plans. If you want to build a cute she shed, I’ve got you covered with step by step instructions and free plans. This shed is built on a sturdy 2×4 framing with studs every 16″ on center. The shed has a gable roof and features double 5′ doors on the front and two side windows. Moreover, I have designed shed with many sizes so check them out, as well. Take a look over the rest of my woodworking plans, if you want to get more building inspiration.
When buying the lumber, you should select the planks with great care, making sure they are straight and without any visible flaws (cracks, knots, twists, decay). Investing in cedar or other weather resistant lumber is a good idea, as it will pay off on the long run. Use a spirit level to plumb and align the components, before inserting the galvanized screws, otherwise the project won’t have a symmetrical look. If you have all the materials and tools required for the project, you could get the job done in about a day. See all my Premium Plans HERE.
Projects made from these plans
12×12 She Shed Plans – Free PDF Download
Building-a-12×12-shed-shed
Cut & Shopping Lists
- A – 4 pieces of 4×4 lumber – 12 ft long SKIDS
- B – 2 pieces of 2×6 lumber – 12 ft long, 10 pieces – 141″ long JOISTS
- C – 3 pieces of 3/4″ plywood – 48″x96″ long, 3 pieces – 48″x48″ long FLOOR
- D – 2 pieces of 2×4 lumber – 12 ft long, 1 piece – 137″ long, 12 pieces – 90″ long, 8 pieces – 8″ long, 8 pieces – 25″ long, 4 pieces – 50″ long, 8 pieces – 35″ long SIDE WALL WITH WINDOWS
- E – 2 pieces of 2×4 lumber – 12 ft long, 1 piece – 137″ long, 12 pieces – 90″ long SIDE WALL
- F – 2 pieces of 2×4 lumber – 137″ long, 1 piece – 144″ long, 10 pieces – 90″ long BACK WALL
- F – 2 pieces of 2×4 lumber – 38 1/2″ long, 1 piece – 137″ long, 1 piece – 144″ long, 8 pieces – 90″ long, 2 pieces – 78 1/2″ long, 6 pieces – 6″ long, 2 pieces of 2×6 lumber – 63″ long FRONT WALL
- G – 9 pieces of 5/8″ T1-11 – 48″x96″ long, 2 pieces – 4’x93″ long, 1 piece – 13″x48″ long SIDING
- H – 1 piece of 2×4 lumber – 12 ft, 2 pieces – 8 ft, 1 piece – 29″ long 10xTRUSS
- I – 4 pieces of 2×4 lumber – 8 ft, 10 pieces – 6 1/4″ long 2xOVERHANG
- J – 4 pieces of 1/2″ plywood – 10″x96″ long, 4 pieces – 4’x8′ long, 4 pieces – 4’x4′ long ROOF SHEETS
- 8 pieces of 1/2″ plywood – 4’x8′
- 4 pieces of 4×4 lumber – 12 ft
- 14 pieces of 2×6 lumber – 12 ft
- 5 pieces of 3/4″ plywood – 4’x8′
- 21 pieces of 2×4 lumber – 12 ft
- 73 pieces of 2×4 lumber – 8 ft
- 13 pieces of 5/8″ T1-11 – 4’x8′
- 8d nails, 2 1/2″ screws, 3 1/2″ screws
- wood filler , wood glue, stain/paint
- shed anchors
- rafter ties
- nails for the plates / ties
- structural screws for plates / ties
- strong tie plate
- strong tie plate
Tools
![]() Hammer, Tape measure, Framing square, Level
Hammer, Tape measure, Framing square, Level
![]() Miter saw, Drill machinery, Screwdriver, Sander
Miter saw, Drill machinery, Screwdriver, Sander
![]() Safety Gloves, Safety Glasses
Safety Gloves, Safety Glasses
Time
![]() One day
One day
Related
- PART 1: 12×12 She Shed Plans
- PART 2: 12×12 She Shed Porch Plans
- 10×20 Modern Office Shed Plans
How to build a 12×12 shed with gable roof
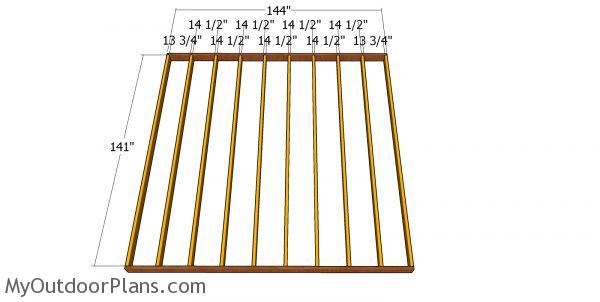
Floor frame
The first step of the project is to build the floor for the 12×12 shed. Cut the joists from 2×6 lumber using a good saw. Align the beams, making sure the corners are square, drill pilot holes and insert 3 1/2″ screws to lock them together tightly. Place the joists every 16″ on center and make sure the corners are square.
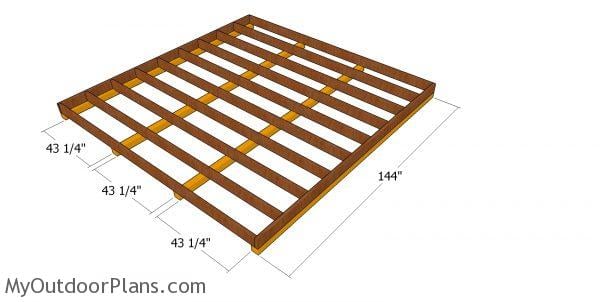
Fitting the skids
After assembling the floor frame, you need to attach the 4×4 skids. Use metal connectors to secure the skids to the joists, after aligning them or toenail them. The skids will lift the frame from the ground and protect the components from the elements. Therefore, your floor components will be protected from moisture.
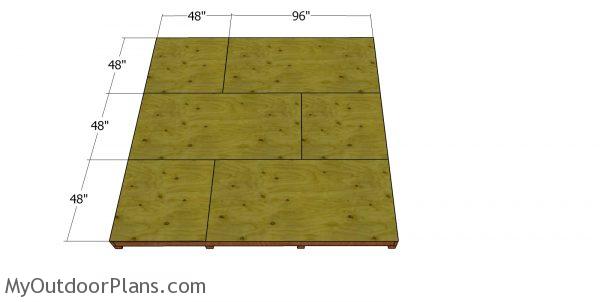
Floor sheets
Continue the project by attaching the 3/4″ plywood sheets to the floor frame. Leave no gaps between the floor sheets and secure them into place with 1 1/4″ screws, every 12″ along the joists.
Select the location for the she shed and remove the top vegetation layer. Level the surface thoroughly and then fit the pressure treated floor frame. You can also fit solid concrete blocks under the skids or at least gravel.
Building the wall frames
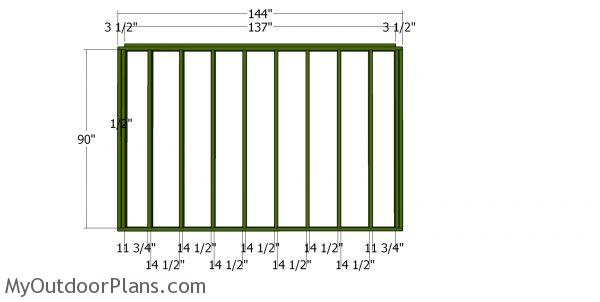
Side wall frame
Assemble the side walls from 2×4 lumber. Cut the studs and the plates at the right dimensions. Drill pilot holes through the top plates and insert 3 1/2″ screws or framing nails into the studs, using the information from the diagram. Place the studs, every 16″ on center. Make sure the corners are square for a professional result. As you can see in the plans, you need to fit 1/2″ plywood fillings to the double end studs. Measure the diagonals and make adjustments until everything is perfectly balanced.
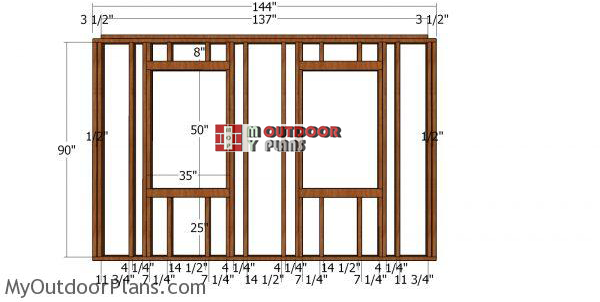
Side-wall-frame-with-windows
Build the opposite side wall for the garden she shed using the same techniques described above. Frame the 32″x50″ windows and the door openings so you can make the most of the shed. You can adjust the size of the door and window, but still use the same techniques described above.
Use 2×4 lumber for the double headers. Fit 1/2″ plywood pieces between the header beams. Add glue and insert 2 1/2″ screws through both sides.
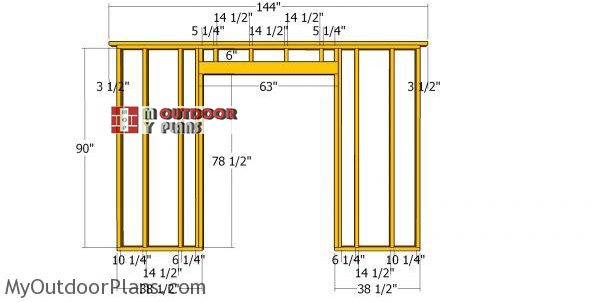
Front-wall-for-12×12-shed-shed
Continue the project by assembling the front wall. As you can notice in the diagram, you need to leave enough space for the 5′ double doors. You can easily adjust the size of the door to suit your nails. As you can see in the plans, you need to install the jack studs to reinforce the structure of the shed. Use 2×6 lumber for the double header. Fit 1/2″ plywood between the double header beams. Place the studs every 16″ on center. Use 3 1/2″ “screws to assemble the frames.
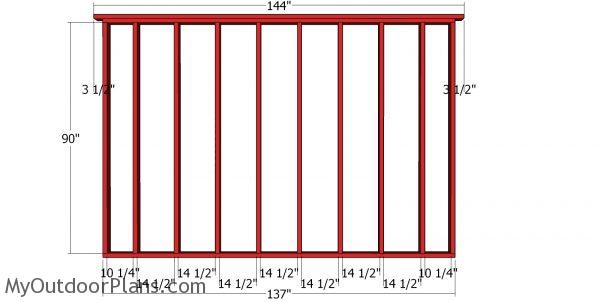
Back wall frame – 12×12 shed
Build the back wall using the same techniques described above. You should also notice the double plates that will add more rigidity to the walls and to the overall framing.
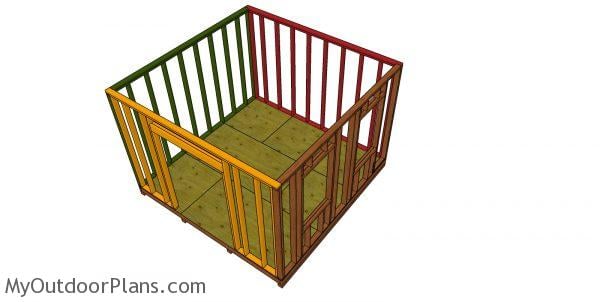
Assembling the frame of the 12×12 she shed
Lift the side walls and lay them to the floor of the shed. Align the edges with attention and use a spirit level to plumb the walls. Drill pilot holes through the bottom plates and insert 3 1/2″ screws into the floor frame, every 8″. Secure the walls into place temporarily with braces. Fit the front and back walls to the shed floor and lock them to the adjacent walls with 2 1/2″ screws. Make sure the corners are square and insert screws through the bottom plates into the floor, as well.
Fitting the siding sheets

Wall with windows siding sheets
Build the exterior walls from 5/8″ T1-11 siding. Use 8d galvanized nails to secure the sheets to the wall frames. Align everything with attention and insert the nails every 8″ along the studs. Make the cut outs around the window openings.
Side wall panels – 12×12 shed
Attach the rest of the sheets to the opposite side wall of the shed. Align the edges with attention and secure them to the wall studs with 8d nails or screws. Make sure you leave no gaps between the sheets for a professional result.
Building the roof
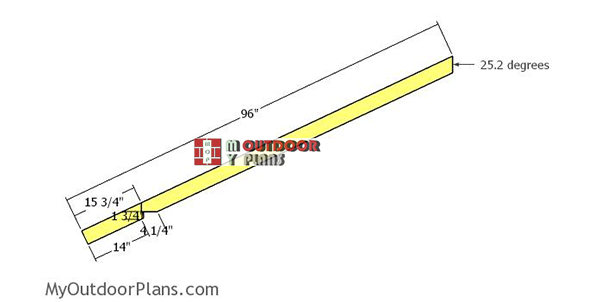
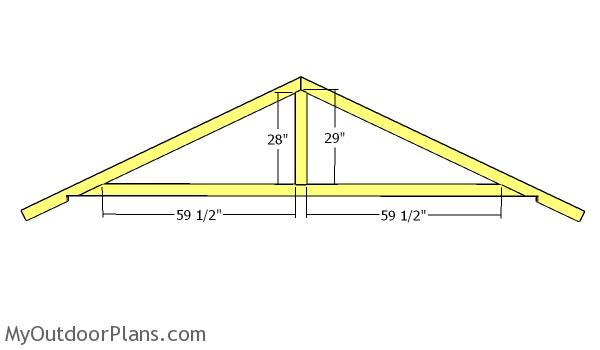
Rafters
The first step is to build the 2×4 rafters. Use a miter saw to make a 25.2 degree cut to one end of the rafters. In addition, make the birdsmouth cut to the rafters.
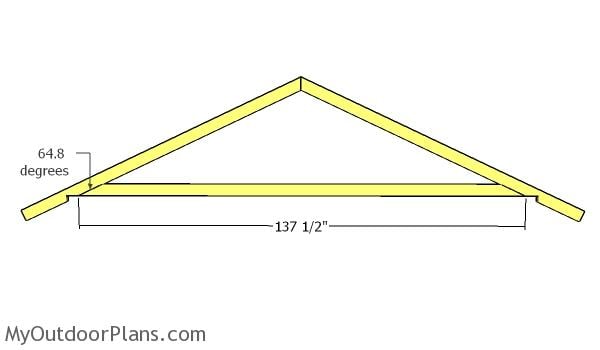
Bottom rafter
Cut the bottom rafters and then lay all the components on a level surface. Align the edges flush and leave no gaps between them.
Fitting the middle truss support
Cut and fit the middle support to the trusses.
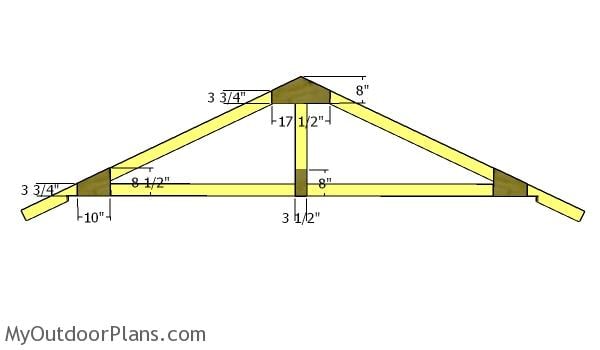
Fitting the gussets
Use 1/2″ plywood for the trusses. Mark the cut lines on a piece of plywood and then get the job done with a saw. Lay the gussets over the joints and then insert 1 1/2″ nails to lock them into place tightly. Alternatively, you can use strong tie plates over the joints (listed in the cut list).

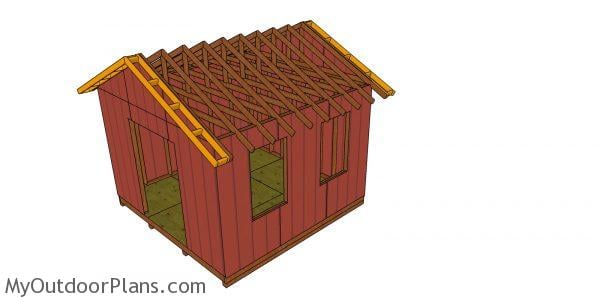
Fitting the trusses
Fit the trusses to the top of the she shed. Plumb the trusses with a spirit level and secure them to the plates with rafter ties. Place the trusses every 16″ on center.
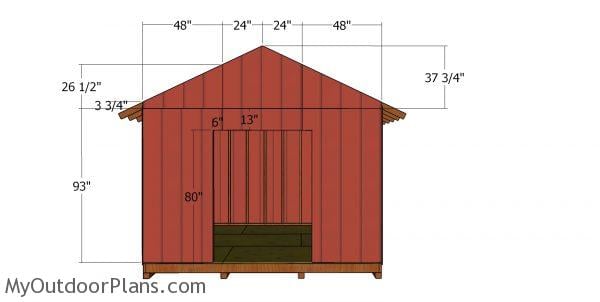
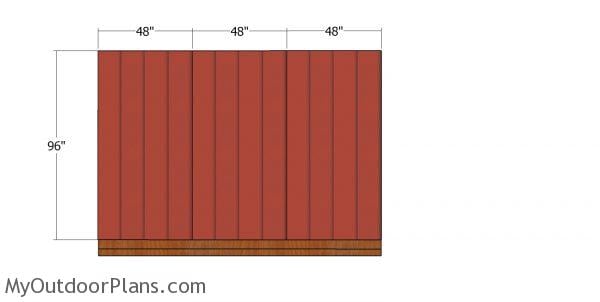
Front wall panels – 12×12 shed
Fit the 5/8″ T1-11 siding sheets to the front of the shed. Align the edges flush and insert 8d nails, every 8″ along the framing. Leave no gaps between the sheets for a professional result.
Alternatively, you can attach 5/8″ OSB sheets to the exterior of the shed and the cover them with house wrap. Last but not least, install the siding to the exterior of the shed. You should choose the alternative that suits your needs best.
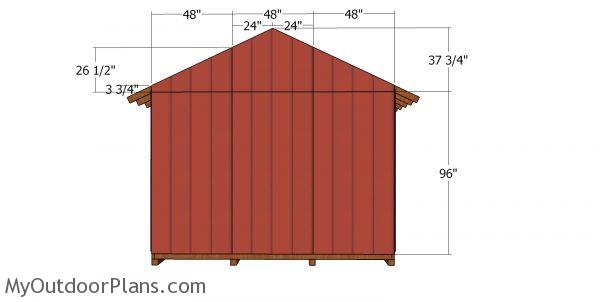
Back wall sheets – she shed plans
Fit the sheets to the back of the shed, as well.
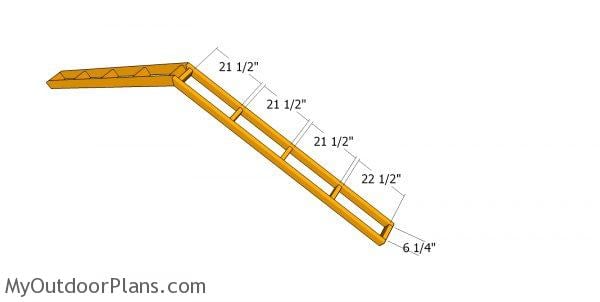
Overhangs
Use 2×4 lumber for the overhangs. You can adjust the size of the overhangs by making the blocks longer of shorter. Drill pilot holes through the rafters and insert 3 1/2″ screws into the blockings.
Fitting the overhangs to the shed
Fit the overhangs to the front and back of the shed. Align the edges flush, drill pilot holes and insert 3 1/2″ screws to lock them into place tightly.
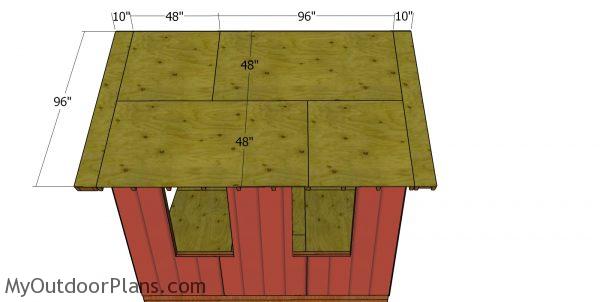
Roof sheets
Use 1/2″ plywood for the roof sheets. Attach the panels to the roof of the shed and align the edges flush. Insert 1 5/8″ screws to secure the sheets into place, every 8″ along the rafters.

How to build a 12×12 she shed
This she shed is easy to build and extra sturdy. You can easily fit insulation between the studs and then attach drywall sheets to the interior of the shed. In addition, you can notice the front porch. I will show you how to build the rest of the she shed in PART 2.
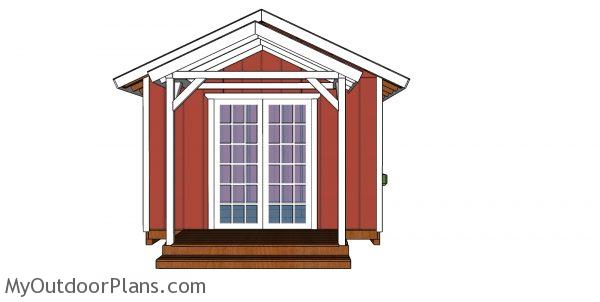
12×12 She Shed Plans – front vie
Building a 12×12 she shed with a covered front porch will likely cost you between $3,000 and $5,000, depending on the materials and finishes you choose. The covered porch adds a cozy, welcoming touch, making this more than just a shed—it’s a true retreat. This investment gives you a charming, functional space that’s perfect for everything from a quiet workspace to a relaxing getaway spot in your own backyard.
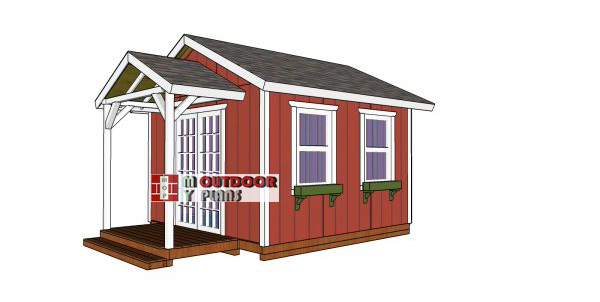
12×12-she-shed-with-porch-plans
You’re looking at about 3 to 5 weekends to complete your 12×12 she shed with a covered front porch. The porch adds a bit more complexity to the build, but with careful planning and attention to detail, it’s a manageable project. Once it’s all done, you’ll have a beautifully crafted space that’s ready to be personalized and enjoyed.

12×12 shed with front deck – free plans

12×12 Shed Shed – dimensions
As you step back and take in your finished 12×12 she shed with its inviting covered front porch, you’ll know you’ve created something truly special. This isn’t just a shed, it’s a personal haven, a place where you can escape, create, or simply unwind. Whether you’re using it as a creative studio, a cozy reading nook, or a peaceful retreat, this she shed combines practicality with a touch of elegance, making it a standout feature in your outdoor space.
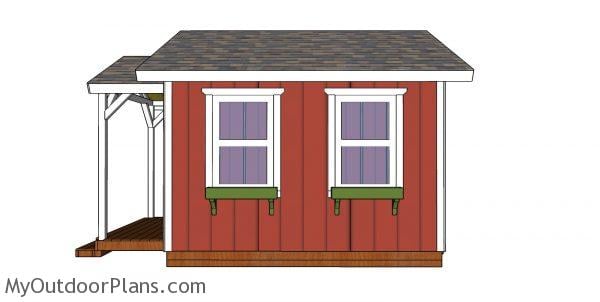
12×12 She Shed Plans – side view
Make sure you check out the rest of the project, so you learn how to frame the roof and how to attach the door and the trims to the shed. In addition, I have lots of other shed projects on the site so I recommend you to browse through all alternatives before starting the building project.
If you want to get PREMIUM PLANS for this project, in a PDF format, please press GET PDF PLANS button bellow. Thank you for the support.

This woodworking project was about 12×12 she shed plans free. If you want to see more outdoor plans, check out the rest of our step by step projects and follow the instructions to obtain a professional result.

7 comments
submitted get plans by email. got a thank you email but no plans. 12 x12 She shed
There is a BIG FAQs- Print button in the menu. Please check it: https://myoutdoorplans.com/faq/
Do i need to put the bottom rafters on the roof? I was hoping to leave half open to store stuff on top
Yes, they are there for a reason. The only way you can do that is to install a ridge beam and then fit the rafters to both sides. For 12 opening you need a 2×8.
so they are needed on 12′ span but not 8′ span? By putting a 2×8 foot ridge beam across top and nailing the 2×4 roof rafters to it will allow me to not put bottom rafters? interesting.
Another question I noticed when cutting the rafters for the 12′ wide shed and the 8’wide shed you have different measurements 25degrees as apposed to 25.2 and the difference between the bottom measurement and top measurement of birdsmouth are not the same 15 3/4 – 14 = 1 3/4
12 1/4 – 10 3/4 = 1 1/2
are these measurements correct? I understand the over all length differences because the span is wider but i would think angles and birdsmouth cuts would be the same.
Yes, you can’t compare a 12 ft long shed with a small front porch. Have you ever used a miter saw in your life? Cut a piece to 25 degrees and another one to 25.2 and see the difference. Also, the shed rafters have nothing to do with the porch rafters, so you should not compare them. The birdsmouth don’t have to be the same. I chose to make some deeper, that’s all. All measurements are correct, they are generated with a 3D software.
Sorry I was comparing your roof rafters with the birdsmouth cuts for the 8×12 shed and the 12 x 12 shed and since I thought the roof pitch was the same i thought the birdsmouth should be the same. I am building a 12 x 12 and was hoping i would have the measurements so i wouldnt have to trial and error cuts I do appreciate your help and these plans are great thanks.