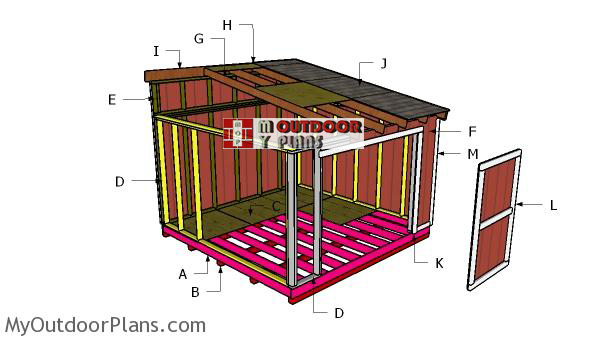
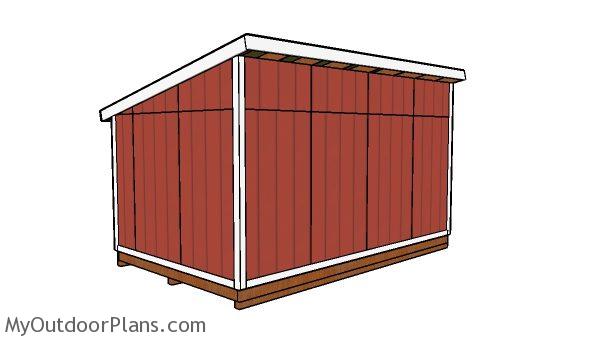
This step by step diy project is about 10×16 lean to shed shed plans. This is a narrow shed but providing lots of storage space, having a lean to roof. The shed comes with a low slope so it is ideal for areas with low precipitations. You can adjust the size of the double front doors so it suits your needs. Total height of this shed is 126″. Take a look over the rest of my woodworking plans, if you want to get more building inspiration.
When buying the lumber, you should select the planks with great care, making sure they are straight and without any visible flaws (cracks, knots, twists, decay). Investing in cedar or other weather resistant lumber is a good idea, as it will pay off on the long run. Use a spirit level to plumb and align the components, before inserting the galvanized screws, otherwise the project won’t have a symmetrical look. See all my Premium Plans HERE.
Projects made from these plans
10×16 Lean to Shed Plans
Building-a-10×16-lean-to-shed
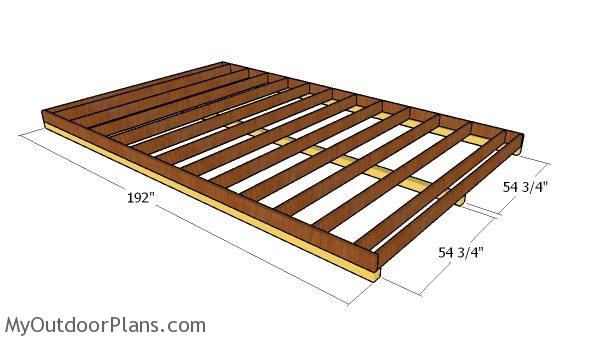
Cut & Shopping Lists
- A – 3 pieces of 4×4 lumber – 192″ long SKIDS
- B – 2 pieces of 2×6 lumber – 192″ long, 13 pieces – 117″long FLOOR
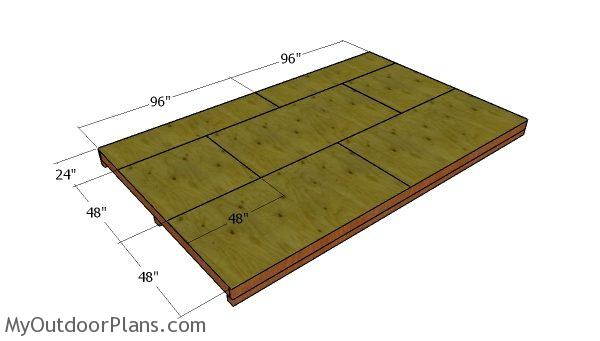
- C – 3 pieces of 3/4″ plywood – 48″x96″ long, 2 pieces – 48″x48″ long, 2 pieces – 24″x96″ long FLOORING
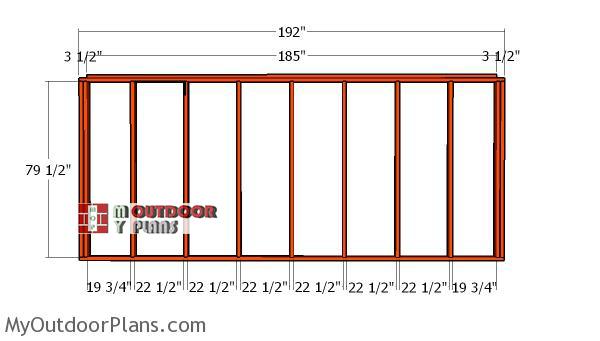
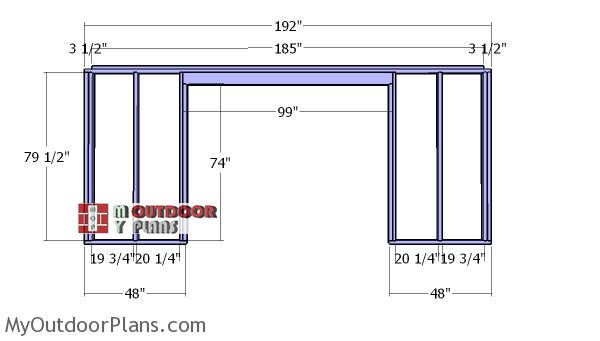
- D – 2 pieces of 2×4 lumber – 48″ long, 1 piece – 192″ long, 1 piece – 185″ long, 8 pieces – 79 1/2″ long, 2 pieces – 74″ long, 2 pieces of 2×6 lumber – 99″ long FRONT WALL
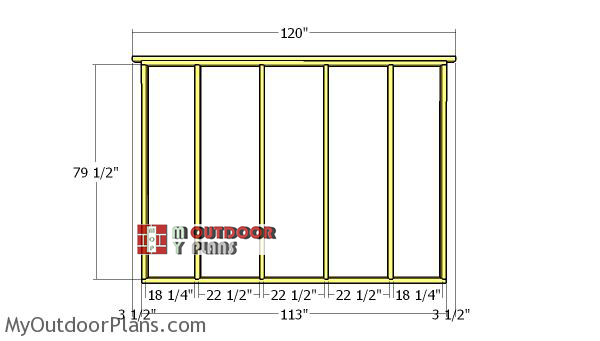
- D – 2 pieces of 2×4 lumber – 120″ long, 1 piece – 113 long, 6 pieces – 79 1/2″ long 2xSIDE WALL
- E – 2 pieces of 2×4 lumber – 192″ long, 1 piece – 185 long, 11 pieces – 79 1/2″ long BACK WALL
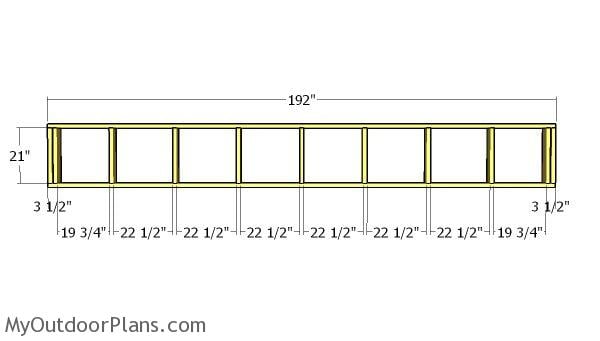
- E – 2 pieces of 2×4 lumber – 192″ long, 11 pieces of 2×4 lumber – 21″ long TOP BACK WALL
- G – 10 pieces of T1-11 – 48″x84″ long, 2 pieces – 24″x84″ long, 2 pieces – 8 1/2″x48″ long SIDING
- 3 pieces of 4×4 lumber – 16′
- 2 pieces of 2×6 lumber – 16′
- 13 pieces of 2×6 lumber – 10′
- 5 pieces of 3/4″ plywood – 4’x8′
- 7 pieces of 2×4 lumber – 16′
- 8 pieces of 2×4 lumber – 10′
- 38 pieces of 2×4 lumber – 8′
- 12 pieces of T1-11 – 48″x96″
- 8d nails, 2 1/2″ screws, 3 1/2″ screws
- wood filler , wood glue, stain/paint
Tools
![]() Hammer, Tape measure, Framing square, Level
Hammer, Tape measure, Framing square, Level
![]() Miter saw, Drill machinery, Screwdriver, Sander
Miter saw, Drill machinery, Screwdriver, Sander
![]() Safety Gloves, Safety Glasses
Safety Gloves, Safety Glasses
Time
![]() One day
One day
Related
- PART 1: 10×16 Shed Plans
- PART 2: 10×16 Shed Roof Plans
- PART 3: 10×16 Lean to shed doors Plans
- 12×12 Lean to shed plans
Building a 10×16 shed with a lean to roof

Building-the-shed-floor-frame
First of all, you need to build the floor frame for the 10×16 lean to shed. Cut the joists from 2×6 lumber at the dimensions shown in the diagram. Lay the joists on a level surface and then align the edges flush. Make sure the corners are square and then drill pilot holes through the rim joists. Insert 3 1/2″ screws to lock the components together tightly.
Fitting the skids
Select the location for the storage shed. Level the surface and make sure you remove the vegetation layer. Fit 4×4 skids under the floor frame. Place the skids equally spaced and then lock them to the frame with rafter ties.
Fitting the floor sheets
Fit the 3/4″ plywood sheets to the floor of the shed. Cut the sheets to the dimensions shown in the diagram. Align the edges flush and leave no gaps between them. Insert 1 5/8″ screws to lock the sheets along the joists, every 8″.
Building the wall frames
Back-wall-frame
Cut the components for the back wall from 2×4 lumber, after taking accurate measurements. Drill pilot holes through the plates and insert 3 1/2″ screws into the studs. Place the studs every 24″ on center, for a professional result. Make sure the corners are square and align the edges flush. Place double studs at both ends of the wall. Fit 1/2″ plywood blockings between the double studs.
Building-the-front-shed-wall-frame
Cut the components from 2×4 lumber at the dimensions shown in the plans, in order to build the front wall. Drill pilot holes through the plates and insert 3 1/2″ screws into the studs. Use 2×6 lumber for the double header and fit 1/2″ plywood between the beams. Drill pilot holes and insert 2 1/2″ screws to assemble the double header. You can adjust the size of the door opening to suit your needs, using the same techniques described above.
Side-wall-frames
Cut the components for the back wall from 2×4 lumber, after taking accurate measurements. Drill pilot holes through the plates and insert 3 1/2″ screws into the studs. Place the studs every 24″ on center, for a professional result. Make sure the corners are square and align the edges flush.
Assembling the shed frame
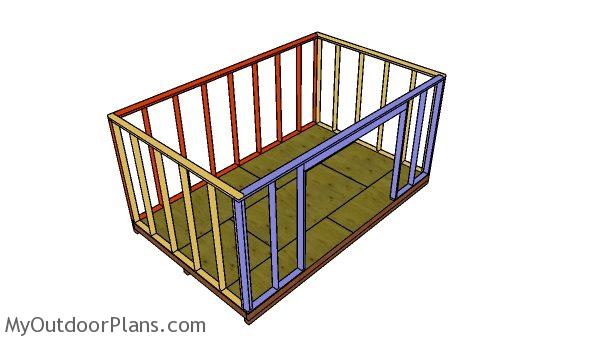
Fit the wall frames to the floor of the shed. Align the edges flush and plumb the walls with a spirit level. Drill pilot holes through the bottom plates and insert 3 1/2″ screws to lock them into place tightly. Moreover, you need to lock the adjacent walls together tightly using 2 1/2″ screws. Make sure the corners are square for a professional result.
Back top wall frame
Build the top frame for the back wall. Cut all the components from 2×4 lumber as shown in diagram. Drill pilot holes through the plates and insert 3 1/2″ screws into the studs. Place the studs every 24″ on center for a professional result.
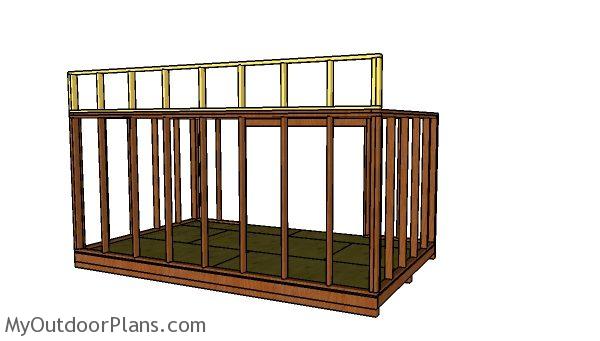
Fitting the top back wall
Fit the frame to the top of the back wall. Align the edges with attention and make sure the frame is perfectly plumb. Drill pilot holes through the bottom plate and insert 3 1/2″ screws into the back wall.
Fitting the siding sheets

Side wall panels
Fit the T1-11 siding sheets to the sides of the lean to shed. Align the edges flush and leave no gaps between the sheets. Insert 6-8d nails every 8″ along the framing.
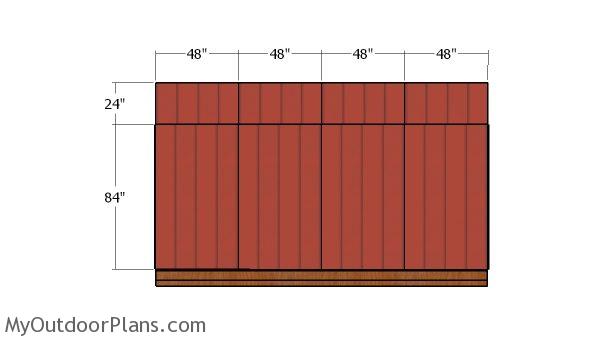
Back wall siding panels
Fit the sheets to the back of the shed. Align the edges with attention and make sure there are no gaps between the panels. Insert 6-8d nails, every 8″ along the framing.
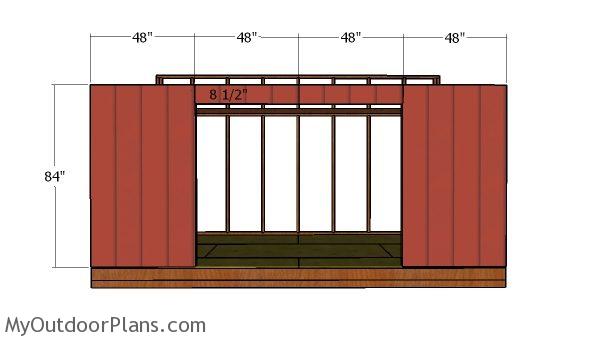
Front wall panels
Fit the panels to the front of the shed. Align the edges with attention and make the necessary cuts, so you can fit the panels around the opening. Use 6-8d nails to lock the panels into place, every 8″ along the framing.
Finishing touches
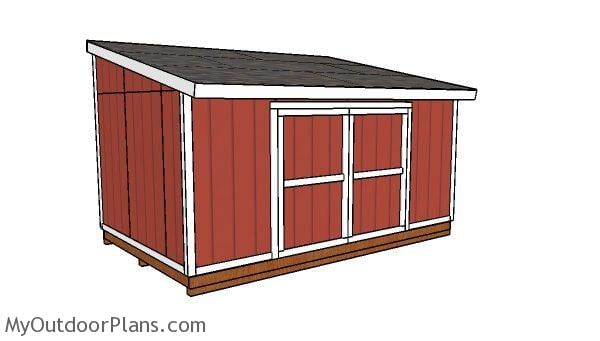
10×16 Lean to shed Plans
You need to take a look over PART 2 and PART 3 of the shed project, where I show you how to build the lean to roof and how to make the double front doors.
10×16 Lean to shed Plans – back view
I have lots of other shed projects on the site so I recommend you to browse through all alternatives before starting the building project.
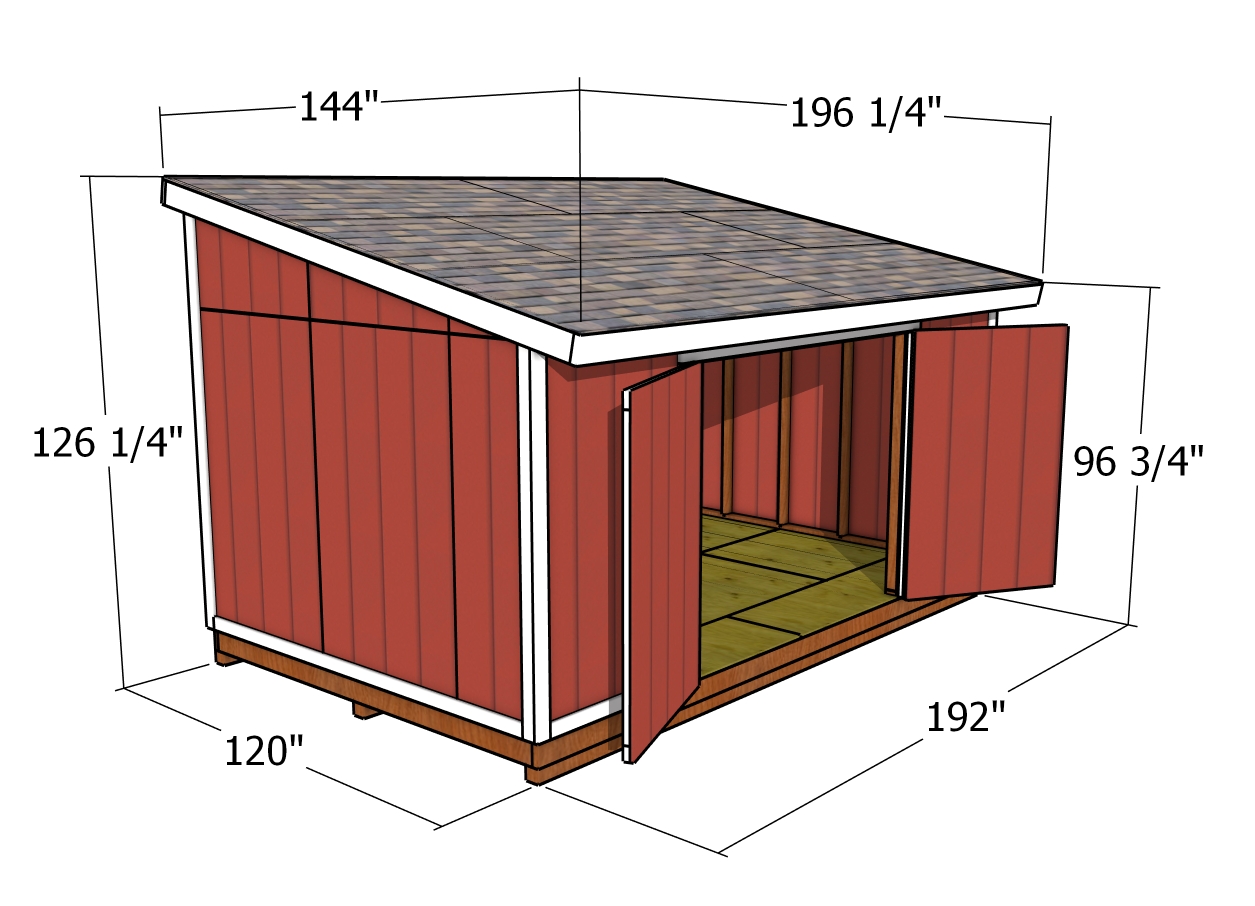
10×16 Lean to shed – dimensions
Building a 10×16 lean-to shed will likely cost you between $4,000 and $7,000, depending on the materials and finishes you select. The lean-to design offers a cost-effective and straightforward construction process, while providing ample space for storage, a workshop, or other needs. This investment creates a practical, spacious shed that blends functionality with a simple, clean aesthetic.

10×16 lean to shed – free plans
You can expect to spend about 4 to 6 weekends constructing your 10×16 lean-to shed. The design’s simplicity makes the build more manageable, but the larger size requires careful planning and consistent effort to ensure everything comes together smoothly. By the end of the project, you’ll have a solid, well-built shed that’s ready to handle a variety of uses.
How to build a 10×16 lean to shed
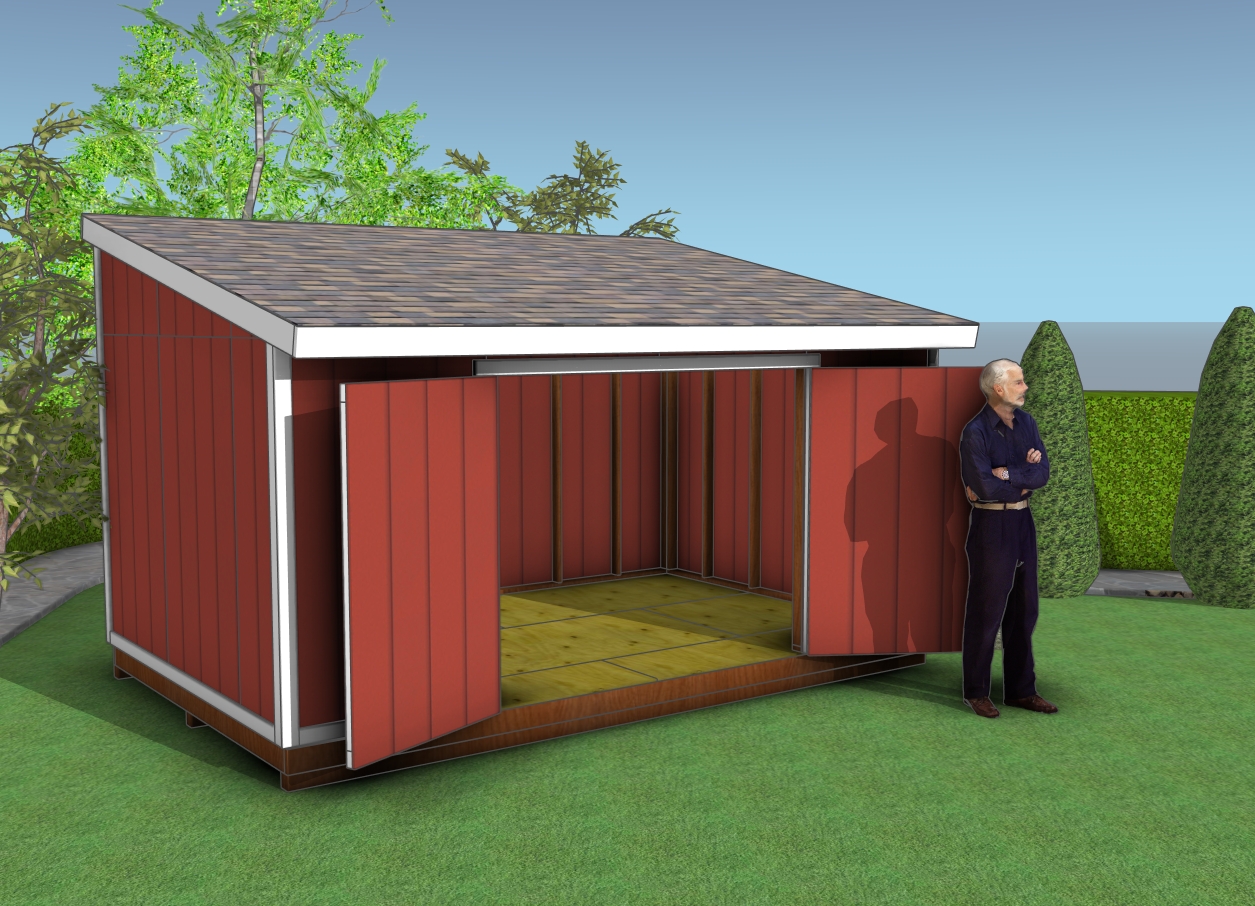
As you finish your 10×16 lean-to shed, you’ll have added a versatile and durable structure to your property. The lean-to design allows for easy integration with existing buildings or as a stand-alone shed, offering flexible options for placement.
See all my shed projects HERE. If you want to get PREMIUM PLANS for this project, in a PDF format, please press GET PDF PLANS button bellow. Thank you for the support.

This woodworking project was about 10×16 lean to shed plans free. If you want to see more outdoor plans, check out the rest of our step by step projects and follow the instructions to obtain a professional result.

7 comments
Do you have pdf plans for the 10×16 lean-to shed by chance? It be easier for I to follow.
Regards
Hi. I added a download button at the end of the article.
Are the 16′ 4×4’s necessary if i already have a concrete slab to put this on? I’m concerned that the 6×6 on top of the 4×4 will make it a large step-up into the shed.
They are no necessary, if the slab is not ground level. Otherwise all the water will rot the floor joists.
Where’s the roof trusses ?
Is there any reason I can’t use hurricane ties for the roof rafters? I want to do the least amount of cutting that I can 🙂
You can use rafter ties, but the bird-mouth cuts are still needed.