This step by step diy project is about strawberry tower plans. Building a strawberry planter is a complex project as it involves many cuts, but the end result is exquisite. Before starting the actual construction of the tower planter, we recommend you to adjust its size and design to your needs. You could add or remove several levels as to suit your budget and tastes.
If you want to build a durable strawberry tower planter we recommend you to invest in high quality lumber, such as pine, cedar or redwood. Cut the components at the right size, smooth the cut edges and lock the tower in a professional manner. Add waterproof glue and insert finishing nails into the components, if you want to get the job done in a professional manner. Fill the structure with proper soil before planting the strawberries. See all my Premium Plans HERE.
Projects made from these plans
Cut & Shopping Lists
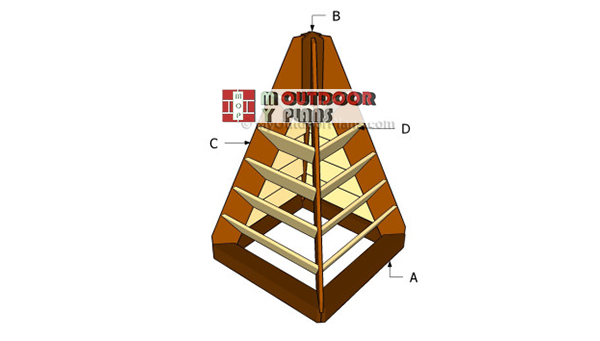
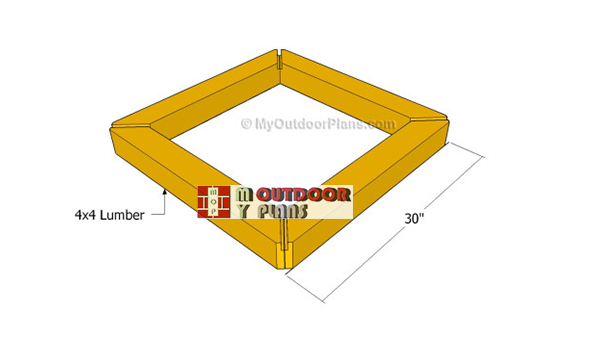
- A – 4 pieces of 4×4 lumber – 30” long BASE
- B – 4 pieces of 1×6 lumber – 48 1/2″ long SUPPORTS
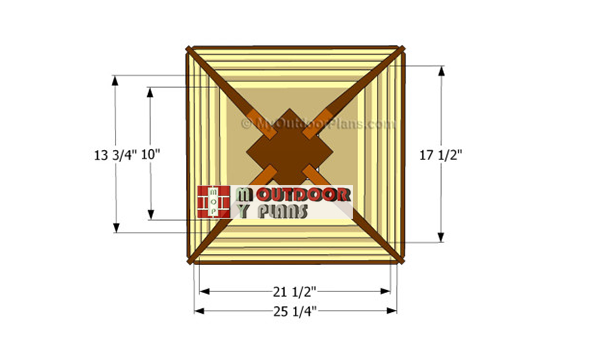
- C – 4 pieces of 1×6 lumber – 10″ long, 4 pieces – 13 3/4″, 4 pieces – 17 1/2″ SLATS
- C – 4 pieces of 1×6 lumber – 21 1/2″ long, 4 pieces – 25 1/4″ long SLATS
- D – 1 piece of 4×4 lumber – 13″ long CENTERPOST
- 1 piece of 4×4 lumber – 12 ft
- 6 pieces of 1×6 lumber – 8 ft
- 100 pieces of 2 1/2″ screws
- 100 pieces of 1 1/4″ screws
- wood glue, stain/paint
- wood filler
Tools
![]() Hammer, Tape measure, Framing square
Hammer, Tape measure, Framing square
![]() Miter saw, Drill machinery, Screwdriver, Sander, Post-hole digger
Miter saw, Drill machinery, Screwdriver, Sander, Post-hole digger
Time
![]() One weekend
One weekend
Related
Building a strawberry tower
Building-a-strawberry-planter
Top Tip: If you like strawberries but you also want to enhance the look of your garden, you should build a tower planter. As you will see in the instruction, you can create something unique in just a weekend.
Strawberry tower plans
Building-the-base
The first step of the woodworking project is to build the base of the tower. As you can notice in the image, you can build the base from 4×4 lumber, if you cut both ends of the components at 45 degrees.
Cut the corners as in the image, if you want to enhance the look of the construction. In addition, make several 1″ deep channels along the diagonals. Drill pilot holes and lock them together using screws.

Building-the-supports
The next step of the garden project is to build the four vertical supports. As you can notice in the plans, you need to build the components from 1×6 lumber. Cut the ends as in the diagrams, by using a good circular or miter saw.
It is essential to make all the four supports equal, otherwise the tower won’t have a nice appearance. Smooth the cut edges with a sand blog and with medium-grit sandpaper.

Fitting the supports
Lock the supports into the base of the planter, at one end, and to the center posts, at the opposite end. Add waterproof glue to the joints and several galvanized screws, in order to create rigid joints.

Attaching the center-post
In this image you can see a close-up with the center posts. Cut several 1/2″ grooves on every side of the center post, in order to fit the supports tightly.

Cutting the slats
Building the slats for the planters is a complex procedure, as there are many cuts that should be made. As you can notice in the image, you need to make the angle cuts in two directions, as to fit into place properly.
Top Tip: Remember that the tower has five stories, so the components should be cut at different sizes. In addition, you need to build four equal slats for each story.
Attaching-the-slats
Fit the slats into place and lock them to the vertical supports with finishing nails and waterproof glue. Use a spirit level to check if the supports are perfectly horizontal.
Align the slats at both ends before drilling pilot holes and inserting the screws. Work with attention, as installing the slats is a tricky process.

Fitting the slats
As you can see in the image, you need to place the slats equally spaced, as to create even gaps between them. Repeat the procedure on all four faces of the tower planter, in the same manner described above.

Strawberry tower plans
Last but not least, you have to take care of the finishing touches. Therefore, fill the holes and the cracks with wood filler and let it dry out for several hours, before sanding the surface with 120-grit sandpaper.
Top Tip: Protect the wooden components from rot and from moisture by applying several coats of paint. Fill the tower with soil and plant the strawberries in the planters.
This woodworking project was about strawberry tower plans. If you want to see more outdoor plans, we recommend you to check out the rest of our step by step projects. I would love you to Pin and Like this project.
EXPLORE MORE IDEAS FOR:
 |
 |
 |
 |
2 comments
We bought these plans from you on pintrest I think…on the vert supports the angles do not match up and saws do not go to that angle…you do not have the measurement top down…onthe one side you come in 2.5 inches tp and 1 3/4 bottom… on other sie one inch and 9 1/4…what is the measurement down the edge of the board where on one side where the 22.5 and the 67.5 meet
then on other side where the 22.5 and 59 meet?
Also slats…showing you cut two different angles on same edge…not possible either?
You didn’t buy these plans from me, because these plans are free. I do not sell this design, it’s free. Therefore, you need to ask the questions from the person that sold you the plans you are talking about