This step by step project is about raised planter box plans. Building a raised planter box is easy and it is a great way to grow vegetables indoor, so make sure you follow the instructions. If you aren’t satisfied with the size or design of this planter, we recommend you to check out the rest of your options HERE. Work with attention and plan everything from the very beginning, as to prevent costly mistakes.
Nevertheless, there are several aspects that you should take into account before starting the construction of the planter. First of all, you need to adjust the design and the shape of the planter as to fit your needs. Next, we recommend you to use quality materials and professional tools, as to add character and style to your project. Use cedar, redwood or pine, as they have both a beautiful natural finish and are resistant to decay. See all my Premium Plans HERE.
Projects made from these plans
Cut & Shopping lists
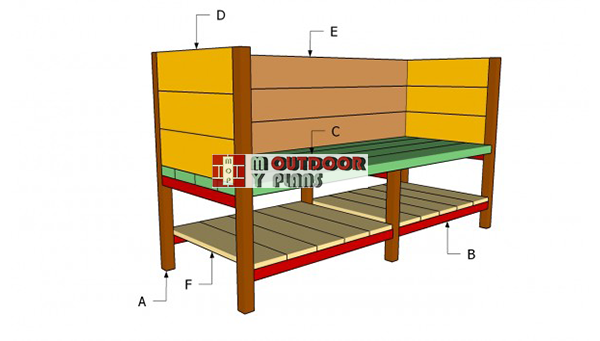
- A – 4 pieces of 2×2 lumber – 33″ long, 2 pieces of 2×2 lumber – 15″ long LEGS
- B – 4 pieces of 2×2 lumber – 27 3/4″ long, 3 pieces of 2×2 lumber – 19″ long FRAME
- C – 4 pieces of 2×6 lumber – 60″ long FLOOR
- D – 6 pieces of 2×6 lumber – 57″ long SLATS
- E – 6 pieces of 2×6 lumber – 57″ long SLATS
- F – 10 pieces of 1×6 lumber – 22″ long SHELF
- 100 pieces of 2 1/2″ screws
- 100 pieces of 1 1/4″ screws
- wood glue, stain/paint
- wood filler
- landscape fabric
Tools
![]() Hammer, Tape measure, Framing square
Hammer, Tape measure, Framing square
![]() Miter saw, Drill machinery, Screwdriver, Sander
Miter saw, Drill machinery, Screwdriver, Sander
Time
![]() One day
One day
Related
Building a raised planter box plans
Building-a-raised-planter
Top Tip: Building a raised planter box is easy, if the right plans and tools are used. As you can notice in the plans, even a person with average woodworking skills can get the job done, as the project requires to a basic frame and to add the side walls.
Raised planter box plans
Building-the-frame-of-the-planter
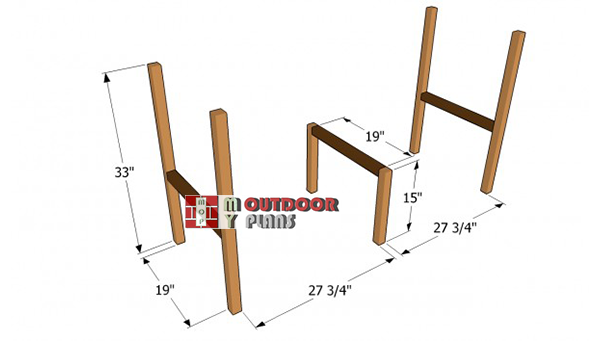
The first step of the project is to build the frame of the raised bed. As you can easily see in the image, you need to use 2×2 lumber and 3 1/2″ screws. Drill pilot holes trough the components before inserting the screws, to prevent the wood from splitting.
Top Tip: Check if the corners are right angled, by using a spirit level. In addition, we recommend you to add waterproof glue to the joints, in order to enhance the rigidity of the frame.
Fitting-the-planter-bottom-slats
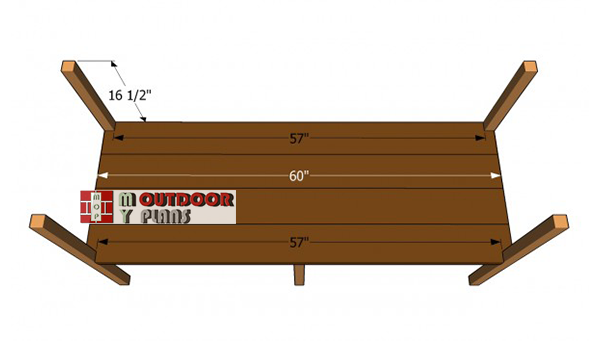
Attach the 2×6 slats to the frame, as in the image. Make sure the slats are flush with the frame at both ends, before locking them into place with screws. Countersink the head of the screws, in order to get a neat appearance.
In addition, we recommend you to close the gaps between the slats and add glue to get a professional result. Place a spirit level on top of the floor to check if it is perfectly horizontal.

Attaching the side walls
Continue the project by fitting the side walls of the raised planter box. As you can easily notice in the plans, you need to drill pocket holes at both ends of the slats and lock them to the corner posts with 1 1/4″ screws.
Add waterproof glue between the components in order to close the gaps. In addition, you should round the exposed edges of the planter, by using a router and a 3/4″ bit. Staple landscape fabric to the interior of the planter, so you protect the wooden slats from decay.

Attaching the bottom shelves
If you want to add functionality to the planter box, you could add a bottom shelf to it. As you an see in the image, all you need to do is to attach the 2×2 cleats to the frame of the planter and lock it into place with galvanized screws.
Attach several 1×6 slats to the cleats and lock them into place with 1 1/4″ screws. If you want to place heavy objects to the shelves, you should fit 2×6 lumber. Level the cleats into place, before locking them with screws.

Raised planter box plans
Last but not least, you should take care of the finishing touches. Therefore, fill the holes with wood putty and let the compound to dry out for several hours. Smooth the surface with medium-grit sandpaper along the wood grain.
Top Tip: Apply several coats of stain or paint to enhance the look of the outdoor storage box and to protect the components from decay. Do not apply the stain to the planter, but only to the stand to the shelf. Check out the rest of the project, to how how to build more garden projects.
This project was about raised planter box plans. If you want to see more outdoor plans, we recommend you to check out the rest of the projects. Don’t forget to share our projects with your friends, by using the social media widgets.
EXPLORE MORE IDEAS FOR:
 |
 |
 |
 |