This step by step diy project is about outdoor pavilion plans. Building a rectangular pavilion is a great project for your backyard. The best part of the woodworking project is that you can get the job done by yourself and keep the costs under control, if you follow the right plans and techniques. Working with attention is important, but adjusting the size and the design of the outdoor pavilion is essential.
We recommend you to choose quality materials, if you want to build the pavilion in a professional manner. Always align the components at both ends and drill pilot holes before inserting the galvanized screws. Moreover, we recommend you to add waterproof glue to the joints, in case you want to increase the bond of the structure. Fill the holes with wood putty, smooth the surface with sandpaper and apply several coats of paint. See all my Premium Plans HERE.
Projects made from these plans
Cut & Shopping Lists
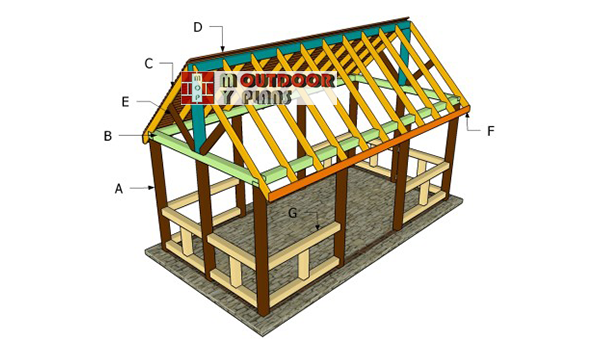
- A – 10 pieces of 6×6 lumber – 96” long POSTS
- B – 2 pieces of 6×6 – 120″ long, 2 pieces – 240″ long TOP RAILS
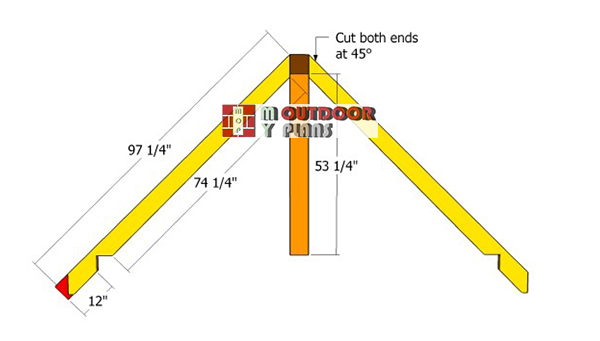
- C – 22 pieces of 2×6 lumber – 97 1/4″ long RAFTERS
- D – 2 pieces of 6×6 lumber – 53 1/4″ long, 1 piece – 240″ long TOP RIDGE
- E – 48 pieces of 1×6 lumber – 240″ long ROOFING
- F – 2 piece of 1×6 lumber – 240″ long TRIMS
- G – 8 pieces of 4×4 lumber – 24″ long, 8 pieces – 51 3/4″, 8 pieces – 72 3/4″ RAILINGS
- 12 pieces of 6×6 lumber – 8′
- 2 pieces of 6×6 lumber – 10′
- 3 pieces of 6×6 lumber – 20′
- 22 pieces of 2×6 lumber – 10′
- 50 pieces of 1×6 lumber – 10′
- 16 pieces of 4×4 lumber – 8′
- post anchors
- 1000 pieces of 2 1/2″ screws screws/nails
- 100 pieces of 6″ screws
Tools
![]() Hammer, Tape measure, Framing square
Hammer, Tape measure, Framing square
![]() Power mixer, Miter saw, Drill machinery, Screwdriver, Sander
Power mixer, Miter saw, Drill machinery, Screwdriver, Sander
Time
![]() One weekend
One weekend
Related
Building an outdoor pavilion
Building-an-outdoor-pavilion
Top Tip: Building a large outdoor pavilion doesn’t have to be a costly and complex project. On the contrary, any person with basic woodworking skills can get the job done, if the right plans and techniques are used.
Outdoor pavilion plans
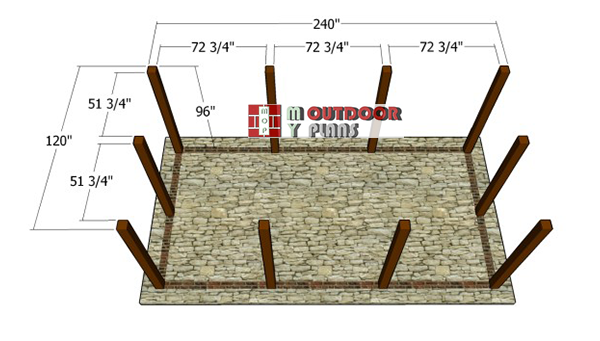
Fitting-the-posts
First of all, you need to install the into place. In order to get a professional result, we recommend you to dig 2-3′ deep holes and pour concrete footings. If you don’t want to set the posts into concrete, you could use metal anchors.
After plumbing the wooden posts, we recommend you to secure them temporarily with braces. Work with attention and with great care, making sure you space the posts as in the free plans.
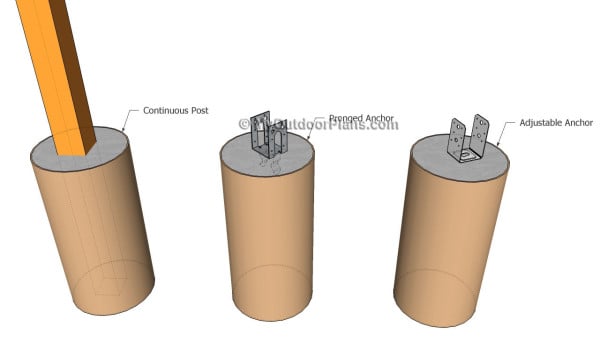
Anchoring the post into concrete
Use the most suitable anchoring system for your needs. Make sure you use temporary braces to secure the posts while locking them into place. Use a spirit level to plumb the posts.
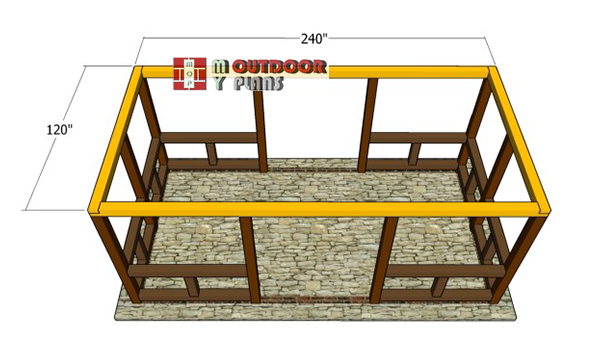
Installing-the-top-rails
The next step of the woodworking project is to install the top rails. As you can notice in the image, you need to use 6×6 lumber and long galvanized screws. Place a spirit level on top of the tails, to see if they are perfectly horizontal.
In addition, the corners should be right-angled, so check them with a carpentry square. Always align the components at both ends and drill pilot holes before inserting the screws.

Building the top rails
Cut the both ends of the rails in a L-shape, as to fit together easily. In order to cut the notches, we recommend you to make several parallel cuts and to clean the recess with a spirit level. Drill pilot holes and insert several 6″ galvanized screws into the posts. The notches should be 2 3/4″ deep and 5 1/2″ wide.

Installing the ridge board
Next, you need to fit the ridge board. As you can notice in the plans, we recommend you to use 6×6 lumber. After cutting the component at the right size, we recommend you to plumb them and to install them into place with corner brackets and screws.
Top Tip: If the pavilion is very long, you might want to fit braces (cut the both ends of the supports at 45º) or a middle posts. Reinforce the joints with metal hardware.
Building-the-rafters
Afterwards, you have to build the rafters for the outdoor pavilion. As you can notice in the image, you need to cut both ends of the rafters at 45º, by using a circular saw with a sharp blade.
In addition, you have to cut small notches inside the rafters, otherwise they won’t fit into place easily. Make sure you take accurate measurements, otherwise the components might not fit into place easily.
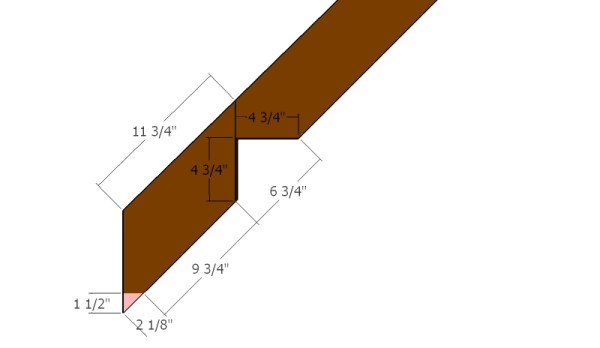
Cutting the notches in the rafters
Take accurate measurements before making the notches in the rafters.

Attaching the rafters
Attach the rafters into place, as in the image. As you can easily notice, you need to place the rafters equally spaced, leaving between them about 22 1/2″. Secure one end of the rafters to the ridge board, while the other one should be locked to the top rails. Drill pilot holes before inserting the galvanized screws.

Fitting the rafters
You can see the roof structure from another angle. Make sure everything is aligned at both ends and properly secured into place. Work with attention and with good judgement.

Installing the roofing slats
The next step of the woodworking project is to install the roofing boards. As you can notice in the image, we recommend you to cover the structure with 1×6 lumber, after covering them with several coats of protective paint. Use 2 1/2″ galvanized screws/nails.
Top Tip: The boards should overlap at least several inches, in order to protect the structure from water damage. Work with attention and with grate care, in order to get a neat appearance.

Attaching the trims
If you really want to add style to the the wooden construction, we recommend you to attach 1×6 trims to the ends of the rafters. After aligning the trims, you need to secure them into place with 1 1/4″ finishing nails or screws.

Outdoor pavilion plans
Afterwards, you have to fill the gaps and the holes with a good wood putty. Let the compound to dry out properly, before sanding the whole wooden components, along the wood grain, with 120-grit sandpaper.
Top Tip: Apply several coats of wood stain, in order to enhance the look of the outdoor pavilions. Use 6×6 lumber to build simple railings, as in the plans.
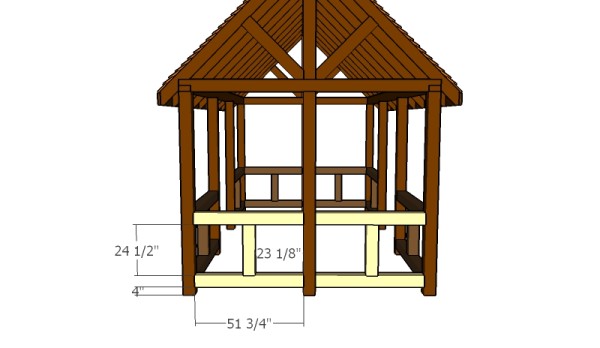
Building the end railings
Build the side railings from 6×6 lumber. Alternatively, you could save money by using 4×4 beams. Drill pocket holes at both ends end secure them to the posts using 2 1/2″ screws. Make sure the corners are square.
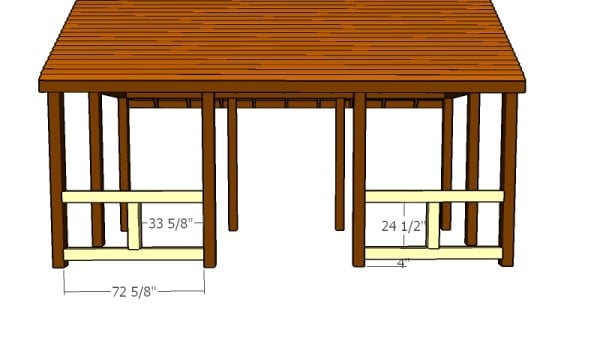
Building the front and back railings
Build the railings for the front and back faces using the same techniques described above.
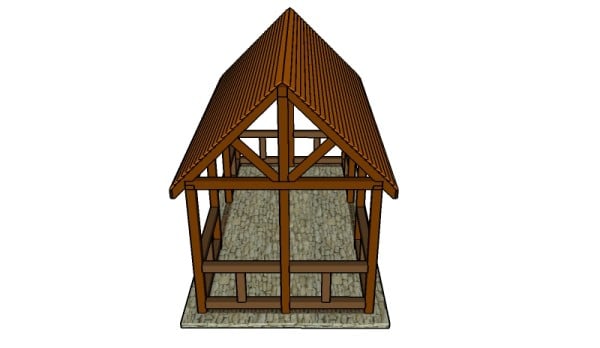
How to build an outdoor pavilion
Alternatively, you could attach 3/4″ plywood sheets to the roof and seal it with corrugated metal sheets. The finishing touches will breathe life into the pavilion, so make sure they reflect your personality and match the style of the property.
This woodworking project is about outdoor pavilion plans free. If you want to see more outdoor plans, we recommend you to check out the rest of our step by step projects. SHARE our projects and follow us on the social networks to help us keep adding free woodworking plans. LIKE us on Facebook to be the first that gets our latest updates and submit pictures with your DIY projects.
33 comments
Thank you for this awesome site!! How kind of you to offer free plans and include easy to understand instructions!!
THANKS!!!
Great plans and ditto on Kathy’s comment.
Do you have a rough estimate of lumber cost, considering it varies area to area, but just a rough estimate would be very helpful.
Again thanks for sharing your plans!
Steve
The easiest way to get an estimate is to print the materials list and go to the local lumber yard. Probably around 1000 dollars depending on the materials used.
Can you substitute 4x4s instead of the 6x6s on this?
Yes, you can. But then you need to make modifications to the other dimensions. But technically speaking 4×4 lumber is sturdy enough for the frame.
I think I will go with the 6x6s. One last question, is it possible to do this with only 3 posts on the 20 foot side and 2 on the 10 foot side? Just trying to figure some options and cut cost. 6x6s in my area are crazy expensive right now.
You could try. I am sure the structure will hold the weight of the roof, but on the long run the plates might bow. You should take a look over the rest of my plans, as I have plenty that require 4x4s: http://myoutdoorplans.com/category/gazebo/
What do you mean by plates? I will be running continuous post rather than the anchor plates?
I mean to the horizontal beams attached to the top of the posts.
Do you happen to have a 15′ x 30′ pavilion plan?
Thank you.
I have a 16×16 pavilion plan. You can make two of these joined together. Plans at: http://myoutdoorplans.com/pergola/16×16-outdoor-pavilion-plans/
How do you connect the 1 x 6 roof lumber so it does not leak at the joint. Also is the entire structure built out of treated lumber?
You overlap the slats and then apply a few coats of sealer. You can use treated lumber or you can use construction lumber and then apply appropriate products to protect them against the elements.
looking for 20′ x 30′ pavilion plans.
I don’t make plans with custom dimensions. I have plans for a 20×20 pavilion if that helps: http://myoutdoorplans.com/gazebo/20×20-picnic-shelter-plans/
I read the comments and see the plans, but I was wondering if you had plans for a 8 x 12 Pavilion with only the four corner posts?
I don’t have plans for a 8×12 pavilion. See all the gazebo and pavilion plans at: http://myoutdoorplans.com/category/gazebo/
I was reviewing your plans for 16 x 16 Pavillion. Wondering if this can be built with 4 6 x 6 posts rather than 6? We are live in an area where we can get heavy snow in winter so want to make sure it’s safe…
First of all, my 16×16 pavilion calls for 8 posts and not 6. Personally, I would not build a 16×16 pavilion with just 4 posts, especially if you live in an area with heavy snow. In addition, make sure you check out the local building codes before starting the project.
How much would this cost to make?
Since I have added a cut list, you can add up the cost for each component. It is hard to make an estimate, since the materials price vary.
What would be the best way to put flooring into this? I was thinking flattening out a area, laying down sand, then putting down 1×1 stone slabs spaced evenly apart. Would this work? or am I going at this the wrong route?
That should work. Alternatively, you can pour a concrete slab before building the pavilion.
I may modify the roof to a hip instead of gable. Will take more lumber, more cuts…hmmm may keep it gable but use metal roof. Great plans!!
Thank you, Ray! A hip roof looks better, but it requires more skills and it increases the costs. I wanted to design a pavilion that can be built by anyone at a manageable cost. Feel free to make any upgrades and modifications so it suits your needs and tastes!
Wondering how I can build a gazebo on a concrete patio. How do I easily secure my 6by6 posts to the floor before I continue the build.
First of all, you need to read the local codes to see if that is allowed. In most cases a simple concrete patio won’t support the weight of the gazebo/pavilion. Footings might be needed. To secure the posts to concrete, you need to use anchors: http://amzn.to/2vzVpcZ
Our church wants to build a pavilion in our back yard area. We want to be able to put about 8 standard tables under the pavilion – how large of a pavilion would you suggest?
What size are the tables?
What is the roof pitch?
12:12
Is this one available as a “premium plan”? I imagine that due to its size I would need plans sufficient to apply for a building permit…
Also, are the middle posts on the 10ft sides structurally necessary, or would it be possible to omit them (maybe with some other alteration?).
I’d like to use this plan to cover an outdoor patio kitchen (which is 18ft long), but without obstructing access to the rest of the patio, so I wouldn’t want to include the railings.
No Premium Plan for this yet.