This step by step woodworking project is about how to build a gazebo roof. Building a rectangular gazebo roof is a complex project, as it involves a lot of cuts, but any person with basic woodworking skills can get the job done, if the right plans are used. You can adjust the size and the shape of the roof, as to fit your needs and tastes. Follow the general instructions and get the job done in one weekend.
Building a roof for a rectangular gazebo is a complex task, as it involves many cuts and a lot of measurements. In addition, you need to ask another person to hols the components in place, after aligning them at both ends, while you drive in the screws. Follow the building codes and use quality materials, if you want to get a professional result. It is essential to use weather-resistant lumber that is in a good condition and perfectly straight.
Projects made from these plans
Cut & Shopping lists
- A – 1 pieces of 2×6 lumber – 97 3/4″ long, 2 piece of 2×4 – 77 1/4” long TOP RIDGE
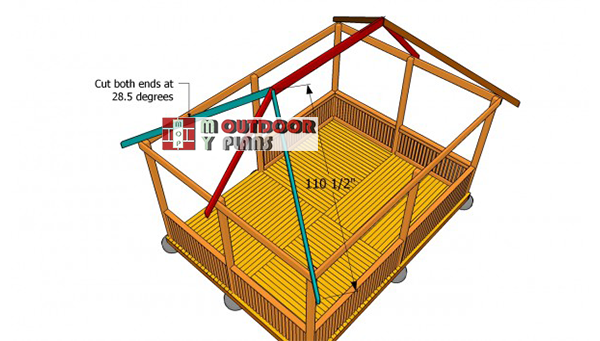
- B – 4 piece of 2×4 lumber – 110 1/2″ long – both ends cut at 28.5º HIP RAFTERS
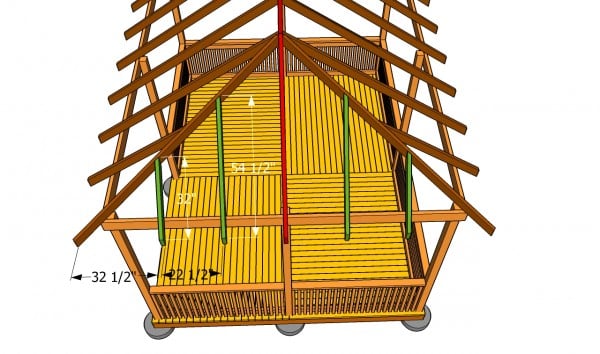
- C – 4 piece of 2×4 lumber – 32″, 4 piece – 54 1/2″ – both ends cut at 45º RAFTERS
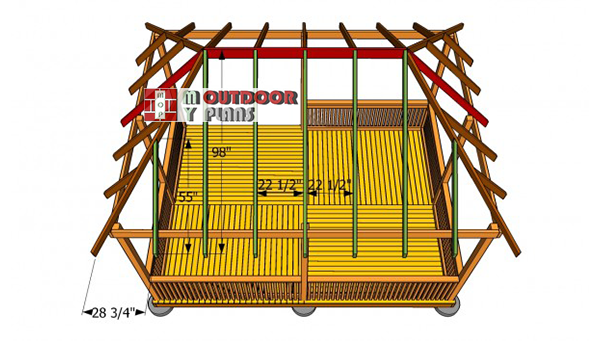
- D – 10 pieces of 2×4 lumber – 98”, 4 pieces – 55″ – both ends cut at at 34º RAFTERS
- E – 11 pieces of 4×8′ of 3/4” tongue and groove plywood ROOFING
- F – 600 sq ft of roofing felt ROOFING FELT
- G – 600 pieces of asphalt shingles SHINGLES
Tools
![]() Hammer, Tape measure, Framing square
Hammer, Tape measure, Framing square
![]() Miter saw, Drill machinery, Screwdriver, Sander
Miter saw, Drill machinery, Screwdriver, Sander
Time
Related
- Part 1: Ractangular Gazebo Plans
- Part 2: How to Build a Gazebo Roof
Building a gazebo roof
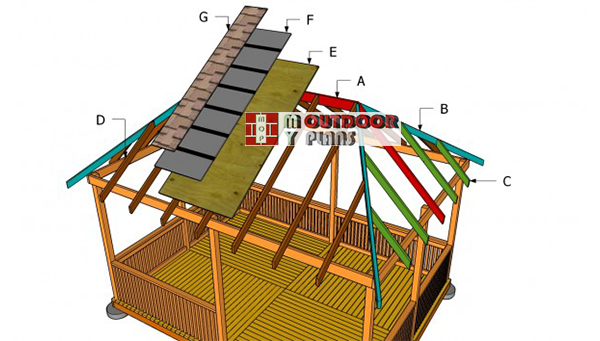
Building-a-gazebo-hip-roof
Top Tip: Building a rectangular gazebo is one of those projects that will add value to a garden. After making the frame of the gazebo, you should build the roof and install the shingles.
How to Build a Gazebo Roof

Fitting-the-top-ridge
The first step of the project is to install the top ridge. As you can see in the image, you need to cut the middle rafters at 45º, using a miter or a circular saw. Align the components with great care, if you want to get a professional result.
Use a spirit level to check if the top ridge is horizontal. Drill pilot holes trough the rafters before driving the 5″ galvanized screws, to prevent the wood from splitting.
Installing-the-hip-rafters
Continue the project by installing the hip rafters. As you can see in the image, you need to cut both ends of the rafters at 61.5º (make 28.5 degree cuts). Use a circular saw or a miter saw to get the job done in a professional manner. An then cut the top of the rafters at 45 degrees on the middle (so two 45 degree cuts on the middle) creating a triangle.
If you use a ladder, make sure you place it on a sturdy surface. It is also essential to secure the rafters tightly into place, otherwise the roof structure might not be enough rigid.
Fit the rafters
The next step of the woodworking project is to install the intermediate rafters. As you can see in the image, you need to cut the rafters at angle, otherwise they might not fit into place properly. Cut both ends of the components at 48.5 degrees. Then you need to cut the top of the rafters at 47 degrees, so they can fit to the hip rafters properly.
Top Tip: On the other hand, it is essential to place the rafters every 24″. otherwise you won’t be able to fit the roofing sheets accurately. Pre-drill the rafters at both ends, before inserting the screws into the hip rafters.
Installing-the-common-rafters
Continue the project by fitting the intermediate rafters on the other sides of the roof. Cut the ends of the rafters at 57º, otherwise they might not fit into place properly. Place the rafters every 24″, in order to support the weight of the roof efficiently. For the small rafters placed at both ends of the front and back of the roof, you need to make one more cut to the top, so they can fit to the hip rafters. Cut them at 29.5 degrees.
Build the rest of the rafters in the same manner and fit them to the opposite side of the rectangular gazebo. Align the rafters at both ends and drive the screws in the top plates.
Installing the roofing sheets
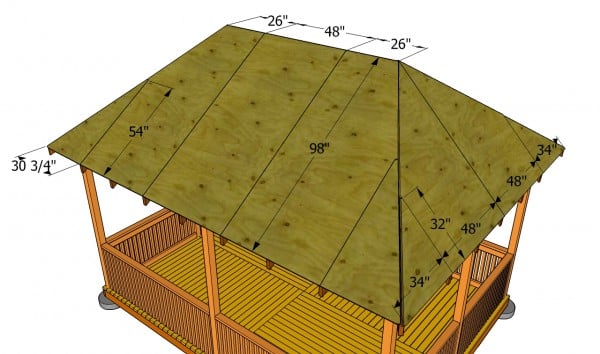
The next step of the outdoor project is to fit the roofing sheets. As you can see in the image, you need to cut the 3/4″ plywood sheets at the right size before attaching them to the rafters. Drill pilot holes trough the plywood and insert 1 1/4″ galvanized screws into the rafters, every 8″.
Cover the roof with tar paper, making sure the strips overlap at least 2″. Use staples to secure the roofing felt into place, every 6″.
Fitting the trims
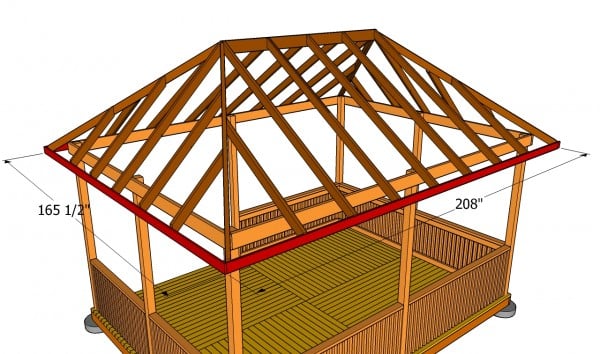
One of the last steps of the project is to enhance the appearance of the rectangular gazebo. Add 1×4 trims to the end of the rafters, if you want to get a professional result. Align the trims at both ends and lock them to the rafters with 1 1/4″ finishing nails.
Top Tip: Use a spirit level to check if the trim are horizontal. In addition, you could cut the ends of the trims at 45º, otherwise they might not fit together easily.
How to build a gazebo roof
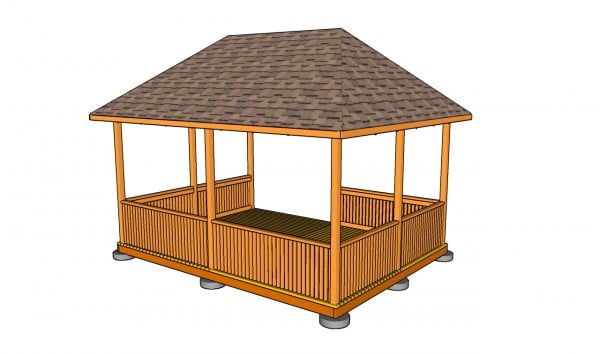
Last but not least, you have to install the asphalt shingles. Fit the starting course before installing the asphalt shingle tabs. Secure them into place with roofing tacks. Cut the tabs into three components, in order to cover the hips.
Top Tip: Fill the holes with putty and let it dry out for several hours, before sanding the surface with 120-grit sandpaper. Vacuum the residues and apply several coats of protective paint.
This project was about gazebo roof plans. If you want to see more outdoor plans, we recommend you to check out the rest of the projects. LIKE us on Facebook to be the first that gets our latest updates and submit pictures with your DIY projects.


27 comments
what is the size of this gazebo
It’s a 12×16 gazebo. See the first part of the project here http://myoutdoorplans.com/pergola/rectangular-gazebo-plans/
Can you figure detail plans for a gazebo 16′ wide by 26′ long and 9′ eve height?
Unfortunately, I don’t make plans with custom sizes.
Hi Julian, I was so happy to find these plans. They’re very detailed and easy to follow. Just wondering what the gazebo measurements are? On the first part of this page it says they are for a size of 10 x 14 but in one of the comments above you say they are for 12 x 16. Could you clarify? I have a very specific space I will be building mine in and need to know for sure. Thanks.
Hi there, Daniel. The plans are for a 12×16 gazebo. Sorry for the confusion. I will modify the typing mistake in the article. See all the gazebo plans here: http://myoutdoorplans.com/category/gazebo/ Happy building!
Doesn’t the rafters need a birds mouth cut for rafters?
It’s up to you. If you want to make birds mouth to the rafters, check out these plans: http://myoutdoorplans.com/pergola/wood-gazebo-plans/
I guess the question I should have asked does the rafters need them or will a rafter tie do? If so, do you have a rafter tie you recommend?
As I said, it is a question of personal choice. I don’t want to enter into details, as they are several schools of thought. If you live in an area with heavy snows or affected by hurricanes, you will safer with both the ties and the birds mouth cuts.
How much overhang does these rafters have?
12 1/4″ on the front and back, and 9 3/4″ on the sides.
I am in the middle of building this gazebo plan. However, I am having trouble with the compound mitre for hip jack rafters. Can you provide the angles for front and side?
Cut both ends of the hip rafters at 61.5 degrees. And then cut the top of the rafters at 45 degrees on the middle (so 2 45 degree cuts on the middle) creating a triangle. I hope this helps.
I would like to build the exact same gazebo except that i would make it 10 feet by 12 feet. Is there a quick way i can adjust your gazebo roof plan measurements to fit my gazebo size? Do you have the step by step plan on how to do this no matter what your gazebo size is?
No, I don’t have instructions so you can build this roof in any size.
I would like to build a gazebo 12 x18. What are the gazebo roof plan measurements to fit my gazebo size?
Thank you!
I don’t understand the question.
I would like to build the same gazebo but 12 x 18. Yours is 12 x 16. How I can adjust your gazebo roof plan measurements to fit my gazebo size 12 x 18. Do you have a step by step plan?
I do not have a step by step plan for a 12×18 gazebo. In order to adapt my plans, you should make the top ridge 2′ longer and fit the necessary rafters into place.
Thank you!
I am planing to build a 12×14 gazebo with the same type of hip roof. Would i need to change the angle and the degrees . I was planning on using 2×6 rafters?
The angles would be the same. You just need to make a few modifications since the gazebo is not 16 long but 14′ long.
Do you have a plan for converting this rectangular gazebo into a screened in one?
No, but I have plans for a square screened gazebo here: http://myoutdoorplans.com/pergola/screened-gazebo-plans/
Don’t see plans for square 8 by 8 square gazebo
I like the gazebo plan and will adjust the it to be an 8 x 12 to so I can build without needing permits (less than 100sqf). How can i adjust the rafters since now i only have 12ft at the widest