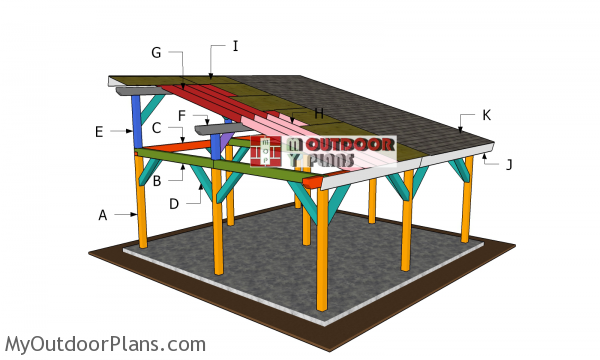
This step by step diy project is about 20×20 pavilion with lean to roof plans. This pavilion has a ground area of 20 ft x 20 ft, but the roof is wider so it will protect more space, as it has overhangs on all sides. This pavilion features a post frame structure made from 6x6s and 6x8s. The pavilion features a lean to roof with generous overhangs on all sides. The base of the pavilion is 24’x24′. Total height of the pavilion is 14′ 3″. The roof pitch is 3:12. Take a look over the rest of my woodworking plans, if you want to get more building inspiration. Premium Plans for this project available in the SHOP.
When buying the lumber, you should select the planks with great care, making sure they are straight and without any visible flaws (cracks, knots, twists, decay). Investing in cedar or other weather resistant lumber is a good idea, as it will pay off on the long run. Use a spirit level to plumb and align the components, before inserting the galvanized screws, otherwise the project won’t have a symmetrical look. If you have all the materials and tools required for the project, you could get the job done in about a day.
Projects made from these plans
20×20 Pavilion with Lean to Roof Plans
Building-a-20×20-lean-to-pavilion
Cut & Shopping Lists
- A – 9 pieces of 6×6 lumber – 8′ long POSTS
- B – 6 pieces of 6×8 lumber – 10 ft long CROSSBEAMS
- C – 4 pieces of 6×8 lumber – 136 ft long, 2 pieces – 10 ft long TOP PLATES
- D – 22 piece of 6×6 lumber – 42″ long BRACES
- E – 3 piece of 6×6 lumber – 51 1/2″ long, 3 pieces – 22″ long RIDGE BEAM SUPPORTS
- F – 4 piece of 6×8 lumber – 136″ long BRACES
- F – 4 piece of 6×6 lumber – 24″ long BRACES
Tools
![]() Hammer, Tape measure, Framing square, Level
Hammer, Tape measure, Framing square, Level
![]() Miter saw, Drill machinery, Screwdriver, Sander
Miter saw, Drill machinery, Screwdriver, Sander
![]() Concrete mixer, Post hole digger
Concrete mixer, Post hole digger
Time
![]() One weekend
One weekend
Related
- PART 1: 20×20 Lean to Pavilion Plans
- PART 2: 20×20 Lean to Roof Plans
20×20 Lean to Pavilion Plans
Laying-out-the-posts
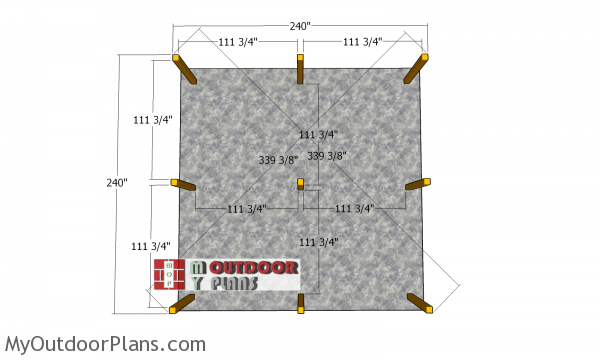
First, layout the posts for the 24×24 pavilion. Use batter boards and string to determine the location of the posts. Apply the 3-4-5 rule to every corner of the pavilion, so you make sure they are right angled. Make sure the diagonals are equal. Determining the location for the pavilion is essential, as you have to comply with the local building codes. Make sure the surface is level and remove the vegetation layer.
Setting the posts in concrete
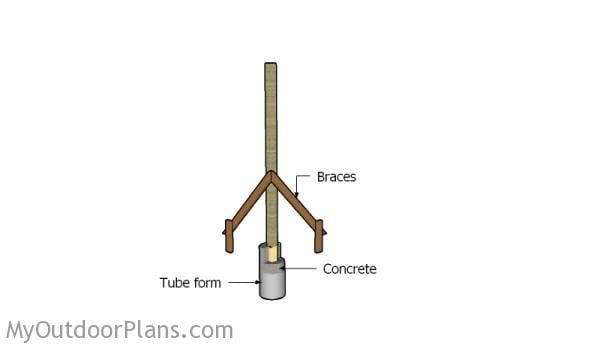
Dig 3 ft holes into the ground, making sure they have about 16″ in diameter. Fit the tubes then the posts into the ground and plumb them with a spirit level. Fill the holes with concrete and insert the post anchors. Align the anchors one to another and let the concrete set for a few days.
Use lag screws to secure the posts to the anchors. Before pouring the concrete you need to make sure the top of the posts are horizontal one to another. Use a laser to mark the level to the top of the posts and use a circular saw, if you need to make cuts.
Top-plates—20×20-lean-to-gazebo
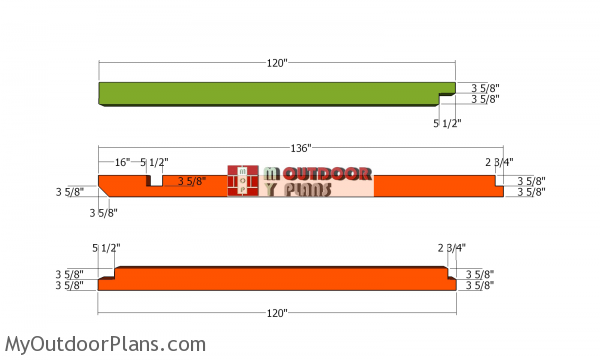
Use 6×8 lumber for the top rails. Mark the cut lines on the beams and then make the cut outs with a circular saw and a chisel. Set the circular saw at 3 5/8″ and then make parallel cuts inside the marked areas. Clean the recess with a chisel and sandpaper.
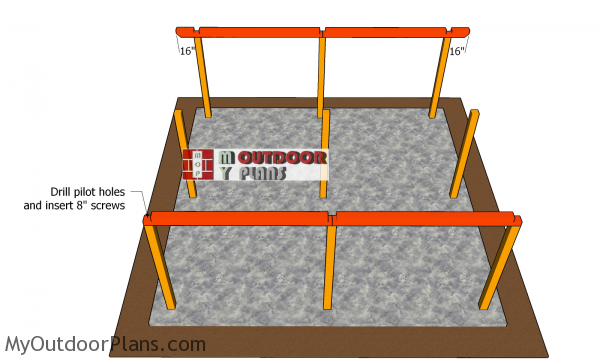
Fitting-the-side-plates
Fit the top rails to the sides of the pavilion. Notice the 16″ overhangs to the front of the pavilion. Drill pilot holes through the plates and insert 8″ screws to lock them to the posts. Use 2 screws for each joint. Make sure the corners are square and plumb the posts vertically.
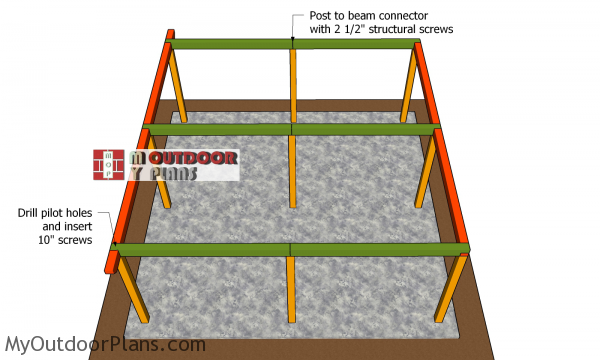
Fitting-the-cross-beams
Fit the 6×8 cross plates to the pavilion. Align the edges flush and drill pilot holes. Insert the 10″ screws to lock the cross plates to the side beams. Use post to beam connectors to lock the crossbeams to the posts.
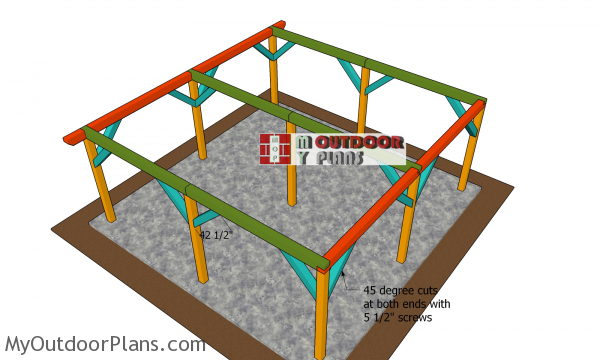
Fitting-the-braces-to-frame
Build the braces for the front and back of the pavilion from 6×6 lumber. Use a miter saw to make 45 degree cuts to both ends of the braces. Fit the braces to the posts, after you plumb them vertically. Drill pilot holes and insert 5 1/2″ screws to secure the braces into place tightly.
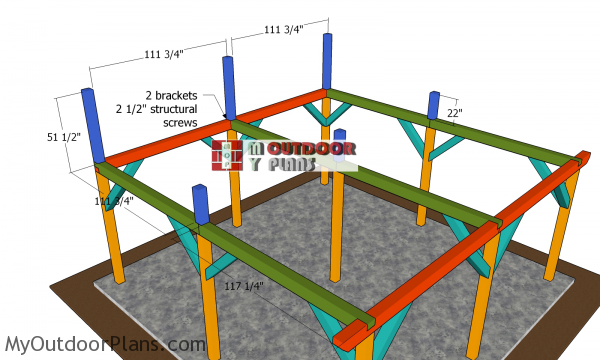
Fitting-the-tall-supports
Fit the 6×6 supports to the back if the pavilion. Plumb the posts and lock them into place with 2 L brackets and 2 1/2″ structural screws. This pavilion has a 3:12 roof pitch, so make sure you adjust the size of the pavilion if you want to change the slope. Next, center the supports to the crossbeams. Use 2 L brackets and 2 1/2″ structural screws to lock them into place tightly.
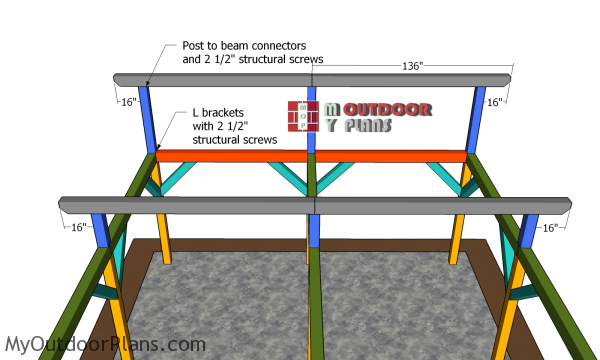
Fitting-the-ridge-beams
Use 6×8 lumber for the ridge beams. Make decorative cuts to both ends of the beams (optional). Notice the 16″ side overhangs and align everything with attention. Check if the corners are square. Use post to beam connectors and 2 1/2″ structural screws to lock the ridge beam into place tightly.
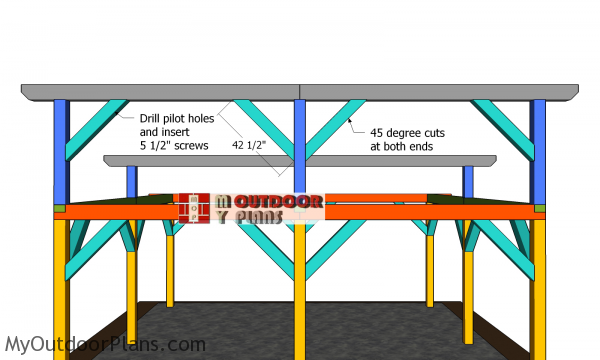
Fitting-the-braces—top-ridge-beam
Use 6×6 lumber for the top ridge beam braces, Make 45 degree cuts to both ends of the braces and secure them to the frame of the pavilion, using 5 1/2″ screws. Drill pilot holes before inserting the screws, to prevent the wood from splitting.
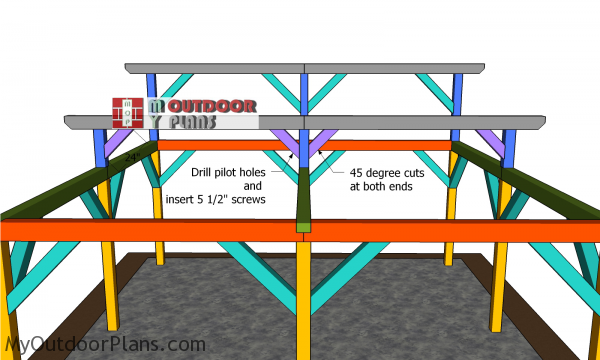
Fitting-the-middle-ridge-beam-braces
Fit the braces to the middle ridge beam, as shown in the diagram. Drill pilot holes and insert 5 1/2″ screws to lock them into place. Plumb the supports with a spirit, before inserting the screws.
Make-a-pavilion-lean-to-roof
I recommend you to take a look over PART 2 of the project, where I show you how to build the lean to roof for the outdoor pavilion.
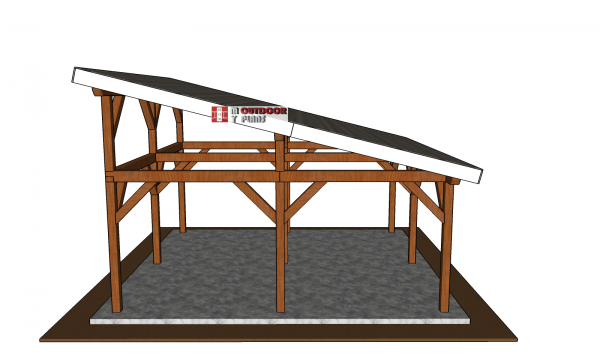
20×20-pavilion—side-view
Check if all joints are rigid and the edges aligned. Filled the holes with wood putty and smooth the surface with 120-220 grit sandpaper. Apply a few coats of stain / paint to protect the lumber from the elements and to make your pavilion look beautiful.
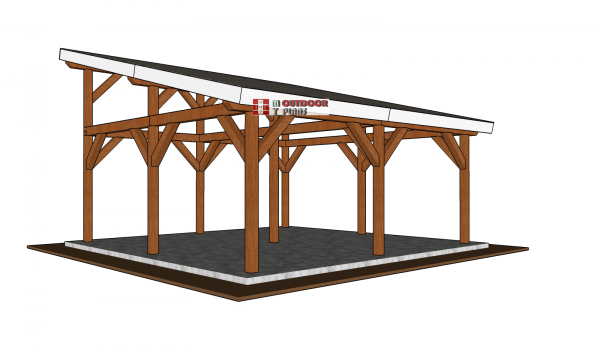
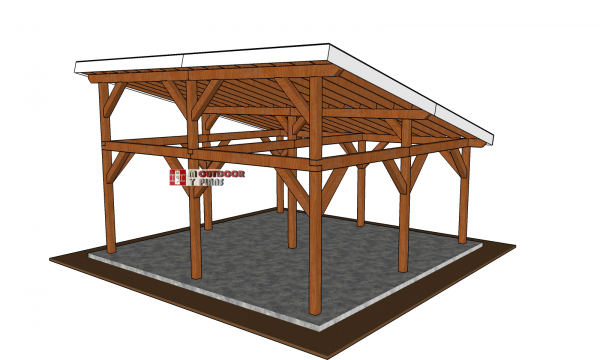
How-to-build-a-lean-to-pavilion-20×20
This pavilion has a sturdy structure and it comes with lots of interesting features that makes this project ideal for your backyard. This pavilion has 6×6 posts and 6×8 plates. You can adjust the 3:12 pitch of the roof to suit your needs. The roof structure is strong enough for winds and snow, but I recommend you to read the local codes and make modifications, if necessary. You should also take a look over my 20×20 pavilion with lean to roof, as it makes for a more stylish alternative to this plan. Premium Plans for this project available in the SHOP.
If you want to get PREMIUM PLANS for this project, in a PDF format, please press GET PDF PLANS button bellow. Thank you for the support.

This woodworking project was about 20×20 pavilion with lean to plans. If you want to see more outdoor plans, check out the rest of our step by step projects and follow the instructions to obtain a professional result.

3 comments
Esta cabaña es muy practica y funcional, los detalles constructivos seria bueno que los explicaran con escala adecuada para que se vean mejor las uniones. Las medidas de los materiales estructurales muy bien detallados, los felicito.
Would these plans work as a 2-car carport?
If your cars fit between the posts, why not?