This step by step diy woodworking project is about a 10×30 pavilion lean to roof plans. This is PART 2 of the rectangular pavilion project, where I show you how to build the slanted roof. This roof has a 4:12 pitch, but you can adjust it super easily. You can play with the roof pitch to suit your needs. Take a look over the rest of my woodworking plans, if you want to get more building inspiration.
Constructing a lean-to pavilion roof entails securely attaching a sloping roof structure to an existing load-bearing structure, creating an extended shelter with one open side for outdoor use or storage purposes. You must pay attention to precise measurements, proper anchoring, and strategic design considerations to ensure effective water drainage, sufficient load-bearing capacity, and overall structural soundness.
Projects made from these plans
10×30 Pavilion Lean to Roof Plans
Building-a-10×30-lean-to-pavilion
Cut and Shopping Lists
Tools
![]() Hammer, Tape measure, Framing square, Level
Hammer, Tape measure, Framing square, Level
![]() Miter saw, Drill machinery, Screwdriver, Sander
Miter saw, Drill machinery, Screwdriver, Sander
Time
![]() One day
One day
Related
- PART 1: 10×30 Pavilion Plans
- PART 2: 10×30 Pavilion Lean to Roof Plans
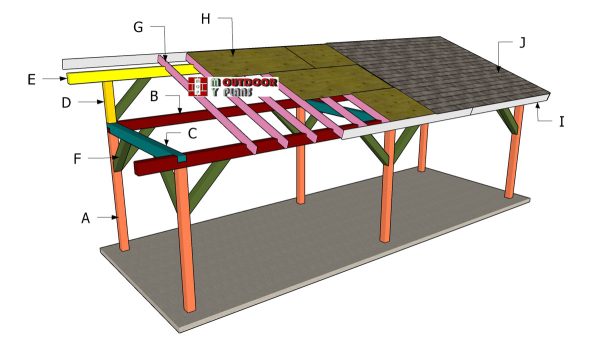
How to build a 10×30 lean to pavilion roof
Rafters
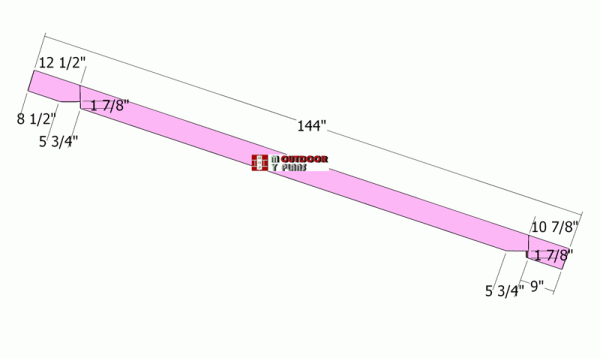
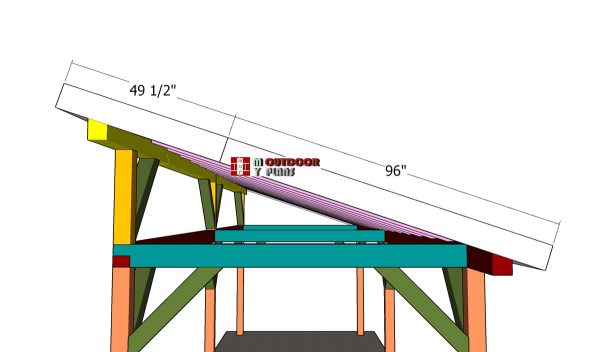
Use 2×6 lumber for the rafters. Mark the cut lines to the rafters and then get the job done with a circular saw. Smooth the edges with sandpaper. Make the birdsmouth notches into the rafters, so you can fit them into place tightly.
Fitting-the-rafters
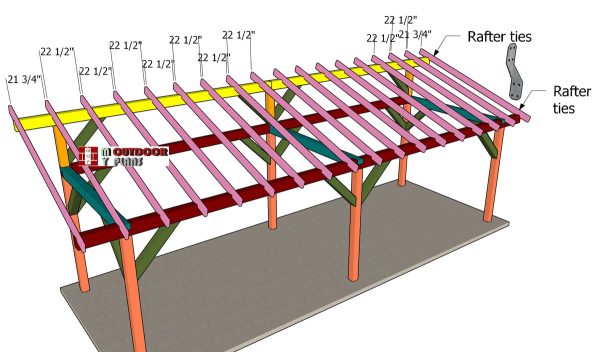
Fit the rafters to the top of the pavilion, using the information from the diagram. It is important to space the rafters properly (every 24″ on center), otherwise you won’t be able to attach the roofing sheets. Use hurricane rafters ties and 1 1/2″ structural screws, to lock the rafters to the support beams.
Metal roof connectors offer several advantages that make them great to use in roofing applications. They are known for their exceptional durability and longevity. They are designed to withstand harsh weather conditions, including strong winds, heavy snow loads, and intense heat. In addition, they are designed for ease of installation, which can save time and labor costs. They come with pre-punched holes and alignment features that simplify the process. Additionally, many connectors are compatible with power tools, making installation even more efficient.
Fitting-the-roof-sheets
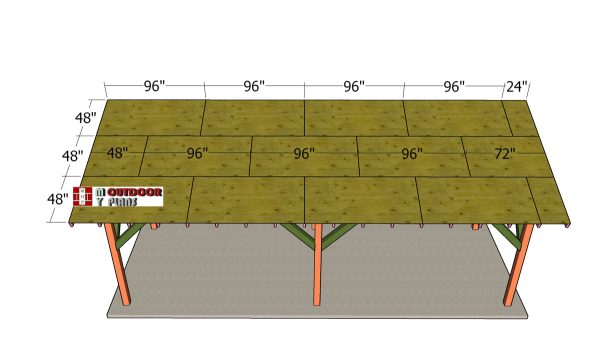
Use 3/4″ plywood for the roof of the pavilion. Cut the sheets at the right dimensions and then lay them to the top of the pavilion. Leave no gaps between the sheets and then insert 1 5/8″ screws, every 8″ along the rafters, so you can secure them into place tightly.
You should consider using metal roofing, by replacing the plywood sheets with 1/4″ purlins, every 24″ OC. Metal roofing sheets typically have a longer lifespan than plywood, often lasting 50 years or more. While the upfront cost of metal sheets may be higher than plywood, their longevity and reduced maintenance needs can result in long-term cost savings.
However, it’s essential to ensure that the roof structure is suitable for supporting the additional weight of the metal sheets. Consulting with a professional roofer or structural engineer can help determine the feasibility and requirements of the replacement process.

Fitting-the-front-and-back-roof-trims
Fit 1×8 trims to the front and back of the pavilion. Align the edges with attention and insert 2″ nails to lock them into place tightly.
Side-roof-trims
Fit the 1×8 trims to the sides of the pavilion. Make the angle cuts to the trims before locking them into place with 2″ nails.
These fascia trims, are essential components of a roofing system. They provide protection for the edges of the roof, preventing water, debris, and pests from infiltrating the underlying structure. They help redirect water away from the roof’s edge, reducing the risk of water damage and leaks. Moreover, they add a finished and polished look to the roofline. They can be designed to complement the overall architectural style of the building, enhancing its curb appeal and visual appeal.
Last but not least, the roof trims provide additional support and reinforcement to the roof’s edge. They help maintain the integrity of the roofing system and prevent sagging or warping over time.
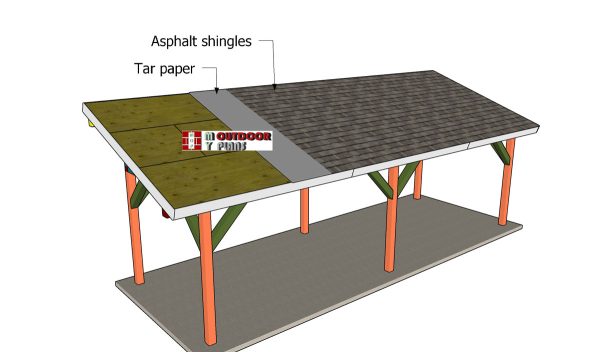
Fitting-the-roofing—10×30
Begin by installing a layer of roofing underlayment, such as asphalt-saturated felt or synthetic underlayment. This acts as an additional barrier against moisture and provides extra protection for the roof. Next, nail a drip edge along the eaves of the roof to facilitate water runoff. The drip edge should extend over the fascia board.
Continue by fitting the starter course. Star at the eaves and install the starter course of shingles along the bottom edge of the roof. This helps create a secure base for the rest of the shingles and prevents wind uplift. Lay the shingles starting with the bottom edge and work your way up, overlapping each row of shingles. Follow the manufacturer’s instructions regarding the specific nailing pattern, overhang, and positioning of the shingles. Use roofing nails to secure the shingles, ensuring they are properly aligned and flat.
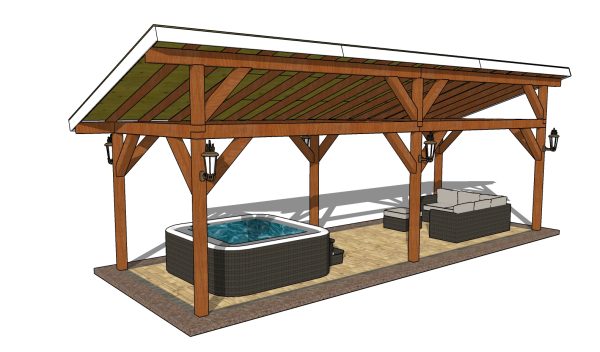
10×30 Lean to Pavilion Plans – back view
An outdoor pavilion can be the perfect addition to accommodate your hot tub. It offers several benefits for a comfortable and enjoyable experience: Also, it provides shelter and privacy, shielding your hot tub from direct sunlight, rain, or snow. It creates a dedicated space for your hot tub, allowing you to relax regardless of the weather conditions. The pavilion also offers a secluded atmosphere, ensuring privacy while you soak in the hot tub.
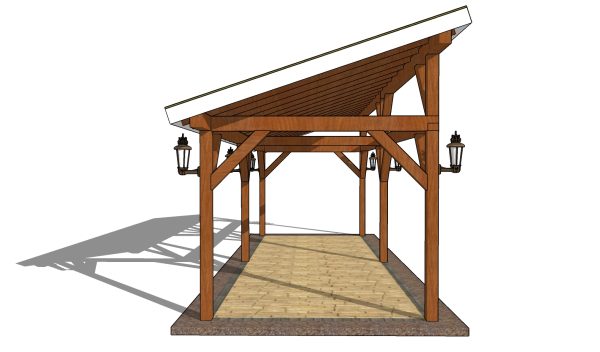
10×30 Lean to Pavilion Plans – side view
Last but not least, there are various options for adding those final touches. First, ensure a smooth surface by sanding the wood. Consider staining the wood to enhance or change its color. Apply a sealant or protective coating to guard against moisture, UV rays, and wear. Finishing oils can nourish the wood and provide a subtle sheen. For a glossy finish, use varnish. Waxing the wood surface creates a smooth and lustrous appearance.
To accentuate details, consider decorative trim, inlays, or carvings. Experiment with staining, glazing, or contrasting colors to highlight these features. Remember to allow proper drying time and follow product instructions. Test the finish on a small area before applying it to the entire project.
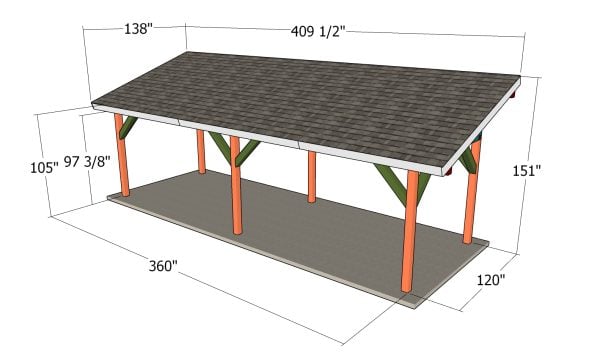
10×30 Lean to Pavilion Plans – dimensions
Don’t forget to take a look over PART 1 of the project, so you learn how to build the frame of the 10×30 pavilion. This free standing pavilion is sturdy and it features a very elegant design that puts and emphasis on cost efficiency and durability. With several modifications to the roof, you can alter the design and attach it to an already existing building.
What I like the most about this pavilion is that you can easily modify the height of the post, so it suits your needs and fits your space. See all my woodworking plans, sorted by category.
This woodworking project was about 10×30 backyard pavilion roof plans. If you want to see more outdoor plans, check out the rest of our step by step projects and follow the instructions to obtain a professional result.

EXPLORE MORE IDEAS FOR:
 |
 |
 |
 |