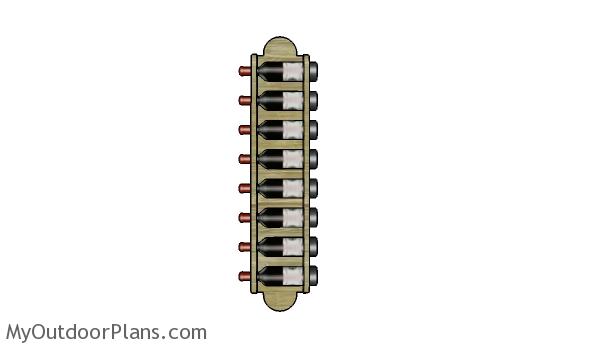
This step by step diy project is about wall wine rack plans. I have designed this wall wine rack so you can store up to 8 bottles in a stylish manner. This project only requires a few hours to make and the cost of the materials should stay under 20 $. With my plans displaying your best bottles of wine will be easy. Remember that you need to adjust the size and the design of the wine rack to suit your needs. Take a look over the rest of my woodworking plans, if you want to get more building inspiration.
When buying the lumber, you should select the planks with great care, making sure they are straight and without any visible flaws (cracks, knots, twists, decay). Investing in cedar or other weather resistant lumber is a good idea, as it will pay off on the long run. Use a spirit level to plumb and align the components, before inserting the galvanized screws, otherwise the project won’t have a symmetrical look. If you have all the materials and tools required for the project, you could get the job done in about a day. See all my Premium Plans HERE.
Projects made from these plans
Building a Wall Wine Rack
Building a wall wine rack
Cut & Shopping Lists
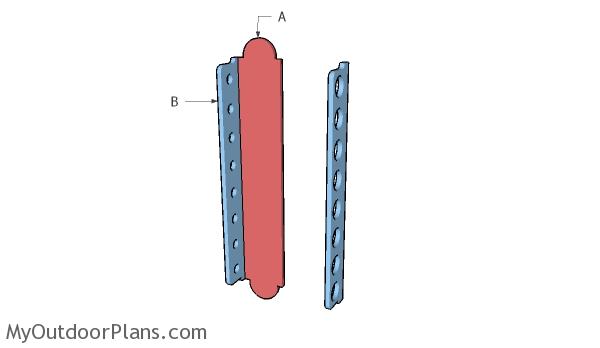
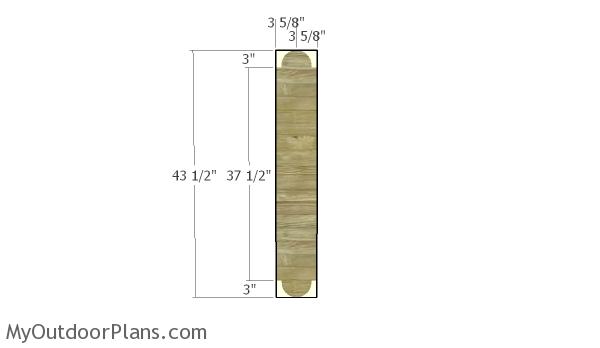
- A – 1 piece of 1×8 lumber – 43 1/2″ long BACK
- B – 2 pieces of 1×6 lumber – 37 1/2″ long SIDES
- 1 piece of 1×6 lumber – 8′
- 1 pieces of 1×8 lumber – 6′
- 1 1/2″ hole saw drill bit
- 3″ hole saw drill bit
- 1 1/4″ pocket screws
- wood filler , wood glue, stain/paint
Tools
![]() Hammer, Tape measure, Framing square, Level
Hammer, Tape measure, Framing square, Level
![]() Miter saw, Drill machinery, Screwdriver, Sander
Miter saw, Drill machinery, Screwdriver, Sander
Time
![]() One day
One day
Related
Wall Wine Rack Plans
Building the back
The first step of the project is to build the back support for the wine rack. Therefore, mark the cut lines on the piece of 1×8 lumber and get the job done with a jigsaw. Smooth the edges with sandpaper to even out the surface.
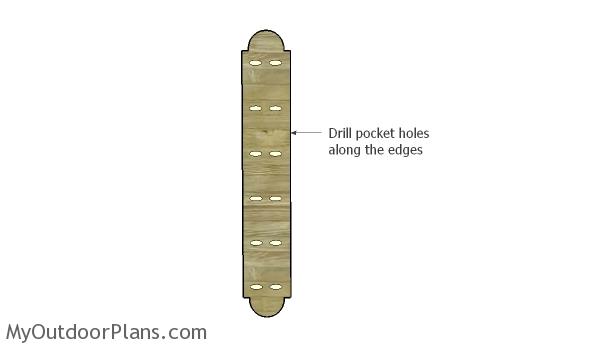
Drilling the pocket holes
Next, you need to drill pocket holes along the sides of the support. Make sure you make the holes to the side that will go against the wall. Set the pocket hole jig to 1 1/2″ thickness, as you will be using 1 1/4″ pocket screws.
Drilling the bottle neck holes
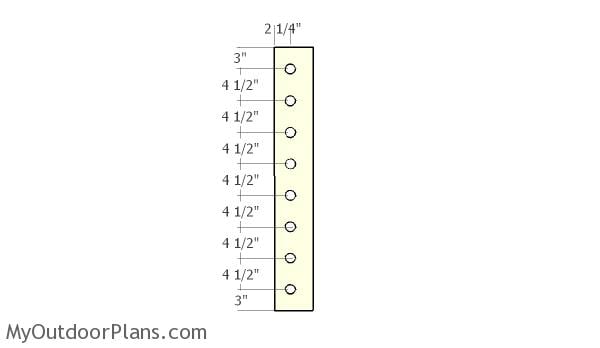
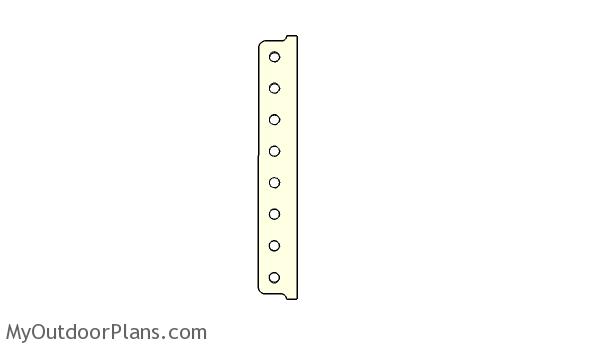
The next step of the woodworking project is to build the sides for the wine rack. Remember that the sides shouldn’t be identical, as one will hold the neck and the other will hold the bottom. First, you should cut out the holes for the necks. Cut a piece of 1×6 lumber at 37 1/2″.
Mark the cut lines and then use a 1 1/2″ hole saw to make the cuts. Make sure you take accurate measurements and do not apply to much pressure when drilling out the holes, so you don’t chip the edges.
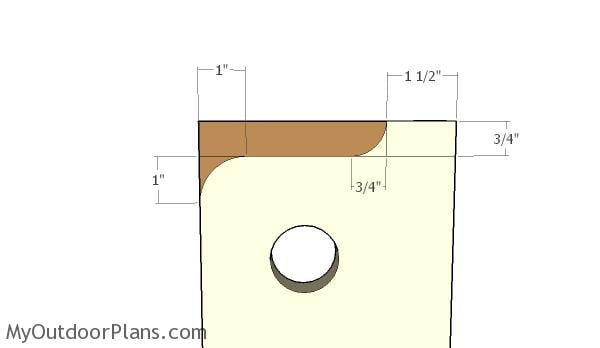
Making the decorative cuts
Afterwards, we need to enhance the look of the diy wall wine rack by making a few decorative cuts to the top end bottom of the sides. Mark the cut lines and get the job done with a jigsaw. Smooth the edges with sandpaper to even out the surface.
Decorative cuts
After making the cuts, one side of the wine rack should look similar to the one in the diagram.
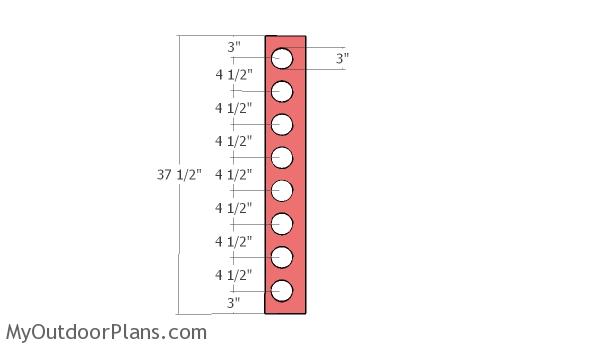
Building the support for the bottle
Build the opposite side for the wine rack from 1×6 lumber, as well. Use a 3″ hole saw to cut out the holes as shown in the diagram. In this manner, the holes will be equally spaced.

Decorative cuts for side
Make decorative cuts to the top and to the bottom of the support, using the same technique and measurements illustrated above. Smooth the edges with sandpaper to get a neat result. Alternatively, you could use a router and a round bit.
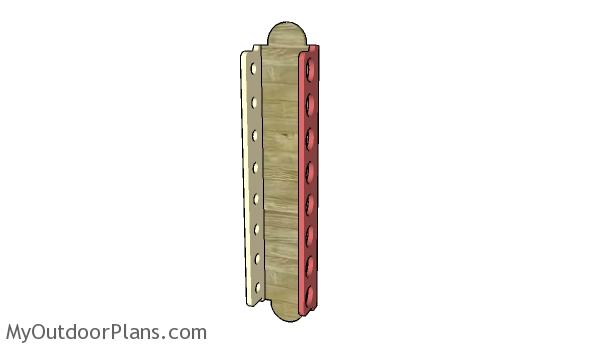
Assembling the wine rack
Assembling the wine rack should be a straight forward process. Align the edges with attention and make sure the corners are square. Add waterproof glue to the joints and insert 1 1/4″ pocket screws to lock the components together tightly.
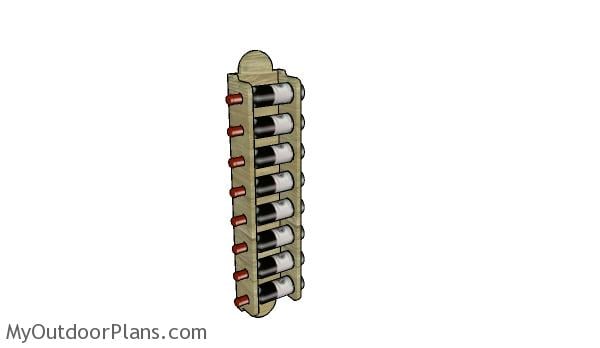
Wood wine rack plans
Fill the holes with wood putty and let it dry out for several hours. Afterwards, smooth the surface with 120-220 grit sandpaper to even it out. Apply a few coats of stain to enhance the look of the wood. Seal the finish with a few coats of lacquer to get a professional result.
Wall Wine Rack Plans
This is a simple project you should be able to build in a few hours without much effort. Remember that you need to adjust the size of the components so they suit your own needs. This wall wine rack is both easy to build and it will add an unique appeal to your home. Check out the rest of the indoor plans on my blog, so you get even more building inspiration.
This woodworking project was about wall wine rack plans free. If you want to see more outdoor plans, check out the rest of our step by step projects and follow the instructions to obtain a professional result.
EXPLORE MORE IDEAS FOR:
 |
 |
 |
 |
5 comments
Thank you for the plans. For the bottle holes… Is the center of the holes for both sides 2 1/4″ from the front of the board?
thank you!!
Debbie.
Yes… 2 1/4″ on both sides of the wine rack. The only thing that differs is the diameter of the holes.
thank you.
Any suggestions on how to hang it from the wall? My wife does not want to just screw to the wall.
You could try Z cleats: http://amzn.to/2ibmdbp